Page is loading ...

Instruction Manual
Model# 368850/368851 3-18
www.bushnellgolf.com

2
Contents Page #
Charging the Battery 3
Buttons and Functions 4
Getting Started 4
Play Golf Mode 4
Using the Play Golf Menu 4-5
Play Golf Menu Items 5
Using the Golf Menu 5
Golf Menu Items 5
Using the Main Menu 5
Main Menu Items 5-6
Accessing Updated Golf Course Data 6
Hazard Glossary 7
Warranty 8
Table of Contents

3
Care and Maintenance
The iON2 watch is durable and waterproof. To help ensure reliable operation, the following care and maintenance guidelines are recommended :
• Avoid exposing the watch to extreme environmental conditions for a prolonged period of time.
• Avoid severe impacts on the watch.
• You may clean the watch occasionally with a soft, damp cloth.
• Brush the clip contacts at the bottom of the watch regularly. Dirt build-up on the surface of the contact points may aect normal charging and data transfer. *Note: Use a soft-
bristled brush (included). Hard bristles or wire brushes may leave scratches on the watch.
• DO NOT expose the watch to strong chemicals such as gasoline and alcohol, as they will damage the watch.
• Store the watch in a dry place when it is not in use.
WARNING
Do not attempt to open the iON2. The iON2 contains a rechargeable lithium ion battery.
Risk of explosion if battery is replaced with incorrect type.
• Do not attempt to open, disassemble or service the internal battery. The battery must be replaced by a qualied technician.
• Do not crush, puncture or short the battery’s external contacts. Do not expose to temperatures above 140
o
F (60
o
C).
• Do not charge the battery if ambient temperature is over 113
o
F (45
o
C)
• Properly recycle or dispose of the battery. Do not dispose in re or water.
Legal Disclaimer
By using this product, you agree that Bushnell Outdoor Products will not be held legally responsible for any injury or damage to you or any person or property caused by the user’s
improper operation and/or poor judgment while using this product.
Note: See Limited Warranty for other limitations to our liability.
Additional Information
The Global Positioning System (GPS), a network of 32 satellites orbiting Earth, is operated and maintained by the U.S. government. This GPS device requires at least 3 satellites to be
acquired to accurately determine your position. Any change made to the system by the government could aect the accuracy and performance of this product.
Bushnell Golf GPS Website
www.bushnellgolf.com is the best online resource for all our Golf GPS product owners, including product support, FAQs, etc. It also serves as a portal to access iGolf.com GPS
course les to use with these Bushnell products. Registering your iON2 via www.bushnell.igolf.com is not required, but will ensure you have access to the latest updated GPS
course data.
CHARGING THE BATTERY
The rechargeable battery of the iON2 Watch is long lasting and provides up to 3 rounds of golf (based upon average
of 4 hours per round), or one year of use as an everyday (time only) watch. However, battery life may be reduced due
to a variety of factors (external temperature, etc). All rechargeable batteries lose their eective charge length over
time. Charging your battery when the battery level display shows “one bar remaining” will guarantee that you will be
able to make it through the entire next round.
To check your remaining battery life, press the MENU button (2, next page) and select BATTERY. To recharge the
battery, insert the watch into the charging cradle, with the charge contacts on the back of the watch lined up with the
charge pins on the left side of the cradle. Then, connect the charging cradle to an open USB port on your computer,
a powered USB hub, or smartphone AC charger. Look for the screen to display “CHARGING” to indicate that your iON2
watch is charging-make sure to connect from either the Time display (Watch mode) screen (see pg. 4) or from the
BATTERY level screen, which can be accessed from the Play Golf Menu or Main Menu (shown below, menu details on
next page).

4
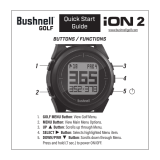
1. GOLF MENU Button: From Time Display, view Golf Menu. From Play Golf mode, activate Shot Distance feature.
2. MENU Button: From Time Display, view Main Menu. From Play Golf mode, view Play Golf Menu. Press to exit any menu screen.
3. UP Button: Scrolls up through menu items.
4. SELECT Button: Selects highlighted menu item or checked option.
5. DOWN Button: Scrolls down through menu items. Press & hold (7 seconds) to turn power on/o .
GETTING STARTED
1. First, be sure the battery has a full charge. If you are using it for the rst time, it should be charged until full (battery level at 4 bars).
2. Press and hold the DOWN/POWER button (5) on the lower right side of the unit until it powers on. Press and hold DOWN/POWER again
to turn power o .
3. The iON2 will power up in “Watch Mode”, with the time and date displayed as shown above.
4. Pressing any button activates the display backlight (visible in low ambient light conditions only) for approx. 8 seconds.
PLAY GOLF MODE
1. Make sure you are outdoors, in a location with a clear view of the sky overhead, to ensure good reception of GPS satellite signals. Press
the GOLF MENU button (1). With PLAY GOLF highlighted (press UP/DOWN button (3/5) if necessary), press the SELECT button (4). The
display will show ”SEARCHING” as the iON2 looks for multiple available GPS satellite signals and locks onto them. Once locked (note that
this can take longer the rst time you use the iON2), you’ll hear beeps con rming a GPS lock, then see a list of course names.
2. Use the UP/DOWN buttons (3/5) to choose (highlight) the course you want to play from the list of nearby courses (closest course at top
of list), then press SELECT. You are now in Play Golf mode.
3. The display shows (screenshot on right): Current hole # (at upper left), Par for the hole (upper right), and
distances to the center (large number at top center), front (lower left) and back (lower right) of green.
4. Press SELECT (4) to view distances to up to 4 Hazard callouts per hole, variable depending on the most
signi cant hazards located near a speci c hole on the current course. See “Hazard Glossary” for a list of all
abbreviations used to designate various hazards. Press the SELECT button after viewing the Hazard screen(s)
to go to the Round Info screen, which shows the elapsed time and distance traveled since you began the
round (entered Play Golf mode).
5. The display will automatically advance to the next hole as you walk the course. Press the UP or DOWN button
(3/5) to manually advance to the next hole (useful for “shotgun” starts), or go back to the previous hole.
6. To use the Shot Distance feature, press the GOLF MENU button (1) while at the tee (this is your start “point A”)-
as you walk, the display will update to indicate distance from point A to your current location (“point B”). This is useful to measure the
length of your shot. Press GOLF MENU again to return to the PLAY GOLF display, press again to set a new Shot Distance starting point
(start at “0” again).
USING THE PLAY GOLF MENU
1. In PLAY GOLF Mode, press the MENU button (2) to view the PLAY GOLF MENU.
2. Select item from menu using UP/DOWN buttons to highlight it, then press SELECT button.
3. If multiple options are available for a setting, use UP/DOWN to highlight your choice, then press SELECT.
PLAY GOLF MODE
BUTTONS / FUNCTIONS
1
2
MENU
UP
3
SELECT
4
5
DOWN/
POWER
Charge Pins
Charge Contacts
TIME DISPLAY (WATCH MODE)
GOLF MENU/PLAY GOLF MODE

5
4. A solid (lled in) checkbox to the left of a setting indicates the current setting. To change it, highlight your preferred setting and press
SELECT.
5. Press MENU button to return to previous menu screen.
PLAY GOLF MENU ITEMS (From Play Golf mode, press MENU button)
• CHANGE COURSE: press SELECT, highlight a dierent golf course from list of nearby courses, then press SELECT.
• BATTERY: press SELECT button to check battery level (charge remaining, 1-4 bars icon).
• EXIT ROUND: press SELECT to stop tracking current course, end game and return to the Time display (Watch mode) screen.
USING THE GOLF MENU
1. From the Time display (Watch mode), press the GOLF MENU button (1) to view the GOLF MENU.
2. Select item from menu using UP/DOWN buttons to highlight it, then press SELECT button.
3. If multiple options are available for a setting, use UP/DOWN to highlight your choice, then press SELECT.
GOLF MENU ITEMS (From Watch mode, press GOLF MENU button)
• PLAY GOLF: from any screen, returns display to showing current hole and distances based on your current position on the course.
• TEE TIME: Tee Time is a convenience feature that allows you to set up a tee time (golf date) in advance. When a Tee Time has been
entered and the feature is set to “ON”, the iON2 will automatically enter Play Golf mode and search for local courses 7 minutes prior to
the set time. Simply select your course from the list, and enjoy your round of golf!
To set a Tee Time, select TEE TIME from the GOLF Menu (with TEE TIME highlighted, press the SELECT button). Next, press the SELECT
button, then use the UP/DOWN buttons set the desired hour. Press SELECT and repeat the same process to set minute, AM/PM, and day
of the week. After pressing SELECT for the last time, you’ll be back on the TEE TIME screen, and see that your Tee Time has been entered
into the unit’s memory. To edit the Tee Time, press SELECT and repeat the process to change the hour, minute, etc. Once the Tee Time has
been set, use the UP/DOWN buttons to turn it ON/OFF (activate/deactivate).
• SETUP: press SELECT to access the SETUP SUB-MENU, with 3 options:
1. AUTO-OFF: The Auto-O feature is designed to automatically exit Play Golf mode when the preset time has expired. When in Play
Golf mode, after the preset time has expired, the watch will automatically exit the round and return to the Home (Time) screen to
preserve battery life. To set the Auto-O time, select AUTO-OFF from the Play Golf/Setup Menu. From the set AUTO-OFF screen
use the UP/DOWN buttons to toggle the time up and down. Auto-O is always set to whatever current time duration is showing
on the set AUTO-OFF page. Time can be set between 1.5 and 9 hours, or press UP or DOWN once more at either end of the time
range to select DISABLE and turn the feature o.
2. YDS/MTRS: press SELECT. The solid (lled in) checkbox indicates the current setting (default=YARDS). To change how distances
are displayed, highlight YARDS or METERS, press SELECT.
3. BATTERY: press SELECT button to check battery condition (charge remaining, 1-4 bars icon).
USING THE MAIN MENU (From Watch mode, press MENU button)
If the iON2 is in Play Golf mode, press the MENU button (2) to enter the Golf Menu, highlight EXIT ROUND and press SELECT to return to
the Time display (Watch mode). From the Time display, press the MENU button to view the MENU (main menu) options. To view the menu
options and select your preferred settings within the Main Menu, follow the same steps as described under “Using the Golf Menu in Play Golf
Mode”. To exit the Main Menu and return to Watch mode, press the MENU button until you see the Time display.
MAIN MENU ITEMS
• BLUETOOTH: The iON2 can connect to the BUSHNELL GOLF smartphone app via Bluetooth. Once connected the app can be used congure
the iON2 (select menu options) and wirelessly update the iON2’s internal golf course database. Tee Times may also be set via the app. The
BUSHNELL GOLF app can be obtained from the Apple Store and Google Play store for iPhone and Android devices, respectively. Download
and install the app on your mobile device. Go to the mobile devices’ settings page to turn on Bluetooth, then launch the BUSHNELL GOLF
app. To connect your iON2 to the smartphone app follow the steps below:
1. On your smartphone, make sure you have Bluetooth turned on.
2. On your iON2, go to the Main Menu, enter the SETTINGS menu, then scroll down to BLUETOOTH and press SELECT.
3. Select “ON” to turn Bluetooth on.
4. Your iON2 will then give you a code. Enter that code into the smartphone app when requested.
5. Once paired correctly, your smartphone app will display a conrmation. The device is now paired with your smartphone.
• PEDOMETER: In order to track steps taken, the iON2 supports a pedometer. This uses an internal accelerometer to track the number of
steps taken. Once enabled, the pedometer screen can be accessed from the Time display (Watch mode) by pressing the DOWN button.
The Pedometer goal is the target number of steps. The goal can be set in increments of 1000 from 1,000 to 99,000 steps. The Pedometer
goal may also be congured from the smartphone app.

6
• FITNESS: The iON2 includes an odometer to track the distance traveled, time elapsed, and speed. Fitness uses GPS for its location. Once
enabled, the Fitness screen can be accessed from the Time screen using the DOWN button.
• STOPWATCH: press SELECT button to start and stop the Stopwatch (display shows elapsed time). Press UP button to reset to zero.
• TIMER: press SELECT button to start and stop the Timer (display shows countdown from set time). Press UP button to reset to the set time
After a reset, with timer not running, press SELECT button (display digits ash) then use UP/DOWN buttons to set the desired time (hours/
minutes/seconds). When the timer is running, it will begin to beep (once per second)10 seconds before the time is up. At the end of the
set time, the iON2 will beep 3x per second.
• ALARM: press SELECT button then use UP/DOWN to set the alarm hour/minute/PM or AM. After setting desired alarm time, press UP to
turn the alarm on or o.
• BATTERY: press SELECT button to check battery level (charge remaining, 1-4 bars icon).
• SETTINGS: press SELECT to access the SETTINGS SUB-MENU, with 6 options:
1. TIME: press SELECT then highlight and select from these three time/date related settings:
SET TIME: press SELECT and highlight a method:
• BY GPS: press SELECT to automatically set the time based on your current GPS location.
• MANUALLY: use the UP/DOWN buttons to enter the correct current time and date yourself.
DAYLIGHT: press SELECT and highlight current daylight savings time status for your location:
• DST ON +1
• DST OFF -1
FORMAT: press SELECT and highlight your preference for time display format:
• 12 HOUR
• 24 HOUR
2. UNITS: press SELECT. The solid (lled in) checkbox indicates the current setting (default=YARDS). To change how distances are
displayed, highlight YARDS or METERS, press SELECT.
3. LANGUAGE: The iON2 features 5 menu language settings (ENGLISH, SPANISH, GERMAN, FRENCH, ITALIAN). By default, the
user interface is in English. Press SELECT, use UP/DOWN to scroll between options on the Language menu, then press the SELECT
button to conrm your preferred (highlighted) language for all display screens.
4. SOUND: to turn o the “beep” button press conrmation sound when using the menus, select “OFF” and press SELECT.
5. ABOUT: press SELECT to display your unit’s rmware version, date of manufacture, and FCC ID#.
6. RESET: to restore the unit to all of its original settings, press SELECT, then select DEFAULT SETTINGS and conrm you want to
do this. The other two options under RESET DEVICE (CHECK UPDATE and REFORMAT) should only be used by qualied service
technicians.
ACCESSING UPDATED GOLF COURSE DATA
Your iON2 is pre-loaded with data for over 33,000 courses located worldwide. It is ready to use right out of the box, with no need to download
software or pay any membership fees.
But you might be thinking, “What if a new course opens sometime after my unit was made? Is there a way to update the database in my unit
to add it?” The answer is yes, and it’s simple to do.
Go to www.bushnellgolf.com and view the product page for any of the dierent color versions of the iON2. You’ll nd three orange links
you can click:
• How to Update Your Golf GPS with the Latest Maps
Click this link for step-by-step directions for nding and downloading new course data from iGolf.com
• Request Course Update
Click this link to go to a form you can ll out and email to iGolf to submit a course that is not included in the database, or if you nd
information (data for a hole) that is not mapped correctly on an existing course.
• Search for Available Courses on Your Bushnell Golf GPS
Click this link to search the current iGolf database to verify a course you are interested in is included.
You can also go to: https://igolf.com and click “Join Now”, ll in your contact info on the registration form then select “I Have A GPS Device”
to access course updates.
Use the provided USB cable to connect your iON2 to your PC or Mac. Once connected, the screen will display “USB MODE”.
Android and Google Play are registered trademarks of Google Inc. in the United States and other countries.
iPhone and Apple Store are trademarks of Apple Inc., registered in the U.S. and other countries.
Other names may be trademarks of their respective owners.

7
HAZARD GLOSSARY
Hazard designations are shown as abbreviations, dened as follows:
• BGB-Back Green Bunker
• BGW- Back Green Water
• CRK- Creek Layup
• CRKC- Creek Carry
• EOF- End of Fairway
• FGB- Front Green Bunker
• FGW- Front Green Water Layup
• FGWC- Front Green Water Carry
• LFB- Left Fairway Bunker
• LFW- Left Fairway Water Layup
• LFWC- Left Fairway Water Carry
• LGB- Left Green Bunker
• LGW- Left Green Water
• MFB- Middle Fairway Bunker
• MFW- Middle Fairway Water Layup
• MFWC- Middle Fairway Water Carry
• RFB- Right Fairway Bunker
• RFW- Right Fairway Water Layup
• RFWC- Right Fairway Water Carry
• RGB- Right Green Bunker
• RGW- Right Green Water

8
ONE YEAR LIMITED WARRANTY
Your Bushnell
®
iON2 is warranted to be free of defects in materials and workmanship for one year after the date of purchase. In the event of a defect
under this warranty, we will, at our option, repair or replace the product, provided that you return the product postage prepaid. This warranty does
not cover damages caused by misuse, improper handling, installation, or maintenance provided by someone other than a Bushnell Authorized
Service Department.
Any return made under this warranty must be accompanied by the items listed below:
1. A check/money order in the amount of $10.00 to cover the cost of postage and handling
2. Name and address for product return
3. An explanation of the defect
4. Proof of Date Purchased
Product should be well packed in a sturdy outside shipping carton to prevent damage in transit, to the address listed below:
IN U.S.A. Send To: IN CANADA Send To:
Bushnell Outdoor Products Bushnell Outdoor Products
Attn.: Repairs Attn.: Repairs
9200 Cody 140 Great Gulf Drive, Unit B
Overland Park, Kansas 66214 Vaughan, Ontario L4K 5W1
For products purchased outside the United States or Canada please contact your local dealer for applicable warranty information. In Europe you
may also contact Bushnell at:
Bushnell Germany GmbH
European Service Centre
Mathias-Brüggen-Str. 80
D-50827 Köln
GERMANY
Tel: +49 221 995568-0
Fax: +49 221 995568-20
This warranty gives you specific legal rights.
You may have other rights which vary from country to country.
©2018 Bushnell Outdoor Products
Industry Canada Statement
This device complies with ISED’s licence-exempt RSSs. Operation is subject to the following two conditions: (1) This device may not cause harmful interference, and (2) this device must accept
any interference received, including interference that may cause undesired operation.
Radiation Exposure Statement:
This device complies with the Industry Canada portable RF exposure limit set forth for an uncontrolled environment and is safe for the intended operation as described in this manual. Further
RF exposure reduction can be achieved if the product can be kept as far as possible from the user’s body or if the device is set to a lower output power if such function is available.

9
FCC Statement
This device complies with Part 15 of the FCC interference limits for Class B digital devices FOR HOME OR OFFICE USE. These limits are designed to provide reasonable protection against harmful
interference in a residential installation, and are more stringent than “outdoor” requirements.
Operation of this device is subject to the following conditions; (1) This device may not cause harmful interference, and (2) this device must accept any interference received, including
interference that may cause undesired operation.
This equipment generates, uses and can radiate radio frequency energy and, if not installed and used in accordance with the instructions, may cause harmful interference to radio
communications. However, there is no guarantee that interference will not occur in a particular installation. If this equipment does cause harmful interference to radio or television reception,
which can be determined by turning the equipment o and on, the user is encouraged to try to correct the interference by one or more of the following measures:
· Reorient or relocate the receiving antenna.
· Increase the separation between the equipment and receiver.
· Connect the equipment into an outlet on a circuit di erent from that to which the receiver is connected.
· Consult the dealer or an experienced radio/TV technician for help.
The device does not contain any user-serviceable parts. Repairs should only be made by an Authorized Bushnell repair center. Unauthorized repairs or modi cations could result in permanent
damage to the equipment, and will void your warranty and your authority to operate this device under Part 15 regulations.
The shielded interface cable which is provided must be used with the equipment in order to comply with the limits for a digital device pursuant to Subpart B of Part 15 of FCC Rules.
FCC ID: 2ABQG-36885
IC: 5830A-36885
Android and Google Play are registered trademarks of Google Inc. in the United States and other countries.
iPhone and Apple Store are trademarks of Apple Inc., registered in the U.S. and other countries.
Other names may be trademarks of their respective owners.
Disposal of Electric and Electronic Equipment
(Applicable in the EU and other European countries with separate collection systems)
This equipment contains electric and/or electronic parts and must therefore not be disposed of as normal household waste. Instead, it should be disposed at the
respective collection points for recycling provided by the communities. For you, this is free of charge.
If the equipment contains exchangeable (rechargeable) batteries, these too must be removed before and, if necessary, in turn be disposed of according to the
relevant regulations (see also the respective comments in this unit’s instructions).
Further information about the subject is available at your community administration, your local waste collection company, or in the store where you purchased
this equipment.
Industry Canada Statement
This device complies with ISED’s licence-exempt RSSs. Operation is subject to the following two conditions: (1) This device may not cause harmful interference, and (2) this device must accept
any interference received, including interference that may cause undesired operation.
Radiation Exposure Statement:
This device complies with the Industry Canada portable RF exposure limit set forth for an uncontrolled environment and is safe for the intended operation as described in this manual. Further
RF exposure reduction can be achieved if the product can be kept as far as possible from the user’s body or if the device is set to a lower output power if such function is available.

15
Vous pouvez également vous rendre sur https://igolf.com et cliquer sur « Inscrivez-vous maintenant », indiquer vos coordonnées sur le
formulaire d’inscription, puis sélectionner «J’ai un appareil GPS» pour accéder aux mises à jour des parcours de golf.
Utilisez le câble USB fourni pour connecter votre iON2 à votre PC ou Mac. Une fois la connexion établie, l’écran achera
«MODE USB».
Android et Google Play sont des marques déposées de Google Inc. aux États-Unis et dans d’autres pays.
iPhone et Apple Store sont des marques déposées d’Apple Inc., enregistrées aux États-Unis et dans d’autres pays.
Les autres noms peuvent être des marques déposées de leurs propriétaires respectifs.
GLOSSAIRE DES DANGERS
Les désignations de danger sont indiquées par des abréviations, dénies comme suit:
• BGB-Back Green Bunker (bunker de green arrière)
• BGW- Back Green Water (eau de green arrière)
• CRK- Creek Layup (accumulation crique)
• CRKC- Creek Carry (transport crique)
• EOF- End of Fairway (n de fairway)
• FGB- Front Green Bunker (bunker de green avant)
• FGW- Front Green Water Layup (accumulation eau green avant)
• FGWC- Front Green Water Carry (accumulation eau green arrière)
• LFB- Left Fairway Bunker (bunker fairway gauche)
• LFW- Left Fairway Water Layup (accumulation eau fairway gauche)
• LFWC- Left Fairway Water Carry (transport eau fairway gauche)
• LGB- Left Green Bunker (bunker green gauche)
• LGW- Left Green Water (eau green gauche)
• MFB- Middle Fairway Bunker (bunker fairway milieu)
• MFW- Middle Fairway Water Layup (accumulation eau fairway milieu)
• MFWC- Middle Fairway Water Carry (transport eau fairway milieu)
• RFB- Right Fairway Bunker (bunker fairway droit)
• RFW- Right Fairway Water Layup (accumulation eau fairway droit)
• RFWC- Right Fairway Water Carry (transport eau fairway droit)
• RGB- Right Green Bunker (bunker green droit)
• RGW- Right Green Water (eau green droit)

36
GLOSSARIO DEGLI OSTACOLI
I nomi degli ostacoli sono mostrati come abbreviazioni denite come segue:
• BGB - Back Green Bunker (bunker sulla parte posteriore del green)
• BGW - Back Green Water (acqua sulla parte posteriore del green)
• CRK - Creek Layup (lay up su insenatura)
• CRKC - Creek Carry (volo su insenatura)
• EOF - End of Fairway (ne fairway)
• FGB - Front Green Bunker (bunker sulla parte frontale del green)
• FGW - Front Green Water Layup (lay up su acqua sulla parte frontale del green)
• FGWC - Front Green Water Carry (volo su acqua sulla parte frontale del green)
• LFB - Left Fairway Bunker (bunker a sinistra del fairway)
• LFW - Left Fairway Water Layup (lay up su acqua a sinistra del fairway)
• LFWC - Left Fairway Water Carry (volo su acqua a sinistra del fairway)
• LGB - Left Green Bunker (bunker sulla parte sinistra del green)
• LGW - Left Green Water (acqua sulla parte sinistra del green)
• MFB - Middle Fairway Bunker (bunker al centro del fairway)
• MFW - Middle Fairway Water Layup (lay up su acqua al centro del fairway)
• MFWC - Middle Fairway Water Carry (volo su acqua al centro del fairway)
• RFB - Right Fairway Bunker (bunker a destra del fairway)
• RFW - Right Fairway Water Layup (lay up su acqua a destra del fairway)
• RFWC - Right Fairway Water Carry (volo su acqua a destra del fairway)
• RGB - Right Green Bunker (bunker sulla parte destra del green)
• RGW - Right Green Water (acqua sulla parte destra del green)

Customer Service: (800) 423-3537
www.bushnellgolf.com
©2018 Bushnell Outdoor Products
/