
11-1 2 RR4200034
d
1.3.1 1.3.2
1.4.21.4.1 1.4.3
1.4.61.4.51.4.4
1.4.7
1.4.10 1.4.11 1.4.12 1.4.13
1.4.8 1.4.9
SE
FI
NO
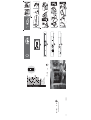
BRUKSANVISNING
www.de-dietrich.com
PL
INSTRUKCJA OBS£UGI
KÄYTTÖOHJE
BRUKSANVISNING

d
b
b
d
d
1.4.14 1.4.15 1.4.16 1.5.1
2.1.1
2.1.3
2.2.1
2.2.4 2.2.5 2.2.6
2.2.2 2.2.3
2.1.4
2.1.2
2.3.5 2.3.6
2.3.7
2.3.8
2.2.7
2.3.1
2.3.4
2.3.9
2.3.2 2.3.3
d
2.3.11 2.6.3 2.6.4
3.4.1
3.5.1 3.5.2
4.1.1 4.1.2
3.5.3 3.5.4
3.4.2
2.7.1
2.4.1
2.5.42.5.32.5.2
2.5.1
2.5.5
2.6.1 2.6.2
2.3.10
Page is loading ...
Page is loading ...
Page is loading ...
Page is loading ...
Page is loading ...
Page is loading ...
Page is loading ...
Page is loading ...
Page is loading ...
Page is loading ...
Page is loading ...
Page is loading ...
Page is loading ...
Page is loading ...
Page is loading ...

english
16
Dear customer,
Discovering De Dietrich’s products evokes an array of unique emotions that can
only be conjured up by objects of true value.
The visual appeal is there from the start. The design stands out for its timeless
quality and impeccable fi nish, and each elegant, refi ned item in the range is in
perfect harmony with the rest.
And then you’ll feel the irresistible desire to touch it. De Dietrich uses only hard-
wearing, high-prestige materials, attaching great importance to authenticity.
Through a combination of state-of-the-art technology and the fi nest materials, De
Dietrich manufactures top-quality products and places them at the service of the
culinary arts, a passion shared by all gourmets.
We want you to fully enjoy your new appliance and we will be pleased to attend
to any suggestions or queries you may have through our consumer service
department or our website.
Thank you for your trust.
De Dietrich
Check out all the brand information at www.de-dietrich.com

17
1
Instruction manual
Very important: Please read this manual fully before using your refrigerator.
This manual has been designed so that the text is linked to the relevant drawings.
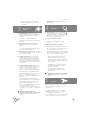
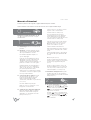
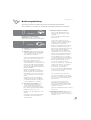
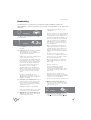
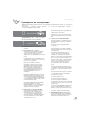
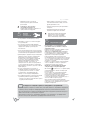
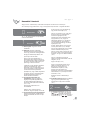
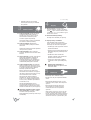
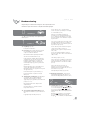
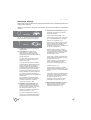
Installation
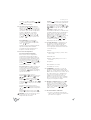
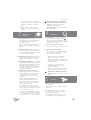
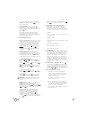
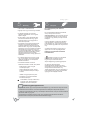
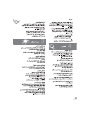
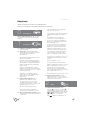
Identify the model of your refrigerator (“a”, “b”,
“c”, “d”) by comparing the control panel with the
illustrations.
1.1 Unpacking. Remove all the protection.
1.2 Location. Position the refrigerator away
from heat sources and protected from direct
sunlight to reduce consumption.
Do not install the refrigerator outside or
anywhere it is exposed to rain.
Air must be able to circulate around the back
of the refrigerator. Leave 25 mm between the
back of the refrigerator and the wall behind
it. Do not block the space between your
refrigerator and the fl oor or ceiling with any
object.
Level the refrigerator to prevent any vibrations
or noise. Remember that if the refrigerator
is located next to a wall or cabinet, it might
make a small noise.
Also check that the shelves have been fi tted
correctly, and place containers apart to
prevent any vibrations.
1.3 Electrical connection. Stand the refrigerator
upright for at least 2 hours before plugging it
in. Check the information on the specifi cations
plate (220-240V earthed) (1.3.1, 1.3.2).
Do not use any adapters or extension leads.
Make sure that the lead is not touching the
motor or trapped underneath it.
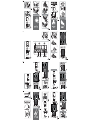
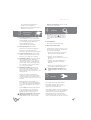
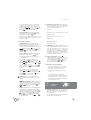
1.4 Changing the direction the door opens.
Unplug the refrigerator from the mains supply
and empty it completely.
Gently lay the appliance on its back (1.4.1).
Undo the screws (1.4.2) and remove the top
hinge and the rotating bushing with the aid of
a screwdriver (1.4.3).
0
Identifi cation
english
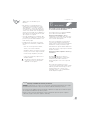
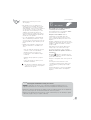
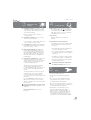
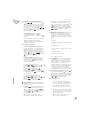
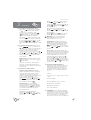
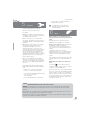
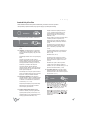
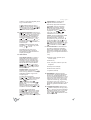
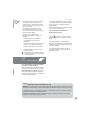
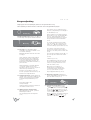
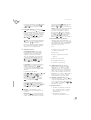
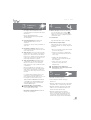
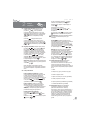
Unplug by pressing on the connector tab
(1.4.4). Remove the refrigerator door (1.4.5).
Remove the control panel, levering it up
by inserting a screwdriver in the notches
provided for that purpose (1.4.6).
Make a notch for the lead on the other side,
in the area indicated on the casing (1.4.7).
Replace the control panel passing the lead
through the notch made (1.4.8).
Undo the screws from the bottom hinge and
remove it. Change the position of the pin in
the hinge and position it on the other side
(1.4.9).
Remove the vertical handle and fi t it on the
other side of the door turning it 180º (1.4.10).
Fit the door (1.4.11).
Fit the closing capsule in the top hinge
space on the other side (1.14.12). Press the
connector to plug it into the door (1.4.13).
Fit the top hinge and the rotating bushing,
inserting any spare lead in the control panel
(1.4.14) and replace the screws (1.4.15).
Lift the refrigerator up carefully (1.4.16).
1.5 Levelling the appliance. Adjust the feet so
that it is tilting backwards slightly, to help the
door close correctly (1.5.1).
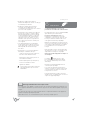
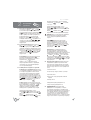
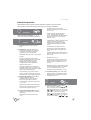
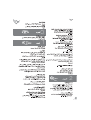
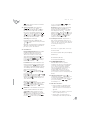
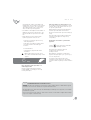
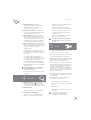
2.1 Switching on the refrigerator. Press the
button (2.1.1) or (2.1.2). Press
,
until
a digit appears on the display (2.1.3) or turn
the control (2.1.4). In models
c
and
, the “on” LED will come on to indicate that
the appliance is switched on.
The child lock is automatically activated in
model
a
, to release it press the button
for 3 seconds (2.3.10). Models
b
,
c
and
do not have the automatic lock
function.
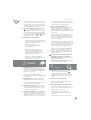
2.2 Setting the temperature. Press the
, buttons (2.2.1, 2.2.2). Press
,
(2.2.3), or turn the control (2.2.4). Once
you have set the temperature required,
you can fi nd out the actual temperature by
pressing the
or (2.2.5, 2.2.6),
2
Use

english
18
or (2.2.7) buttons for fi ve seconds. The
temperature will fl ash. Model
does not
have this function.
Recommendation: The recommended
temperature for your refrigerator is
degrees. It is best to always keep it between
and
degrees.
Remember that the temperature inside
the refrigerator depends on the ambient
temperature, the location and how often the
refrigerator door is opened.
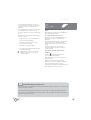
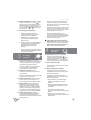
2.3 Refrigerator functions.
Fast cooling function: This function sets the
refrigerator to the coolest temperature for 6
hours. It is recommended that you activate
this function when you put a large amount
of food into the refrigerator. To activate
and deactivate it: Press
(2.3.1, 2.3.2) or
(2.3.3, 2.3.4), in model
c
the
display will show
whilst the function is
activated.
Holiday function: Ideal for when you
are away from home for a long time. The
refrigerator will remain set at
degrees,
preventing any bad smells from developing
and keeping electricity consumption very low.
To activate holiday mode:
Models
a
and
c
:
Press the
or
button until
appears on the display (2.3.5,
2.3.7).
Model
b
: Press the
button until
appears on the display (2.3.6).
is displayed on the screen while the
option is active. Model
does not have
this option.
To disable holiday mode:
Models
a
and
c
:
Press the
or
button until the desired temperature appears
on the display.
Model
b
: Press the
button until the
desired temperature appears is displayed.
Warning: For the holiday function to work
correctly, the refrigerator door must be
closed.
setting: This helps you to economise
by better preserving foods. Activate or
disable by pressing the
button and
appears on the screen (2.3.8, 2.3.9). Models
c
and do not have this option.
Child lock: Ideal for preventing changes
being made inadvertently to appliance
settings or children from interfering with
them. The screen will display the
icon
whilst the child lock is activated. Press
(2.3.10) or
(2.3.11). The screen will show
or alternating with the normal display
whilst the function is activated. Models
b
and do not have this option.
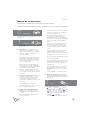
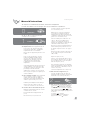
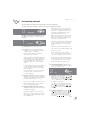
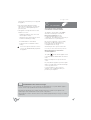
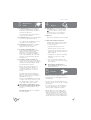
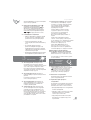
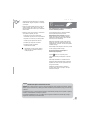
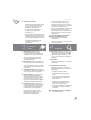
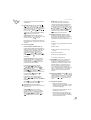
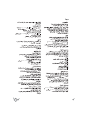
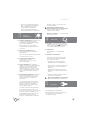
2.4 Arranging food in your refrigerator. The
temperature is not uniform inside your
refrigerator. Some areas are colder than
others. Food must be stored in the right area
to make sure that it is kept correctly (2.4.1):
1. Butter.
2. Hors d’oeuvres, cheese, yoghurts, cream,
sauces, eggs.
3. Bottles, milk.
4. Meat, poultry, game and fresh fi sh, cooked
meats.
5. Pulses and vegetables.
6. Vacuum box (accessory).
7. Ice maker (accessory).
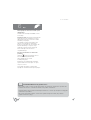
2.5 ICE MAKER. This is an accessory in your
refrigerator that can generate up to 20 cubes
of ice. If you have an Ice Maker, take it out
of the refrigerator (2.5.1). Remove each of
the 5 ice-trays inside (2.5.2) and fi ll them
with water (2.5.3). Put the ice-trays back
trying not to spill any water (2.5.4). Put your
Ice Maker carefully back into place inside
the refrigerator (2.5.5). The ice cubes will be
ready for use in 24 hours.
2.6 Switching the refrigerator off. Press
for
3 seconds or press
until no temperature
appears on the display (2.6.1, 2.6.2, 2.6.3),
or turn the control to the off setting (2.6.4). In
models
c
, the “on” LED will go off.
2.7 Recommendations for use.
• More effi cient energy consumption is
achieved when the drawers and shelves
are in the same position in which the
appliance is delivered.
• Keep the fan switched off for greater
energy savings (2.7.1).
• Do not open the doors for longer than
necessary. This will allow your refrigerator
to work more effi ciently and prevent any
increase in energy consumption.
• Store food in sealed containers to prevent
it from drying out.

english
19
3
Maintenance and
cleaning
3.1 Cleaning the inside. Use a sponge or cloth
soaked in water with bicarbonate of soda to
clean the inside of the refrigerator to prevent
any smells from forming.
Never use a steam cleaner, solvents or
scouring powders.
3.2 Cleaning the outside. Never use a steam
cleaner to clean the displays.
It is a good idea to clean the grille at the back
once a year with a vacuum cleaner.
3.3 Cleaning the accessories. Do not put them
in the dishwasher. Clean them by hand with
the help of a sponge or cloth.
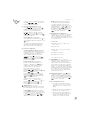
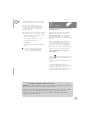
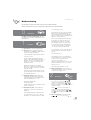
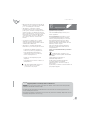
3.4 Changing the light bulb. If the light bulb
blows: switch off the refrigerator. Remove
the cover by pressing on the lug (3.4.1) and
removed the blown bulb (3.4.2). Replace it
with another with the same type of thread,
E14, 220-240V, 15/25W or as indicated on
the light fi tting.
3.5 Changing the carbon fi lter. Your refrigerator
may have a carbon fi lter to absorb any
strange smells from some types of food and
capture any microorganisms (fungus and
bacteria) circulating in the air.
The fi lter keeps its properties for a limited
time of 6 months. After this time it is
recommended that you replace it with a new
one. Its location varies depending on the
model.
To activate the fi lter: Press down on the tab
and remove the cover to access the fi lter
(3.5.1). Separate the used fi lter from the
cover (3.5.2). Remove the seals from the new
fi lter (3.5.3).
Press the BIOFILTER visor until you hear a
light click (3.5.4) and in a few seconds the
duration scale will start to colour. Put the fi lter
back into place.
Keep used and new fi lters out of the reach
of children; digesting large quantities can be
dangerous.
Do not wet the fi lter as it can lose its
properties.
4
Troubleshooting
4.1 Door open. If you leave the door open for
more than 1 minute, the
, signal will come
on, an alarm will sound and the refrigerator
light will go off (4.1.1, 4.1.2). The alarm will
stop when the door is closed.
4.2 Power cut.
Open the refrigerator as few times as
possible.
4.3 Normal noises in the refrigerator.
Your refrigerator may make a number of quite
normal operating noises which should not
concern you.
• The refrigerant may make a gargling noise
as it passes through the circuits.
• The compressor may make a buzzing and/
or a slight knocking noise, above all when it
switches on.
• The dilation or contraction of the materials
used can make clicking or creaking noises.
• The air moved by the freezer fan can make
a small background noise.
Do not tamper with your refrigerator in
an attempt to repair it. Call for service.
5
Safety
• Keep the ventilation grills clear.
• Be careful not to damage the refrigeration
circuit.
• Do not use any electrical appliances inside
your refrigerator unless they are of the type
recommended by the manufacturer.
• Do not use any mechanical devices or any other
means to speed up defrosting other than those
recommended by the manufacturer.
• This appliance is not intended for use by
people (including children) with reduced
physical, sensory or mental capabilities, or
lack of experience or knowledge, unless they
have been given supervision or instruction
concerning use of the appliance by a person
responsible for their safety. Children should be

english
20
6
The environment
This refrigerator was designed with
environmental conservation in mind.
The appliance operates with coolant R600A,
which does not damage the environment.
Respect the environment. Use the
recommended temperatures for each
compartment. They will depend on the mode you
need for effi cient use of your refrigerator.
Disconnect the refrigerator or set it to holiday
mode when you will not be using it for a
prolonged period. You will reduce power
consumption and save energy.
Avoid leaving the doors open more time than
necessary. It causes an increase in power use.
Waste management of electrical and
electronic appliances.
The symbol
indicates that the appliance must
not be disposed of in traditional bins for domestic
waste.
Deliver your refrigerator to a special collection
centre.
Recycling domestic appliances prevents negative
impacts on health and the environment and helps
save energy and resources.
For more information, contact your local
authorities or the establishment where you
purchased your refrigerator.
supervised to ensure that they do not play with
the appliance.
• If the power lead is damaged, it must be
replaced by the manufacturer, or by their after
sales service or a similar qualifi ed person to
prevent any risk.
• This appliance is designed for domestic and
similar uses, such as:
– staff kitchen facilities in shops, offi ces and
other workplace settings;
– rural guest houses and hotel guests, motels
and other residential type settings;
– bed and breakfast accommodation;
– restaurant services and similar non-retail
settings.
Do not store explosive substances such as
aerosol cans with infl ammable propellant in
the appliance.
Standard after-sales service message:
In case of breakdown please contact your dealer or installer. Maintenance of your De Dietrich appliance
must be carried out by a qualifi ed electrician authorised by the brand.
On making an appointment, please indicate the full model reference number of your appliance. This
number fi gures on the manufacturer's reference plate on the product.
When maintenance work is carried out, insist on only certifi ed original parts being used. (Logo of certifi ed
original parts)
Page is loading ...
Page is loading ...
Page is loading ...
Page is loading ...
Page is loading ...
Page is loading ...
Page is loading ...
Page is loading ...
Page is loading ...
Page is loading ...
Page is loading ...
Page is loading ...
Page is loading ...
Page is loading ...
Page is loading ...
Page is loading ...
Page is loading ...
Page is loading ...
Page is loading ...
Page is loading ...
Page is loading ...
Page is loading ...
Page is loading ...
Page is loading ...
Page is loading ...
Page is loading ...
Page is loading ...
Page is loading ...
Page is loading ...
Page is loading ...
Page is loading ...
Page is loading ...
Page is loading ...
Page is loading ...
Page is loading ...
Page is loading ...

57
1
0
2
a
c

58
(2.2.2, 1.2.2)
(6.2.2, 5.2.2)
(3.2.2)(4.2.2)
(7.2.2)
(2.3.2, 1.3.2)
(3.2.6, 2.6.2, 1.6.2)
(4.3.2, 3.3.2)
c
(10.3.2)
(1.4.2)
(1.5.2)
(2.5.2)(3.5.2)
(4.6.2)
(4.5.2)
(5.5.2)
(11.3.2)
c
bc
ac
)2.3.6.(
b
ac
b
c
b

59
3
4

60
6
5
Page is loading ...
Page is loading ...
Page is loading ...
Page is loading ...
Page is loading ...
Page is loading ...
Page is loading ...
Page is loading ...
Page is loading ...
Page is loading ...
Page is loading ...
Page is loading ...
Page is loading ...
Page is loading ...
Page is loading ...

76
norsk
76
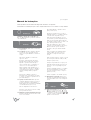
Kjære kunde!
Å oppdage produktene til De Dietrich er å oppleve unike følelser som bare kan
skapes av verdigjenstander.
Den visuelle tiltrekningskraften er umiddelbar fra første øyeblikk. Kvaliteten på
designen utmerker seg på grunn av tidløs estetikk og perfekt fi nish slik at hele det
elegante og raffi nerte produktet er i total harmoni med de andre.
Du vil deretter ha en uimotståelig trang til å berøre. De Dietrich bruker bare
bestandige og prestisjefylte materialer, og gir dermed autentisitet forrang.
Ved å kombinere avansert teknologi og edle materialer klarer De Dietrich å lage
produkter med den høyeste kvalitet som tjener den kulinariske kunst, en lidenskap
alle gourmeter har til felles.
Vi håper at du får fullt utbytte av dette nye apparatet, og vi tar gjerne mot alle forslag
eller spørsmål som du måtte ha via vår kundeservice eller via vårt webområde.
Mange takk for tilliten.
De Dietrich
Les all informasjon om merket hos oss på www.de-dietrich.com
Page is loading ...
Page is loading ...
Page is loading ...
Page is loading ...
Page is loading ...
Page is loading ...
Page is loading ...
Page is loading ...
Page is loading ...


-
 1
1
-
 2
2
-
 3
3
-
 4
4
-
 5
5
-
 6
6
-
 7
7
-
 8
8
-
 9
9
-
 10
10
-
 11
11
-
 12
12
-
 13
13
-
 14
14
-
 15
15
-
 16
16
-
 17
17
-
 18
18
-
 19
19
-
 20
20
-
 21
21
-
 22
22
-
 23
23
-
 24
24
-
 25
25
-
 26
26
-
 27
27
-
 28
28
-
 29
29
-
 30
30
-
 31
31
-
 32
32
-
 33
33
-
 34
34
-
 35
35
-
 36
36
-
 37
37
-
 38
38
-
 39
39
-
 40
40
-
 41
41
-
 42
42
-
 43
43
-
 44
44
-
 45
45
-
 46
46
-
 47
47
-
 48
48
-
 49
49
-
 50
50
-
 51
51
-
 52
52
-
 53
53
-
 54
54
-
 55
55
-
 56
56
-
 57
57
-
 58
58
-
 59
59
-
 60
60
-
 61
61
-
 62
62
-
 63
63
-
 64
64
-
 65
65
-
 66
66
-
 67
67
-
 68
68
-
 69
69
-
 70
70
-
 71
71
-
 72
72
-
 73
73
-
 74
74
-
 75
75
-
 76
76
-
 77
77
-
 78
78
-
 79
79
-
 80
80
-
 81
81
-
 82
82
-
 83
83
-
 84
84
-
 85
85
-
 86
86
-
 87
87
-
 88
88
-
 89
89
-
 90
90


Ask a question and I''ll find the answer in the document
Finding information in a document is now easier with AI
in other languages
- italiano: De Dietrich DKS1337X Manuale del proprietario
- français: De Dietrich DKS1337X Le manuel du propriétaire
- español: De Dietrich DKS1337X El manual del propietario
- Deutsch: De Dietrich DKS1337X Bedienungsanleitung
- русский: De Dietrich DKS1337X Инструкция по применению
- Nederlands: De Dietrich DKS1337X de handleiding
- português: De Dietrich DKS1337X Manual do proprietário
- slovenčina: De Dietrich DKS1337X Návod na obsluhu
- dansk: De Dietrich DKS1337X Brugervejledning
- polski: De Dietrich DKS1337X Instrukcja obsługi
- čeština: De Dietrich DKS1337X Návod k obsluze
- svenska: De Dietrich DKS1337X Bruksanvisning
- suomi: De Dietrich DKS1337X Omistajan opas
Related papers


Other documents
-
Groupe Brandt FFK1674XW Owner's manual
-
Groupe Brandt FFK1700X Owner's manual
-
-
-
-
-
Groupe Brandt BFL8B2BW Owner's manual
-
Groupe Brandt BFL2372YX Owner's manual
-
-
Fagor FFJ6825N Owner's manual