Edition 14 - Rev. 2
USER AND MAINTENANCE BOOK
en
LIBRETTO USO E MANUTENZIONE
it
BEDIENUNGS- UND WARTUNGSANLEITUNG
de
MANUAL DE INSTRUCCIONES PARA EL USO Y MANTENIMIENTO
es
MANUEL D’UTILISATION ET DE MAINTENANCE
fr
VEJLEDNING OM BRUG OG VEDLIGEHOLDELSE
da
KÄYTTÖ- JA HUOLTO-OHJE
HEFTE FOR BRUK OG VEDLIKEHOLD
no
ANVÄNDAR- OCH UNDERHÅLLSHANDBOK
sv
INSTRUKCJA OBSŁUGI I KONSERWACJI
pl
РУКОВОДСТВО ПО ЭКСПЛУАТАЦИИ И ТЕХНИЧЕСКОМУ ОБСЛУЖИВАНИЮ
ru
PŘÍRUČKA PRO POUŽITÍ A ÚDRŽBU
cs
HASZNÁLATI ÉS KARBANTARTÁSI KÉZIKÖNYV
hu
NAUDOJIMO IR PRIEŽIŪROS KNYGELĖ
lt
LIETOŠANAS UN TEHNISKĀS APKOPES GRĀMATIŅA
lv
KASUTUS- JA HOOLDUSJUHEND
et
MANUAL DE UTILIZARE ŞI ÎNTREŢINERE
ro
PRÍRUČKA PRE POUŽITIE A ÚDRŽBU
sk
НАРЪЧНИК ЗА ИЗПОЛЗВАНЕ И ПОДДРЪЖКА
bg
MCS Italy S.p.A.
Via Tione 12, -37010-
Pastrengo (VR), Italy
MCS Italy S.p.A.
Виа Тионе, 12, 37010
Пастренго (Верона), Италия
MCS Central Europe Sp. z o.o.
ul. Magazynowa 5A,
62-023 Gądki, Poland
MCS Central Europe Sp. z o.o.
ул. Магазинова, 5A,
62-023 Гадки, Польша
MCS Russia LLC
ul. Transportnaya - 22 ownership 2,
142802, STUPINO, Moscow region, Russia
ООО «ЭмСиЭс Россия»
Ул. Транспортная, владение 22/2,
142802, г.Ступино, Московская обл., РФ
MCS China LTD
Unit A1, No. 1515, Jinshao Rd.,
Baoshan Industrial Zone,
Shanghai, 200949, China
MCS China LTD
строение A1, № 1515, ул. Джиньшао,
промышленная зона Баошань,
Шанхай, 200949, Китай
DHA 140 - DHA 250 - DHA 360

en
it
de
es
fr
da
no
sv
pl
ru
cs
hu
lt
lv
et
ro
sk
bg
ТЕХНИЧЕСКИ ДАНИ – TECHNICKÉ ÚDAJE – TECHNISCHE DATEN – TEKNISK DATA –
TEHNILISED ANDMED – ESPECIFICACIONES TÉCNICAS – TEKNISET TIEDOT –
DONNÉES TECHNIQUES – TECHNICAL DATA – TEHNIČKI PODACI – MŐSZAKI ADATOK –
DATI TECNICI – TECHNINIAI DUOMENYS – TEHNISKIE DATI – TECHNISCHE GEGEVENS –
TEKNISKE DATA – DANE TECHNICZNE – DADOS TÉCNICOS – DADOS TÉCNICOS – INFORMAłII
TEHNICE – ТЕХНИЧЕСКИЕ ДАННЫЕ – TEKNISKA DATA – TEHNIČNI PODATKI –
TECHNICKÉ PARAMETRE – ТЕХНІЧНІ ДАНІ
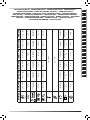
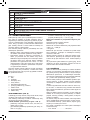
MODEL DHA 140 DHA 250 DHA 360 DHA 140 DHA 250 DHA 360
Power supply
Power /Ampere consumption *
Moisture removal capacity
Compressor
Refrigerant
Working range
Water tank capacity
Size (WxDxH)
N.W.
230 V
HFC
H
2
O
W
L
H
RT 30ºC
RH 80%
( )
~230V / 50Hz ~230V / 50Hz ~230V / 50Hz ~230V / 60Hz ~230V / 60Hz ~230V / 60Hz
Power supply
Power /Ampere consumption *
Moisture removal capacity
Compressor
Refrigerant
Working range
Water tank capacity
Size (WxDxH)
N.W.
230 V
HFC
H
2
O
W
L
H
RT 30ºC
RH 80%
( )
780 W 1630 W 1970 W 780 W 1630 W 1970 W
11 kg/24h 25 kg/24h 35 kg/24h 11 kg/24h 25 kg/24h 35 kg/24h
40 m
3
/h 65 m
3
/h 70 m
3
/h 40 m
3
/h 65 m
3
/h 70 m
3
/h
120 m
3
/h 290 m
3
/h 400 m
3
/h 120 m
3
/h 290 m
3
/h 400 m
3
/h
Power supply
Power /Ampere consumption *
Moisture removal capacity
Compressor
Refrigerant
Working range
Water tank capacity
Size (WxDxH)
N.W.
230 V
HFC
H
2
O
W
L
H
RT 30ºC
RH 80%
( )
-20 – 40
o
C
Power supply
Power /Ampere consumption *
Moisture removal capacity
Compressor
Refrigerant
Working range
Water tank capacity
Size (WxDxH)
N.W.
230 V
HFC
H
2
O
W
L
H
RT 30ºC
RH 80%
( )
30 - 100%
58 dB(A) 64 dB(A) 64 dB(A) 58 dB(A) 64 dB(A) 64 dB(A)
Power supply
Power /Ampere consumption *
Moisture removal capacity
Compressor
Refrigerant
Working range
Water tank capacity
Size (WxDxH)
N.W.
230 V
HFC
H
2
O
W
L
H
RT 30ºC
RH 80%
( )
405x315x316
mm
475x330x357
mm
550x402x427
mm
405x315x316
mm
475x330x357
mm
550x402x427
mm
Power supply
Power /Ampere consumption *
Moisture removal capacity
Compressor
Refrigerant
Working range
Water tank capacity
Size (WxDxH)
N.W.
230 V
HFC
H
2
O
W
L
H
RT 30ºC
RH 80%
( )
12 kg 19 kg 28 kg 12 kg 19 kg 28 kg
Page is loading ...
Page is loading ...
Page is loading ...
Page is loading ...

en
CZ
DE
DK
EE
ES
FI
FR
GB
HR
HU
IT
LT
LV
NL
NO
PL
RO
RU
SE
SI
SK
UA
SE
SI
SK
TR
UA
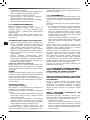
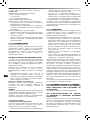
PLEASE TAKE TIME TO READ THIS MA-
NUAL CAREFULLY BEFORE USE AND
SAVE IT FOR FUTURE REFERENCE.
► 1. PRINCIPLE OF OPERATION
The dehumidier removes water from an airow through,
and the removed water is carried away from the dehu-
midier with the regeneration air (henceforward called
reg.–air). Water adsorption and –extraction takes place
in an rotor made of water resistant silica gel. The air
ows in the dehumidier divides the rotor in two parts :
drying part and reg.–part.
Two separate air ows goes through the rotor as this:
– the main air (moist air inlet) goes through the drying
part, and leaves the dehumidier as dry air
– the reg.–air is taken from the process air, after
passing through two purge sections of the rotor. The
air is then heated to app 110°C by the build–in PTC
heaters. The warm air then passes through the reg.
section of the rotor and removes the adsorbed water
(as water vapours). The water vapours and the reg.–
air now leaves the dehumidier through the reg.– air
outlet.
The two air ows are xed and the rotor turns – this gives
an automatic process of simultaneous adsorption and
water extraction.
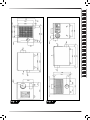
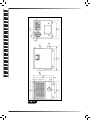
► FIG. 1:
1. lter,
2. fan,
3. rotor,
4. dry air,
5. PTC heating element,
6. regeneration air outlet,
7. drying sector,
8. regeneration sector,
9. pure sectors.
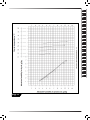
CAPACITY DIAGRAM (FIG. 5).
The inlet conditions of the air to be dried, determines
how much water the dehumidier will remove.
On the capacity diagram shows how much water will be
removed per kg process air.
Example, DHA360: (shown in the diagram – FIG. 5)
– inlet air conditions 20°C, 60 %RH, gives water con-
tent 8,7 g/kg
– the diagram shows then dry air condition of X= 5,6 g/
kg
– removed per kg air is then: 8,7 – 5.6 = 3,1 g/kg
Capacity DHA360 at this condition:
Dry air ow is nominal
400 m
3
/h =(x1,2) = 480 kg/h
Capacity, removed water per hour
= 480x3.1 = 1488 g/h
= 35 kg/24h
Capacity for DHA140 and DHA250 to be calculated in
the same way, using 120 and 290 m
3
/h.
The temperature of the dry air is higher than for the inlet air.
This is caused by the evaporation heat release and heat
gain from the rotor. The temperature is shown to be 33°C.
If bigger specic capacity g/kg is needed, this is possible
if the process air is reduced to less than nominal.
► 2. APPLICATIONS
Dehumidiers in the DHA range is used for dehumidica-
tion of ambient air at normal atmospheric pressure. This
can be an installation for moisture control in an unheated
store room, in a water work building, production room
for hygro–scopic materials... – with the dehumidier in a
separate installation.
The dehumidier also can be used as a part of a bigger
air treatment system. Here the dehumidier often will be
placed in a by–pass to the main system.
In this case the pressure in the main system will inuence
the dehumidier – and your supplier must be contacted,
as this can inuence the capacity of the dehumidier.
Normally the dehumidier will be placed on the oor, on
a table or in a wall bracket (option). It should always be
placed horizontal, resting on the four pcs. rubber sup-
ports.
The air to the dehumidier should be free from solvents
or other explosive components, and should be free from
pollution from solid particles, oil vapours and exhaust
gases from Diesel engines.
For air to the dehumidier the following limit values must
be respected:
– max. humidity ...................... 100%RH
– max. Temperature ................... 35°C
– max./min. pressure ................. ambient +/–300Pa
The DHA range is for indoor, stationary or temporary
installations. Should not be placed in rooms with
possibility for free water on the cabinet.
CONTENTS
1... PRINCIPLE OF OPERATION
2... APPLICATIONS
3... COMPONENTS
4... INSTALLATION
5... COMMISSIONING
6... AIR FLOWS
7... MAINTENANCE
8... TROUBLE SHOOTING
9... SERVICE/REPAIR

en
CZ
DE
DK
EE
ES
FI
FR
GB
HR
HU
IT
LT
LV
NL
NO
PL
RO
RU
SE
SI
SK
UA
SE
SI
SK
TR
UA
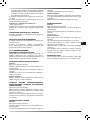
► 3. COMPONENTS
REGULATION BY HYGROSTAT
The dehumidier is prepared for external regulation by
a hygrostat. Therefore a special connector for this con-
nection is placed in the cabinet front cover (the black
connector).
The male part of the connector can be delivered as option.
The cable for the hygrostat must be connected the male
connector, terminals 1,2,PE.
If regulation by hygrostat is needed, simply connect the
two connector parts and choose pos. ”auto” on the se-
lector switch.
As hygrostat we recommend our DR10*) - 4512.600. Or
our electronic hygrostat DA20 - 4512.601.
*) Important:
The DR10 hygrostat must be xed onto a wall or si-
milar and must not be exposed for condensate or
other kind of free liquid.
The hygrostat should be approved for 10A.
ELECTRIC CONNECTION
The dehumidier is connected 230V, 1Ph+N+PE.
The dehumidier has a 2m cable with plug for the power
supply.
THE INSTALLED ELECTRIC HEATER
The PTC type electric heater is only functioning when
air ow through. This is the reason why no thermostats
is installed.
WARNING: DO NOT TOUCH THE ELEC-
TRIC HEATER WHEN SWITCHED ON, AS
IT IS AN UNINSULATED LIVE WIRE.
POWER CONSUMPTION & AIRFLOWS.
The dehumidier is equipped with PTC heaters.
The energy consumption of the PTC–heater is depen-
ding of the air passing through.
At the nominal air ows for the three models, the Amp for
the heater is:
DHA140: 3A, DHA250:6A, DHA360: 8A
The airow and the energy consumption is regulated on
the damper delivered in our standard reg.– duct system
(option).
NOTICE: the energy consumption of the electric hea-
ter in the rst seconds is up to 2x nominal value in
5–10 sec. after switching on the heater.
Special for DHA360:
THE ELECTRONIC TIMER, 10K4 (on delay):
The timer has the following function:
– PTC heater E1 will be switched on 30 sec. after star-
ting–up the dehumidier (on selector switch or by the
hygrostat).
The dehumidier has two PTC heaters, E1 & E2. Both are
the PTC–type, which means that the switch–on Amp is 10A.
When starting up the dehumidier, E2 is immediately
switched on. When E2 has reached its nominal Amp
(app. 5A) E1 is switched on. In this way the switch–on
Amp. is reduced compared to starting up both heaters at
the same time.
► 4. INSTALLATION
The dehumidier should be installed indoors, placed on
a wall bracket or some other horizontal basis. It should
be placed on the four pcs shock absorbers underneath
the cabinet.
CONNECTION OF DUCTS/HOSES:
The main air to be dried is normally taken from the room
and through the main air lter in the back plate.
The air intake is common for process air and reg.air.
As standard the dehumidier is delivered with lter/lter
frame for the common air intake.
Reg.–air outlet should be tted with duct or hose, Instal-
led draining away from the dehumidier to allow the con-
densed water to run free. If this is not possible, a DN4
mm hole should be drilled underneath at the lowest part
of the duct.
A damper should be installed too for the adjustment of
the nominal reg.air ow (reading the Ammeter).
Dry air outlet can be connected duct or hose with the
same size as the outlet on the cabinet. See dimensions
on cabinet, FIG. 2, 3, 4.
In general ducts of the same size as placed on the dehu-
midier should be used – or bigger.
► 5. COMMISSIONING
ELECTRIC
Before starting–up the dehumidier, check that all elec-
tric connections are made correctly.
If this is OK, just connect the plug into the electric switch,
and switch on.
DHA140:
The dehumidier has 2 toggle switches:
– the left one: 0/I (start/stop),
– the right one: Man/Auto (Auto = hygrostat controlled).
DHA250, 360:
The selector switch SA1 has 3 positions:
– auto = operation controlled by a hygrostat
– 0 = switched off
– man = continuous operation
“Man” means continuous operation.
Especially at ”auto” (with connected hygrostat):
– If it does not start–up, it can be caused by the hyg-
rostat.
– If the actual %RH is lower than the set value, the hy-
grostat contacts are open.
This can be checked like this:
– adjust the hygrostat to 20%RH, and the dehumidier
should then be operating
– adjust the hygrostat to 90%RH, and the dehumidier
should stop operating.
► 6. AIR FLOWS.
Air ows should be adjusted.
The dry air ow should be adjusted for the nominal m
3
/h
for obtaining data from the capacity diagram.
If lower dew points are wanted, you need to adjust the
dry air ow to values lower than nominal.
HOW TO ADJUST THE AIRFLOWS:
– the dry air ow can be adjusted on the optional damper
in the dry air outlet. The airow must be measured be

en
CZ
DE
DK
EE
ES
FI
FR
GB
HR
HU
IT
LT
LV
NL
NO
PL
RO
RU
SE
SI
SK
UA
SE
SI
SK
TR
UA
measured and adjusted on the damper for the nominal
value.
Free blowing, the capacity in kg/h will increase: If the
demand for very dry air is not needed, the dehumidier
should then operate free blowing
– the reg.– air ow can be adjusted on the damper in
the reg.–air outlet (option). Start–up with the damper
in the closed position, opening until the Ammeter in-
dicates:
DHA140: 3A, DHA250:6A, DHA360: 8A
Notice: DHA140 has no Ammeter installed and the Amp
must be measured using an Ampere instrument.
IMPORTANT :
Reg.–air ow always has to be controlled. Check the
reg.–duct for allowing free blowing of the reg.–air.
Check that the reg.–air duct is installed draining from the
dehumidier.
SPECIAL FOR DHA360:
STARTING–UP OF THE HEATERS:
The two heaters E1 & E2 starts up with 10K4 delaying
E1 with 30 seconds.
On the Am–meter this will be indicated like this:
– when the dehumidier is switched on, the Am.meter
shows 10A in app. 5 sec., and fall down to 5A.
– after 30 sec. E1 is switched on and the Ammeter
show app. 18A for 5 sec., and then it fall down to
8,00A with the reg–air correctly adjusted.
With the electrical settings and air ows adjusted, the
dehumidier will then operate automatically by means of
the internal control– and safety functions – controlled by
an external hygrostat.
► 7. MAINTENANCE
The DHA dehumidiers only needs a minimum of main-
tenance. All components are service free, which means
no lubrication or adjustment.
Only three things should be checked under normal ope-
ration:
– air lter should be replaced at least every 2 months
if stationary installed. At renting the dust level might
be high and the lter must be replaced often – and
the cabinet and rotor should be cleaned after each
period,
– the rotation of the rotor should be checked once a
month,
– the power consumption of the electric heater should
be checked often (reading on the Ammeter, Excl.
DHA140)).
Rotation of the rotor can be checked through the dry air
outlet if no duct is connected). The rotor should then turn
clockwise.
If the rotor rotates during operation, and the energy con-
sumption of the electric heater shows nominal Amp, you
can be almost sure that the dehumidier is operating at
an optimum. We nevertheless recommend some peri-
odic verication of the entire dehumidier, to see if all
internal functions are OK and checking of gaskets and
moving parts for wear and tear.
This will ensure that the capacity is on its maximum, and
thus won’t waste any energy.
► 8. TROUBLE SHOOTING
IF THE DEHUMIDIFIER DOES NOT START
WHEN ELECTRIC CONNECTED:
► check the external fuse
IF THE DEHUMIDIFIER IS NOT OPERA-
TING IT IS PROBABLY THE EXTERNAL
HYGROSTAT WHICH HAS BROKEN:
► This is a normal situation when the desired humidity
is obtained. To check: adjust the hygrostat for 20%RH,
and the dehumidier should start operating. Adjust again
for the desired humidity.
IF THE DESIRED HUMIDITY IS NOT OB-
TAINED:
► The problem can be the dehumidier – or the oth-
er parts in the total installation ( room tightness, hyg-
rostat...). To verify this, check:
– rotation of rotor ?
– the dry air should be 15–20°C warmer than the inlet
main air. If it is cold it could indicate that the rotor is
not turning caused by broken drive belt or the motor
has stopped.
– by hand feel the temperature of the reg. outlet air, and
feel the airow. The temperature is depending on the
inlet conditions, but should be 40–60°C.
► If the temperature is higher it could indicate that the
rotor is not turning.
► Check the Ammeter reading, must be nominal value:
DHA140: 3A *), DHA250:6A, DHA360: 8A
*) no Ammete
If it is cold and Ammeter shows 0A, the electric heater
might need replacement.
THE UNIT IS TOO NOISY:
► Check whether the unit is sitting on a level surface.
THE UNIT IS LEAKING:
► Make sure the unit is in good shape.
► If you are not using continuous drainage, make sure
the rubber plug (at the bottom of the unit) is in its posi-
tion.
► 9. SERVICE/REPAIR
SAFETY INSTRUCTION
Before opening the dehumidier, make sure that the
electric power is switched off on the main switch. Pull
the power plug to be sure.
REPLACING THE ELECTRIC HEATERS
DHA140:
Remove the cabinet top cover.
Remove the internal hose for the reg–air outlet.
Release the total internal assembly, and pull it out of the
cabinet.
The PTC heater is now accessible for replacing.
DHA250, DHA360:
When the small cover in the front of the dehumidier is
removed, the two PTC heaters are accessible for repla-
cing.

en
CZ
DE
DK
EE
ES
FI
FR
GB
HR
HU
IT
LT
LV
NL
NO
PL
RO
RU
SE
SI
SK
UA
SE
SI
SK
TR
UA
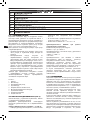
REPLACING OF GEARMOTOR, AMMETER,
HOURCOUNTER, SELECTOR SWITCH
Remove the cabinet top cover.
Remove the cabinet front cover. All cables to the dehumi-
dier (fan, gear motor and heaters) are to be unscrewed
by the terminals.
Now the cabinet front cover is free to be unscrewed and
the components accessible for replacing.
REPLACING OF FAN
DHA140:
Remove the cabinet top cover.
Remove the internal hose for the reg–air outlet.
Release the total internal assembly, and pull it out of the
cabinet.
The fan is now accessible for replacement.
DHA250, DHA360:
Remove the cabinet top plate. The fan is placed on the
fan plate, and can easily be pulled up and out of the ca-
binet.
Disconnect the electric connection (separate the plug).
REPLACING OF ROTOR
DHA140:
Remove the cabinet top cover.
Remove the internal hose for the reg–air outlet.
Release the total internal assembly, and pull it out of the
cabinet.
The rotor is now accessible for replacement.
DHA250, DHA360:
Remove the top plate and pull the fan up and out of the
cabinet.
Remove the hose by pulling it off the duct connections
Remove the two springs on the small shafts by unscre-
wing the screws
Unscrew the screw in the rotor shaft, remove the washer
and the spring.
Now the dividing plate with the reg.air connector can be
pulled off the shafts, and the rotor is free for replacing
too.
REPLACING THE FILTER
For replacing the lter in the air inlet, remove the screws
and the net. Now the lter can be taken out and a new
one installed.
Page is loading ...
Page is loading ...
Page is loading ...
Page is loading ...
Page is loading ...
Page is loading ...
Page is loading ...
Page is loading ...
Page is loading ...
Page is loading ...
Page is loading ...
Page is loading ...
Page is loading ...
Page is loading ...
Page is loading ...
Page is loading ...
Page is loading ...
Page is loading ...
Page is loading ...
Page is loading ...
Page is loading ...
Page is loading ...
Page is loading ...
Page is loading ...
Page is loading ...
Page is loading ...
Page is loading ...
Page is loading ...
Page is loading ...
Page is loading ...
Page is loading ...
Page is loading ...
Page is loading ...
Page is loading ...
Page is loading ...
Page is loading ...
Page is loading ...
Page is loading ...
Page is loading ...
Page is loading ...
Page is loading ...
Page is loading ...
Page is loading ...
Page is loading ...
Page is loading ...
Page is loading ...
Page is loading ...
Page is loading ...
Page is loading ...
Page is loading ...
Page is loading ...
Page is loading ...
Page is loading ...
Page is loading ...
Page is loading ...
Page is loading ...
Page is loading ...
Page is loading ...
Page is loading ...
Page is loading ...
Page is loading ...
Page is loading ...
Page is loading ...
Page is loading ...
Page is loading ...
Page is loading ...
Page is loading ...
Page is loading ...
Page is loading ...
Page is loading ...
Page is loading ...
Page is loading ...
Page is loading ...
Page is loading ...
Page is loading ...
Page is loading ...
Page is loading ...

en
it
de
es
fr
da
no
sv
pl
ru
cs
hu
lt
lv
et
ro
sk
bg
34
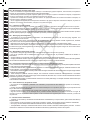
BG - Изхвърляне на вашия стар уред
- Когато този символ на задраскана кофа за боклук е поставен върху дадено изделие, това означава, че изделието попада под
разпоредбите на Европейска директива 2002/96/EC.
- Всички електрически и елекронни изделия трябва да се изхвърлят отделно от битовите отпадъци, в определени за целта
съоръжения, посочени от държавните или местните органи.
- Правилното изхвърляне на вашия уред ще помогне за предотвратяване на възможни негативни последици за околната среда
и човешкото здраве.
- За по-подробна информация за изхвърлянето на вашия стар уред се обърнете към вашата община, службите за събиране на
отпадъци или магазина, откъдето сте купили своя уред.
CN –
报废或旧产品的处理
报废或旧产品的处理报废或旧产品的处理
报废或旧产品的处理
- 我们的产品是精心设计且使用高质量的材料和零部件生产的,可以用于回收再利用。
- 当上述图案“大叉出现在这个带轮子的垃圾桶”出现时,说明此产品符合2002/96/EC规则。
- 请熟知当地关于电子电器废弃物的分类丢弃系统的相关规定。
- 当和日常生活垃圾一起丢弃时,请熟知当地的相关规定。正确的处理报废或旧的产品可以防止潜在的对环境或人体的负面影响。
CZ - Likvidace starého produktu
- Produkt je navržen a vyroben za použití velmi kvalitních materiálů a komponent, které lze recyklovat a znovu použít. - Když je produktu
připevněn symbol s přeškrtnutým košem, znamená to, že je produkt kryt evropskou směrnicí 2002/96/EC.
- Informujte se o místním tříděném systému pro elektrické produkty.
- Řiďte se místními pravidly a nelikvidujte staré produkty spolu s běžným odpadem. Správná likvidace starého produktu pomůže zabránit
případným negativním následkům pro životní prostředí a lidské zdraví.
DE - Entsorgung Ihres Altgerätes
- Ihr Produkt ist aus hochqualitativen Materialien und Bestandteilen hergestellt, die dem Recycling zugeführt und wiederverwertet
werden können.
- Falls dieses symbol eines durchgestrichenen Müllcontainers auf Rollen
auf diesem Produkt angebracht ist, bedeutet dies, class es von der Europäischen Richtlinie 2002/96/EC erfasst wird.
- Bitte informieren Sie sich über die örtlichen sammelstellen für Elektroprodukte und elektronische geräte.
- Bitte beachten Sie die lokalen Vorschriften und entsorgen Sie Ihre Altgeräte
nicht mit dem normalen Haushaltsmüll. Die korrekte Entsorgung Ihres Altgerätes ist ein Beitrag zur Vermeidung möglicher negativer
Folgen für die Umwelt und die menschliche gesundhei.
DK - Bortskaffelse af dit gamle produkt
- Dit produkt er designet og produceret met materialer af høj kvalitet, som kan blive genbrugt.
- Når du ser symbolet med en skraldespand, der er kryds over, betyder det, at produktet er dækket af EU direktiv nr. 2002/96/EC.
- Venligst sæt dig ind i de danske regler om indsamling af elektriske og elektroniske produkter.
- Venligst overhold de danske regler og smid ikke dine gamle produkter ud sammen med dit normale husholdningsaffald. den korrekte
bortskaffelsesmetode vil forebygge negative følger for miljøet og folkesundheden.
EE - Informatsioon kasutatud elektrooniliste ja elekrtiseadmete likvideerimise kohta
- See, seadmel olev märk informeerib, et tegemist on elektrooniliste või elektriseadmetega, mida pärast lõplikku kasutamist ei tohi hoida
koos teiste jäätmetega.
- Kasutatud elektrooniliste ja elektriseadmete koostises on keskkonnale kahjulikke materjale. Selliseid seadmeid ei tohi hoida prügilates,
need tuleb anda ümbertöötlemiseks.
- Informatsiooni kasutatud elektrooniliste ja elektriseadmete kogumissüsteemist võib saada seadme müüjalt müügikohtades ja tootjalt või
maaletoojalt.
- Erilist tähelepanu peaksid osutama tarbijad, kes kasutavad nimetatud seadmeid eramajapidamises. Arvestades asjaoluga, et sellesse
sektorisse satub kõige rohkem seadmeid, tähendeb see, et nende osavõtt selektiivsest kasutatud seadmete kogumisest on eriti tähtis.
- Kasutatud elektrooniliste ja elektriseadmete hoidmine koos teiste jäätmetega on tarbijaile keelatud vastavalt Euroopa Liidu Direktiivile
2002/96/EC.
ES - Cómo deshacerse del producto usado
- Su producto ha sido diseñado y fabricado con materiales y components de alta calidad, que pueden ser reciclados y reutilizados.
- Cuando vea este símbolo de una papelera con ruedas tachada junto a un producto, esto signifi ca que el producto está bajo la
Directiva Europea 2002/96/EC.
- Deberá informarse sobre el sistema de rciclaje local separado para productos eléctricos y electrónicos. - Siga las normas locales y no
se deshaga de los productos usados tirándolos en la basura normal de su hogar. El reciclaje correcto de su producto usado ayudará a
evitar consecuencias negativas para el medio ambiente y la salud de las personas.
FI - Vanhan tuotteen hävittämine
- Tuotteesi on suunniteltu ja valmistettu korkealuokkaisista materiaaleista ja komponenteista, jotka voidaan kierrättää ja käyttää uudell.
- Kun tuotteessa on tämä ylivedetyn pyörillä olevan roskakorin symboli, tuote täyttää Euroopan Direktiivin 2002/96/EC.
- Ole hyvä ja etsi tieto lähimmästä erillisestä sähköllä toimivien tuotteiden keräysjärjestelmästä.
- Toimipaikallisten sääntöjen mukaisesti äläkä hävitä vanhaa tuotetta normaalin kotitalousjätteen joukossa. Tuotteen oikeanlainen
hävittäminen auttaa estämää mahdolliset vaikutukset ympäristölle ja ihmisten terveydelle.
FR - Se débarrasser de votre produit usagé
FR – Se débarrasser de votre produit usagé
– Votre produit est conçu et fabriqué avec des matériaux et des composants de haute qualité, qui peuvent être recyclés
et utilisés de nouveau.
– Lorsque ce symbole d’une poubelle à roue barrée à un produit, cela signi e que le produit est couvert par la Directive
Européenne 2002/96/EC.
– Veuillez vous informer du système local de séparation des déchets électriques et électroniques.
– Veuillez agir selon les règles locales et ne pas jeter vos produits usages avec les déchets domestiques usuels. Jeter
correctement votre produit usagé aidera à prévenir les conéquences négatives potentielles contre l’environnement et la
santé humaine.
GB – Disposal of your old product
– You product is designed and manufactured with high quality materials and components, which can be recycled and
reused.
– When this crossed–out wheeled bin symbol is attached to a product it means the product is covered by the European
Directive 2002/96/EC.
– Please inform yourself about the local separate collection system for electrical and electronic products.
– Please act according to your local rules and do not dispose of your oldproduct with your normal household waste. The
correct disposal of your old product will help prevent potential negative consequences for the environment and human
health.
GR – Απόρριψη του παλαιού πρΪόντος σας
– Το προΪόν σας είναι σχεδιασμένο και κατασκευασμένο από υλικά και συστατικά υψηλής ποιότητας, τα οποία μπορούν
να ανακυκλωθούν και να επαναχρησιμοποιηθούν.
– ΌΤαν σε ένα προΪόν υπάρχει το σύμβολο του τροχοΦόρου διαΥραμμένου κάδου απορριμμάτων, σημαίνει ότι το προΪόν
καλύπτεται από την ΕυρωπαΪκή ΟδηΥία 2002/96/EC
– Παρακαλούμε ενημερωθείτε οχετικά με το ξεχωριστό τοπικό σύστημα συλλοΥής ηλεκτρικών και ηλεκτρονικών προΪόντων.
– Παρακαλούμε πράξτε σύμΦωνα με τους τοπικούς κανονισμούς και μην απορρίπτετε τα παλαιά προΪόντα σας μαξί με
οικιακά απορρίμματα. Η σωστή απόρριψη των παλαιών προΪόντων θα βοηθήσει στην αποτροπή αρνητικών συνεπειών
στο περιβάλλον και την ανθρώπινη υΥεία.
HU – Régi termékének eldobása
– A terméket kiváló anyagokból és összetevıkbıl tervezték és készítették, melyek újrahaszosíthatóak és újra
felhasználhatóak.
– Ha az áthúzott kerekes szemetes szimbólumot látja egy terméken, akkor a termék megfelel a 2002/96/EC Európai
Direktívának.
– Kérjük, érdeklıdjön az elektromos és elektronikus termékek helyi szelektív hulladékgyőjtési rendjérıl.
– Kérjük, a helvyi törvényeknek megfelelıen járjon el, és régi termékeit ne a normális háztartási szeméttel dobja ki. A régi
termék helyes eldobása segít megelızni a lehetséges negatív következményeket a környezetre és az emberi egészségre
nézve.
IT – Smaltimento del prodotto
– Questo prodotto è stato progettato e fabbricato con materiali e componenti di alta qualità, che possono essere riciclati
e riutilizzati.
– Quando ad un prodotto è attaccato il simbolo del bidone con le ruote segnato da una croce, signi ca che il prodotto è
tutelato dalla Direttiva Europea 2002/96/EC.
– Si prega di informarsi in merito al sistema locale di raccolta differenziata per i prodotti elettrici ed elettronici.
– Rispettare le norme locali in vigore e non smaltire i prodotti vecchi nei normali ri uti domestici. Il corretto smaltimento
del prodotto aiuta ad evitare possibili conseguenze negative per la salute dell’ambiente e dell’uomo.
LT – Informacija apie panaudotos elektrinés įrangos šalinimą
– Panaudotą elektrinę ir elektroninę įrangą laikyti su kitomis atliekomis vartotojams draudžiama pagal Europos Sajungos
Direktyvą 2002/96/EC.
– Šis ženklas, pavaizduotas ant įrenginio, informuoja, kad tai yra elektriné arba elektroniné įranga, kuri panaudota negali
būti laikoma kartu su kitomis atliekomis.
– Panaudotos elektrines įrangos sudetyje yra natūraliai aplinkai kenksmingų medžiagų. Tokios įrangos negalima laikyti
sąvartynuose, ji turi būti atiduota perdirbimui.
– Informaciją apie panaudotos elektrinés įrangos rinkimo sistemą galima gauti įrenginių pardavimo vietose bei iš gamintojo
arba importuotojo.
LV – Informācija par izlietoto elektrisko un elektronisko ierīču utilizēšanu
– Izlietotas elektriskā un elektroniskās ierīces izmest ar citiem atkritumiem lietotājiem ir aizliegts saskanā ar Eiropas
Savienības Direktīvu 2002/96/EC.
– Šis simbols, attēlots uz ierīces, informē, ka tā ir elektriska vai elektronika ierīce, kuru pēc izlietošanas nedrīkst izmest
kopā ar citiem atkritumiem.
– Informera dig själv om lokala återvinnings och sophanteringssystem för elektriska och elektroniska produkter.
– Agera i enlighet med dina lokala regler och släng inte dina gamla produkter tillsammans med ditt normala hushållsavfall.
Page is loading ...
Page is loading ...
Page is loading ...
-
 1
1
-
 2
2
-
 3
3
-
 4
4
-
 5
5
-
 6
6
-
 7
7
-
 8
8
-
 9
9
-
 10
10
-
 11
11
-
 12
12
-
 13
13
-
 14
14
-
 15
15
-
 16
16
-
 17
17
-
 18
18
-
 19
19
-
 20
20
-
 21
21
-
 22
22
-
 23
23
-
 24
24
-
 25
25
-
 26
26
-
 27
27
-
 28
28
-
 29
29
-
 30
30
-
 31
31
-
 32
32
-
 33
33
-
 34
34
-
 35
35
-
 36
36
-
 37
37
-
 38
38
-
 39
39
-
 40
40
-
 41
41
-
 42
42
-
 43
43
-
 44
44
-
 45
45
-
 46
46
-
 47
47
-
 48
48
-
 49
49
-
 50
50
-
 51
51
-
 52
52
-
 53
53
-
 54
54
-
 55
55
-
 56
56
-
 57
57
-
 58
58
-
 59
59
-
 60
60
-
 61
61
-
 62
62
-
 63
63
-
 64
64
-
 65
65
-
 66
66
-
 67
67
-
 68
68
-
 69
69
-
 70
70
-
 71
71
-
 72
72
-
 73
73
-
 74
74
-
 75
75
-
 76
76
-
 77
77
-
 78
78
-
 79
79
-
 80
80
-
 81
81
-
 82
82
-
 83
83
-
 84
84
-
 85
85
-
 86
86
-
 87
87
-
 88
88
-
 89
89
-
 90
90
-
 91
91


Master DHA 140 250 360 Owner's manual
- Type
- Owner's manual
Ask a question and I''ll find the answer in the document
Finding information in a document is now easier with AI
in other languages
- italiano: Master DHA 140 250 360 Manuale del proprietario
- français: Master DHA 140 250 360 Le manuel du propriétaire
- español: Master DHA 140 250 360 El manual del propietario
- Deutsch: Master DHA 140 250 360 Bedienungsanleitung
- русский: Master DHA 140 250 360 Инструкция по применению
- slovenčina: Master DHA 140 250 360 Návod na obsluhu
- dansk: Master DHA 140 250 360 Brugervejledning
- polski: Master DHA 140 250 360 Instrukcja obsługi
- čeština: Master DHA 140 250 360 Návod k obsluze
- eesti: Master DHA 140 250 360 Omaniku manuaal
- svenska: Master DHA 140 250 360 Bruksanvisning
- suomi: Master DHA 140 250 360 Omistajan opas
- română: Master DHA 140 250 360 Manualul proprietarului
Related papers
-
Master DH 711 Owner's manual
-
-
Master DH 731 Owner's manual
-
-
-
-
-
-
-