Page is loading ...

True to the Music
www.radialeng.com
®
True to the Music
®
User Guide
JDX
™
500 Reactor
Amplifier Direct Box & Cabinet Emulator
500 Series Module
www.radialeng.com
Radial Engineering Ltd.
1588 Kebet Way, Port Coquitlam
British Columbia, Canada, V3C 5M5
tel: 604-942-1001 • fax: 604-942-1010
email: [email protected]

WARNING NOTICE TO USER!
The Radial JDX 500 is not a load box. This means that if you are using it with a guitar
amplifi er it must be connected to a speaker cabinet or some type of load box. Failure
to do so could result in damaging the JDX and your amplifi er which of course would not
be covered under warranty. Always ensure you have proper cables and connections
have been checked. We recommend using high quality 12 gauge speaker cables.
Because the JDX 500 can also be used as a direct input from a guitar, we have
instituted a slow fl ashing LED to let you know when you are in this mode. This safety
measure reminds you that you should not connect a guitar amplifi er output to the JDX
when in guitar mode as this may damage the JDX.
Although preventative safety measures have been designed into Radial 500 series
products we strictly advise against hot-swapping modules or plugging and
unplugging them when the Workhorse or other 500 series rack is powered on. Hot
swapping can cause connection sparks at the card-edge connector that could send
damaging transients to other equipment. This also greatly reduces the life span of the
contacts. Damage due to hot swapping is not covered under warranty. There are no
user serviceable parts inside.
Radial
®
JDX
™
500 Reactor
User Guide
Table of Contents ......................................................Page
Feature Set .................................................................... 1
Overview ........................................................................ 2
Function Details ............................................................. 4
Getting Started ............................................................... 5
Amp Mode ...................................................................... 6
Guitar Mode ................................................................... 7
Re-amping and Other Applications ................................ 8
Specifi cations ................................................................. 9
Block Diagram ................................................................ 9
Warranty ........................................................... Back cover
Congratulations and thank you for purchasing the Radial JDX 500 Reactor module. The
JDX is a unique 500 series amplifi er interface designed to capture the dynamic relationship
between an amplifi er and speaker cabinet while also offering direct instrument recording with
active speaker cabinet emulation.
This manual describes installing and operating your JDX 500 in the Radial Workhorse or
other 500 series module power racks. To take full advantage of the unique features that
have been incorporated into the JDX 500, please read through this manual before using
it. This user guide will give you a broader sense of the module’s capabilities. If you have
questions that are not covered in this manual, please visit the FAQ section on our website.
This is where we post answers to questions from users. If you cannot fi nd the answer to your
question please feel free to send an email to [email protected] and we will do our very
best to respond as quickly as possible.
The JDX 500, one small step for audio engineering, one huge leap for tone fanatics!

True to the Music
®
Radial Engineering Ltd.
JDX 500 Module
FEATURE SET
1. 180º REVERSE - Inverts the signal polarity
between 0° and 180°.
2. LIFT - Ground lift switch works with the
transformer isolation to help eliminate hum
and buzz caused by ground loops.
3. LPF TONE SHIFT - Low pass fi lter control,
rolls off the high end to tame the aggressive
edge from overly bright sounding amps.
4. LF-EXT - Low frequency extension, lowers
the bass frequency response to emulate the
sound of a 15” speaker for added bass.
5. GUITAR - Toggles the front panel 1/4” jacks
between “amp mode” and “guitar mode”.
When set to “guitar mode” (inward position)
instruments may be connected directly
to the 1/4” HEAD jack. The LED indicator
fl ashes when “guitar mode” is engaged.
Do not connect an amplifi er when the LED
is fl ashing. Read the user warning notice
before using this feature.
6. 300W - Reduces the input sensitivity to allow
high-power guitar and bass amps to be used
with the JDX.
7. 1/4” HEAD JACK - Used to connect amps or
instruments depending on the position of the
GUITAR switch. When the JDX is in “amp
mode” this jack connects the speaker output
of an amplifi er. When the JDX is set to “guitar
mode” instrument may be connected directly
to this jack. Read the user warning notice
before using this feature.
8. 1/4” SPEAKER JACK - Used to connect a
speaker cabinet when JDX is used with
an amplifi er. The JDX is not a load box.
Therefore, it must be connected to a
speaker or load box when used with a
guitar amp.
9. OMNIPORT - When installed in the Radial
Workhorse rack you will have access to the
Omniport ¼” TRS jack. The JDX Omniport
is an alternative output set up as a balanced
mic-level direct box to feed a microphone
preamp, snake system or mixing console in
a live touring setup.
8
7
1
4
3
2
6
5
Rear Panel
1
9

Radial Engineering Ltd.
JDX 500 Module
True to the Music
®
2
OVERVIEW
The Radial JDX 500 is a 500 series module designed to bring the sound of a guitar amplifi er
into the recording system without having to necessarily set up microphones or amplifi ers. In
other words, it is designed as a quick production tool for professionals who make music and
record.
Inside the JDX are two different circuits: The fi rst is a reactive load that captures the sound
of the head and the back electro-magnetic impulse from the loudspeaker. The second is
a series of band-pass fi lters that shape the tone to create the 4x12 cabinet emulation. To
address the problem of overly bright amplifi ers, the front panel is equipped with a variable
low-pass fi lter designed to gently remove high end.
There are two basic ways to use the JDX: For the ultimate tone, the JDX can be connected in
‘amp-mode’ where it is placed between a guitar head and cabinet to capture both the sound
of the amplifi er and the reactive load of the cabinet.
Alternately, the JDX can be used in ‘guitar mode’ whereby the amplifi er and cabinet are not
used. Instead, the guitar is connected directly to the JDX, via some effect pedals, to take full
advantage of the advanced multistage speaker emulation fi ltering. If you have ever tried to
record a guitar through an overdrive pedal directly to the recorder you know how unpleasant
it can sound. The JDX fi ltering circuit takes the harshness away by emulating the response
of a speaker cabinet. The variable low-pass fi lter gives you extra control to further shape the
tone. Using the JDX in guitar mode is a great approach to laying down quick tracks when
writing. Simply connect your guitar to some pedals then into the JDX and you are set to go.
You can also use the JDX as an analogue fi lter to warm up tracks by sending a pre-recorded
track into the JDX via the XLR input. This approach applies to more than just guitar tracks.
Sending a synth or bass through the JDX can add mid range punch that can make a track
stand out. As always… there are no rules, only guidelines. Have fun. Experiment!

True to the Music
®
Radial Engineering Ltd.
JDX 500 Module
3
FUNCTION DETAILS
180º Reverse
This switch inverts the signal at the JDX output to align
the polarity with a microphone so they may be combined
at the mixing console without phase cancellation.
Lift
This ground lift switch works with the transformer isolation
to help eliminate hum and buzz caused by ground loops.
For the vast majority of amplifi ers this switch is set to the
inward position (ground lifted). However, some amplifi ers
may need to have the lift switch set to the outward
position (ground not lifted). Try both settings and use the
one that eliminates the most noise.
LPF Tone Shift
This variable low pass fi lter rolls off the high end to
tame the aggressive edge from overly bright sounding
amps. To engage the fi lter depress the LPF switch and
adjust the TONE SHIFT control for the best high-end
response.
LF-EXT
Or Low Frequency Extension, extends the frequency
response of the speaker emulation circuit downward
to emulate the sound of a 15” speaker for added bass.
When the LF-EXT switch is depressed the low frequency
cutoff shifts from 200Hz down to 100Hz.
Guitar
This recessed switch toggles the front panel 1/4” jacks
between “amp mode” and “guitar mode”. When “guitar
mode” is engaged this feature allows instruments to be
connected directly to the front panel 1/4” HEAD jack for
quiet recording without an amp. Engaging guitar mode
causes the LED to fl ash and changes the input sensitivity
of the ¼” HEAD jack to accept instrument level signals.
Do not connect a speaker-level signal to the 1/4”
HEAD jack when the GUITAR switch is engaged and
the LED is fl ashing.
300W
This recessed switch allows high power guitar and bass
amps (up to 300 watts) to be used with the JDX without
overloading the output stage. In the outward position the
sensitivity of the ¼” HEAD input jack is set for 100 watt
or less amps. When set to the inward position the input
sensitivity is reduced to accept 300 watt amps and the
LED indicator illuminates.
Outward position: amp mode
Inward position: guitar mode
(LED fl ashes)

Radial Engineering Ltd.
JDX 500 Module
True to the Music
®
¼” Head Jack
This front panel jack has two modes of operation
depending on the setting of the GUITAR switch:
Out position = amp mode; jack accepts speaker-level
signals from an amp.
In position = guitar mode; jack accepts instrument
level signal from guitar or pedals. LED
will fl ash when guitar mode is engaged.
¼” Speaker Jack
This front panel jack has two modes of operation
depending on the setting of the GUITAR switch:
Out position = amp mode; thru-put jack connects
amplifer to speaker cabinet.
In position = guitar mode; thru-put jack connects guitar
to pedals and amp. LED will fl ash when
guitar mode is engaged.
REAR PANEL CONNECTIONS
XLR Input
When installed in a 500 series rack the rear panel female
XLR input jack is used to feed a signal from your DAW
through the JDX speaker emulation circuit. This turns the
JDX into a unique fi lter where the TONE SHIFT LPF and
LF-EXT controls can be used to shape the sound.
XLR Output
When installed in a 500 series rack the rear panel male
XLR output jack produces a balanced line-level signal.
This is how the JDX normally outputs the signal to mixing
consoles and DAW’s.
WORKHORSE ENABLED FEATURES
Omniport
When installed in the Radial Workhorse rack you will
have access to the Omniport ¼” TRS jack. The JDX
Omniport is an alternative output set up as a balanced
mic-level direct box to feed a microphone preamp, snake
system or mixing console in a live touring setup.
Parallel 1/4” I/O Jacks
When installed in the Radial Workhorse the standard
balanced input and output connections are enhanced
with parallel ¼” TRS jacks and D-SUB connectors.
INPUT
OMNIPORT
FEED
LINK
1
OFF
OFF
CARD SLOT 1
OUTPUT
OUTPUT
INPUT
INPUT
OUTPUT
4

True to the Music
®
Radial Engineering Ltd.
JDX 500 Module
GETTING STARTED
Before making any connections, start by turning off your audio system and turning all
volume levels down. This helps protect equipment from turn-on transients that could damage
loudspeakers and other sensitive equipment. We recommend using a power bar with an on-
off switch as this makes it easy to turn on and off the 500 series rack, monitors and so on,
using a single switch. Carefully plug the JDX into your 500 series rack to avoid stress on the
card edge connector. Screw the module in to ensure it does not accidentally get dislodged.
Guitar and amp connections to and from the JDX are made on the front panel while
connections to the recording system or PA are done on the rear panel. Most 500 series
racks are equipped with XLR connectors. When you plug the JDX into your 500 series rack,
it will automatically route the card-slot input and output jacks to the module. With the Radial
Workhorse, the I/O is augmented with ¼” TRS connectors, D-Subs and the Mix Buss signal
to feed the Workhorse mixer.
Start by setting up the JDX panel controls as follows:
1. 180º POLARITY REVERSE: outward position (in phase)
2. LIFT: inward position (lifted)
3. LPF: outward position (bypassed)
4. TONE SHIFT fi lter: control fully clock-wise
5. LF-EXT: outward position (normal LF response)
6. GUITAR: outward position (LED not fl ashing)
7. 300W: outward position for 100 watt or less amps.
Keep in mind that the JDX is not a load box. This means that if you are
using high power output devices like a guitar amplifi er, the JDX must be
connected to a speaker or some form of load resistor. Failure to do so can
cause the JDX to blow up into a bazillion pieces and ruin your whole day!
5
AMP MODE: Speaker-level from amp into JDX
and thru-put to speaker cabinet. Speaker load
must be connected. Use 12awg. speaker cables.
GUITAR MODE: Instrument input and thru-put to
amplifi er input. Use guitar cables to connect.
Speaker In
Amp Out
Guitar Out
Guitar In

Radial Engineering Ltd.
JDX 500 Module
True to the Music
®
6
Using The JDX In Amp Mode
This set up is designed to record the sound of your guitar or bass using the JDX without a
microphone.
Make sure the GUITAR selector switch is set to the outward position (LED not fl ashing). Plug
your guitar into your amp and connect the head’s speaker output to the JDX, then the JDX
speaker out to your guitar speaker cabinet. Always use heavy 12 gauge speaker cables to
ensure you get maximum signal transfer between the amp head and cabinet. Start by testing
your amp to make sure it is working properly. We always recommend testing at low volumes
for safety. This can save your ears and equipment from damage.
Connect from the JDX to your recording system using the balanced XLR output located
on the rear of your 500 series rack. Start playing. You should be able to hear the sound in
your recording system. If you have a Workhorse, turn on the channel module slot. You can
then monitor it via the headphones or one of the outputs. If you hear any buzz or hum, try
depressing the lift switch. This disconnects the ground connection going to the amplifi er.
Extending the bass - The JDX is designed to emulate a 4x12 cabinet. Although this may
sound very ‘guitar-centric’, smaller speakers are often used for bass as it allows the sound
to punch through the mix with less of a heavy bottom end. To add versatility, the JDX module
is equipped with a LF-EXT or low frequency extension switch that basically widens the
frequency response and reaches down further to emulate a 15” loudspeaker. This adds an
octave or more to the bottom end to create bigger bass tones. On keyboards, it can be used
to fatten up the low end of a Hammond and with today’s 7-string guitars, you can descend
into the trenches of fi lth and degradation.
Extending the power - The JDX was originally designed for 100 watt guitar amps. But as we
later discovered, many artists began using the JDX with high-power bass amps causing the
JDX output levels to be signifi cantly greater than with 100 watts amps. As a safety measure
and to reduce the risk of overdriving the output stage, the JDX module has been outfi tted
with a 300W switch. This introduces an attenuating pad at the ¼” HEAD input to lower the
sensitivity.
Playing in phase - Another cool feature on the JDX is the 180º polarity reverse switch. This
is used when combining the sound from the JDX with a microphone on the speaker cabinet.
Sometimes, by simply reversing the polarity, you can improve the tone dramatically. You can
of course take this to a signifi cantly higher level by adding a PhazeQ to this set up. With the
PhazeQ’s completely variable phase control, you can dial it the perfect tone from mid punch
to major crunch!
The Low Pass Filter - Once you start listening to the JDX, you will certainly want to tweak
the tone to suit. The variable low pass fi lter is designed to gently roll off top end and smooth
out the tone so that it better replicates the sound of your guitar coming through the amp.
Simply depress the LPF switch and then rotate the TONE SHIFT control counter-clockwise
(starting at 5:00 o’clock) until it sounds right.

True to the Music
®
Radial Engineering Ltd.
JDX 500 Module
7
Using The JDX In Guitar Mode
Guitar mode or direct record mode is actually easier than using the JDX in amp mode. It
consists of connecting your guitar to the JDX and hitting record. The advantage with this set
up is effi ciency. All you do is connect your guitar through a distortion pedal like a Hot British™
and you are set to go.
To make this work, depress the guitar switch. This is recessed for safety and is equipped with
a fl ashing LED to let you know that you are in guitar mode. The ‘fl ashing LED light’ reminds
you that if you intend to use the JDX in amp-mode that you will have to switch this setting
to off. In guitar mode, the variable low-pass fi lter is still available to help shape your tone.
Adjust to suit.
Using The JDX To Reamp
While in guitar mode the JDX can also be used to Reamp™ your signal. This process
involves recording a dry track while auditioning the performance using a guitar amplifi er. A
direct box like the Radial J48, JDV or JDI are often used to record the dry track but the JDX
can be used for this too.
To record a dry track with the JDX ensure the polarity and low pass fi lter are switched out
to get the cleanest possible recording. Connect the rear panel XLR output to your recording
system. Set the JDX to guitar mode by setting the GUITAR switch to the inward position (LED
fl ashing) and connect the guitar to the front panel HEAD ¼” input. When set to guitar mode,
the SPEAKER ¼” output acts as a parallel thru-put allowing an instrument cable to connect to
your guitar amp. You can record the amp sound at the same time. The JDX’s balanced XLR
output on the 500 rack is used to record the clean track.
Once the clean track has been recorded, send it back to the JDX via the rear XLR input
where it can then be reprocessed. Set the JDX in guitar mode and use the ¼” SPEAKER
jack to drive the guitar amp. You can simultaneously feed other modules and combine them
to create exciting effects.
(Reamp track)
The cool thing about using the JDX for Reamping is that you are shaping the guitar tone
to sound more amp-like. This means that you can then later send the prerecorded track to
devices like limiters or EQs and you are already half-way there!

Radial Engineering Ltd.
JDX 500 Module
True to the Music
®
Using The JDX For Tone Shaping
As described above, it is common to record a clean guitar track and then later Reamp the
signal by sending it from the recorder to some guitar amps using a device like the Radial
X-Amp. You can also use the Radial JDX as a tone shaping tool by sending a pre-recorded
track into it via the XLR input on your 500 series rack. This can be used for guitar tracks,
keyboard or any number of instruments.
Hook-up is easy. Simply send the track to the JDX, process and then use the XLR output to
feed a new track. With the Workhorse, you can add other modules in series for EQ, phase
and limiting to create exciting new tones. Note: When using the XLR input, make sure the
ground is in the lifted position (pushed in). This arranges the ground so that both the plus
and minus of the balanced input are kept separate and assures a proper balanced input will
be introduced.
Combining The JDX With The PhazeQ
You can create huge guitar tones by combining the direct sound of the JDX with a room mic.
When you combine the two, you will invariably fi nd that some frequencies will amplify each
other (be in phase) while some will cancel each other out (be out of phase). The PhazeQ lets
you fi ne tune the phase relationship between the direct sound from the JDX and the room
mic.
The set up is simple. Because the sound from the JDX is direct (traveling at the speed of
electricity) it will arrive to the recorder before the mic’d signal as sound travels much slower
through air. We will therefore adjust the phase of the JDX signal to slow it down. Set the
levels on your mixer or Workhorse so that the two signals are relatively the same, then adjust
the phase to suit. Be prepared for total world dominating tones!
Using The Omniport Direct Out
If you are equipped with a Workhorse, then you have the added benefi t of a direct box output
via the Omniport. This mic-level TRS balanced output is designed to feed a mic splitter in a
live touring set up or can be used to feed a mic preamp input on a mixer. This setup would be
ideal for quiet stages where guitar amplifi ers are not used such as in a house of worship.
8

True to the Music
®
Radial Engineering Ltd.
JDX 500 Module
Spea ker/
Gui tar
GND LIFT
Ground lift MUST be
turned on if the amplifier
has a floating or bridged output!
Ground lift MUST be turned on
if XLR input is expected to be balanced.
300W
REAR PANEL
XLR
INPUT
PHASE
REVERSE
LF-EXT FILTER1
EXTEND
HEAD/
GUITAR
INPUT
SPK/THRU
NC
NO
NC
NO
221R
332R
15.0K
NC
NO
NC
NO
OMNIPORT OUTPUT
MIC LEVEL
REAR PANEL
XLR
OUTPUT
FILTER2
TONE
SHIFT
LPF
PHASE
SPLITTER
20 db
GAIN
GAIN
INVERTING
BUFFER
BALANCED TO
UNBALANCED
CONVERTER
BUSS
OUTPUT
NC
NO
4.75K
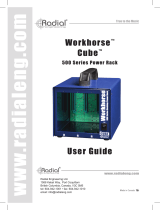
BLOCK DIAGRAM*
SPECIFICATIONS*
Circuit type: 100% Class-A discrete, transformer coupled
Frequency response: Custom multistage band-pass fi lter (speaker cabinet emulation)
Power requirement: 80mA, +/-16VDC
Low pass fi lter: Variable (Tone Shift) from 800Hz to 5kHz
Low freq. extension: Shifts low frequency cutoff from 200Hz down to 100Hz
Front Panel Jacks
Amp mode: ¼” HEAD/GUITAR: Speaker-level input for amplifi er 100W ~ 300W (selectable)
¼” SPEAKER: Parallel connection for speaker cabinet.
Guitar mode: ¼” HEAD/GUITAR: Instrument-level input, impedance 10kOhms
¼” SPEAKER: Parallel thru-put from guitar
Rear Panel (500 Series Rack)
Guitar mode: XLR input: Input impedance 10kOhms
XLR output: Balanced +4dB nominal
Amp mode: XLR input: Not Used
XLR output: Balanced +4dB nominal
Omniport: ¼” TRS Balanced, mic-level, 600 Ohms (with Workhorse)
Shipping weight: 1.5 lbs. (.7 kg)
Size: Standard 500 series rack format
Warranty: 3 years, transferable
* Subject to change without notice.
9
GROUND
CONNECTOR WIRING
HOT (+)
COLD (-)
GROUND
TRS ¼” Phone Connector
HOT (+)
TS ¼” Phone Connector
1
2
3
HOT (+)
COLD (-)
XLR Connector
GROUND

®
www.radialeng.com
True to the Music
THREE YEAR TRANSFERABLE LIMITED WARRANTY
RADIAL ENGINEERING LTD. (“Radial”) warrants this product to be free from defects in material and
workmanship and will remedy any such defects free of charge according to the terms of this warranty.
Radial will repair or replace (at its option) any defective component(s) of this product (excluding fi nish
and wear and tear on components under normal use) for a period of three (3) years from the original
date of purchase. In the event that a particular product is no longer available, Radial reserves the
right to replace the product with a similar product of equal or greater value. In the unlikely event that
a defect is uncovered, please call 604-942-1001 or email [email protected] to obtain an RA
number (Return Authorization number) before the 3 year warranty period expires. The product must be
returned prepaid in the original shipping container (or equivalent) to Radial or to an authorized Radial
repair centre and you must assume the risk of loss or damage. A copy of the original invoice showing
date of purchase and the dealer name must accompany any request for work to be performed under
this limited and transferable warranty. This warranty shall not apply if the product has been damaged
due to abuse, misuse, misapplication, accident or as a result of service or modifi cation by any other
than an authorized Radial repair centre.
THERE ARE NO EXPRESSED WARRANTIES OTHER THAN THOSE ON THE FACE HEREOF
AND DESCRIBED ABOVE. NO WARRANTIES WHETHER EXPRESSED OR IMPLIED, INCLUDING
BUT NOT LIMITED TO, ANY IMPLIED WARRANTIES OF MERCHANTABILITY OR FITNESS FOR
A PARTICULAR PURPOSE SHALL EXTEND BEYOND THE RESPECTIVE WARRANTY PERIOD
DESCRIBED ABOVE OF THREE YEARS. RADIAL SHALL NOT BE RESPONSIBLE OR LIABLE
FOR ANY SPECIAL, INCIDENTAL OR CONSEQUENTIAL DAMAGES OR LOSS ARISING FROM
THE USE OF THIS PRODUCT. THIS WARRANTY GIVES YOU SPECIFIC LEGAL RIGHTS, AND
YOU MAY ALSO HAVE OTHER RIGHTS, WHICH MAY VARY DEPENDING ON WHERE YOU LIVE
AND WHERE THE PRODUCT WAS PURCHASED.
API, Lunchbox, Protools and Neve are registered trademarks of their respective owners.
Reamp, Reamper, Reamping and Workhorse are trademarks of Radial Engineering Ltd.
Copyright 2011 Radial Engineering Ltd. All rights reserved.
Specifi cations and appearances subject to change without notice.
Radial
®
JDX
™
500 Module User Guide Rev1.0 March 2011 - Part #: R870 1242 00 Printed in Canada
!
This product is intended for professional use only.
The user should be familiar and experienced with
the 500 series rack and module format
Radial Engineering Ltd.
1588 Kebet Way, Port Coquitlam, British Columbia, V3C 5M5
tel: 604-942-1001 • fax: 604-942-1010 • email: [email protected]
/