Page is loading ...

Manual # P80170005A - Date:2009/08/25
Charcoal Grill
MODEL CCH07A090
OPERATOR'S MANUAL
Whether this grill was assembled by you or
someone else, you must read this entire manual
before using your grill to ensure the grill is
properly assembled and installed.
Obtain assistance from another person when
handling the large or heavy pieces.
Some parts may contain sharp edges, wear
protective work gloves if necessary.
Combustion byproducts produced when using
this product contain chemicals known to the
State of California to cause cancer, birth de-
fects, or other reproductive harm.
THIS APPLIANCE IS DESIGNED FOR
OUTDOOR USE ONLY
CARBON MONOXIDE HAZARD - Burning
charcoal inside gives off carbon monoxide
without odor that can kill you. NEVER burn
charcoal inside homes, vehicles or tents.
This product contains chemicals known to
the State of California to cause birth defects
or other reproductive harm.
Ÿ
Ÿ
Ÿ
Ÿ
Ÿ
WARNING
! !
Ÿ
Customer Support Helpline:
Ÿ
Ÿ
Ÿ
NOTE TO ASSEMBLER / INSTALLER:
Leave this manual with the consumer.
NOTE TO CONSUMER:
Keep this manual for future reference.
RECORD YOUR SERIAL # __________________
(see silver CSA label on main body of grill)
IMPORTANT:
Ÿ
FREE HELP
FROM THE GRILL EXPERTS
At Grand Hall we're the experts on this
product and trained to help you with:
visit www.grandhall.com or call:
1-877-934-7455
Monday - Friday 8:00am-4:30pm CST
Assembly Questions
Grill Operation
Replacement of Damaged or Missing parts
Ÿ
Ÿ
Ÿ

2
!
DANGER
!
Primary Safety Warnings...........................1-2
Part Diagrams and Lists..........................3-6
Assembly Instructions...............................7-12
Use & Care Instructions:
Cleaning and Maintenance..........................13
Warranty Terms...........................Back Cover
Table of Contents
This instruction manual contains
important information necessary for the proper
assembly and safe use of the appliance.
Read and follow all warnings and
instructions before assembling and
using the appliance.
Follow all warnings and instructions when using
the appliance.
Keep this manual for future reference.
•
•
•
•
WARNING
!
!
Do not store or use gasoline or other flamable
liquids or vapors in the vicinity of this or any
other appliances.
WARNING
! !
Use your grill at least 3 feet away from any wall
or surface. Use your grill at least 3 feet away from
combustible objects that can melt or catch fire
(such as vinyl or wood siding, fences and over-
hangs) or sources of ignition including pilot lights
on water heaters and live electrical appliances.
WARNING
! !
Ÿ Never allow children to operate your grill. Do not
allow children or pets to play near your grill.
In the event of rain, move grill to a covered
area.
Use your grill on a level, stable surface in an area
clear of combustible materials.
Most surfaces on this grill are hot when in
use. Always wear protective clothing to prevent
injury.
Do not leave grill unattended when in use.
Do not move the appliance when in use.
Allow the grill to cool before moving or storing.
Do not use your grill as a heater.
Do not use water to extinguish the coals.
Close the lid and vents to cut off the air flow
to the coals.
This grill is not intended to be installed in or
on recreational vehicles and/or boats.
Never substitute gasoline, kerosene or alcohol
for charcoal starter. In some states, the use
of charcoal starter is prohibited by law. In this
case, paraffin-based starter cubes can be
substituted for charcoal starter fluid. Never use
charcoal starter fluid with an electric starter.
Ÿ
Ÿ
Ÿ
Ÿ
Ÿ
Ÿ
Ÿ
Ÿ
Ÿ
Ÿ

3
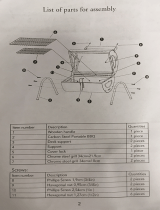
Hardware Pack Parts List for CCH07A090
Hardware Pack Diagram for CCH07A090
Phillips Head Screw 1/4"x3/8"
Qty. 28
Part # S112G04061
Pan Head with Cross Recess Screw
1/4"x1/2"
Qty. 13
Part # S182G04081
Wrench
Qty. 1
Part # P05515015L
Hex Key Wrench
Qty. 1
Part # P05515016B
Phillips Head Screw 1/4"x1/2"
Qty. 8
Part # S112G04081
Phillips Head Screw 3/16"x3/8"
Qty. 6
Part # S112G03061
Plain Washer M10.5
Qty. 2
Part # S411M10221
PART # PART DESCRIPTION QTYPURPOSE OF PART
P06002012AHardware Pack 1 For use in assembly
S112G04061Phillips Head Screw 1/4"x3/8" 16 Installs Cart Legs
P05515015L Wrench 1 Tightens Casters
S411M10221Plain Washer M10.5 2 Installs into Wheel Axle
4 Installs Grease/Ash Tray Bracket
8 Installs Grease/Ash Tray Tracks
S182G04081
Pan Head with Cross Recess
Screw 1/4"x1/2"
13 Installs Grill Bowl
P05515016BHex Key Wrench 1 Tightens Hex Socket Set Screws
S112G04081Phillips Head Screw 1/4"x1/2" 8 Installs Side Shelves
S112G03061Phillips Head Screw 3/16"x3/8" 6 Assembles Grease/Ash Tray Handle
S112G04061Phillips Head Screw 1/4"x3/8"

Parts Diagram for Model CCH07A090
4

Parts List for Model CCH07A090
5
KEY DESCRIPTION PART# QTY
1 Lid Assembly Y0110035 1
2 Lid Handle P00205005B 1
3 Lid Handle Heat-Insulating Spacer P06801002A 2
4 Lid Handle Bracket, Left P00301016E 1
5 Lid Handle Bracket, Right P00302016E 1
6 Temperature Gauge P00601171A 1
7 Protective Pad P05518002I 4
8 Name Plate P00407010D 1
9 Bowl Frame Panel, Front P0073821FC 1
10 Bowl Frame Panel, Left P0072019FC 1
11 Bowl Frame Panel, Right P0072119FC 1
12 Bowl Frame Panel, Rear P0072536FC 1
13 Bowl Panel, Left P0072021EC 1
14 Bowl Side Panel/Trim Plate/Left P07514006A 1
15 Bowl Panel, Right P0072122EC 1
16 Bowl Side Panel/Trim Plate/Right P07514007A 1
17 Lid Hinge with Nut P05511006A 2
18 Bowl Panel, Rear P00725406C 1
19 Charcoal Tray Side Panel, Left P01304005M 1
20 Charcoal Tray Side Panel, Right P01305006M 1
21 Charcoal Tray Panel, Rear P01319001M 1
22 Charcoal Tray Panel Bracket, Front Lower P03305012H 1
23 Charcoal Tray Panel Bracket, Front Upper P03305083C 1
24 Charcoal Tray Panel Bracket, Rear P03305014H 1
25 Charcoal Tray Support P01714002E 2
26 Charcoal Tray P01705010E 2
27 Charcoal Tray Access Door P04301023A 2
28 Charcoal Tray Access Door Trim Plate P07510009A 2
29 Charcoal Tray Access Door Handle Assembly Y0010009 2
30 Charcoal Tray Access Door Stop P05510012A 1
31 Cooking Rack/Secondary P01507003E 1
32 Cooking Grid P01615023E 3
33 Charcoal Tray Support Bracket, Left P04106001C 1
34 Charcoal Tray Support Bracket, Right P04106002C 1
35 Charcoal Tray Adjusting Arm Shaft P04103002C 1

6
Parts List for Model CCH07A090
To obtain the correct replacement parts for your grill, please refer to the part numbers in this parts list.
The following information is required to ensure you receive the correct parts:
1. Model and Serial Number (see label on grill)
2. Part Number
3. Part Description
4. Quantity of parts needed
Important: Use only authorized parts. The use of any part that is not factory authorized can be dangerous
and will also void your product warranty. Keep this Operator's Manual for convenient referral and for part
replacement.
For the repair or replacement parts you need:
Call 8am to 4.30pm CST 1-877-934-7455 Monday through Friday
KEY PART DESCRIPTION PART# QTY
36 Charcoal Tray Adjusting Arm P04102002D 2
37 Charcoal Tray Adjusting Arm Handle P05508076E 2
38A Grease/Ash Tray Body P02717671A 1
38B Grease/Ash Tray Handle P00210002H 2
38C Grease/Ash Tray Trim Plate P02720063C 1
39 Grease/Ash Tray Track, Left/Right P05330010E 2
40 Grease/Ash Tray Bracket P05330011E 1
41 Cart Bottom Shelf P01010015C 1
42 Cart Leg, Left Front P00917001B 1
43 Cart Leg, Left Back P00918001B 1
44 Cart Leg, Right Front P00919001B 1
45 Cart Leg, Right Back P00920001B 1
46 Caster Seat P04507002A 2
47 Caster, 4 in., with Brake P05120003E 2
48 Wheel, 10 in. P05121001K 2
49 Wheel Axle P05509001A 1
50 Side Shelf P01105030B 2
51 Side Shelf Bracket, Left/Right P01208001A 2
52 Side Shelf Lock P05501003A 4
53 Charcoal Shovel P06612003F 1
54 Vent Handle Y0010018 2
Cover P07007058B 1
Hardware Pack P06002012A 1
Operator's Manual P80170005A 1

Assembly Instructions
7
Have an assistant help you with positioning the Cart
Legs (Left Back, Left Front, Right Front, Right Back)
onto the Cart Bottom Shelf.
1
Install Cart Legs onto Cart Bottom Shelf
Phillips Head Screw 1/4"x3/8"
Qty. 16
Part # S112G04061
Wrench
Qty. 1
Part # P05515015L
Plain Washer M10.5
Qty. 2
Part # S411M10221
2
Install two Casters into the threaded holes on
the Caster Seats. Turn the threaded stem by
hand, clockwise until it stops. Tighten securely
using Wrench provided.
Install Casters and Wheels
Insert the Wheel Axle through the axle holes on
Right Front and Right Back Cart Legs.
Attach Plain Washers and Wheels onto Axle.
Press down on the silver Wheel Clips then push
the Wheel fully onto the Axle until it stops.
Important: Once the Wheels are fully installed,
you must lock them onto the Axle by pulling the
silver Wheel Clips until you hear a clicking
sound.
Wheel Clip
Use 4 Phillips Head Screws 1/4"x3/8" to secure
each Cart Leg.
Note: The legs are not interchangeable. They
must be installed in a particular order, or the
casters and wheels can not be installed
correctly. The Left Cart Legs have black
casters seats on one end. The Right Cart
Legs have one end open. Refer to the
diagram for more information.
A & B: Left Front and Left Back Cart Legs.
C & D: Right Front and Right Back Cart Legs.
B
A
C
D
Key:

3
Install Grease/Ash Tray Bracket
Install Grease/Ash Tray Tracks
Install Grease/Ash Tray Bracket onto Cart Legs as shown using
4 Phillips Head Screws 1/4"x3/8".
Install 1 Grease/Ash Tray Track onto the Left Cart Legs
using 4 Phillips Head Screws 1/4'x3/8".
4
Phillips Head Screw 1/4"x3/8"
Qty. 4
Part # S112G04061
Phillips Head Screw 1/4"x3/8"
Qty. 8
Part # S112G04061
8
Repeat step for installing the right Grease/Ash Tray Track.

6
Install Charcoal Tray Adjusting Arm Handles, Char-
coal Tray Access Door Handles, and Vent Handles
Install Grill Bowl
5
Secure the Grill Bowl by using 13 Pan Head with Cross Recess Screws
1/4"x1/2" as shown.
Hex Key Wrench
Qty. 1
Part # P05515016B
Turn the Charcoal Tray Adjusting Arm Handles into
the threaded Adjusting Arm, clockwise until it stops.
Install the Charcoal Tray Access Door Handles onto
the Charcoal Tray Doors. Use the Hex Key Wrench
to secure the 2 Hex Screws inserted in the handles.
Pan Head with Cross Recess Screw
1/4"x1/2"
Qty. 13
Part # S182G04081
9
Hex
Charcoal Tray Door
Install 2 Vent Handles into the threaded Adjusting Arm
on the Rear Bowl Panel, clockwise until it stops. (See
Figure Below)
With an assistant, lift and position the Grill Bowl onto the Cart as shown.
Remove Cooking Grids and Secondary Cooking Rack from Grill Bowl.

Install Side Shelves
10
7
Align the 4 holes on the Left Side Shelf with the threaded holes
on the Cart. Insert 4 Phillips Head Screws 1/4"x1/2 from the inside
of the Side Shelf and tighten securely.
Repeat for Right Side Shelf.
Install Charcoal Trays
8
Open the Access Doors and install two Charcoal Trays.
When installing the Charcoal Trays, make sure the sloped
handles are placed in front so that they are facing the
Access Doors.
Phillips Head Screw 1/4"x1/2"
Qty. 8
Part # S112G04081

11
Install Grease/Ash Tray Handle onto Grease/Ash
Tray. Secure the
Handle using 6 Phillips Head Screws 3/16"x3/8".
Assemble Grease/Ash Tray Handle onto the Grease/Ash Tray
9
Install Grease/Ash Tray
Phillips Head Screw 3/16"x3/8"
Qty. 6
Part # S112G03061
Slide the assembled Grease/Ash Tray over the
Grease/Ash Tray Tracks.
10

12
Secondary Cooking Rack
Cooking Grids
Air Vents
Adjusting Handle
Burning charcoal inside will kill you. It
gives off carbon monoxide, which is
odorless and colorless. Never burn
charcoal inside homes, tents and ve-
hicles.
Carbon Monoxide Hazard
WARNING
!
!
•
•
•
WARNING
!
!
Use your grill at least 3 feet away from any
wall or surface. Use your grill at least 3 feet
away from combustible objects that can melt
or catch fire (such as vinyl or wood siding,
fences and overhangs) or sources of ignition
including pilot lights on water heaters and live
electrical appliances.
Never use your grill in a garage, porch, shed,
breezeway or any other enclosed area.
Never obstruct the flow of ventilation air around
your grill housing.
Final Grill Assembly Step
When you have finished assembling your
grill be sure that all screws are tightened
for safe operation of your grill.
Install Cooking Components
Place Cooking Grids on bowl ledge.
Place the Secondary Cooking Rack into the
slots on Grill Bowl Side Panels.
11
Congratulations. Your Charcoal Grill is now
ready to use.
Keep grill area clear and free from combustible
materials, gasoline and other flammable vapors
and liquids.
Do not obstruct the flow of air for combustion
and ventilation.
Keep the ventilation openings of the grill free and
clear of debris.
CAUTION
Failure to comply with these instructions may
result in a hazardous situation which, if not
avoided, may result in injury.
!
!

13
Proper care and maintenance will keep your grill in top
operating condition and prolong its life. Follow these
cleaning procedures on a timely basis and your grill will stay
clean and operate with minimum effort.
CAUTION: Make sure coals are completely extinguished and
the grill is cool before cleaning.
USE AND CARE INSTRUCTIONS
USING YOUR CHARCOAL GRILL
Using Charcoal
CLEANING AND MAINTENANCE
Open Access Door. Slide the Charcoal Tray out from
Charcoal Tray Support. Place Charcoal in each
Charcoal Tray. Do not build too large of a fire. We
recommend starting a fire with a maximum of 3.5
pounds of charcoal and adding more as needed
during cooking. Never fill charcoal above the upper
level of the Tray.
You can easily add charcoal to the Grill during cooking.
We recommend you wear flame retardant BBQ mitts to
avoid hot surfaces.
You can adjust the Vent Handles to control the flow of
air into your grill. By controlling the flow of air, you can
adjust the flame level in your grill. (Ex: Opening the
Vent Handles will allow you to build a bigger fire.)
You can use the Charcoal Tray Adjusting Arm Handles
to adjust the Charcoal Tray to different levels to control
grilling temperature.
Cleaning Exterior Stainless Steel Surfaces
Weathering and extreme heat can cause exterior
stainless steel surfaces to turn tan in color. Machine
oils used in the manufacturing process of stainless
steel can also cause this tanning color. Before initial
use, and after removing any protective PVC from the
Grill Lid, use a Stainless Steel Cleaner to polish the
stainless steel surfaces of your grill. Never use a stiff
wire brush, brass brush or abrasive cleaners beause
they will scratch the stainless steel surface of your
grill.
Cleaning The Cooking Grids
Before initial use, and periodically, wash your Cooking
Grids in a mild soap and warm water solution. You
can use a wash cloth or vegetable brush to clean your
Cooking Grids. Then coat both sides of the Cooking
Grids with a light coat of vegetable oil.
Cleaning The Grease/Ash Tray
To reduce the chance of fire, the Grease/Ash Tray
should be visually inspected before each grill use.
Remove any grease and ash, then wash Grease/Ash
Tray with a mild soap and warm water solution.
Cleaning The Inside of The Grill Lid
Grease can have a tendency to build up on the inside
of the Grill Lid and could drip onto deck or patio when
the lid is opened. Visually inspect the inside of the
Grill Lid and bowl before each grill use. Remove any
grease and wash with a mild soap and warm water.
Never use a stiff wire brush, brass brush, or abrasive
cleaners because they will scratch the stainless steel
or cause it to rust.
Cleaning of The Grill Interior
Frequency of clean up is determined by how often the
grill is used. However, at least every 3 months you
must give the entire gill a thorough cleaning to
minimize your risk of fire and keep the grill in top
shape. Follow these steps:
Ÿ
Make sure coals are completely extinguished and the
grill is cool before cleaning.
Remove and clean the Cooking Grids and Grease/
Ash Tray following the instructions provided above.
Clean the inside of the grill lid as described above.
Brush the inside and bottom of the grill with a fiber
pad or nylon brush and wash with a mild soap and
warm water solution. Rinse thoroughly and let dry.
Ÿ
Ÿ
Preparing Your Grill For Initial Use
Before cooking on your grill for the first time, you
should burn off the grill to eliminate any odor or
foreign matter. Build a small fire on the Charcoal
Trays. Close the lid and position the air vents approxi-
mately one quarter open. This burn should be
sustained for at least 30 minutes. Begin increasing
the temperature by opening the air vent halfway and
adding charcoal through the charcoal access doors.
Your charcoal grill is now ready for use.
Charcoal Grilling
Always wear a flame retardant BBQ mitt when cooking
on your grill or when adding charcoal to the Charcoal
Trays. Charcoal is recommended, however wood or a
combination of both may be used as a fuel source for
grilling.
Remove the Cooking Grids when starting the fire (see
Using Charcoal). Ignite the charcoal and allow the fire
to burn down before adding more charcoal. Use flame
retardant BBQ mitts when replacing the Cooking
Grids.
Adjust the air vents to regulate the temperature (open
the vents to get a highter flame, and gradually close
the air vents to lower the flame).
Adjust the height of the Charcoal Trays by moving the
Charcoal Tray Adjusting Arms up or down.
By adjusting the height of the Charcoal Trays, you can
control how close the heat is to your food. Placing the
Charcoal Trays at the highest position is ideal for
searing. Placing the Charcoal Trays at lower positions
allows you to roast or smoke your food.
Remove charcoal and food remnants from Charcoal
Trays. Clean the Trays with a fiber pad or nylon brush
and wash with a mild soap and warm water solution.
Rinse thoroughly and let dry.
Ÿ

Grand Hall will warrant to the ORIGINAL PURCHASER of this product that it will be free of defects in material
and workmanship for set periods below from the date of purchase when used under normal outdoor use and
correct assembly:
Grand Hall will require reasonable proof of your date of purchase. Therefore, you should send in the owner
registration card or register online at www.grandhall.com. Save your receipt in case it is required as proof
of purchase.
This Limited Warranty is limited to replacement of parts at Grand Hall's option that proved to be defective
under normal use and service.
Grand Hall may require the return of defective parts for examination before issuing replacement parts. If you
are required to return defective parts, shipping charges must be prepaid. No returns will be accepted without
prior authorization from Grand Hall.
Upon examination and to Grand Hall's satisfaction, if the original part is proven defective, Grand Hall may
approve your claim and elect to replace such parts without charge. You will be charged for shipping and
handling of the replacement parts.
This Warranty does not cover any failures or operating difficulties due to accident, abuse, misuse, alteration,
misapplication, vandalism, improper installation, maintenance, operation or service, as set out in the Operator’s
Manual.
This Warranty does not cover cosmetic wear and tear such as scratches, dents, corrosion or discoloration
caused by weather, heat, chemicals, paint loss, or surface rust. Deterioration or damage due to severe weather
conditions such as hail, hurricanes, earthquakes, tsunami, tornadoes, Act of God or terrorism is not
covered by this Limited Warranty.
To Obtain Warranty:
Call 1-877-934-7455
Monday through Friday
8am - 4:30pm CST
Warranty Restrictions
This Warranty is non-transferable and is void if product is used for commercial or rental purposes.
This Warranty applies only when the product is used in the United States or Canada.
This Warranty gives you specific legal rights, and you may also have other rights which vary from state
to state.
Manufacturer:
Grand Hall Enterprise Co., Ltd.
9th Fl., No. 298, Rueiguang Rd., Neihu,
Taipei, Taiwan (114)
Grand Hall Limited Warranty
•
•
•
All SS Parts-Limited Lifetime Warranty
All Other Grill Parts-2 Years
1 Year Full Warranty
/