Page is loading ...

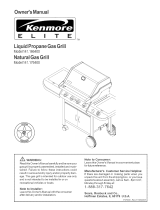
OPERATOR'S MANUAL
Island Kit
Model 141.166981 and 141.166991
Your Island Kit is very heavy. With the
assistance of another person, use care when
unpacking, moving and assembling the
granite pieces to avoid bodily injury and
breakage of the granite.
• NOTE TO ASSEMBLER / INSTALLER:
Leave this manual with the consumer.
• NOTE TO CONSUMER:
Keep this manual for future reference.
• RECORD YOUR SERIAL#
(see silver label on main body of Island)
Call us first if you have any problem with this
product. We can help you with questions about
assembly and operation or if there are
damaged or missing parts when you unpack
this unit from the shipping box. Please call
before returning to the store.
1-888-317-7642
8am-8pm CST, Monday throu,qh Friday
I Sears, Roebuck and Co.,
Hoffman Estates, IL 60179 U.S.A.
Manuat# P8014700IC- Date:2005/02/17

The following table illustrates a breakdown of the hardware pack. It highlights what components are used
in the various stages of assembly.
PART # PART DESCRIPTION QTY PURPOSE OF PART
P06016001B Hardware Pack 1 ::For use in
assembly
$122G04061 Phillips Head Screw 1/4"x3/8" 4 Attaches
Weights to Decorative Panels
$3t3G04061 Flange Nut 1/4" 2
$122G04161 Phillips Head Screw 1/4"x1" 8 Attaches Handles to Door and Drawers
$194G04121 Hex Socket Set Screw 1/4"x3/4" 8 .........
.......... ........ ^ Attacnes L_ranlzeJaole Jop _anels
_eleL_u4ubl t-]ange 1"4u_1/4
Already installed in your grill
The Screws are taken from Grill Side Shelf to attach
$112G04121 Phillips Head Screw 1/4"x3/4" 4 Island
Frames to the sides of Grill
S122G04061
Qty. 4
Phillips Head Screw 1/4"x3/8"
$122G04161
Qty. 8
Phillips Head Screw 1/4"x1"
$194G04121
Qty. 8
Hex Socket Set Screw 1/4"x3/4"
©
S313G04061
Qty. 10
Flange Nut 1/4"
P05515006B
Qty. 1
Hex Key Wrench
Hardware already installed in your grill
$122G04121
Qty. 4
Phillips Head Screw 1/4"x3/4"
NOTE:
Screws needed to attach Island Frame
to Grill Frame. Use screws for side shelf
installation that are packed with Grill.

28
6
12
26
27
25
17
6
14
13 11 10 9 14

44
14 9 10 11 15

KEY DESCRIPTION PART# QTY
1 Leg, Right Front/Left Island P00912007G 1
6 ...... Tab!e Top F['ame{ Left Island ................... P01004005K 1
7 Bottom Shelf/Left Island P01004006K 1
8 iCovering Plate P07515007D 2
9 Drawer Panel, Upper P01902001B 2
10 Drawer Trim Plate, Upper P01910001G 2
11 Drawer, Upper P01906001B 2
!2 Drawer Slide Bracket, Upper P01908001G 2
13 Drawer Slide Set P05516005L 3
15 Drawer Panel, Lower/Left Island P01902002B 1
........................................................Drawe ........................................................................................................................................................................................................................................................................................................................................................................P01910002G 1
................Drawerslide Brackei:£ower2I_efiis!and....... ........ #5_958552G
19 Drawer Slide Bracket Brace, Lower/Left Island ............................... ....................................................................1........................................
..........25...........5_awer SiiaeB_aci_e{Fastener ...............................................................................................................................# __552G.........................3.........................
21......................................................................................................................................Level Adjuster .............P05322536A ............................i 5....
23 Decorative Panel/Inner P07901020A 1
24 Panel, Front! Left Island P07901001A 1
....................2S.....................#an_i: E_ft/Ee_i_ia_i _ig5_i_5{ i_iSna........................................................................................................................................................................................................................................................................2....................................
26 Panel, Rear/Left Island P07901003A 1
...... Rig h_L:_:: i_ ....................... !:
28 Table Top, Left Island/Granite/Rustic Tan P07802001A 1
......... #57853551_...... _...............
30 Leg, Right Front/Right Island
33 Decorative Strip Plate/Right Island P07504001A 1
34 TableTop Frame/Right Island P01004007K 1
35 Bottem Shelf/Right is!and .................................................................. P0! OO4O08K .........................! ............
36 Door Panel/Right Island P04303015A 1
...................._t........................ iSna........................................................................................................................................................................................................................................................................................................................._..................................
..........................._ _ !_! t_!_a .................................................................................................................................................................................P03314001 C ..........................................................................................
......................39........................ .....................................................................................................................................................P033!4002C ...................................................................1 ..........
40 Door Magnet/Right Island P05523002K 2
4:1........ Paneil ..................................................................................P07901005A 1
P07901006A 1
.................. P°7901°°7A ........
43 Panel, Left/Right Island 1
44 Table Top/Right Island/Granite/Rustic Tan P07802002A 1
..............................................Top/Rig t4iisland/G ..............................................................................................................................................................# 07853 ......................................................................;i...........................................
g5 ...... Leg Seai ........................................................................ P04509002A ...... 8..........................
46 Lighting Tube P05313001C 1
...................................................................................................................................................................................................................................................................................................................................................................47 Lighting Tube Extension .......................................................................................................1........................................
48 Decorative PanelANeight
...................................................................................................................................................................................................................................................................................................................................................................................................................................................................................................................49 Decorative Panel Adjusting Bracket .............................................................................:i................................
..........::::.............RsrawarePa_k.......................................................................................................................................................PSe51e551B....................................._..................
For the repair or replacement parts you need: Call anytime 1-800-4-MY-HOME ®(1-800-469-4663)
To make sure you obtain the correct replacement parts for your Granite Island, please refer to the part numbers
on this page. The following information is required to ensure you receive the correct parts:
1. Island Kit Model Number
2. Part Number
3. Part Description
4. Quantity of parts needed
Important: Keep this Operator's Manual for convenient referral and for part replacement.
Important: Use only manufacturer authorized parts, The use of any part that is not manufacturer authorized can
be dangerous and will also void your product warranty,

CAUTION: While it is possible for one person to assemble this Island, obtain assistance from another person
when handling some of the larger, heavier pieces, especially the Granite Table Top.
1. During unpacking and assembly always wear work gloves and eye protection.
2. Open Lid of shipping carton and remove top sheet of cardboard. Lay cardboard sheet on floor and use as a
work surface to protect floor and Island parts from scratches.
3. Remove packing materials and Island parts from shipping carton.
4. You may slice the carton front corners with a utility knife to lay open the carton front panel. This will offer you
easier access to the Island Frames.
5. Use the parts list to check that all parts have been included.
6. Inspect the Island for damage as you assemble it. Do not assemble the Islands if they appear to be damaged.
If there are damaged or missing parts when you unpack the shipping box, or you have questions during the
assembly process, call:
Customer Support Helpline 1-888-317-7642
8am - 8pro CST, Monday through Friday
I Tools required for assembly:
#2 Phillips head screwdriver 1/4" Wrench or Adjustable Wrench
I
Record the Model and Serial Number below:
MODEL NUMBER
SERIAL NUMBER
Serial number label
located here
Read these instructions before assembling your Island Kit. The granite pieces
are very heavy. With the assistance of another person, use care when unpacking,
moving and assembling the granite pieces to avoid bodily injury and breakage
of the granite.
Make sure the surface is solid, flat and level. Rough or soft ground will cause
levelling problems that could cause the Island Kit to incline, door frames to distort
and/or the island to partially sink after installation.

Your Island Kit is designed to attach to select Sears products (sold separately) as
illustrated below. This dimensions provided will assist you in planning for adequate
space of the Island Kit when attached to optional products.
153"
P3
\ /
\
/
\
/
\ /
o
P2
\ /
\ /
/
\
\ /
O4
INSTALLATION AREA FOR 6B GRILL MODEL 16690/17690/16691/17691/
16686/17686
142"
im_
P5 P2
f \
/ N
/ \
/ \
/ \
/ \
/ \
/
, )
\ / \ /
\ / \ /
\ / \ /
\ / \ /
O4
INSTALLATION AREA FOR 4 & 5B GRILLS MODEL 166801176801166811176811
16682117682/16684/17684
Use a tape measure to ensure that all four (4) points P1, P2, P3 and P4 are at the
same height.
:°I
@ @o@ @ @ @©
,,,,,,,,,,,,,,,,,,H,,HH#HH,HHHHH,#
P1
P2
i
E
" E
_-- 04
03 _ SOLID AND FLAT
03 SURFACE
////! //////////////////////

Remove Drawers
[] Before attaching the Island to the grill,
remove Drawers by lifting the Left Slide
Lock and pressing the Right Slide Lock
at the same time.
Slide Lock
Slide Lock
H djust Island Height
[] With an assistant, lay the Island Frames on its
side onto protective cardboard. Turn the Level
Adjusters for an overall Island height of 38-11/16"
to match the grill shelf height. See Page 7.

InstallLeftIsland
[] BesuretheSideShelfandCartSideHandlehave
beentakendownfromgrill.AttachtheIslandto
thesideofthegrill.Aligntheholeson theIsland
Framewiththethreadedholesonthegrill.Tighten
securelyusingtwooffourPhillipsHeadScrews
takenfromtheGrillSideShelf.
$122G04121
Qty.2
PhillipsHeadScrew1/4"x3/4"
Install Right Island
[] Follow steps 1 through 3 for installation
of the other Island Frame.
$122G04121
Qty. 2
Phillips Head Screw
1/4"x3/4"
NOTE:
Screws needed to attach
Island Frame to Grill Frame.
Use screws for side shelf
installation that are packed
with Grill.

H ttach Hex Socket Set Screw
[] Use the Hex Key Wrench to attach four
of the Hex Socket Set Screws to the
back of each Table Top.
$194G04121
Qty. 8
Hex. Socket Set Screw 1/4"x3/4"
I
I
P05515006B
Qty. 1
Hex Key Wrench
H nstall Granite Table Top Panels
[] With an assistant, place the Table Top on
the Island and make sure the attached set
screws fit through the two brackets on the
Table Top Frame. Tighten the four Flange
Nuts securely with a wrench. CAUTION: Do
not overtighten and risk cracking Granite.
©
$313G04061
Qty. 8
Flange Nut 1/4"
10

Install Drawers/Door Handles
[] Attach the Handles to Drawers/Door using
Phillips Head Screws and tighten securely.
$122G04161
Qty. 8
Phillips Head Screw 1/4"x1"
H Assemble Drawers
[] Slide the Drawers into the Island Frames.
11

Adjust Decorative Panel and Install Weights
[] Adjust the proper width of Decorative Panel by pressing
Decorative Pannel Adjusting Bracket of Inner Decorative Panel.
A position: For models 16690/17690/16691/17691/16686/17686
B position: For models 16684/17684
C position: For models 16680/17680/16681/17681
D position: For models 16682/17682
[] Install two Weights onto the Decorative Panel, use 2 Flange
Nuts for assembling Outer Decorative Panel and Weights.
C position
B position
A position
$122G04061
Qty. 4
Phillips Head Screw
1/4"x3/8"
©
S313G04061
Qty. 2
Flange Nut 1/4"
Inner Decorative Panel
D position
Outer Decorative Panel
Weights
Weights
Install Decorative Panel
[] Place the attached Decorative Panels under the
grill doors. Be sure grill casters are fully locked
and front casters are rotated to the rear to allow
for flush alignment of Decorative Panels with front
bottom of grill doors.
12

The warm beauty of granite is unparalleled among building materials, but preserving that beauty in certain granites
requires careful, regular maintenance.
Granite and other natural stones have become increasingly popular for backyard residential and commercial uses.
However, some simple steps will help preserve the original luster of the stone over time.
Granite requires very little maintenance and is naturally resistant to stains and scratches. However, it is not indestruc-
tible! Please follow these simple guidelines for care of your granite.
1. Regularly clean your surfaces with a damp cloth. Dry-off wet spots to avoid dull patches appearing where hard water
and soap residue have been left behind during daily use. A light neutral (PH7) solution may be safely added.
Maintain an original finish on the granite surface by using sealers and regular maintenance procedures. Be sure
to select sealers and waxes with caution, as they may contain ingredients which could dull or scratch the Table
Top. Before application, clean the Table Top with soapy water and let it dry. Apply two coats of sealer in quick
succession, using sealer brushes. After 30 minutes, remove the excess sealer with a dry cloth.
3. Avoid the use of abrasive cleaners or scour pads.
4. Aspray cleaner can be applied to surfaces to clean and help the surface shine.
5. Cutting foods on the stone Table Top should not scratch the granite but it will blunt your knives quickly! To be safe
use a separate cutting board.
6. Do not place hot pots/pans on your granite surface as they could leave a scorch mark.
7. Avoid contact with edges of worksurfaces as chipping may occur.
Granite is a porous material even though surfaces and edges have been polished. The stone is treated before
leaving the factory to help resist staining. Be mindful there are oil and spirit based products such as wine, fruits
and perfume, and also oil based products such as olive and cooking oils that may stain if allowed to soak into the
Table Top. Should spills occur, wipe off as soon as possible.
9. Table Top should not be brought into contact with strong acid based chemicals including paint stripper, brush
cleaner, oven cleaners, varnish remover, degreasant or similar products.
13

NOTE: A Lighting Tube is used whenever you cannot electronically ignite your grill. Some older
model grills did not come with Lighting Tubes (Models #166801#176801#166901#17690). Therefore a
Lighting Tube is provided for these grills. If your grill already has a Lighting Tube installed,
disregard page 14 & 15. Follow steps 1 through 6 to install Lighting Tube Kit.
STEP 1: Remove cooking grids, flame tamers and
secondary cooking rack.
I
I
I
q
I
I
I
J
Locate the fllowing parts provided with the upgrade
Lighting Tube Kit.
PARTS LIST
For Models 16680/17680/16690/17690
REF# DESCRIPTION PART# QTY
1 Lighting Tube P05313001C 1
2 Phillips Head Screw 1/4_'x3/8'' $122G04061 2
3 Nut 1/4" $362G04061 2
Additional Parts
For Models 16680/17680
4 Extension Tube P05313002C
5 Phitlips Head Screw M4xSmm $112M04081
1
1
STEP 2: On inside of left bowl panel, insert Lighting
Tube slightly below the burner top and align
the holes of Lighting Tube mounting bracket
with holes in the side of grill bowl.
I
If you have any problem with the Lighting Tube
Kit, call us 8am-8pm CST, Monday through
Friday at: 1-888-317-7642
For 16690/17690
For 16680/17680
14

STEP3: Insert2 Phillipsheadscrews1/4"x3/8"
fromoutsideof grill bowlthrough
LightingTubebracketandsecure
tightlywith 2 1/4"Nuts.
6,
7.
Set ALL Control Knobs to OFF. For LP Models,
open gas tank valve slowly until 1/4 to 1/2 open.
Light a match and place it over the top opening of
the Lighting Tube. Turn the farthest Left Control
Knob to the HIGH setting to release gas. The
Burner should light immediately.
STEP 5: Turn Control Knob to "OFF"
STEP 4 :
Follow below Lighting Instruction procedures to
check Lighting Tube function and light your grill.
1. Familiarize yourself with the safety guidelines in
the Grill manual. Do not smoke while lighting grill or
checking gas supply connections.
2. If you have a LP gas grill be sure the LP gas tank
is filled, or if you have a NG grill be sure that the
locking shut off valve is open.
3. Open the Grill Lid.
4. Check that the end of the Burner Tube is properly
located under the far left burner top.
5. Be sure all gas connections are securely tightened.
STEP 6: Replace flame tamers, cooking grids and
secondary cooking rack.
WARN ING
Failure to open Grill Lid during the
lighting procedures could result in a fire
or explosion that could cause serious
bodily injury, death, or property damage.
15

Your Home
For repair-in your home-of aH major b_and appliances
_awn and garden equipment, or heating and c®o_n9 systems
no matter who made it, no matter who sold iti
For the repiacement parD, ao_ssories and
o_"}e¢s manuals that yo_Jneed to d®4toyourse_f.
For Sears profess_ona_ instaliatian d home appliances
sad items like garage door ,openers and water heaters.
Call anytme day o_ (U S,A a_c: Casada)
_ea_socom w_wo_ears,._a
< < <
For repar of carryqn items ilike vacuums lawn equipment,
and e_ect_enies call or go om_ine for the location of your nearest
Sears; Par_ & Repair Center,
iiiiiiiiiiiiiiii....
/