CAUTION READ ALL INSTRUCTIONS CAREFULLY BEFORE
STARTING THE INSTALLATION!
Please handle all parts carefully to prevent scratches or breakage.
BEFORE YOU BEGIN
Thank you for purchasing the Pegasus
Kitchen Sink.
PLEASE READ ALL INSTALLATION
INSTRUCTIONS PRIOR TO
INSTALLATION OF THE SINK.
PLEASE ALSO READ AND
FOLLOW THE INSTALLATION
INSTRUCTION FOR ANY OTHER
PRODUCTS INTENDED TO BE
INSTALLED WITH THIS SINK.
CAUTION:
HANDLE WITH CARE
PLEASE NOTE THAT THE EDGE
OF THE SINK MAY BE SHARP.
TAKE ANY PRECAUTIONS
NECESSARY TO AVOID PHYSICAL
INJURY DURING HANDLING AND
INSTALLATION.
TOOLS AND MATERIALS
Ask your countertop dealer for a list of
the proper tools necessary to cut a hole
in the countertop.
Note: If a countertop is Corian, a
router must be used.
Read the installation instructions
that accompanied faucets and
accessories that are intended to
be installed with the sink. The
installation instructions likely will
provide a list of installation tools,
aids and tips for each individual
product.
To install this sink you may need:
An electric saber saw or router
A caulking gun with Acrylic or Silicone
caulk
A pencil
A tape measure
A hole saw 1 3/8”, carbide/diamond
tip recommended
An electric drill
A Phillips screwdriver
Scrap lumber (Two 2” x 4” each 2’
long would be sufficient)
A paint brush
Clean up materials such as
disposable cloths, soap and water.
RECOMMENDED TOOLS
Pencil
Electric Drill
with hole saw
(
pilot bit)
C
aulking gun
Phillips head
s
crewdriver
Electric saber saw
o
r router
BEFORE INSTALLATION
1. This sink was produced and
packaged by experienced people. Please
inspect your sink for any problems prior
to installation. If there are problems
that prevent installation of the sink,
please return it to the merchant from
whom the sink was purchased.
2. Determine from your faucet the
number of holes that your sink
requires in order to accommodate the
faucet. Faucets can require 1,2,3,4 or 5
holes. You may have already purchased
sink accessories to install on the sink
ledge. (Examples are a
soap/lotion dispenser, etc.) Add the
number of accessory holes required to
the number of holes required for faucet
installations, to determine the total
number of holes to drill into the sink.
Hole drilling to Faucet/Accessory Holes
and placement MUST
be performed
prior to installation.
DRILLING FAUCET/
ACCESSORY HOLES
READ THIS ENTIRE
SECTION BEFORE
STARTING TO DRILL.
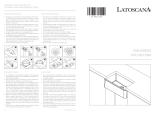
Fig.2
the sink. (Do not use the countertop as
the structurally sound surface to
support the sink. Doing so will result in
damage to the countertop.
4. Scoring on the underside of the sink
is centred on the sink and indicates hole
positioning.
5. Drill straight down from the
underside of the sink, until the pilot bit
pierces through the sink surface.
DO allow the hole saw to cut completely
through the sink.
(Fig.2)
S
ink Bottom
INSTALLING YOUR
NEW SINK
1. See template for instruction steps.
TIPS FOR EASIER
INSTALLATION
1. After removing the countertop
cutout section is a good time to dry test
fit the sink in the hole, to assure that
the sink will install without any pitch
points. Test fit and remove sink, correct
hole if required.
2. Depending on the type of material
from which the counter is made, it may
be desirable to apply sealant to the raw
vertical edge of the cutout in the
countertop at this time. Silicone or
acrylic sealant may be spread with a
paint brush in a thin layer over this cut.
3. We have fount it to be easier to
install the faucet(s), accessories and
basket strainers to the sink at this point
rather than wait until the sink is
installed, (when all would be assembled
and installed from below the sink).
Follow the instructions from the
faucet(s), accessories and basket
strainers manufacturers to install the
product to the sink.
1. Drill holes from the Underside
of the sink.
2. Use a 1 3/8” Hole saw with
a pilot bit. (Fig. 1)
(Note: Use carbide/diamond
tipped for best results.)
3. Turn the sink upside down
being certain to not damage
the topside. Make sure the
sink ledge is supported by a structurally
sound surface. The two pieces of scrap
lumber mentioned in the Tools and
Materials section can be used to support
Fig.1
Hole Saw
P E G A S U S
K I T C H E N S I N K S
I N S TA L L AT I O N I N S T R U C T I O N S
English
2.