Page is loading ...

Tools/Outils/Herramientas
Thank You For Choosing Kohler Company
We appreciate your commitment to Kohler quality. Please take a few minutes to review
this manual before you start installation. If you encounter any installation or
performance problems, please don’t hesitate to contact us. Our phone numbers and
website are listed on the back cover. Thanks again for choosing Kohler Company.
Merci d’avoir choisi la compagnie Kohler
Nous apprécions votre engagement envers la qualité Kohler. Veuillez prendre s’il vous
plaît quelques minutes pour lire ce manuel avant de commencer l’installation. Ne pas
hésiter à nous contacter en cas de problème d’installation ou de performance. Nos
numéros de téléphone et notre adresse du site internet sont au verso. Merci encore
d’avoir choisi la compagnie Kohler.
Gracias por elegir los productos de Kohler
Le agradecemos que haya elegido la calidad de Kohler. Dedique unos minutos para leer
este manual antes de comenzar la instalación. En caso de problemas de instalación o de
funcionamiento, no dude en contactarnos. Nuestros números de teléfono y nuestro sitio
web se encuentran en la cubierta posterior de esta guía. Gracias nuevamente por escoger
a Kohler.
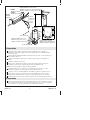
Important Information
CAUTION: Risk of personal injury or product damage. Handle with care.
Product can break, chip or cause injury if handled carelessly. Get help lifting the
lavatory.
CAUTION: Risk product damage. Do not overtighten connections.
Overtightening may break or chip the lavatory or pedestal.
These instructions are for installing the lavatory to wood frame construction. For
other installations, supply suitable bracing and fastening devices of sufficient size
and strength.
Fixture dimensions are nominal and conform to tolerances in ASME Standard
A112.19.2.
Observe all local plumbing and building codes.
Kohler Co. reserves the right to make revisions in the design of products without
notice, as specified in the Price Book.
1068258-2-A 2 Kohler Co.
Page is loading ...

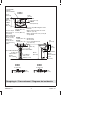
Roughing-in / Raccordement / Diagrama de instalación
K-2286-1
K-2294-1
K-2286-4
K-2294-4
K-2286-8
K-2294-8
Finished Wall
Mur fini
Pared acabada
9-1/4"
(23.5 cm)
2-5/8"
(6.7 cm)
4" (10.2 cm)
4" (10.2 cm)
2-5/8"
(6.7 cm)
2-5/8"
(6.7 cm)
3/8" Hot/Chaud/Caliente
1-1/4" Outlet
Sortie 1-1/4"
Salida de 1-1/4"
Finished Floor
Sol fini
Piso acabado
3/8" Cold/Froid/Fría
4" (10.2 cm)
9"
(22.9 cm)
33-1/2"
(85.1 cm)
L
C of Backing
Axe de renfort
Línea central del refuerzo
4" (10.2 cm)
1/2" (1.3 cm) D. Mounting Hole in the
Pedestal
Orifice de montage dans la colonne
de Ø 1/2" (1,3 cm)
Orificio de fijación de 1/2" (1,3 cm) D.
en el pedestal
1/2" (1.3 cm) D.
Anchor Holes in
the Lavatory
Orifices d'ancrage
dans le lavabo de
Ø 1/2" (1,3 cm)
Orificios de
anclaje de 1/2"
(1,3 cm) D. en el
lavabo
6-1/4"
(15.9 cm)
10"
(25.4 cm)
14-3/8"
(36.5 cm)
Finished Wall
Mur fini
Pared acabada
K-2286
19-3/4"
(50.2 cm)
K-2294
19-7/8"
(50.5 cm)
K-2286
24-1/8" (61.3 cm)
K-2294
27-1/2" (69.9 cm)
K-2286
9-1/2" (24.1 cm)
K-2294
9-3/4" (24.8 cm)
K-2286
14-3/4" (37.5 cm)
K-2294
14-5/8" (37.1 cm)
1068258-2-A 4 Kohler Co.

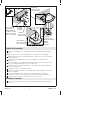
Preparation
Install the water supplies and drain piping according to the roughing-in
information. Install the supply stops so the handles will not touch the pedestal
when fully open.
Install sufficient backing behind the finished wall to provide a secure material for
the anchoring devices.
Apply six self-adhesive gaskets (provided) to the top edge of the pedestal as
shown.
Mark the centerline on the floor.
Refer to the roughing-in information, and position the pedestal on the floor
centerline location at the required distance from the finished wall.
NOTE: The lavatory must be supported by the pedestal.
Carefully lift the lavatory into place on the pedestal, and slowly move the
pedestal as required to ensure proper fit in the desired location.
Level the lavatory, and add additional self-adhesive gaskets as needed to level.
Locate the two lavatory anchoring holes, and mark the hole locations on the
finished wall. Mark the location of the hole in the pedestal base onto the floor.
Carefully remove the lavatory from the pedestal. Move the pedestal from the area.
Préparation
Installer les alimentations d’eau et tuyauterie du drain selon l’information du plan
de raccordement. Installer les arrêts d’alimentation de façon à ce que les poignées
ne touchent pas la colonne quand elles sont entièrement ouvertes.
1/2" (1.3 cm) D.
9-1/4" (23.5cm)
K-2286
14-3/4" (37.5 cm)
K-2294
14-5/8" (37.1 cm)
29-1/2"
(74.9 cm)
to Floor
au sol
al piso
Backing
Support
Refuerzo
Mark and drill the anchor holes.
Marquer et percer les orifices d'ancrage.
Marque y taladre los orificios de anclaje.
Mark and drill the floor here.
Marquer et percer le sol ici.
Marque y taladre el piso aquí.
Apply adhesive gaskets.
Appliquer des joints adhésifs.
Aplique empaques adhesivos.
Kohler Co. 5 1068258-2-A
Page is loading ...

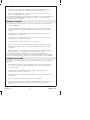
Install the Lavatory
Drill 1/4” mounting holes at the marked locations on the finished wall and the
floor.
NOTE: You may also use other fastening devices of sufficient size and strength.
Install the hanger bolts to the backing material so they extend 1” (2.5 cm) beyond
the finished wall.
Install the faucet and drain to the lavatory according to the manufacturer’s
instructions.
Move the pedestal over the drilled hole in the floor, and secure the pedestal to the
floor by carefully tightening the lag screw and washer.
Carefully set the lavatory on the pedestal so the hanger bolts extend through the
lavatory anchoring holes.
Verify the lavatory is positioned as desired.
Install the cap nuts and washers to the hanger bolts; carefully tighten until secure.
Do not overtighten.
Connect and tighten the trap to the drain, and complete the water supply
connections to the faucet according to the instructions packed with the faucet.
Run water into the lavatory and check all connections for leaks.
Installer le lavabo
Percer des orifices de fixation de 1/4″ aux emplacements marqués sur le mur fini
et le sol.
Washer
Rondelle
Arandela
Cap Nut
Écrou borgne
Tapón roscado
Hanger Bolt
Boulon d'ancrage
Perno de sujeción
1" (2.5 cm)
Washer
Rondelle
Arandela
Pedestal Base
Base de colonne
Base de pedestal
Lag Screw
Vis à tête carrée
Tornillo para madera
1/2" (1.3 cm) D.
Anchor Hole
Orifice d'ancrage
de Ø 1/2" (1,3 cm)
Orificio de anclaje
de 1/2" (1,3 cm) D.
Kohler Co. 7 1068258-2-A

Installer le lavabo (cont.)
REMARQUE: Il est aussi possible d’utiliser d’autres systèmes de serrage aux dimensions et
résistances suffisantes.
Installer les boulons d’ancrage sur le renfort, pour que chaque boulon dépasse de
1″ (2,5 cm) du mur fini.
Assembler le robinet et le drain au lavabo conformément aux instructions du
fabricant.
Placer la colonne sur l’orifice percé sur le plancher, puis sécuriser la colonne au sol
en serrant avec soin le tire-fond et la rondelle.
Poser soigneusement le lavabo sur sa colonne de façon à faire passer les écrous
d’ancrage dans les orifices prévus.
Vérifier que le lavabo soit positionné tel que désiré.
Installer les écrous borgnes et les rondelles sur les boulons d’ancrage; serrer avec
précaution jusqu’au serrage. Ne pas trop serrer.
Connecter et serrer le siphon au drain, puis terminer les connexions d’alimentation
d’eau au robinet selon les instructions emballées avec le robinet.
Laisser couler l’eau dans le lavabo et vérifier toutes les connexions pour voir s’il y
a des fuites.
Instale el lavabo
Taladre orificios de fijación de 1/4″ en los lugares marcados en la pared y el piso
acabados.
NOTA: También puede utilizar otros herrajes de suficiente tamaño y resistencia.
Instale los pernos de sujeción en el material de soporte de manera que sobresalgan
1″ (2,5 cm) de la pared acabada.
Instale la grifería y el desagüe en el lavabo según las instrucciones del fabricante.
Mueva el pedestal sobre el orificio taladrado en el piso, y fíjelo apretando con
cuidado el tornillo de rosca para madera y la arandela.
Coloque el lavabo con cuidado sobre el pedestal de manera que los pernos de
sujeción sobresalgan a través de los orificios de anclaje del lavabo.
Verifique que el lavabo quede en el lugar deseado.
Instale los tapones roscados y las arandelas en los pernos de sujeción; apriete con
cuidado hasta asegurar. No apriete demasiado.
Conecte y apriete la trampa al desagüe y termine las conexiones del suministro de
agua a la grifería, conforme a las instrucciones incluidas con la grifería.
Haga circular agua en el lavabo y revise todas las conexiones para verificar que no
haya fugas.
Cleaning Your Lavatory
For best results, keep the following in mind when caring for your KOHLER product:
•
Use a mild detergent such as liquid dishwashing soap and warm water for
cleaning. Do not use abrasive cleaners that may scratch or dull the surface.
•
Carefully read the cleaner product label to ensure the cleaner is safe for use on the
material.
•
Always test your cleaning solution on an inconspicuous area before applying to
the entire surface.
•
Do not allow cleaners to sit or soak on the surface.
1068258-2-A 8 Kohler Co.

Cleaning Your Lavatory (cont.)
•
Wipe surfaces clean and rinse completely with water immediately after cleaner
application. Rinse and dry any overspray that lands on nearby surfaces.
•
Use a soft, dampened sponge or cloth. Never use an abrasive material such as a
brush or scouring pad to clean surfaces.
For detailed cleaning information and products to consider, visit www.kohler.com/clean.
To order Care & Cleaning information, call 1-800-456-4537 and press 1 for Kohler
Products and then 3 for Literature.
Nettoyer le lavabo
Pour de meilleurs résultats, prendre ce qui suit en considération lors de l’entretien de
votre produit KOHLER:
•
Utiliser un détergent doux tel que liquide pour vaisselle et de l’eau chaude pour
nettoyer. Ne pas utiliser de nettoyants abrasifs car ils pourraient rayer ou abîmer
la surface.
•
Lire attentivement l’étiquette du produit de nettoyage pour vérifier qu’il soit
adéquat à utiliser sur le matériau.
•
Toujours tester la solution de nettoyage sur une surface la moins évidente avant
de l’appliquer sur la totalité de la surface.
•
Ne pas permettre aux nettoyants de reposer sur la surface.
•
Essuyer les surfaces et rincer complètement avec de l’eau immédiatement après
l’application du nettoyant. Rincer et sécher tout éclaboussement sur les surfaces
avoisinantes.
•
Utiliser une éponge ou un chiffon doux et humide. Ne jamais utiliser de matériau
abrasif tel que brosse ou éponges à récurer pour nettoyer les surfaces.
Pour l’information détaillée de nettoyage et des produits à considérer, visiter
www.kohler.com/clean. Pour commander des informations d’entretien et de nettoyage,
composer le 1-800-456-4537 puis presser 1 pour les produits Kohler et 3 pour littérature.
Limpieza del lavabo
Para obtener los mejores resultados, tenga presente lo siguiente al limpiar su producto
KOHLER:
•
Para la limpieza, utilice solamente un detergente suave como el jabón líquido para
lavar platos y agua tibia. No utilice limpiadores abrasivos que puedan rayar u
opacar la superficie.
•
Lea atentamente la etiqueta del producto de limpieza para asegurar que no
presente riesgos al usarse en el material.
•
Siempre pruebe la solución de limpieza en un área oculta antes de aplicarla a toda
la superficie.
•
No deje por tiempo prolongado los limpiadores en la superficie.
•
Limpie con un trapo y enjuague completa e inmediatamente con agua después de
aplicar limpiadores. Enjuague y seque las superficies cercanas que se hayan
rociado.
Kohler Co. 9 1068258-2-A

Limpieza del lavabo (cont.)
•
Utilice una esponja o trapo suave y húmedo. Nunca utilice materiales abrasivos
como cepillos o estropajos de tallar para limpiar las superficies.
Para obtener información detallada de limpieza y los limpiadores a considerar, visite
www.kohler.com/clean. Para solicitar información sobre el cuidado y la limpieza, llame
al 1-800-456-4537 y presione 1 para productos Kohler y luego 3 para documentos.
One-Year Limited Warranty — USA and Canada
For the USA and Canada Only
KOHLER plumbing products are warranted to be free of defects in material and
workmanship for one year from date of installation.
Kohler Co. will, at its election, repair, replace or make appropriate adjustment where
Kohler Co. inspection discloses any such defects occurring in normal usage within one
(1) year after installation. Kohler Co. is not responsible for removal or installation costs.
To obtain warranty service contact Kohler Co. either through your Dealer, Plumbing
Contractor, Home Center or E-tailer, or by writing Kohler Co., Attn.: Customer Service
Department, 444 Highland Drive, Kohler, WI 53044, USA, or by calling 1-800-4-KOHLER
from within the USA, 1-800-964-5590 from within Canada and 001-877-680-1310 from
within Mexico.
Implied warranties including that of merchantability and fitness for a particular
purpose are expressly limited in duration to the duration of this warranty. Kohler Co.
and/or seller disclaims any liability for special, incidental or consequential damages.
Some states/provinces do not allow limitations on how long an implied warranty lasts,
or the exclusion or limitation of special, incidental or consequential damages so these
limitations and exclusions may not apply to you. This warranty gives you specific legal
rights. You may also have other rights which vary from state/province to state/province.
This is Kohler Co.’s exclusive written warranty.
Garantie limitée d’un an — É.U. et Canada
Pour les É.U. et le Canada uniquement
Les produits de plomberie KOHLER sont garantis contre tout défaut matériel et de
fabrication pour un an, à partir de la date de l’installation.
Kohler Co. jugera à sa discrétion, de la réparation, du remplacement ou du réglage
approprié et ceci après toute inspection faite par Kohler Co. de tous défauts dûs à une
utilisation normale et ceci pendant un (1) an à partir de la date d’installation. Kohler Co.
n’est pas responsable des coûts de démontage ou d’installation.
Pour obtenir un service-garantie, contacter Kohler Co. par l’intermédiaire de votre
vendeur, plombier, centre de rénovation, revendeur par internet ou par écrit à Kohler Co.
à l’attention de: Département du service clientèle, 444 Highland Drive, Kohler, Wisconsin
53044, USA, ou en composant le 1-800-4-KOHLER à partir des É.U., le 1-800-964-5590 à
partir du Canada et le 001-877-680-1310 depuis le Mexique.
Les garanties implicites, y compris celles de qualité marchande et d’aptitude à un
emploi particulier, se limitent expressément à la durée de la présente garantie. Kohler
Co. et/ou le vendeur déclinent toutes responsabilités contre tous dommages
occasionnés, imprévisibles ou corrélatifs.
Certains états/provinces ne permettent pas la limitation sur la durée de la garantie, ou
l’exclusion ou la limitation spéciale, de dommages occasionnés, ou corrélatifs à un
accident, ainsi ces limitations ou exclusions pourraient ne pas s’appliquer dans votre cas.
Cette garantie vous donne des droits légaux spécifiques. Vous pouvez également avoir
d’autres droits qui varient d’un état/province à l’autre.
Ceci constitue la garantie écrite exclusive de Kohler Co.
1068258-2-A 10 Kohler Co.
Page is loading ...
Page is loading ...
-
 1
1
-
 2
2
-
 3
3
-
 4
4
-
 5
5
-
 6
6
-
 7
7
-
 8
8
-
 9
9
-
 10
10
-
 11
11
-
 12
12


Ask a question and I''ll find the answer in the document
Finding information in a document is now easier with AI
in other languages
- français: Kohler K-2295-8-96 Guide d'installation
- español: Kohler K-2295-8-96 Guía de instalación
Related papers
-
Kohler 2176-1-96 Installation guide
-
Kohler K-2340-8-0 Installation guide
-
-
Kohler 2296-1-0 Installation guide
-
Kohler 2833-FT Installation guide
-
-
-
Kohler K-2259-8-96 Installation guide
-
-
Other documents
-
Crane 122100 Installation guide
-
Sterling 442424 User manual
-
-
American Standard 0468800.020 Installation guide
-
-
Danze DC028110BC Installation guide
-
Gerber Hinsdale 8" Centers Standard Pedestal Bathroom Sink User manual
-
-
-
Kallista P72000 Installation guide