Page is loading ...

Rain Gauge
........................................................
Operation Manual
P0320

Welcome:
Congratulations on your purchase of the P0320 Rain Gauge! This
quality instrument will perform well for years if cared for properly, and
allows you to measure the amount of rainfall over a specic period
of time. In order to fully understand the features and functions of
this product, be sure to read the instructions carefully and retain this
manual for future reference.
● Rain gauge recording: Rain gauge range 0–9999 mm
or 0–393.7 inch
● Perpetual Calendar Up to Year 2099.
● Real Time function with 12/24 Hour selectable time display.
● Battery : DC 1.5 V AA size (Not included)
● Dimensions: 5"H x 5"W x 4"D
FEATURES
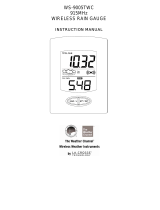
DISPLAY

Part-A LCD
A1: Real Time A2: Rain gauge A3: Date
A4: Recorded time A5: Raining icon
Part-B button
B1: “TIME SET” button B2: “RESET/▲” button
Part-C Structure
C1 : Rain collector C2: Battery compartment
DISPLAY
SET UP
The P0320 Rain Gauge is the result of P3’s years of experience with
manufacturing lawn and garden products. In addition to the standard
features found on most rain gauges, our easy-to-use unit includes
advanced digital technology allowing you to measure rainfall over a
specic period of time.
To install the battery:
Remove the bottom of the unit and unscrew the battery compartment
door. Place one DC 1.5 V AA size battery in the battery compartment,
replace the door and close securely. For the best performance we
recommend the use of Alkaline or Lithium batteries.

Using the unit:
The P0320 Rain Gauge can be used continuously until the battery
expires. When this happens, install a new battery to reactivate the unit.
Dispose of exhausted batteries properly.
Mounting the unit:
In order to achieve the most accurate reading, make sure that your rain
gauge is mounted as follows:
● Is placed on at and stable surface
● Is not placed near roofs, high walls and very large objects which
can affect local rainfall and give inaccurate rainfall measurements.
● Is not placed in places exposed to strong winds
● Is not placed directly on the ground to avoid back splash which
can give inaccurate rainfall measurements.
SET UP
Time Setting:
A. Press and hold “TIME SET” (B1) button for 4 seconds.
B. Press “TIME SET” (B1) button again to select: 12/24 Hour format,
Hour, Minute, Year, Month/Day sequence, Month, Day, mm/inch.”
C. Press “▲“ (B2) button to adjust selected item. Pressing and
holding this button will activate the fast adjust mode.
D. The unit will automatically exit the Setting Mode after 15 seconds
without any button presses.
Rain Gauge Display
A. Press “▲” (B2) button to see the rainfall status:
Last hour rainfall status (1H) → Last 24 hours rainfall status (24H)
→ 7 day total rainfall status ( 7 DAY) → 30 day total rainfall status
( 30 DAY) → Total rainfall status (TOTAL) → cycle
DISPLAY FUNCTIONS

B. Total rainfall display:
Shows the measurement of rainfall from the moment when the
unit started collecting the data until it is cleared to zero. The status
will be updated immediately after the reset.
DISPLAY FUNCTIONS
To see how much time has passed since last rainfall press “TIME
SET” (B1).
C. The last hour rainfall (1H) display:
Shows the total rainfall in the past hour. After the rst 60 minutes,
it updates, recounts and refreshes the data every 10 minutes.
D. The last 24 hour (24H) rainfall display:
Shows the total rainfall in the past 24 hours from start up or reset.
After the rst 24 hours it updates, recounts and refreshes the data
every 60 minutes.

DISPLAY FUNCTIONS
E. The last 7 day rainfall display:
Shows the total rainfall in the past 7 days from start up or reset.
After the rst 7 days it updates, recounts and refreshes the data
every 24 hours.
F. The last 30 day rainfall display:
Shows the total rainfall in the past 30 days from start up or reset.
After the rst 30 days it updates, recounts and refreshes the data
every 24 hours.
Clear rainfall record:
To clear all rainfall records and start a new count you need to
press the “RESET” (B2) button and hold it for 4 seconds.
Raining icon:
Once the unit detects that it’s raining, the raining icon (A5) starts
ashing and it will continue to do so until no rain detected for a
period of 30 minutes.

MAINTENANCE
Try to prevent falling leaves, small stones and other small objects from
getting into your P0320 Rain Gauge. It can affect the unit’s accuracy
and may cause permanent damage.
Troubleshooting:
● If the unit does not work properly, please take the battery out.
Wait a few seconds for the display to turn off and reinstall the
battery. This will cause the unit to reset.
● If the unit seems to be showing inaccurate readings make sure
that it is mounted properly.
● If the unit turns off and loses all readings, check the battery and
replace if necessary.
● To insure that rainfall readings are retained in the unit’s memory,
do not remove the battery. Removing the battery will erase all the
readings stored in memory.
SPECIFICATIONS
Model: P0320
Display: Real Time function
12/24 Hour time display selectable
Resolution: 0.03” per inch of rain
Batteries: 1 x AA (not included)
Dimensions: 5"H x 5"W x 4"D
Weight: 8 oz.
(Specications are subject to change without notice)

P3 INTERNATIONAL CORPORATION
LIMITED WARRANTY
P3 INTERNATIONAL CORPORATION (“P3”) warrants to the original retail purchaser
only, that its product is free from defects in material or workmanship under the condition
of normal use and service for a period of six (6) months from the date of purchase. In
the event that a defect, malfunction or failure occurs or is discovered during the warranty
period, P3 will repair or replace at its option the product or component part(s) which shall
appear in the reasonable judgment of P3 to be defective or not to factory specications.
A product requiring service is to be returned to P3 along with the sales receipt or other
proof of purchase acceptable to P3 and a statement describing the defect or malfunction.
All transportation costs shall be borne by the owner and the risk of loss shall be upon the
party initiating the transportation. All items repaired or replaced thereunder shall be sub-
jected to the same limited warranty for a period of six (6) months from the day P3 ships
the repaired or replaced product. The warranty does not apply to any product that has
been subject to misuse, tampering, neglect, or accident or as a result of unauthorized
alterations or repairs to the product. This warranty is void if the serial number (if any) has
been removed, altered, or defaced. This warranty is in lieu of all warranties expressed
or implied, including the implied warranties of merchantability and tness for a particular
purpose which are expressly excluded or disclaimed. P3 shall not be responsible for
consequential, incidental or other damages, and P3 expressly excludes and disclaims
liability for any damages resulting from the use, operation, improper application, mal-
function or defeat of any P3 product covered by this limited warranty. P3’s obligation is
strictly and exclusively limited to the replacement or repair of any defective product or
component part(s). Some states do not allow the exclusion or limitation of incidental or
consequential damages, so the above limitation or exclusion may not apply to you. P3
does not assume or authorize anyone to assume for it any other obligation whatsoever.
Some states do not allow limitation on how long an implied warranty lasts, so the above
limitations may not apply to you. It is the owner/user's responsibility to comply with local,
state, or federal regulations, if any, that may pertain to P3 products or their use. This
warranty gives you specic legal rights, and you may also have other rights which vary
from state to state.
If you experience difculty in the operation of your unit, or if your unit requires repair
please contact:
P3 INTERNATIONAL CORPORATION
TECHNICAL SUPPORT
Tel: 212-741-7289
Fax: 212-741-2288
Email: [email protected]
Rev. 0507
© 2007 P3 International Corporation
/