Dacor RNMD30S Installation guide

Type
Installation guide

Dacor RNMD30S Microwave In-A-Drawer™ offers convenient and versatile cooking options for your kitchen. With its compact design, it can be seamlessly integrated into your cabinetry, providing easy access to microwave functions. The drawer features a variety of preset cooking programs, making it simple to prepare meals like popcorn, beverages, and more. It also includes sensor cooking options, allowing you to cook food based on its moisture content for precise results. Additionally, the RNMD30S offers defrost, reheat, and keep warm functions, providing flexibility for different cooking needs.

Dacor RNMD30S Microwave In-A-Drawer™ offers convenient and versatile cooking options for your kitchen. With its compact design, it can be seamlessly integrated into your cabinetry, providing easy access to microwave functions. The drawer features a variety of preset cooking programs, making it simple to prepare meals like popcorn, beverages, and more. It also includes sensor cooking options, allowing you to cook food based on its moisture content for precise results. Additionally, the RNMD30S offers defrost, reheat, and keep warm functions, providing flexibility for different cooking needs.

Important Safety Instructions ..........................1
What You Need to Know About Safety
Instructions .............................................1
Safety Symbols and Labels ....................... E1
Installation Requirements ................................2
Important Notes To The Installer .................2
Important Notes To The Consumer ...............2
Grounding Instructions ............................... 2
Design Specifications ...................................3-5
Clearances and Dimensions .........................3
24" Drawer Measurements .......................... 3
30" Drawer Measurements .......................... 4
Anti-tip Block ............................................5
Installation Instructions ................................5-6
Verifying Package Contents .........................5
Electrical Outlet .........................................5
Drawer Installation ....................................6
Model and Serial Number Location ...................6
Care, Cleaning and Maintenance ....................... 6
Before You Call for Service ...............................6
Table of Contents
Microwave In-A-Drawer
Part No. 109615 TINSKB216MRR0
For Use With:
RNMD30B / RNMD30S
RNMD24B / RNMD24S
Model RNMD30S
Installation Instructions
KEEP
WARM
SOFTEN
MELT
CLOSE
OPEN
EASY MINUTE
SETUP
HELP
CONTROL
LOCK
WARM
BEVERAGE
CENTER
SENSOR
POPCORN
SENSOR
COOK
SENSOR
REHEAT
DEFROST REHEAT
IMPORTANT SAFETY INSTRUCTIONS
WARNING
If the information in this manual is not followed exactly, a re or electrical shock may result that could cause
property damage, personal injury or death.
To reduce the risk of tipping, the Microwave In-A-Drawer™ must be secured by a properly installed anti-tip block.
This drawer must be electrically grounded in accordance with local codes.
Make sure the wall coverings and the cabinets around the drawer can withstand the heat generated by the
microwave.
Never leave children alone or unattended in the area where a microwave is in use. Never leave the
drawer open when the microwave is unattended.
Stepping, leaning or sitting on the drawer may result in serious injuries and can also cause damage to the
Microwave In-A-Drawer™.
Do not use the drawer as a storage space. Doing so creates a potentially hazardous situation.
Check that the time-of-day is on the display. If not, touch S T O P/CLE A R to prevent unintended use.
WHAT YOU NEED TO KNOW ABOUT
SAFETY INSTRUCTIONS
Warnings and Important Safety Instructions appearing in
this guide are not meant to cover all possible conditions
and situations that may occur. Always use common
sense, caution and care when installing, maintaining or
operating this appliance.
Always contact Dacor
®
about problems or conditions you
do not understand.
SAFETY SYMBOLS AND LABELS
DANGER
Immediate hazards that WILL result in severe
personal injury or death.
WARNING
Hazards or unsafe practices that COULD result in
severe personal injury or death.
CAUTION
Hazards or unsafe practices that COULD result in
minor personal injury or property damage.
Installer: Leave these instructions with the appliance.
Customer: Please read and keep these installation
instructions for future reference. This guide provides
proper installation information.
If you have any questions, call:
Dacor Customer Service
1-800-793-0093 (U.S.A. and Canada)
Monday — Friday 6:00 am to 5:00 pm Pacic Time
Web site: www.Dacor.com
Have the complete model and serial number identication
of your appliance ready. These numbers are found on a
rating label, located on the faceplate behind the drawer
front. See page 6.
E2
Installation Requirements
The importance of the proper installation of your new
appliance cannot be overemphasized. Installation should
be done by a qualied installer.
Before you begin the installation process, read this entire
installation instruction manual. It contains information
necessary for proper, safe installation.
Any questions or problems with the installation should
be directed to your Dacor dealer or the Dacor Customer
Service Department at 800.793.0093. You can also visit
our web site at www.Dacor.com.
IMPORTANT NOTES TO THE
INSTALLER
Read all of the installation instructions before
installing the Microwave In-A-Drawer™.
Remove all packing material before connecting
the electrical supply.
Observe all governing codes and ordinances.
Be sure to leave these instructions with the
consumer.
IMPORTANT NOTES TO THE
CONSUMER
Keep these instructions with your use & care manual for
future reference.
When using any microwave oven generating
heat, there are certain safety precautions you
should follow, that are listed in the use & care
manual. Read the use and care manual and follow
all safety precautions carefully.
Be sure your Microwave In-A-Drawer™ is installed
and grounded properly by a qualied installer or
service technician.
For SAFETY CONSIDERATIONS do not install the drawer
in any combustible cabinetry, which is not in accord with
the stated clearances and dimensions on pages 3, 4 and
5. See Figure 2 (for 24") or Figures 4 and 5 (for 30").
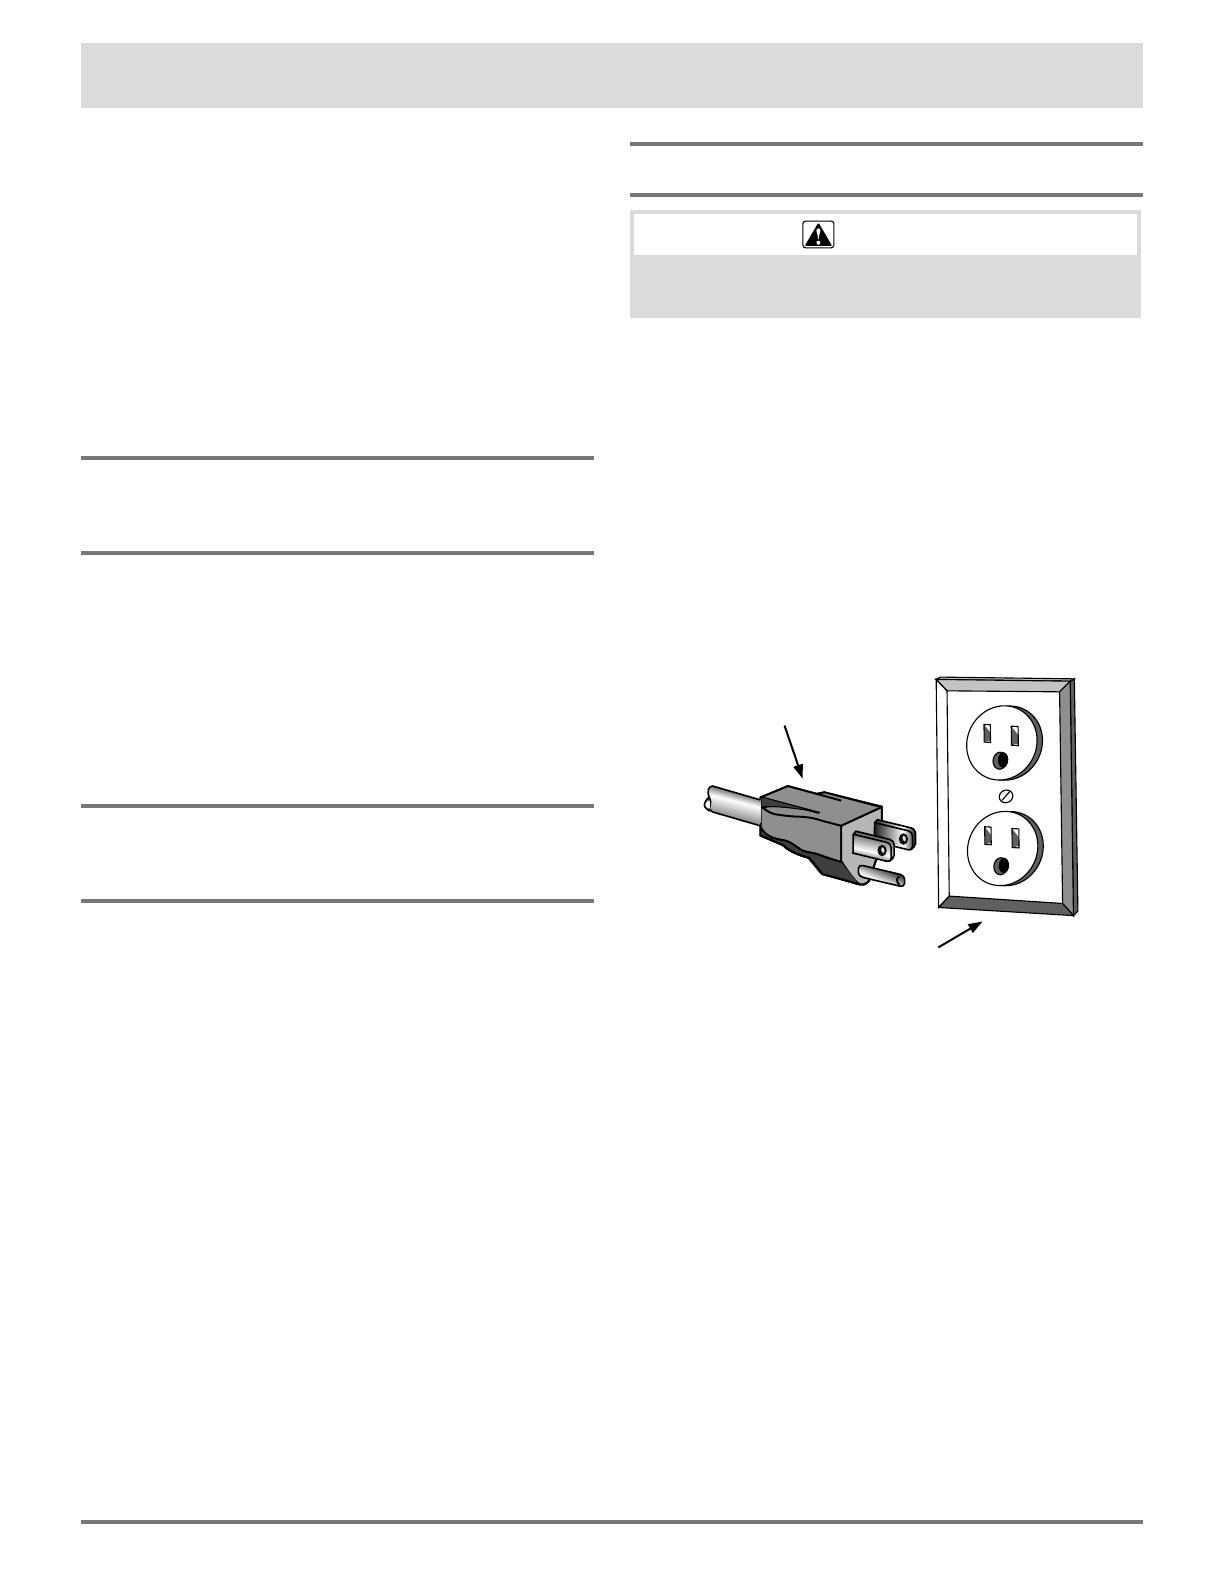
GROUNDING INSTRUCTIONS
WARNING
Improper use of the grounding plug can result in a
risk of electric shock.
This appliance is equipped with a three-prong grounding
plug for your protection against possible electric
shock hazards. It must be plugged into a grounded
wall receptacle. If only a two-prong wall receptacle
is available, it is the responsibility of the customer to
have it replaced with a properly grounded three-prong
wall receptacle. Do not under any circumstances,
cut or remove the third (ground) prong from the
power cord. Do not use an adapter plug. Do not use
an extension cord. If the power supply cord is too short,
have a qualied electrician or serviceman install an outlet
near the appliance. Do not use a Ground Fault Circuit
Interrupter.
Power supply cord with
three-prong grounding plug
Grounding type wall receptacle
(ground fault circuit not allowed)
E3
Design Specifications
A
B
C
D
E
F
G
H
I
I
J
K
L
M
N
0
P
A
B
C
L
K
J
D
E
G
H
F
I
M
M
N
O
P
Q
R
A
B
C
F
I
D
H
G
E
J
A
B
C
D
E
F
G
H
I
I
J
K
L
M
N
0
P
A
B
C
L
K
J
D
E
G
H
F
I
M
M
N
O
P
Q
R
A
B
C
F
I
D
H
G
E
J
CLEARANCES AND
DIMENSIONS
Dimensions that are shown in Figures 2, 4
and 5 must be used. Given dimensions provide
minimum clearance. Locate the electrical outlet
in the shaded area in the upper left-hand corner
of the cutout. See Figure 8.
The contact surface must be solid and level.
Pay special attention to the oor on which the
drawer will sit. The oor of the opening should be
constructed of plywood strong enough to support
the weight of the unit (about 100 pounds).
Check the location where the drawer will be
installed for proper electrical supply.
Your oven can be built into a cabinet or wall by
itself or under any gas or electric wall oven.
Be sure that the clearance of the oor between
the wall oven and the drawer is a minimum of 2".
The
Microwave In-A-Drawer™ interior will easily
accommodate a 9” x 13” oblong dish or bag of
microwave popcorn.
The Microwave In-A-Drawer™ can also be
mounted ush. Please see instructions for ush
mounting included with the ush mount deector
vent.
24" DRAWER MEASUREMENTS
Figures 1 and 2 contain many Microwave In-A-Drawer™
measurements for reference when planning the drawer’s
location.
Figure 2
A. 6"
B. Electrical outlet location
C. Anti-tip block
D. 5"
E. 3
1
/2"
F. 4"
G. 22
1
/8" opening
H. 14
13
/16" to bottom
of anti-tip block
Figure 1
A. 21
5
/8"
B. 4
11
/16"
C. 1
3
/4"
D. 21
7
/8"
E. 23
7
/8"
F. 15
7
/8"
G. 14
19
/32"
H. 1
9
/64" door thickness
I. 15" auto drawer opening
J. 4"
I. Allow
7
/8" minimum overlap
J. 23
1
/2" minimum depth
K. Allow
3
/16" minimum overlap
L. 36" nominal countertop height
M. Allow
1
/8" minimum overlap
N. Floor must support 100 lbs.
O. *24" cabinet minimum
P. 15
9
/16" opening
NOTE: Open Top Cabinet illustrated
E4
Design Specifications
30" DRAWER MEASUREMENTS
Figures 3, 4 and 5 contain the appliance and cutout
measurements for reference when planning the drawer’s
location.
A
B
C
D
E
F
G
H
I
I
J
K
L
M
N
0
P
A
B
C
L
K
J
D
E
G
H
F
I
M
M
N
O
P
Q
R
A
B
C
F
I
D
H
G
E
J
A. 21
5
/8"
B. 4
11
/16"
C. 1
3
/4"
D. 21
7
/8"
E. 30"
F. 15
7
/8"
G. 14
19
/32"
H. 1
9
/64" door thickness
I. 15" auto drawer opening
J. 4"
Figure 4
A. 6"
B. Electrical outlet location
C. Anti-tip block
D. 5"
E. 3
1
/2"
F. 4"
G. 22
1
/8" minimum
28
7
/16" maximum
H. 14
13
/16" to bottom
of anti-tip block
I. Allow
23
/32" minimum overlap
J. 23
1
/2" minimum depth
K. Allow
3
/16" minimum overlap
L. 36" nominal countertop height
M. Allow
1
/8" minimum overlap
N. Floor must support 100 lbs.
O. *30" cabinet minimum
P. 15
9
/16" opening
NOTE: Open Top
Cabinet illustrated
Figure 5
A. 84" nominal wall cabinet
B. Optional wall oven cutout
illustrated in sketch
C. Electrical outlet location
D. 6"
E. Anti-tip block
F. 3
1
/2"
G. 5"
H. 4"
I. 2" minimum
J. 22
1
/8” minimum
28
7
/16” maximum
K. Allow
3
/16" overlap
L. 14
13
/16" to bottom
of anti-tip block
M. Allow
23
/32" minimum overlap
N. 23
1
/2" minimum depth
O. 15
9
/16" opening
P. Allow
1
/8" minimum overlap
Q. Floor must support 100 lbs.
R. 30" cabinet minimum
A
B
C
D
E
F
G
H
I
I
J
K
L
M
N
0
P
A
B
C
L
K
J
D
E
G
H
F
I
M
M
N
O
P
Q
R
A
B
C
F
I
D
H
G
E
J
A
B
C
D
E
F
G
H
I
I
J
K
L
M
N
0
P
A
B
C
L
K
J
D
E
G
H
F
I
M
M
N
O
P
Q
R
A
B
C
F
I
D
H
G
E
J
Figure 3
E5
Design Specifications
ANTI-TIP BLOCK
NORMAL INSTALLATION STEPS
ANTI-TIP BLOCK INSTALLATION INSTRUCTIONS
To reduce the risk of tipping the drawer, the anti-tip
block must be properly installed 14
13
/16
" above the oor
cutout. The 6" anti-tip block must be provided by the
installer. See Figures 2 and 6 for (24") or Figures 4, 5,
and 6 (for 30"). The anti-tip block prevents serious injury
that might result from spilled hot liquids.
If the drawer is moved to a different location later, the
anti-tip block must also be moved and installed. When
installed to the wall, make sure that the screws completely
VERIFYING PACKAGE
CONTENTS
Remove all packing materials from inside the
drawer. DO NOT REMOVE THE WAVEGUIDE
COVER, which is located inside, on the ceiling of
the Microwave In-A-Drawer™.
Waveguide
Cover
Sealing
Surface
Remove the feature sticker, if there is one. Check
the drawer for any damage, such as misaligned or
bent drawer, damaged drawer seals and sealing
surfaces, broken or loose drawer guides and
dents inside the cavity or on the front side of the
drawer. If there is any damage, do not install or
operate the Microwave In-A-Drawer™ and contact
your dealer or a DACOR AUTHORIZED SERVICER.
Sealing
Surface
Oven
Cavity
Figure 7
ELECTRICAL OUTLET
4"
5"
electrical outlet
location
anti-tip
block
(6")
Figure 8
The electrical requirements are a 120 volt 60 Hz, AC
only, 15 amp. or more protected electrical supply. It
is recommended that a separate circuit serving only
this appliance be provided.
The drawer is equipped with a 3-prong grounding
plug. It must be plugged into a wall receptacle that
is properly installed and grounded. Should you only
have a 2-prong outlet, have a qualied electrician
install a correct wall receptacle.
NOTE:
If you have any questions about the grounding or
electrical instructions, consult a qualied electrician
or service person.
penetrate the dry wall and are properly secured into the
base material underneath so that the block is totally
stable. When fastening, be sure that the screws do not
penetrate electrical wiring or plumbing.
4"
5"
electrical outlet
location
anti-tip
block
(6")
Figure 6
Installation Instructions
E6
Installation Instructions
MODEL AND SERIAL NUMBER
LOCATION
The rating label includes the model and serial
number. Open the microwave drawer fully. The
label is located slightly beyond the back wall of the
microwave cavity facing up from the at surface.
See
Figure 9A.
CARE, CLEANING AND
MAINTENANCE
Refer to the use & care manual for cleaning instructions.
BEFORE YOU CALL FOR
SERVICE
Read the BEFORE YOU CALL and operating instruction
sections in your use & care manual. It may save
you time and expense. The list includes common
occurrences that are not the result of defective
workmanship or materials in this microwave.
Refer to the warranty in your use & care manual
for Dacor’s toll-free service number and address.
Please call or write if you have inquiries about your
microwave product and/or need to order parts.
4 Screws
Parts Supplied
Figure 9B
DRAWER INSTALLATION
Rating Label
Figure 9A
1. Place the drawer adjacent to the
wall or cabinet opening. Plug
the power supply cord into the
electrical outlet.
2. Carefully guide the unit into the
prepared opening. Avoid pinching
the cord between the appliance
and the wall.
3. Slide the drawer in until the mounting ange is
ush with the face of the cabinet.
4. Open the drawer. Using the 4 holes on the drawer
as a template, predrill the cabinet using a
1
/16
"
drill bit. See Figure 9A.
5. Secure the drawer with the 4 screws supplied.
See Figure 9B.
Specications contained within are subject to change without notice.
No liability is assumed by DACOR
®
for changes in specications.
Les caractéristiques contenues en dedans sont sujettes au changement sans communication préalable.
Aucune responsabilité n’est assumée par DACOR
®
pour des changements des caractéristiques.
The information and images in this book are the copyright
property of Distinctive Appliances, Inc. Neither this book
nor any information or images contained herein may be
copied or used in whole or in part without the express
written permission of Distinctive Appliances, Inc.
L’information et les images en ce livre sont la propriété de copyright des
appareils distinctifs, inc. Ni ce livre ni quels l’information ou des images
contenues ci-dessus peut être copiée ou employée entièrement ou
partiellement sans permission écrite exprès de Distinctive Appliances, Inc.
©2016 Distinctive Appliances, Inc. all rights reserved / tous droits réservés.
Web Site : www.Dacor.com
Phone/ Téléphone : (800) 793-0093
  • Page 1 1
  • Page 2 2
  • Page 3 3
  • Page 4 4
  • Page 5 5
  • Page 6 6
  • Page 7 7
  • Page 8 8
  • Page 9 9
  • Page 10 10
  • Page 11 11
  • Page 12 12
  • Page 13 13
  • Page 14 14
  • Page 15 15
  • Page 16 16

Dacor RNMD30S Installation guide

Type
Installation guide

Dacor RNMD30S Microwave In-A-Drawer™ offers convenient and versatile cooking options for your kitchen. With its compact design, it can be seamlessly integrated into your cabinetry, providing easy access to microwave functions. The drawer features a variety of preset cooking programs, making it simple to prepare meals like popcorn, beverages, and more. It also includes sensor cooking options, allowing you to cook food based on its moisture content for precise results. Additionally, the RNMD30S offers defrost, reheat, and keep warm functions, providing flexibility for different cooking needs.

Ask a question and I''ll find the answer in the document

Finding information in a document is now easier with AI

in other languages