Audiovox XMCK-5P User manual
- Category
- Car video systems
- Type
- User manual
This manual is also suitable for

user guide
XMCK-5P

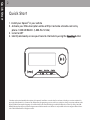
Quick Start
1. Install your Xpress
EZ
in your vehicle
2. Activate your XM subscription online at http://activate.xmradio.com or by
phone 1 800 XM RADIO (1-800-967-2346 )
3. Listen to XM*
4. Identify and easily access your favorite channels by using the
ffaavvoorriitteess
button
Quick Start
2
*Hardware and required monthly subscription sold separately. Installation cost and other fees and taxes, including a one-time activation fee,
may apply. Subscription fee is consumer only. XM products, programming, services, and fees are subject to change, at any time, without notice.
Channels with frequent explicit language are indicated with an XL. Channel blocking is available for XM radio receivers by calling 1-800-XM-
RADIO. Subscriptions subject to Customer Agreement available at xmradio.com. XM service only available in the 48 contiguous United States.
©2007 XM Satellite Radio Inc. All rights reserved.

Contents
3
IInnttrroodduuccttiioonn
.............................................. 4
Features............................................................ 4
Safety Instructions........................................ 5
What’s in the Box .......................................... 7
Xpress
EZ
Controls .......................................... 8
Using this Guide............................................ 9
VVeehhiiccllee IInnssttaallllaattiioonn
............................ 10
Mounting the XM Antenna .................... 12
Installing the Vent Mount........................ 13
How to Receive XM Through your Car’s
Stereo ............................................................ 14
Making Your FM Radio an XM Radio .. 15
AAccttiivvaattiioonn
.................................................. 18
UUssiinngg yyoouurr XXpprreessss
EEZZ
.......................... 20
Listening to Live XM.................................. 21
Search by Category .................................. 21
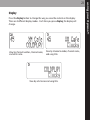
Favorites ........................................................ 22
Display............................................................ 23
MMeennuu OOppttiioonnss
............................................ 24
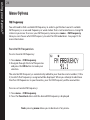
FM Frequency .............................................. 24
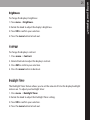
Brightness .................................................... 25
Contrast ........................................................ 25
Backlight Timer .......................................... 25
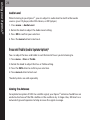
Audio Level .................................................. 26
Bass and Treble............................................ 26
Antenna Aiming ........................................ 26
Auto Tune Mode ........................................ 27
Auto Off ........................................................ 28
Factory Defaults.......................................... 28
CCuussttoommeerr SSuuppppoorrtt
.............................. 29
Troubleshooting ........................................ 30
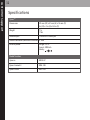
Specifications .............................................. 32
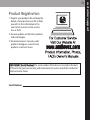
Product Registration ................................ 33
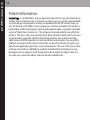
Patent Information .................................... 34
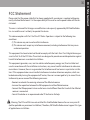
FFCCCC SSttaatteemmeenntt
...................................... 35
WWaarrrraannttyy
.................................................... 36

4
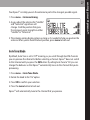
introduction
Features
Congratulations on your purchase of the Audiovox Xpress
EZ
. Your new
Xpress
EZ
includes:
Built-in FM modulator
Favorites button allows you to program 10 of your favorite channels
Easily view channel, artist, and song title via a bright 3 line display
Move quickly through XM channels with the tune and press knob
Enjoy XM’s 170 channels from coast to coast, with over 80,000 hours of entertainment
each month. XM offers musical choice, variety, and discovery – worlds beyond your
own collection – plus a wide range of news, sports, talk, comedy, kids, and entertain-
ment channels.
We recommend that you read the entire manual before using your Xpress
EZ
.

introduction
5
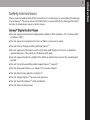
Safety Instructions
Please read and understand all the instructions to avoid injury to yourself and/or damage
to your Xpress
EZ
. Please be aware that XM claims no responsibility for damage from data
loss due to breakdown, repair, or other causes.
XXpprreessss
EEZZ
DDiiggiittaall AAuuddiioo PPllaayyeerr
Do not expose to extreme temperatures (above 140°F or below -4°F, or above 60°C
or below -20°C).
Do not expose to moisture. Do not use Xpress
EZ
near or in water.
Do not let any foreign matter spill into Xpress
EZ
.
Do not expose to chemicals such as benzene and thinners. Do not use liquid or
aerosol cleaners. Clean with a soft damp cloth only.
Do not expose to direct sunlight, fire, flame or other heat sources for a prolonged
period.
Do not try to disassemble and/or repair Xpress
EZ
yourself.
Do not drop your Xpress
EZ
or subject it to severe impact.
Do not place heavy objects on Xpress
EZ
.
Do not subject Xpress
EZ
to excessive pressure.
Do not touch the Xpress
EZ
with wet hands.
Do not store in dusty areas.

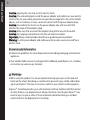
6
CCaauuttiioonn::
Opening the case may result in electric shock.
CCaauuttiioonn::
The uninsulated parts inside the power adapter and cradle may cause electric
shock or fire. For your safety, please do not open these components. Do not let metallic
objects, such as necklaces or coins, come into contact with the power adapter plugs.
CCaauuttiioonn::
To avoid electric shock, use the power adapter only with an outlet that
matches the shape of the adapter’s plug.
CCaauuttiioonn::
Make sure that you insert the adapter’s plug all the way into the outlet.
CCaauuttiioonn::
Do not plug several devices into the same electrical outlet.
IImmppoorrttaanntt::
Always read and understand the user guide to prevent problems.
WWaarrnniinngg::
Use the power adapter and cradle away from water sources to avoid fire or
electric shock.
EEnnvviirroonnmmeennttaall IInnffoorrmmaattiioonn
Follow local guidelines for waste disposal when discarding packaging and electronic
appliances.
Your Satellite Radio receiver is packaged with cardboard, polyethylene, etc., and does
not contain any unnecessary materials.
WWaarrnniinnggss
When using this product it is always important to keep your eyes on the road and
hands on the wheel. Not doing so could result in personal injury, death, and/or dam-
age to your Xpress
EZ
Receiver, accessories, and/or to your vehicle or other property.
Xpress
EZ
should be placed in your vehicle where it will not interfere with the function
of safety features, e.g. deployment of airbags. Failure to correctly place Xpress
EZ
may
result in injury to you or others if the unit becomes detached during an accident
and/or obstructs the deployment of an airbag.
introduction

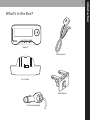
What’s in the Box?
introduction
7
Car Power Adapter
Vent Mount
Xpress
EZ
Car Cradle
XM Antenna

introduction
8
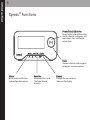
Xpress
EZ
Functions
DDiissppllaayy
Changes the way content is
shown on the display.
KKnnoobb
Previews channels and navigates
categories and menu options.
MMeennuu
Access advanced features
and configuration options.
FFaavvoorriitteess
Store and access up to
10 of your favorite
channels.
PPoowweerr//SSeelleecctt XXMM BBuuttttoonn
Power button; also confirms selec-
tion for channels, categories, and
menu items. Press and hold to
power down.

introduction
9
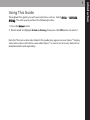
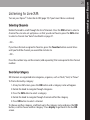
Using This Guide
Throughout this guide, you will see instructions such as: Select
mmeennuu
AAnntteennnnaa
AAiimmiinngg
. This tells you to perform the following actions:
1. Press the
mmeennuu
button.
2. Rotate knob to highlight Antenna Aiming, then press the XM button to select it.
Not all of the menu items described in this guide may appear on your Xpress
EZ
display.
Some menu items will only be seen when Xpress
EZ
is used in an accessory home kit or
boombox (both sold separately).

vehicle installation
10
1
vehicle installation

vehicle installation
11
Vehicle installation
Every vehicle is different; for your safety, follow all instructions carefully. Consult a
professional installer if you have questions.
1. To begin, first decide which method of installation is best for your vehicle:
XM SureConnect (Sold Separately): You can listen to your Xpress
EZ
through your car
stereo by using Xpress
EZ
’s built-in FM modulator and the XM SureConnect. Simply find
an unused FM frequency on the stereo and set your Xpress
EZ
to transmit on that same
frequency.
FM Direct Adapter (Sold Separately): If you choose to use the FM Direct Adapter to
transmit XM audio through your car stereo, we recommend professional installation.
Cassette Adapter (Sold Separately): Use the cassette adapter if your vehicle’s audio
system has a built in cassette player. The cassette adapter will provide the best audio
quality.
Audio input: Some vehicles come with an audio input jack. If your vehicle has this
type of input you can simply use a mini audio cable (sold separately).
Note: Separate purchase of one of the above accessories is required in order to install
your XpressEZ
2. Once you have chosen your method of installation, next you can mount your
Xpress
EZ
.
3. Next decide the best location for your XM antenna. Mount this antenna to the
roof or trunk of the vehicle. During installation, make sure you are outdoors and the
antenna is not obstructed by tall buildings.
4. Finally you will connect all of the plugs to the car cradle and dock your Xpress
EZ
into
the cradle. Once in place you can activate your Xpress
EZ
.
Now that you have all of the parts you need, you are ready to begin installing your
Xpress
EZ
.

vehicle installation
12
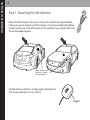
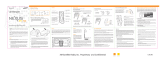
Step 1: Mounting the XM Antenna
Mount the XM antenna to the roof or trunk of the vehicle. During installation,
make sure you are outdoors and the antenna is not obstructed by tall buildings.
For best results mount the XM antenna to the outside of your vehicle. Below are
the recommended options.
The XM antenna contains a strong magnet, allowing it to
stick to any metal parts of your vehicle.
option 1
option 2
Keep excess cable
behind or under
the dashboard.
Magnet

vehicle installation
13
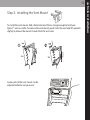
Step 2: Installing the Vent Mount
To install the vent mount, find a horizontal vent that is strong enough to hold your
Xpress
EZ
and car cradle. To remove the vent mount, push it into the vent and lift upwards
slightly to release the mount’s hooks from the vent vane.
Some parts of the vent mount can be
adjusted to better suit your vent.

ANT IN
AUDIO OUT
AANNTT IINN
Plug in your XM antenna here. If
you choose the XM SureConnect
method of install, this is where
you plug it in.
AAUUDDIIOO OOUUTT
If you choose to use a cassette
adapter or a mini audio cable,
plug it in here.
DDCC IINN
This is where you plug in the
power adapter.
DC IN
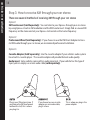
Step 3: How to receive XM through your car stereo
There are several methods of receiving XM through your car stereo
Option 1
XM SureConnect (Sold Separately): You can listen to your Xpress
EZ
through your car stereo
by using Xpress
EZ
’s built-in FM modulator and the XM SureConnect. Simply find an unused FM
frequency on the stereo and set your Xpress
EZ
to transmit on that same frequency.
Option 2
Professional Wired (Sold Separately): If you choose to use the FM Direct Adapter to trans-
mit XM audio through your car stereo, we recommend professional installation.
Option 3
Cassette Adapter (Sold Separately): Use the cassette adapter if your vehicle’s audio system
has a built in cassette player. The cassette adapter will provide the best audio quality.
Audio input: Some vehicles come with an audio input jack. If your vehicle has this type of
input you can simply use a mini audio cable (sold separately).
vehicle installation
14

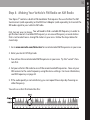
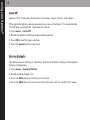
Step 4: Making Your Vehicle’s FM Radio an XM Radio
Your Xpress
EZ
contains a built-in FM modulator that requires the use of either the XM
SureConnect (sold separately) or the FM Direct Adapter (sold separately) to transmit the
XM audio signal to your vehicle’s FM radio.
First, turn on your car stereo.
You will need to find a suitable FM frequency in order to
get the best sound. A suitable FM frequency is an unused frequency or weak station
that is not located near a strong FM station in your area. Follow the steps below for
more help:
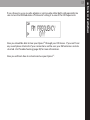
1. Go to www.xmradio.com/fmlocator for recommended FM frequencies in your area.
2. Enter your local USPS Zip Code.
3. You will see the recommended FM frequencies in your area. Try the “vacant” chan-
nels first.
4. Set your vehicle’s FM radio to one of the recommended frequencies. Now set your
XM receiver to the same frequency using the menu settings. For more information,
see FM Frequency on page 24.
5. If the audio quality is not satisfactory, you can repeat these steps by choosing an-
other frequency.
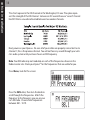
You will see a chart that looks like this:
vehicle installation
15

vehicle installation
16
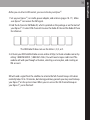
This chart represents the FM channels in the Washington, DC area. The spikes repre-
sent
the strength of the FM channel. Someone in DC would choose a “vacant” channel
like 92.9 that is unused and located between two weaker channels.
Next, power on your Xpress
EZ
. Be sure all of your cables are properly connected. Go to
channel 1, this is the preview channel. You will not hear any sound through your vehi-
cle’s audio system until you have chosen an FM Frequency.
Note: Your XM radio may not modulate on each of the frequencies shown on the
Radio-Locator site. Check your Xpress
EZ
for the frequencies that are usable for you.
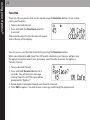
Press Menu, look for this screen:
Press the XM button, then turn the knob to
scroll through the frequencies. Match the
frequency to the frequency you see on your
car’s FM radio. Choose from frequencies
between 88.1 - 107.9.

vehicle installation
17
If you choose to use a cassette adapter or a mini audio cable (both sold separately) be
sure to turn the FM Modulator off instead of setting it to one of the FM frequencies:
Now you should be able to hear your Xpress
EZ
through your FM stereo. If you can’t hear
any sound please check all of your connections and be sure your XM antenna is not ob-
structed. Visit Troubleshooting (page 30) for more information.
Now you will learn how to activate and use your Xpress
EZ
.

2
activation
activation
18

activation
19
Before you can listen to XM content, you must activate your Xpress
EZ
.
1. Set up your Xpress
EZ
, car cradle, power adapter, and antenna (pages 10 -17). Make
sure Xpress
EZ
can receive the XM signal.
2. Find the 8-character XM Radio ID, which is printed on the package or on the back of
your Xpress
EZ
. Or select XM channel 0 to view the Radio ID. Record the Radio ID here
for reference:
The XM Radio ID does not use the letters I, O, S, or F.
3. Activate your XM Satellite Radio service online at http://activate.xmradio.com or by
calling 1 800 XM RADIO (1-800-967-2346 ). You will need a major credit card. The
website will walk you through activation, selecting a service plan, and creating an
XM account.
XM will send a signal from the satellites to activate the full channel lineup. Activation
normally takes 10 to 15 minutes, but during peak busy periods you may need to keep
your Xpress
EZ
on for up to an hour. When you can access the full channel lineup on
your Xpress
EZ
, you’re finished!

3
using your Xpress
EZ
using your Xpress
EZ
20
Page is loading ...
Page is loading ...
Page is loading ...
Page is loading ...
Page is loading ...
Page is loading ...
Page is loading ...
Page is loading ...
Page is loading ...
Page is loading ...
Page is loading ...
Page is loading ...
Page is loading ...
Page is loading ...
Page is loading ...
Page is loading ...
Page is loading ...
Page is loading ...
Page is loading ...
Page is loading ...
-
 1
1
-
 2
2
-
 3
3
-
 4
4
-
 5
5
-
 6
6
-
 7
7
-
 8
8
-
 9
9
-
 10
10
-
 11
11
-
 12
12
-
 13
13
-
 14
14
-
 15
15
-
 16
16
-
 17
17
-
 18
18
-
 19
19
-
 20
20
-
 21
21
-
 22
22
-
 23
23
-
 24
24
-
 25
25
-
 26
26
-
 27
27
-
 28
28
-
 29
29
-
 30
30
-
 31
31
-
 32
32
-
 33
33
-
 34
34
-
 35
35
-
 36
36
-
 37
37
-
 38
38
-
 39
39
-
 40
40


Audiovox XMCK-5P User manual
- Category
- Car video systems
- Type
- User manual
- This manual is also suitable for
Ask a question and I''ll find the answer in the document
Finding information in a document is now easier with AI
Related papers
-
Audiovox XMFM1 XM User manual
-
-
-
-
XM Satellite Radio XMC10A User manual
-
-
-
-
-
Other documents
-
-
XM Satellite Radio RS2SPRCI User manual
-
Mpow CA040B User guide
-
Samsung HT-Q45 User manual
-
Sirius Satellite Radio Portable Speaker Dock User guide
-
-
SiriusXM SXABB2 Datasheet
-
 Nexus 21 YA-CP200 User manual
-
-
SiriusXM XADH2 User guide
