Page is loading ...

1
Inflatable Kayak Owner Manual
Odyssey 375 - Three person kayak
Odyssey 295 - Two person kayak
Orbit 245 - One person kayak
THIS MANUAL CONTAINS IMPORTANT
SAFETY INFORMATION ALONG WITH CARE
AND MAINTENANCE INSTRUCTIONS

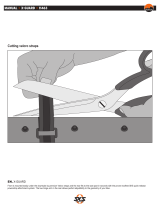
2
CONGRATULATIONS ON PURCHASING AN INFINITY
INFLATABLE KAYAK!
Kayaking is a great way to enjoy and to explore rivers, lakes and
the sea and your Infinity inflatable is a safe, fun and easy way to
get on the water. Infinity’s range of kayaks are designed to be
paddled by anybody, regardless of previous experience and offer
a great way to experience the outdoors.
In order to stay safe and get the most from your paddling
experience, please read these simple instructions and guidelines
which will help you to look after yourself and your kayak.
Infinity Kayaks is a division of Palm Equipment International.
Founded in 1979, Palm has grown to be a market leader
throughout the world in the design and manufacture of kayaks
and paddlesports apparel.
Our large and professional dealer network across the globe
means we can offer you the best buying and aftercare
experience.
We hope that you enjoy using our kayaks.
www.infinitykayaks.com

3
TABLE OF CONTENTS
7. ON THE WATER
7.1 Recommended clothing
and equipment
7.2 Where to use your
Infinity kayak
7.3 Guidelines for usage
7.4 Staying safe
8. AFTER USE
8.1 Draining your kayak
8.2 Cleaning and drying
your kayak
8.3 Folding your kayak
8.4 Transporting your kayak
9. REPAIR INSTRUCTIONS
9.1 Checking for leaks
9.2 Repairing pinholes
9.3 Repairing larger holes
9.4 Replacing inflatable
chambers
9.5 Replacement parts
10. INFINITY WARRANTY
11. TROUBLESHOOTING
1. INTRODUCTION
1.1 About this manual
1.2 Warranty
1.3 Modifications
2. CERTIFICATION
2.1 Declaration of conformity
2.2 ISO approval
3. SAFETY INFORMATION
3.1 Boating safety
3.2 Safety warnings
3.3 Boating regulations
3.4 Boat safety labels
3.5 Registration
3.6 Education
4. INFINITY KAYAK FEATURES
4.1 Odyssey 375
4.2 Odyssey 295
4.3 Orbit 245
5. INFLATION VALVES
5.1 Main chamber valves
5.2 Inflatable seat valve
5.3 Childseat valves
6. GETTING STARTED
6.1 Inflating your kayak
6.2 Inflation information
6.3 Over inflation
6.4 Fitting seats and footrest
6.5 Seat configurations

4
1. INTRODUCTION
1.1 ABOUT THIS MANUAL
This manual contains details of your kayak, equipment supplied
or fitted, specifications and information on operation and
maintenance.
If this is your first kayak or you are changing from a another type
of craft, for your own comfort and safety, please ensure that you
obtain handling and operating experience before use.
PLEASE KEEP THIS MANUAL IN A SECURE PLACE AND
PASS IT ON TO THE NEW OWNER IF YOU SELL THE CRAFT.
1.2 WARRANTY
Complete and return the Warranty Registration card enclosed
with this manual. Details of the warranty can be found in section
10.
1.3 MODIFICATIONS
Owner modifications to the kayak are not recommended.
Unauthorised modifications to the kayak could compromise
safety, design integrity and warranty coverage.

5
2.1 DECLARATION OF CONFORMITY
2. CERTIFICATION
Declaration of Conformity
(according to ISO/IEC Guide 22 and EN 45014)
Manufacturer's Name: Infinity Kayaks
Manufacturer's Address: Kenn Business Park, Kenn Road,
Clevedon, Somerset, BS21 6TH, England.
declares that the product:
Product Name: “Odyssey 375”, “Odyssey 295", ”Orbit 245”
Model Number(s): ODY375, ODY295, ORB245
to which this declaration relates, meets the essential health
and safety requirements and is in conformity with the relevant
EU Directives listed below:
General Product Safety Directive
using the relevant section of the following EU standards and
other normative documents:
EN / ISO 6185-1 : 2002
ABYCH28-76
Date: 23/3/2011
Andy Knight, Director
This product complies with European directives for recreational vessels
as published by the International Organization for Standardization (ISO).

6
2.2 ISO APPROVAL
2. CERTIFICATION

7
3. SAFETY INFORMATION
3.1 BOATING SAFETY
Users of this product agree by their use to accept the inherent
risks involved in this paddlesport activity and agree to follow all
instructions and items marked WARNING, CAUTION & NOTICE
carefully before using this kayak.
PLEASE READ CAUTION STATEMENT CAREFULLY.
CAUTION
!
SAFETY WARNING
PADDLESPORTS CAN BE VERY DANGEROUS AND PHYSICALLY
DEMANDING. THE USER OF THIS PRODUCT MUST UNDERSTAND
THAT PARTlCIPATlON IN PADDLESPORTS COULD INVOLVE SERIOUS
INJURY OR DEATH. YOU SHOULD OBSERVE THE FOLLOWING SAFETY
ADVICE WHENEVER USING THIS PRODUCT.
SEEK INSTRUCTIONS ON PADDLESPORTS RELEVANT TO THIS TYPE OF
KAYAK.
CARRY FIRST AID AND SAFETY EQUIPMENT AND UNDERSTAND HOW TO
USE IT.
ALWAYS WEAR A NATIONALLY APPROVED PERSONAL FLOATATION
DEVICE (BUOYANCY AID).
ALWAYS WEAR A HELMET WHERE APPROPRIATE.
ENSURE YOU DRESS APPROPRIATELY IN ANTICIPATION FOR ALL
WEATHER CONDITIONS.
YOU SHOULD CHECK YOUR EQUIPMENT PRIOR TO EACH USE.
NEVER PADDLE ALONE.
BE AWARE OF APPROPRIATE RIVER WATER LEVELS. TIDAL CHANGES,
DANGEROUS CURRENTS, WEATHER CHANGES AND STRONG
OFFSHORE WINDS.
BE AWARE OF YOUR ENVIRONMENT, SCOUT OR PORTAGE WHERE
APPROPRIATE.
BE CAREFUL YOU DO NOT OVERESTIMATE YOUR STRENGTH,
ENDURANCE OR SKILL
DO NOT USE THIS KAYAK UNDER THE INFLUENCE OF DRUGS OR
ALCOHOL.
USE MANUFACTURERS APPROVED ACCESSORIES ONLY. APPROVED
MATERIALS ONLY. DO NOT IMPAIR ENTRY OR EXIT ACCESS.
t
t
t
t
t
t
t
t
t
t
t
t

8
3. SAFETY INFORMATION
3.2 SAFETY WARNINGS
Safety alert symbol table shown below. Adhere to all safety
messages showing these symbols to avoid possible hazard,
injury or death.
3.3 BOATING REGULATIONS
Before kayaking, check with local, regional and national
authorities to identify restricted areas. These authorities are there
to assist you and enforce boating regulations.
CAUTION
!
WARNING
!
DANGER
! !
CAUTION
NOTICE
Indicates an imminently hazardous
situation which, if not avoided, will
result in death or serious injury or
substantial property damage.
Indicates a potentially hazardous
situation which, if not avoided,
could result in death or serious
injury or property damage.
Indicates a potentially hazardous
situation which, if not avoided, may
result in property damage.
Used without the safety alert
symbol indicates a potentially
hazardous CAUTION situation,
which, if not avoided, may result in
property damage.
Indicates installation, operation or
NOTICE maintenance information
which is important but not
hazard-related.

9
3. SAFETY INFORMATION
Information on inland and coastal regulations along with
accessibility can be obtained from your local Coast Guard
unit, Environment Agency, Park Authority or similar national
organisation.
3.4 BOAT SAFETY LABELS
Your kayak is affixed with various safety labels at point of
manufacture. These labels appear at specific locations on the
kayak where safety is of particular concern. Safety labels should
not be removed.
3.5 REGISTRATION
Depending on country of use, your kayak may need
registration before use on certain waterways. Check with local
environmental, waterway or coastguard authorities for details
of local, regional and national requirements. Some areas may
require that you register and display a registration number on the
front of your kayak.
The U.S. Coast Guard requires that all power boats operated
on the navigable waters of the United States must be registered
in the state of main use; also, many States require registration
in that state whenever boating on waters within their state
boundary. Always contact your state boating authorities (and
neighbouring states) for registration information on boats. Once
you have been issued a number, it is best to affix it on the boat
by printing it on the material with a permanent ink marker.
3.6 EDUCATION
This manual is not intended to provide complete training on all
aspects of boat operation.

10
4.1 ODYSSEY 375
Length 3.75m Width 0.9m Weight 28kg Max Capacity 224kg
INFINITY
FINITY
INFINITY
INFINITY
INFINITY
Carry handle
Adult seatFootrest Child seat
Carry handle
Gear storage
mesh
Hardwearing Nylon
shell fabric
Neoprene knuckle
protector strips
Inflation
valves
Spray visor
Removable
skeg
Drain plug
Velcro strips for
seat and footrest
attachment
Backrest
attachments
Paddle park
Rubbing
strake
Carry handleCarry handle
Front Back
4. INFINITY KAYAK FEATURES
Backpack
Odyssey 375 includes the following items:
2 x Inatable seats
Handpump and nozzles
1 x Childseat Skeg
Repair Kit
Owner Manual,
Quickstart Guide and
Registration Card
1
2
3
INFLATION
= ________ bar ( ________ psi )
0.1 1.5
21
224 493
kg ( _______ lbs )
MODEL:
ODYSSEY 375
#ODY375
EN ISO 6185-1
TYPE IIIB
INFINITY KAYAKS A DIVISION OF PALM EQUIPMENT LTD
KENN BUSINESS PARK, KENN ROAD
CLEVEDON
NORTH SOMERSET, BS21 6TH, UNITED KINGDOM
PLEASE READ
It is the owner’s responsibility to
read the manual before use and
follow all instructions regarding
ination and assembly.
Do not over-inate or exceed
maximum capacity.
Ensure all persons and gear are
correctly distributed in the boat to
prevent swamping or capsizing.
After use, store clean and dry away
from direct sunlight.
WARNING
BEWARE OF
OFFSHORE WIND AND CURRENTS
AVOID SHARP OBJECTS
Made in China

11
4. INFINITY KAYAK FEATURES
4.2 ODYSSEY 295
Length 2.95m Width 0.9m Weight 22kg Max Capacity 170kg
INFINITY
INFINITY
INFINITY
INFINITY
FINITY
Carry handle
Adult seat
Carry handle
Gear storage
mesh
Hardwearing Nylon
shell fabric
Neoprene knuckle
protector strips
Spray visor
Drain plug
Velcro strips for
seat attachment
Backrest
attachments
Paddle park
Rubbing
strake
Carry handle
Removable
skeg
Front Back
Inflation
valves
Footrest
Backpack
Odyssey 295 includes the following items:
2 x Inatable seats Handpump and nozzlesSkeg Repair Kit
Owner Manual,
Quickstart Guide and
Registration Card
1
2
3
INFLATION
= ________ bar ( ________ psi )
0.1 1.5
20
170 374
kg ( _______ lbs )
MODEL:
ODYSSEY 295
#ODY295
EN ISO 6185-1
TYPE IIIB
INFINITY KAYAKS A DIVISION OF PALM EQUIPMENT LTD
KENN BUSINESS PARK, KENN ROAD
CLEVEDON
NORTH SOMERSET, BS21 6TH, UNITED KINGDOM
PLEASE READ
It is the owner’s responsibility to
read the manual before use and
follow all instructions regarding
ination and assembly.
Do not over-inate or exceed
maximum capacity.
Ensure all persons and gear are
correctly distributed in the boat to
prevent swamping or capsizing.
After use, store clean and dry away
from direct sunlight.
WARNING
BEWARE OF
OFFSHORE WIND AND CURRENTS
AVOID SHARP OBJECTS
Made in China

12
4.3 ORBIT 245
Length 2.45m Width 0.85m Weight 8.5kg Max Capacity 130kg
INFINITY
INFINITY
INFINITY
INFINITY
INFINITY
FINITY
Carry handle
Seat with
backrest
Carry handle
Hardwearing Nylon
shell fabric
Neoprene knuckle
protector strips
Inflation valve
Spray visor
Fin Drain plug
Velcro strips for
seat attachment
Paddle park
Inflation
valves
Rubbing
strake
Carry handle
Footrest
Front Back
4. INFINITY KAYAK FEATURES
Backpack
Orbit 245 includes the following items:
Seat
Handpump and nozzles Repair Kit
Owner Manual,
Quickstart Guide and
Registration Card
WARNING
BEWARE OF
OFFSHORE WIND AND CURRENTS
AVOID SHARP OBJECTS
Made in China
MODEL:
INFLATION
ORBIT 245
#ORB245
10
EN ISO 6185-1
TYPE IIIB
INFINITY KAYAKS A DIVISION OF PALM EQUIPMENT LTD
KENN BUSINESS PARK, KENN ROAD
CLEVEDON
NORTH SOMERSET, BS21 6TH, UNITED KINGDOM
= ________ bar ( ________ psi )
0.1 1.5
130 287
kg ( _______ lbs )
3
2
PLEASE READ
It is the owner’s responsibility to
read the manual before use and
follow all instructions regarding
ination and assembly.
Do not over-inate or exceed
maximum capacity.
Ensure all persons and gear are
correctly distributed in the boat to
prevent swamping or capsizing.
After use, store clean and dry away
from direct sunlight.
1

13
5.1 MAIN CHAMBER VALVES
There is one valve per inflatable chamber and the valve itself is
split into two parts. By unscrewing the dust cap you will reveal
a small opening which is used for inflation. By unscrewing the
larger section of the valve you will reveal a larger opening used
for deflation (see above illustration).
Inflation is achieved by pumping air into the smaller opening.
This opening contains a no-return seal so air can only be added
via this opening.
Because the small opening has a no-return seal, the kayak
cannot be deflated by this opening. To deflate the kayak,
unscrew the larger section to open the larger opening through
which air can escape rapidly to quickly deflate the kayak.
1 To inflate the main side and floor chambers, use the push-fit
screw nozzle. This nozzle is one of a selection included with your
hand pump. Attach the nozzle to the hand pump tube via the
bayonet attachment and ensure it is tight.
5. INFLATION VALVES
Main chamber
valve
Dust cap
Main valve
Smaller opening
for inflation
Larger opening
for deflation
Push-fit screw
nozzle
Push-fit screw
nozzle
Handpump tube
Bayonet
attachment

14
5. INFLATION VALVES
2 Unscrew and remove the smaller valve dust cap.
3 Push the push-fit screw nozzle firmly into the valve and screw
tight. Inflate once secure
4 After inflation, remove nozzle and replace dust cap.
5.2 INFLATABLE SEAT VALVE
1
The inflatable seats use a twist valve for inflation and deflation.
It is opened by twisting the valve anticlockwise until air flows
freely through it.
Push-fit screw nozzle
Dust cap
Valve
Twist valve

15
2 Inflate the seats by inserting the correct nozzle into the twist
valve. Push firmly to seat the nozzle into the valve.
3 Hold the nozzle and valve while inflating to prevent them
separating.
4 After inflation and before removing the nozzle, twist the valve
clockwise until tight and fully closed.
5 After twisting the valve closed, you can remove the nozzle.
5. INFLATION VALVES
Pump nozzle
for twist valve
Outside Diameter = 10mm
or 3/8”

16
5. INFLATION VALVES
5.2 CHILDSEAT VALVES
1
The childseat incorporates two types of valve. A twist valve
(identical to the inflatable seats) is used to inflate the seat pad
section. Inflate using the same method as the inflatable seats.
2 A second type of valve is used to inflate the backrest section
of the childseat. This is a non-return valve and is inflated with the
appropriate nozzle.
3 Once the childseat is inflated, check all valves are tightly
closed.
NOTICE -
All valves are shipped loose and need tightening
before inflation.
CAUTION - ENSURE VALVES REMAIN TIGHT WHEN
REMOVING PUMP NOZZLES.
Twist valve
Non-return
valve
Backrest section
Seat pad section
Pump nozzle
for non-return
valve
Outside Diameter = 5mm
or 3/16”
!

17
6. GETTING STARTED
6.1 INFLATING YOUR KAYAK
1 Remove the kayak from its storage bag and unfold it on a
clean surface free of sharp objects.
2 Before inflating the kayak, ensure all inflation valves are
aligned with the holes in the outer fabric shell. Each valve should
be positioned in the centre of the hole with an even gap around
it before and after inflation.
NOTICE – It is easier to centre the valve while the kayak is
partially inflated.
Fabric
Gap
Gap
Valve
Odyssey 375 and Odyssey 295
inflation valves - 3 at rear
Orbit 245 inflation valves
- 2 at front, 1 at rear
Front FrontBack Back
INFINITY
INFINITY
INFINITY
INFINITY

18
3 Fit the removable skeg before inflating the kayak. To do this,
clip each end of the skeg into the slotted fittings at the rear of
the kayak hull.
4 To inflate the side and floor inflation chambers, unscrew and
remove the valve dust cap, push the pump nozzle (see 5.1) firmly
into the valve and screw tight. Proceed with inflation using the
hand pump supplied.
5 Partially inflate the floor chamber.
6 Partially inflate the side chambers, until the fabric cover shape
begins to fill out. The kayak should feel soft or limp at this point.
7 Make sure the valves are aligned with the holes in the cover
(see 6.1 step 2). Adjust the cover and/or valves to realign if
necessary.
8 Next add air to the side and floor chambers in turn, until most
of the wrinkles are gone and the kayak feels firm to the touch.
Do not exceed the pressure of 1.5 psi
for both the floor and side
chambers.
9 When the kayak is fully inflated, unscrew and remove the
push-fit screw valve. No air will escape as the valve incorporates
a non-return seal.
6. GETTING STARTED
Hull
Skeg
Front Back

19
6. GETTING STARTED
10 When unscrewing the push-fit screw nozzle after inflation,
hold the larger part of the valve to prevent it loosening.
11 Make sure all dust caps and valves are closed and screwed
down tightly.
12 Ensure the drain plug is closed before taking to the water.
13 To deflate your kayak, unscrew the larger valve outlets to let
the air escape. Once deflated, retighten the valve outlets and
dust caps to prevent damage to internal valve components.
6.2 INFLATION INFORMATION
WARNING - DO NOT INFLATE USING A COMPRESSOR,
CO2 OR COMPRESSED AIR.
Correct pressure will have been reached when the inflation
chambers (both main and floor) are firm to touch and resistance
Unscrew larger
part of valve to
deflate
Drain Plug is at
rear of hull
!

20
6. GETTING STARTED
can be felt against the handpump while inflating.
The chambers should be inflated to 1.5 psi as shown on the
pump gauge. The indicator needle should remain in the black
section of the gauge.
6.3 OVER INFLATION
CAUTION - OVER INFLATION IS THE PRIMARY CAUSE OF
LEAKS AND DAMAGE TO THE INFLATION CHAMBERS. DO
NOT OVER INFLATE YOUR KAYAK.
Variation in temperature such as air, water or contact surfaces
(i.e. sand, asphalt, concrete) will affect the air pressure within the
kayak inflation chambers. You should avoid exposing your kayak
to extreme temperatures, both hot and cold.
Cold conditions could result in some loss of air pressure and
should this occur you should add some air (in line with the
inflation guidelines) to maintain performance.
Hot conditions could result in the air inside the chambers
expanding and increasing pressure. In this case you should let
some air out of the chambers (in line with the inflation guidelines)
to avoid over pressure.
Before paddling, be sure all the kayak’s air chambers are
properly inflated.
Handpump
pressure gauge
2
1
0
psi
!
/