Whirlpool AKP 161/01/IX User guide
- Category
- Ovens
- Type
- User guide
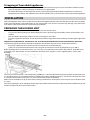
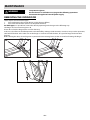
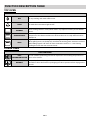
Whirlpool AKP 161/01/IX is a built-in electric oven designed for cooking various dishes. It features multiple heating functions, including grilling, baking, and roasting, allowing you to prepare a wide range of meals. The oven has a spacious 71-liter capacity, accommodating large dishes and family-sized meals. It comes equipped with several accessories, including a baking tray, grill, and telescopic rails, enhancing convenience and functionality. The oven's intuitive controls and clear display make it easy to set cooking programs and monitor the progress of your dishes.
Whirlpool AKP 161/01/IX is a built-in electric oven designed for cooking various dishes. It features multiple heating functions, including grilling, baking, and roasting, allowing you to prepare a wide range of meals. The oven has a spacious 71-liter capacity, accommodating large dishes and family-sized meals. It comes equipped with several accessories, including a baking tray, grill, and telescopic rails, enhancing convenience and functionality. The oven's intuitive controls and clear display make it easy to set cooking programs and monitor the progress of your dishes.


-
 1
1
-
 2
2
-
 3
3
-
 4
4
-
 5
5
-
 6
6
-
 7
7
-
 8
8
-
 9
9
-
 10
10
-
 11
11
-
 12
12
-
 13
13
-
 14
14
-
 15
15
-
 16
16
-
 17
17
-
 18
18
-
 19
19
-
 20
20


Whirlpool AKP 161/01/IX User guide
- Category
- Ovens
- Type
- User guide
Whirlpool AKP 161/01/IX is a built-in electric oven designed for cooking various dishes. It features multiple heating functions, including grilling, baking, and roasting, allowing you to prepare a wide range of meals. The oven has a spacious 71-liter capacity, accommodating large dishes and family-sized meals. It comes equipped with several accessories, including a baking tray, grill, and telescopic rails, enhancing convenience and functionality. The oven's intuitive controls and clear display make it easy to set cooking programs and monitor the progress of your dishes.
Ask a question and I''ll find the answer in the document
Finding information in a document is now easier with AI