Page is loading ...

1
Montage und Betriebsanleitung
Farb-Domekamera
VKCD-1319SM/3.6, VKCD-1320SM/VF
Installation and Operating Instructions
Colour Dome Camera
VKCD-1319SM/3.6, VKCD-1320SM/VF

2
Inhaltsverzeichnis
1. Sicherheitshinweise .............................................................................. 3
2. Allgemeine Beschreibung ......................................................................
4
3. Installationsanweisungen ...................................................................... 5
3.1 Dome-Kamera ohne Wandmontagewinkel .............................................
5
3.2 Dome-Kamera VKCD-1319SM/3.6 mit Wandmontagewinkel
(optional erhältlich) ................................................................................
6
4. Anlegen der Versorgungsspannung .......................................................
7
5. Scharfstellen des Objektivs und Einstellen des Bildausschnitts ..............
7
6. Technische Daten .................................................................................. 8
7. Maßzeichnungen ................................................................................. 17
Contents
1. Safety Instructions and Notes .............................................................. 10
2. General Descriptions ...........................................................................
11
3. Installation Instructions
....................................................................... 12
3.1 Dome Camera without the Wall Mount Bracket ...................................
12
3.2 Dome Camera VKCD-1319SM/3.6 with Wall Mount Bracket
(optional) ............................................................................................. 13
4. Power Connection ...............................................................................
14
5. Focus Adjustment and Image Adjustment ............................................
14
6. Specifications .....................................................................................
15
7. Dimensional Drawings ........................................................................ 17

10
1. Safety Instructions
• Read these safety instructions and the operation manual first before you
install and commission the camera.
• Keep the manual in a safe place for later reference.
• Protect your camera from contamination with water and humidity to
prevent it from permanent damage.
Never switch the camera on when it gets wet. Have it checked at an
authorized service center in this case.
• Never operate the camera outside of the specifications as this may prevent
the camera functioning.
• Do not operate the cameras beyond their specified temperature, humidity
or power ratings.
• Operate the camera only at a temperature range of -10°C to +50°C and
at a humidity of max. 90%.
• To disconnect the power cord of the unit, pull it out by the plug.
Never pull the cord itself.
• Pay attention when laying the connection cable and observe that the cable
is not subject to heavy loads, kinks, or damage and no moisture can get in.
• Do not attempt to disassemble the camera board from the dome.
• The warranty becomes void if repairs are undertaken by unauthorized
persons.
Do not open the camera housing.
• Never point the camera towards the sun with the aperture open. This can
destroy the sensor.
• Installation, maintenance and repair have to be carried out only by
authorized service centers.
Before opening the cover disconnect the unit from mains input.
• The fitter is responsible for the system of protection being followed in
accordance with the technical data, e.g. by sealing of the cable outlet with
silicone.
• All openings provided in the housing for assembly purposes must be closed
and/or sealed.
• Contact your local dealer in case of malfunction.
• Only use original parts and original accessories from Videor E. Hartig GmbH.
• Do not use strong or abrasive detergents when cleaning the dome.
Use a dry cloth to clean the dome surface.
In case the dirt is hard to remove, use a mild detergent and wipe gently.
• During assembly, care must be taken to ensure that existing seals are
correctly inserted and are not displaced as a result of assembly.
You must not continue to use damaged seals.
NOTE: This is a class A digital device. This digital device can cause
harmful interference in a residential area;
in this case the user may be required to take appropriate
corrective action at his/her own expense.

11
2. General Descriptions
• 1/3” Colour Dome Camera, Drop Ceiling Mount
• For Drop Ceiling or Wall Mount
• Clear bubble with Inner Liner
• Resolution of 540 Horizontal Lines
• Sensitivity: VKCD-1319SM/3.6 – 0.6Lux (F2.0)
VKCD-1320SM/VF – 0.2Lux (F1.2)
• Built-in Lens:
VKCD-1319SM/3.6 – F2.0/3.6mm
VKCD-1320SM/VF – F1.2/2.8-10mm with DC Iris Control
• Digital Signal Processing (DSP)
• Automatic Shutter Control (AES)
• Backlight Compensation (BLC)
• Automatic White Balance (ATW)
• Easy Installation
• Supply Voltage: 12VDC
• Option: Wall Mount Bracket
(VKCD-IWMVB-1, IWMB-2SW)
Supplied Items
Dome camera:
1 x Digital colour dome camera
1 x Installation and Operating Instructions
1 x Ceiling-/wall mount, incl. 3 screws for
VKCD-1320SM/VF
Wall mount bracket (optional for VKCD-1319SM/3.6):
2 x Screws for mounting dome (3.5
∅ x 12mm)
2 x Screws for bracket cover (3.0
∅ x 8mm)
2 x Screws for wall mount bracket (3.5
∅ x 20mm)
2 x Plastic caps for bracket screw holes

12
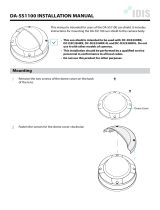
3.1 Dome Camera without the Wall Mount Bracket
3. Installation instructions
• Make sure the power is removed before the installation.
• Dome camera should be put on a balanced non vibrative area.
• Do not apply the excessive force to the dome.
1
Dome Housing Turn it counter-clockwise to remove it.
2
Shield dome Grip and pull up to separate it from the base
assembly.
(VKCD-1319SM/3.6 only)
5
Mounting screw
holes
Mount the the base assembly on the wall or
the ceiling with suitable attachements through
the holes 5.
7
Rotating plate To set the pan angle
(VKCD-1319SM/3.6
only) rotate plate 7.
6
Tilt retainer screws To set the tilt angle, loosen the screws
6.
(VKCD-1319SM/3.6 only)
3
Camera bracket Adjust the tilt of camera by using bracket
3.
6
Retainer screws Fasten the screws
6. (VKCD-1319SM/3.6
only)
8
Adjustment of the
signal level
Correction when contrast is too low or for a
darker picture. Adjustment with test pattern
(3,000 Lux) and oscillograph.
Note
Default setting is average control.
!
Focus adjustment Refer to „Focus Adjustment” on page 14.
1/2
Dome housing /
shield dome
To re-assemble
1 und 2 the raised edges of
2 must be pushed into the rotating plate 7.
(VKCD-1319SM/3.6 only)
VKCD-1319SM/3.6
VKCD-1320SM/VF
1
3
4
7
5
8
1
2
6
3
4
7
5

13
Dimensions (in mm)
Bottom of dome Wall mount bracket
3.2 Dome Camera VKCD-1319SM/3.6
with Wall Mount Bracket (optional)
B
Wall mount hole Insert two screws (3.5 ∅ x 20mm) on the wall.
Take care for suitable attachements.
1
Dome Housing Turn counter-clockwise to remove it.
2
Shield dome Push up to separate it from the base assembly
3-7.
C
Cable pass through
hole
Route the cable of camera through C.
3-7
Base assembly Place the base assembly with the screws
(3.5 ∅ x 12mm) on the seat of the wall mount
bracket A.
D/E
Bracket cover Assemble
D using two screws (3.0 ∅ x 8mm)
through E on the wall mount bracket A.
A
Wall mount bracket Assemble wall mount bracket A with base
assembly 3-7.
7
Rotating plate To set the pan angle, rotate plate
7 till the right
position of the camera is adjusted.
6
Tilt retainer screws To set the tilt angle, loosen the 6.
3
Camera bracket Adjust the tilt angle of camera by using
bracket
3.
6
Tilt retainer screws Fasten the 6.
!
Lens focus
adjustment
Refer to „Focus adjustment” on page 14.
1/2
Dome housing /
shield dome
To re-assemble 1 und 2 the raised edges of 2
must be pushed into the rotating plate 7.
F
Screw cap Stop up the wall mount holes
B with two screw
caps F.
46.0
64.0
1
2
6
3
4
7
5
F
B
D
A
C
E

14
4. Power Connection
Connect DC plug to DC jack first and then plug the AC adapter to the AC
outlets to avoid the damage from the surge voltage charged when no load.
Take care of polarity !
Camera Separate the camera bracket 3 from the base
assembly 3-7 and disassemble it from the
camera bracket.
Focus fix screws Loosen the focus fix screw on the lens holder of
the camera.
Lens Screw out the lens insert and replace it. Carefully
apply the power to the camera and adjust the
lens focus.
Focus fix screws Tighten the focus fix screw.
Reassembling Remove the power and reassemble the camera
in reverse order.
Note:
VKCD-1320SM/VF: Adjust sharpness and image
(2.8-10mm, varifocal lens) at lens and focus ring.
5. Focus Adjustment and Image Adjustment
In normal case of use, it is not necessary to readjust the lens focus because it
is preset before shipping in case of a lens replacement.
To readjust the lens focus, follow the steps below:

15
6. Specifications
Model VKCD-1319SM/3.6 VKCD-1320SM/VF
Art. No.
92155 92156
Video standard
PAL
System
Colour
Sensor size
1/3”
Imager
CCD, 1/4” Sony Super HAD Interline Transfer
Synchronization
Internal
Sensitivity
(at 50% video signal)
0.2Lux at F1.2, 0.6Lux
at F2.0
0.2Lux at F1.2 (Videor
measurement result)
Horizontal resolution
540TVL
Rotation range
110°
Tilt range
65° (+25° ~ +90°
from horizontal level)
80° (+10° ~ +90°
from vertical level)
Automatic gain control
(AGC)
28dB, ON/OFF switchable
Automatic shutter
control (AES)
1/50 ~ 1/100,000sec.
Integration rate
no
Digital Noise
Reduction (DNR)
no
White balance (ATW)
2500 ~ 8000K
(automatic)
2000 ~ 8000K
(automatic)
Backlight
compensation
BLC
Switchable IR cut filter
no
Video outputs (type)
CVBS
Video outputs
1Vp-p, CVBS, 75ohms
Lens mount
Integrated lens
Lens type
Fixed focal length
Varifocal
Lens
F2.0/3.6mm F1.2 ~ F270/2.8-
10mm, with galvano
-
meter driven iris
Aspherical technology
no yes
Focal length
3.6mm 2.8-10mm
Horizontal angle of
view
68° 82 ~ 27°
Iris control
no
MOD (Minimum object
distance)
0.1m 0.1
Focus range
– 0,1 ~
Filter screw size
Not available
External connections
Video (BNC), 12VDC (DC socket)
Serial interfaces
no
Temperature range
(Operation)
-10° ~ +50°C
Heater
no
Protection rating
IP40
Supply voltage
12VDC

16
Accessories optional
Art. No. Type Description
91805 VKCD/WMB-1
Wall Mount (VKCD-1319SM/3.6 only)
92047 VKCD/WMB-
2SW
Wall Mount Bracket, black
(VKCD-1320SM/VF only)
92153 VKCD-1320/
DUMMY
Dummy camera with dummy cable
(VKCD-1320SM/VF)
70535 VT-PS12DC-8
Plug-in Power Supply Unit 100-240VAC 12VDC
(1.0A), regulated, with DC plug
77773 VT-PS12DCDT1
PSU 12VDC/1.0A, regulated, desktop version,
1.8m cables each with open ends
70495 VT-PS12DC-7
Plugable PSU with Cont. & UK mains plug-in
100-240VAC/12VDC-1.25A, regulated
Model VKCD-1319SM/3.6 VKCD-1320SM/VF
Art. No.
92155 92156
Power consumption
1.8watts max.
Vandalism resistant
no
Colour (bubble)
Clear
Camera fixing
no
Mounting
Surface mount Surface mount,
wall mount
Housing
Indoor
Housing material
Plastic
Colour (housing)
Light grey
Weight
Approx. 150g Approx. 310g
Certificates
CE

17
7. Maßzeichnung – Dimensional drawing
VKCD-1319SM/3.6 Wand-Montagewinkel / WMB-1
Wall mount bracket / WMB-1
Maße - Dimensions: mm
VKCD-1320SM/VF
Wand-Montagewinkel / WMB-2(SW)
Wall mount bracket / WMB-2 (SW)
46.0
64
∅ 86.5
18.5
68
96
120
160
128
67
145
80
65
48.3
113

20
eneo
®
ist eine eingetragene Marke der Videor E. Hartig GmbH
Vertrieb ausschließlich über den Fachhandel.
eneo
®
is a registered trademark of Videor E. Hartig GmbH
Exclusive distribution through specialised trade channels only.
VIDEOR E. Hartig GmbH
Carl-Zeiss-Straße 8 · 63322 Rödermark/Germany
Tel. +49 (0) 6074 / 888-0 · Fax +49 (0) 6074 / 888-100
www.videor.com
Technische Änderungen vorbehalten
Technical changes reserved
© Copyright by VIDEOR E. Hartig GmbH 11/2009
/