
Xonar D2X
Audio Card
User’s manual

ii
E3359
First Edition V1
August 2007
Copyright © 2007 ASUSTeK COMPUTER INC. All Rights Reserved.
No part of this manual, including the products and software described in it, may be reproduced,
transmitted, transcribed, stored in a retrieval system, or translated into any language in any form or by any
means, except documentation kept by the purchaser for backup purposes, without the express written
permission of ASUSTeK COMPUTER INC. (“ASUS”).
Product warranty or service will not be extended if: (1) the product is repaired, modified or altered, unless
such repair, modification of alteration is authorized in writing by ASUS; or (2) the serial number of the
product is defaced or missing.
ASUS PROVIDES THIS MANUAL “AS IS” WITHOUT WARRANTY OF ANY KIND, EITHER EXPRESS
OR IMPLIED, INCLUDING BUT NOT LIMITED TO THE IMPLIED WARRANTIES OR CONDITIONS OF
MERCHANTABILITY OR FITNESS FOR A PARTICULAR PURPOSE. IN NO EVENT SHALL ASUS, ITS
DIRECTORS, OFFICERS, EMPLOYEES OR AGENTS BE LIABLE FOR ANY INDIRECT, SPECIAL,
INCIDENTAL, OR CONSEQUENTIAL DAMAGES (INCLUDING DAMAGES FOR LOSS OF PROFITS,
LOSS OF BUSINESS, LOSS OF USE OR DATA, INTERRUPTION OF BUSINESS AND THE LIKE),
EVEN IF ASUS HAS BEEN ADVISED OF THE POSSIBILITY OF SUCH DAMAGES ARISING FROM ANY
DEFECT OR ERROR IN THIS MANUAL OR PRODUCT.
SPECIFICATIONS AND INFORMATION CONTAINED IN THIS MANUAL ARE FURNISHED FOR
INFORMATIONAL USE ONLY, AND ARE SUBJECT TO CHANGE AT ANY TIME WITHOUT NOTICE,
AND SHOULD NOT BE CONSTRUED AS A COMMITMENT BY ASUS. ASUS ASSUMES NO
RESPONSIBILITY OR LIABILITY FOR ANY ERRORS OR INACCURACIES THAT MAY APPEAR IN THIS
MANUAL, INCLUDING THE PRODUCTS AND SOFTWARE DESCRIBED IN IT.
Products and corporate names appearing in this manual may or may not be registered trademarks or
copyrights of their respective companies, and are used only for identification or explanation and to the
owners’ benefit, without intent to infringe.

iii
Contents
Contents ...................................................................................................... iii
Contents ...................................................................................................... iv
Notices .......................................................................................................... v
Federal Communications Commission Statement .............................v
Canadian Department of Communications Statement .......................v
Safety information ...................................................................................... vi
Trademarks .................................................................................................. vi
License ........................................................................................................ vi
1. Introduction ..................................................................................... 1
1.1 Package Contents .............................................................. 1
1.2 System Requirements ........................................................ 1
1.3 Specifications summary ..................................................... 2
2. About Hardware .............................................................................. 5
2.1 Xonar D2X Audio Processing Card .................................... 5
2.2 MIDI Board/Cable .............................................................. 7
3. Installing the Xonar Hardware ....................................................... 8
3.1 Preparing Your Computer .................................................. 8
3.2 Installing the Audio Processing Card ................................. 9
3.3 Installing the MIDI board .................................................. 10
3.4 Connecting CD/DVD-ROM Drive
(with the analog header) .................................................. 10
3.5 Connecting TV Tuner Card ...............................................11
4. Installing Software ........................................................................ 12
4.1 Installing the Audio Card Driver ....................................... 12
4.2 Installing the PMP software (Portable Music Processor) . 13
4.3 Installing the Ableton Live ................................................ 14
4.4 Installing the Cakewalk Production Plus Pack ................. 15
4.5 Uninstalling or Reinstalling Software ............................... 17
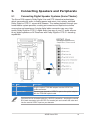
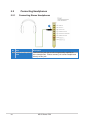
5. Connecting Speakers and Peripherals ....................................... 19
5.1 Connecting Digital Speaker Systems (Home Theater) .... 19
5.2 Connecting Headphones ................................................. 20
5.3 Connecting Analog Speaker Systems .............................. 22
5.4 Connecting Microphone ................................................... 27
5.5 Connecting Line-In Audio Sources ................................... 27
5.6 Connecting Digital Audio Sources .................................... 28

iv
Contents
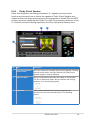
6. Xonar D2X Driver Guide ............................................................... 29
6.1 Introduction to the Xonar D2X Audio Center GUI ............ 29
6.2 Main Setting ..................................................................... 31
6.3 Mixer/Volume ................................................................... 40
6.4 Effects .............................................................................. 43
6.5 Karaoke/Magic Voice ....................................................... 45
6.6 FlexBass .......................................................................... 46
6.7 AEC (Acoustic Echo Cancellation) ................................... 47
6.8 Smart Volume Normalization ........................................... 48
6.9 DS3D GX and DSP Modes .............................................. 50
6.10 ASIO 2 Driver ................................................................... 51
7. Portable Music Processor™ Software Guide ............................. 55
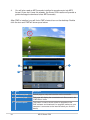
7.1 Introduction ...................................................................... 55
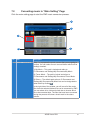
7.2 Converting music in “Main Setting” Page ......................... 57
7.3 Find Converted Music in “PMP Music” Page ................... 59
8 Ableton Live Software Guide ....................................................... 60
9. Cakewalk Production Plus Pack Software Guide ...................... 60
10. RMAA Test Guide .......................................................................... 61
10.1 Setting Up Xonar D2X Audio Card ................................... 61
10.2 Configuration and Test with RMAA................................... 64
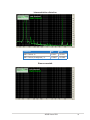
10.3 RMAA Testing Results...................................................... 69
11. Troubleshooting and FAQs .......................................................... 75

v
Notices
Federal Communications Commission Statement
This device complies with Part 15 of the FCC Rules. Operation is subject to the
following two conditions:
•
This device may not cause harmful interference, and
•
This device must accept any interference received including interference that
may cause undesired operation.
This equipment has been tested and found to comply with the limits for a
Class B digital device, pursuant to Part 15 of the FCC Rules. These limits are
designed to provide reasonable protection against harmful interference in a
residential installation. This equipment generates, uses and can radiate radio
frequency energy and, if not installed and used in accordance with manufacturer’s
instructions, may cause harmful interference to radio communications. However,
there is no guarantee that interference will not occur in a particular installation. If
this equipment does cause harmful interference to radio or television reception,
which can be determined by turning the equipment off and on, the user is
encouraged to try to correct the interference by one or more of the following
measures:
•
Reorient or relocate the receiving antenna.
•
Increase the separation between the equipment and receiver.
•
Connect the equipment to an outlet on a circuit different from that to which the
receiver is connected.
•
Consult the dealer or an experienced radio/TV technician for help.
Canadian Department of Communications Statement
This digital apparatus does not exceed the Class B limits for radio noise emissions
from digital apparatus set out in the Radio Interference Regulations of the
Canadian Department of Communications.
This class B digital apparatus complies with Canadian ICES-003.

vi
This symbol of the crossed out wheeled bin indicates that the product (electrical
and electronic equipment) should not be placed in municipal waste. Check local
regulations for disposal of electronic products.
Safety information
•
Before installing the device on a motherboard, carefully read all the manuals
that came with the package.
•
To prevent electrical shock hazard or short circuits, switch off the power supply
before installing the device on a motherboard or connecting any singal cables
to the device.
•
If the device is broken, do not try to fix it by yourself. Contact a qualified service
technician or your retailer.
•
Before using the product, make sure all cables are correctly connected. If you
detect any damage, contact your dealer immediately.
•
To avoid short circuits, keep paper clips, screws, and staples away from
connectors, sockets and circuitry.
•
Avoid dust, humidity, and temperature extremes. Do not place the product in
any area where it may become wet.
•
Place the product on a stable surface.
•
If you encounter technical problems with the product, contact a qualified
service technician or your retailer.
Trademarks
Xonar and ASUS logo are trademarks of ASUSTek Computer Inc. “Dolby”
and “Dolby Digital Live”, “Dolby Pro Logic IIx”, “Dolby Virtual Speaker”, “Dolby
Headphone” are trademarks of Dolby Laboratories. “DTS” and “DTS CONNECT”,
“DTS Interactive”, “DTS Neo: PC” are trademarks of Digital Theater Systems,
Inc. EAX and A3D are trademarks of Creative Technology Ltd. Microsoft,
DirectSound3D, Windows are trademarks of Microsoft Corporation. Other company
and product names may be trademarks of the respective companies with which
they are associated. ASIO is a trademark and software of Steinberg Media
Technologies GmbH.
License
Dolby Master Studio driver is manufactured under license from Dolby Laboratories;
DTS Connect driver is manufactured under license from Digital Theater Systems,
Inc.

1
ASUS Xonar D2X
1. Introduction
1.1 Package Contents
• ASUS Xonar D2X audio card
• ASUS Xonar D2X support CD (including Portable Music Processor™ utility)
• Ableton™ Live software CD
• Cakewalk™ Production Plus Pack CD
(Sonar LE, Dimension LE, and Project5 LE)
• PowerDVD 7.0 software DVD player CD
• Additional MIDI bracket and adaptor cable x1
• S/PDIF TOSLINK optical adaptors x2
• S/PDIF TOSLINK optical cable x1
• 3.5mm-to-RCA cables for 8-channel output x4
• Dolby Demo CD
• Quick Installation Guide
1.2 System Requirements
• One PCI Express 1.0 (or higher) compatible slot for the audio card
• One available 4-pin power cable from PC’s power supply unit
• Microsoft® Windows® Vista/XP(32/64bit)/MCE2005
• Intel® Pentium® 4 1.4GHz or AMD Athlon 1400 CPU or faster CPU
• > 256 MB DRAM system memory
• > 60 MB available HDD space for driver installation package; > 200MB space
available for Ableton Live and > 320MB for Cakewalk package
• CD-ROM drive (or DVD-ROM drive) for software installation
• High-quality headphones, powered analog speakers, or digital speakers with
Dolby Digital or DTS decoders to enjoy the Ultra-High Fidelity sounds of the
card

2ASUS Xonar D2X
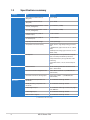
1.3 Specications summary
Category Item Description
Audio Performance Output Signal-to-Noise Ratio (A-
Weighted):
Up to 118 dB
Input Signal-to-Noise Ratio (A-
Weighted):
Up to 118 dB
Output Total Harmonic Distortion + Noise
at 1kHz (A-Weighted) :
Up to 0.0004% (-108dB)
Input Total Harmonic Distortion + Noise
at 1kHz (A-Weighted) :
Up to 0.0004% (-108dB)
Frequency Response (-3dB, 24-
bit/96kHz input ):
<10Hz to 46KHz
Frequency Response (-3dB, 24-
bit/192kHz input):
<10Hz to 90KHz
Output/Input Full-Scale Voltage 2 Vrms (5.65 Vp-p)
Sample Rate Conversion Quality Almost lossless, high-fidelity floating-point filters,
with:
-140dB THD+N (typical value for 44.1K-> 48KHz,
24bit)
145dB Dynamic Range (typical value for 44.1K->
48KHz, 24bit)
Bus Compatibility PCI Express -PCI Express Rev.1.0a specification compatible
-Max. full 2.5Gbps bandwidth per direction
and optimized latency for high-definition audio
processing
-Compatible with X1, X4, X8, X16 PCI Express
slots
Main Chipset Audio Processor ASUS AV200 High-Definition Sound Processor
(Max. 192KHz/24bit)
24-bit D-A Converter of Digital Sources: TI Burr-Brown PCM1796 *4 (123dB SNR, Max.
192kHz/24bit)
24-bit A-D Converter for Analog Inputs: Cirrus-Logic CS5381* 1 (120dB SNR, Max.
192kHz/24bit)
Sample Rate and
Resolution
Analog Playback Sample Rate and
Resolution
44.1K/48K/96K/192KHz @ 16/24bit
Analog Recording Sample Rate and
Resolution
44.1K/48K/96K/192KHz @ 16/24bit
S/PDIF Digital Output 44.1K/48K/96K/192KHz @ 16/24bit, Dolby Digital,
DTS, WMA-Pro
S/PDIF Digital Input 44.1K/48K/96K/192KHz @ 16/24bit
ASIO 2.0 Driver Support: 44.1K/48K/96K/192KHz @ 16/24bit
(continued on the next page)

3
ASUS Xonar D2X
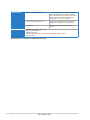
I/O Ports Analog Output Jack: 3.50mm mini jack *4 (Front/Side/Center-
Subwoofer/Back)
Analog Input Jack: 3.50mm mini jack *2 (Line-In/Mic-In)
Other line-level analog input
(for CD-IN/TV Tuner):
CD-In, Aux-In (4-pin header on the card)
Digital S/PDIF Output Coaxial and High-bandwidth Optical Combo
Connector Supports 192KHz/24bit
Digital S/PDIF Input Coaxial and High-bandwidth Optical Combo
Connector Supports 192KHz/24bit
MIDI Ports Additional MPU-401 MIDI I/O bracket and
converter cable
Driver Features Operation System Windows® Vista/XP(32/64bit)/MCE2005
Dolby® Technologies Dolby® Headphone, Dolby® Virtual Speaker, Dolby
® Pro-Logic IIx, Dolby® Digital Live
DTS® Technologies DTS® Connect (DTS Interactive Encoder and
DTS Neo:PC)
Smart Volume Normalizer™ Normalizes the volume of all audio sources into a
constant level and also enhances your 3D sound
listening range and advantages in gaming
DirectSound3D Game EXtensions 1.0
(DS3D GX 1.0)/DirectX
DS3D GX 1.0 supports EAX gaming sound
effects and DirectSound 3D hardware enhanced
functions on Windows Vista. (DirectX/DirectSound
3D compatible)
Acoustic Echo Cancellation (AEC) Provides advanced Acoustic Echo Cancellation
(AEC) and noise suppression for best voice
communication quality in VOIP applications or
online gaming
Xear 3D™ Virtual Speaker Shifter Virtual 7.1 speaker positioning
Magic Voice™ Modifies the sound of your voice, for VOIP and
online chat applications
Karaoke Functions Music Key-Shifting and Microphone Echo effects
FlexBass™ Professional Bass Management/Enhancement
system
Other Effects 10-band Equalier/27 Environment Effects
3D Gaming Sound Engines/APIs Vista: DirectSound3D® GX 1.0, EAX® 2.0&1.0,
DirectSound® HW, DirectSound SW, A3D®
1.0, OpenAL generic modes, 128 3D sounds
processing capability
XP: EAX® 2.0&1.0, DirectSound® HW,
DirectSound SW, A3D® 1.0, OpenAL generic
modes, 128 3D sounds processing capability
(continued on the next page)

4ASUS Xonar D2X
Software Utility Portable Music Processor utility Converts digital music content or CD audio into
regular MP3/WMA files with Dolby Headphone,
Dolby Virtual Speaker (w/ Pro-Logic II), and Smart
Volume Normalization processing (Windows
Media Player 10 or above is required)
Professional Audio Editing Utility Ableton Live; Cakewalk Production Plus Pack
(SONAR LE, Dimension LE, and Project5 LE)
PowerDVD 7.0 Software DVD player with Dolby Digital 5.1
decoder
Accessories -3.5mm-to-RCA adaptor cable *4 (8ch)
-S/PDIF optical adaptors *2
-S/PDIF optical cable *1
-Additional MIDI card, cable, and external standard MIDI adaptor Y cable *1
-Dolby Demo CD
*Specications are subject to change without notice.

5
ASUS Xonar D2X
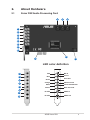
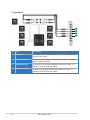
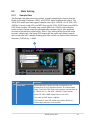
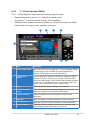
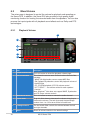
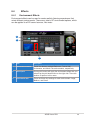
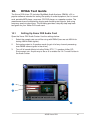
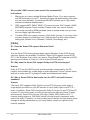
2. About Hardware
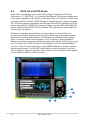
2.1 Xonar D2X Audio Processing Card
1
2
3
4
5
6
7
8
12
13
7
8
1
2
3
4
5
6
9 10 11
14
MIC In
Red
Line In
Front Out
Side Surround
Center & Subwoofer
Back Surround
SPDIF In
SPDIF Out
Blue
Green
Orange
White
Amber
No LED
No LED
LED color denition

6ASUS Xonar D2X
No Item Description
1 Microphone Jack Connect your external PC microphone to this 3.5mm jack for
voice input. Built-in high-quality Microphone pre-amplifier.
2 Line Input Jack Connect analog devices like MP3 players, CD players,
music synthesizers and other line-level sound sources to
this 3.5mm jack for audio recording or processing. (Through
Ultra-high fidelity 118dB SNR A-D converter)
3 Headphone/Front
Output Jack
Connect your headphones or 2/2.1 channel speakers to this
jack. For multi-channel speaker systems, connects to the
front left/right input on the powered speakers.
4 Side Surround Output
Jack
Connects to the surround channel input on 4/4.1/5.1/6.1/7.1
powered analog speakers.
5 Center/Subwoofer
Output Jack
Connects to the front center/subwoofer input on 5.1/6.1/7.1
powered analog speakers.
6 Rear/Back Surround
Output Jack
Connects to the Back Surround input on 6.1/7.1 powered
analog speakers.
7 S/PDIF Input Coaxial and optical TOSLINK combo digital input jack.
Connects to external digital audio sources such as MD
players, CD players, or DVD players, for audio recording or
loopback.
8 S/PDIF Output Coaxial and optical TOSLINK combo digital output jack.
Connects to external digital decoder or digital speaker
systems, Home Theater systems, AV receivers for outputting
digital audio including PCM, Dolby Digital, DTS, WMA-Pro,
etc.
9 CD Input Header 4-pin header. Connects to the Analog Audio output on the
back panel of CD/DVD-ROM drive using an Analog CD
audio cable, which is usually available with your CD/DVD-
ROM drive. You can still play CD audio through the Xonar
driver without connecting this. We recommend playing audio
through the driver to take advantage of the Xonar’s high
quality D-A converter, but this header is provided in case you
need it.
10 Aux Input Header 4-pin header. Usually connects to the Analog Audio output of
TV tuner card or other sound source inside your PC system.
(To monitor your TV tuner card’s audio from this Aux-In, you
must enable the “monitor” function for Aux-In in the Xonar
Audio Center software’s recording mixer.)
11 MIDI I/O Header Connects to the additional MIDI board/bracket (available in
the package)
12 Main Audio Processor ASUS Xonar AV200 Audio Processing Unit (DuplexHD
192K/24bit)
13 PCI Bus Golden
Fingers
Connects to the PCI slot on your motherboard
14 Power Connector Connects to the power cable of your power supply

7
ASUS Xonar D2X
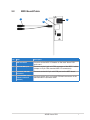
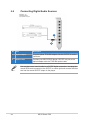
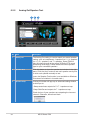
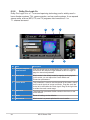
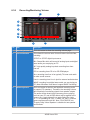
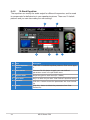
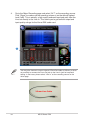
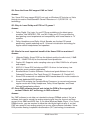
2.2 MIDI Board/Cable
1
2
3
4
No Item Description
1 MIDI I/O Header Connects to the MIDI I/O header on the main Xonar D2X
audio card
2 Mini-DIN MIDI port Connects to the 6-pin mini-DIN connector of the MIDI Y cable
(adaptor to 5-pin DIN standard MIDI I/O connectors)
3 6-pin Mini-DIN MIDI
connector
Connects to the #2 6-pin mini-DIN port on the MIDI board
4 5-pin DIN MIDI input/
output connectors
(Female)
Connects to the input and output DIN male connector of the
standard MIDI instrument cable

8ASUS Xonar D2X
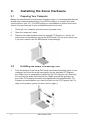
3. Installing the Xonar Hardware
3.1 Preparing Your Computer
Before you proceed with the following installation steps, it’s recommended that you
disable your onboard audio device in your BIOS settings, or uninstall any other
sound cards on your PC. (For BIOS setting or uninstallation of other sound cards,
refer to the user manuals of your motherboard and sound card)
1. Power off your computer and disconnect the power cord.
2. Open the computer’s case.
3. Remove the metal brackets from one unused PCI Express x1 slot for the
audio card and its adjacent slot for the MIDI board (You can just remove one
if you don’t need to use the MIDI board in the package).
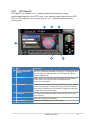
3.2 Installing the Audio Processing Card
1. Face the bracket of the Xonar D2X audio card toward the back panel of your
computer and insert the audio card gently into an available PCI Express
slot. Make sure it’s completely inserted into the PCI Express slot. (Warning!
Do not force the audio card into the slot. Make sure that the gold pins of
the card's PCI Express connector are aligned with the motherboard’s PCI
Express connector before you insert the card into the PCI Express slot. If it
does not fit properly, gently remove it and try again.)

9
ASUS Xonar D2X
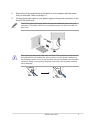
2. Secure the audio card bracket to the back of your computer with the screw
that you removed. Refer to section 3.1.
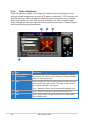
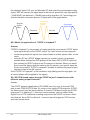
3. Connect the power cable of your power supply to the power connector on the
Xonar D2X audio card.
The PCI Express high-quality audio card requires additional power from your
computer. If the power cable is not connected properly, the audio card will not
work at all.
When removing the power cable from the Xonar D2X audio card, make sure to
pull outward the 4-pin header first, then unplug it from the power connector as
the following pictures show. Do not forcefully remove the header from the power
connector; doing so may pull up the power connector from the audio card and
cause damage!
1
1

10 ASUS Xonar D2X
3.4 Connecting CD/DVD-ROM Drive (with the analog
header)
1.
If you would like to use the physical playback buttons on your CD-ROM drive
to control audio CD playback on your PC, you need to connect the analog
cable between the CD-ROM drive and the audio card. Otherwise, you can
just skip this section and use ordinary digital CD playback on Windows.
2. Connect the CD-IN 4-pin header to the analog output on the back of your
CD/DVD-ROM drive with the audio CD cable which is usually included with
CD/DVD-ROM drive.
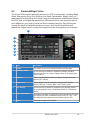
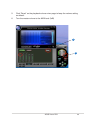
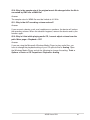
3.3 Installing the MIDI board
1. Secure the MIDI bracket to another slot on the back of your computer case.
2. Connect the 4-pin MIDI header on the audio card to the MIDI bracket with the
MIDI cable as the figure below.

11
ASUS Xonar D2X
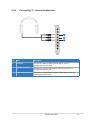
3.5 Connecting TV Tuner Card
1.
If you have a traditional PCI or PCI Express TV tuner card on your PC, you
may need to connect it to the audio card to send the tuner card’s sound to
your PC speakers.
2. Secure the PCI/PCI Express TV tuner card and screw it into the back-panel.
3. Connect the audio output header from the TV tuner card to the Aux-In header
of the audio card, as shown in the figure below.
For optimum TV audio quality, Xonar uses ADC recording to digitize the signal
and loops it back to DAC playback. Please select Aux-In as the recording
source in the Xonar Audio Center’s recording mixer and enable the monitoring
button to pass this signal to the audio output. Using this setup, you can even
turn on sound effects such as Pro-Logic IIx to expand the stereo TV audio to 5.1
or 7.1 channel surround sound. TV audio on your PC will become even better
than on your TV set!

12 ASUS Xonar D2X
4. Installing Software
4.1 Installing the Audio Card Driver
1. After you have installed your audio card, turn on your computer. Windows
automatically detects your audio card and searches for device drivers. When
prompted for the audio drivers, click the “Cancel” button.
2. Insert the driver installation CD into your CD-ROM or DVD-ROM drive. If
Windows AutoPlay mode is enabled for your CD-ROM drive, the CD starts
running automatically. If it doesn’t start the installation, double-click the setup.
exe icon located on the CD-ROM.
3. The installation program will remind you to make sure you have connected
the additional power cable from your power supply unit to the card. If the
power cable is not connected properly, the audio card will not work at all. If
it has not been done, please turn off the computer to install the power cable
before you go on the installation process.
4. Follow the instructions on the screen to complete the installation. Please read
the “END USER LICENCE AGREEMENT” in the process and make sure
you understand and accept it before you continue the installation. When the
installation finishes, you may be prompted to restart your computer. You can
choose to restart the computer later if desired.

13
ASUS Xonar D2X
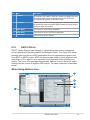
4.2 Installing the PMP software (Portable Music
Processor)
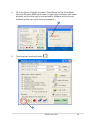
1. From the installation CD menu, select the option to install the PMP software.
2. Follow the instructions on the screen to complete the installation. After the
installation is complete, click Finish.

14 ASUS Xonar D2X
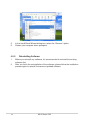
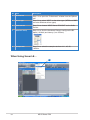
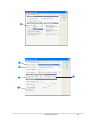
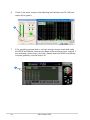
4.3 Installing the Ableton Live
1. Insert the Ableton Live installation CD into the CD/DVD-ROM drive.
2. The installation program will start automatically. If it does not, double click the
setup program.
3. Follow the instructions on the screen to complete the installation. Please read
the “END USER LICENCE AGREEMENT” and make sure you understand
and accept it before you continue the installation. After the installation is
complete, click Finish.
Page is loading ...
Page is loading ...
Page is loading ...
Page is loading ...
Page is loading ...
Page is loading ...
Page is loading ...
Page is loading ...
Page is loading ...
Page is loading ...
Page is loading ...
Page is loading ...
Page is loading ...
Page is loading ...
Page is loading ...
Page is loading ...
Page is loading ...
Page is loading ...
Page is loading ...
Page is loading ...
Page is loading ...
Page is loading ...
Page is loading ...
Page is loading ...
Page is loading ...
Page is loading ...
Page is loading ...
Page is loading ...
Page is loading ...
Page is loading ...
Page is loading ...
Page is loading ...
Page is loading ...
Page is loading ...
Page is loading ...
Page is loading ...
Page is loading ...
Page is loading ...
Page is loading ...
Page is loading ...
Page is loading ...
Page is loading ...
Page is loading ...
Page is loading ...
Page is loading ...
Page is loading ...
Page is loading ...
Page is loading ...
Page is loading ...
Page is loading ...
Page is loading ...
Page is loading ...
Page is loading ...
Page is loading ...
Page is loading ...
Page is loading ...
Page is loading ...
Page is loading ...
Page is loading ...
Page is loading ...
Page is loading ...
Page is loading ...
Page is loading ...
Page is loading ...
Page is loading ...
Page is loading ...
Page is loading ...
Page is loading ...
-
 1
1
-
 2
2
-
 3
3
-
 4
4
-
 5
5
-
 6
6
-
 7
7
-
 8
8
-
 9
9
-
 10
10
-
 11
11
-
 12
12
-
 13
13
-
 14
14
-
 15
15
-
 16
16
-
 17
17
-
 18
18
-
 19
19
-
 20
20
-
 21
21
-
 22
22
-
 23
23
-
 24
24
-
 25
25
-
 26
26
-
 27
27
-
 28
28
-
 29
29
-
 30
30
-
 31
31
-
 32
32
-
 33
33
-
 34
34
-
 35
35
-
 36
36
-
 37
37
-
 38
38
-
 39
39
-
 40
40
-
 41
41
-
 42
42
-
 43
43
-
 44
44
-
 45
45
-
 46
46
-
 47
47
-
 48
48
-
 49
49
-
 50
50
-
 51
51
-
 52
52
-
 53
53
-
 54
54
-
 55
55
-
 56
56
-
 57
57
-
 58
58
-
 59
59
-
 60
60
-
 61
61
-
 62
62
-
 63
63
-
 64
64
-
 65
65
-
 66
66
-
 67
67
-
 68
68
-
 69
69
-
 70
70
-
 71
71
-
 72
72
-
 73
73
-
 74
74
-
 75
75
-
 76
76
-
 77
77
-
 78
78
-
 79
79
-
 80
80
-
 81
81
-
 82
82
-
 83
83
-
 84
84
-
 85
85
-
 86
86
-
 87
87
-
 88
88


Ask a question and I''ll find the answer in the document
Finding information in a document is now easier with AI
Related papers
Other documents
-
Value Audio Converter - Digital to Analogue User manual
-
 PRO SIGNAL PSG3460 Operating instructions
-
Orei DA21 User manual
-
 Covid ACDA-100 User manual
-
Orei DA34 User manual
-
 Cypress DCT-1D Operating instructions
-
Sweex SC016 Owner's manual
-
 infobit iTrans EA300 User manual
-
 VigilLink VLEX-ACT300-TR User manual
-
BluStream OPT41AU User manual


