
GF529 Accessory Kit
OWNER’S MANUAL
READ ALL INSTRUCTIONS AND WARNINGS IN THIS MANUAL BEFORE USING THIS SIGHT
Crosman Corporation
7629 Routes 5 & 20
Bloomeld, NY 14469
United States of America
www.crosman.com
1-800-7AIRGUN (724-7486)
Made in China GF529ACC-515
BUYER AND USER HAVE THE DUTY TO OBEY ALL LAWS ABOUT THE USE AND OWNERSHIP OF THIS SIGHT.
ALWAYS FOLLOW ALL RULES OF FIREARM AND GUN SAFETY.
THIS PRODUCT CONTAINS A CHEMICAL KNOWN TO THE STATE OF CALIFORNIA TO
CAUSE CANCER AND BIRTH DEFECTS AND OTHER REPRODUCTIVE HARM.
RED DOT INSTRUCTIONS
DIRECT VIEWING OF THE SUN CAN CAUSE PERMANENT EYE DAMAGE. DO NOT
ATTEMPT TO VIEW THE SUN THROUGH THIS RIFLESCOPE OR ANY OTHER OPTICAL INSTRUMENT.
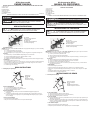
1. Learning the parts of your scope
A. Ocular lens
B. Elevation (vertical) adjustment
C. Illumination dial
D. Objective lens
E. Windage (horizontal) adjustment
F. Picatinny mounting rings
A. Mounting Procedure
CAUTION:
Always ensure your rie is UNLOADED, UNCOCKED and the safety is applied before tting the scope. Practice safe handling
procedures at all times.
1. Locate the proper mounting position on your rie
2. Loosen the mounting screws (F) from the ring mount
3. Install and adjust the scope at a proper position to suit your shooting preferences, then tighten the mounting screws
B. Red Dot
1.
Remove the battery cover from the illumination dial by turning the cover counter clockwise.
2. Install one CR2025 3V lithium battery into the compartment with the “+” side up
3. Replace the cover and tighten it by turning it clockwise
4. To illuminate the red dot, turn the dial clockwise for low power setting (1) and counter-clockwise for high power setting (2).
C. Maintenance
• Do not attempt to lubricate any part of the scope.
• Do not disassemble the scope. Do not loosen or remove any screws or parts. Any such or similar actions will void the warranty.
• Wipe the lens with a clean annel cloth to keep it clean and dry. Do not use nger or nger nail to touch or clean lenses.
• To maintain battery life, turn illumination o when not in use.
• For extended storage, remove the battery
BIPOD INSTRUCTIONS
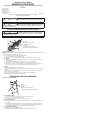
2. Learning the parts of your bipod
A. Mount Base
B. Thumb Nut
C. Legs
D. Pivot release knob
E. Extension Locking ring
A. How to mount the Bipod
1.
Loosen the thumb nut by turning it counter clockwise.
2. Fit the cross bar in the mounting base into the Picatinny rail slot.
3. Tighten the thumb nut by turning it clockwise.
B. How to use the Bipod
1.
To fold and unfold the legs, slide the pivot release knobs downward while swinging the bipod leg into the
desired position.
2. To extend the length of the bipod’s legs, turn the extension locking ring counter-clockwise until the leg extends. To
shorten the length, push up on the leg until you reach your desired height. While holding the leg in place, tighter the
extension locking ring.
C. How to Care for Your Bipod
• Keep the bipod away from harsh chemicals.
• Always use a soft cloth, moistened with alcohol to clean any dust or dirt from the bipod.
Kit de accesorios GF529
MANUAL DEL PROPIETARIO
LEA TODAS LAS INSTRUCCIONES Y ADVERTENCIAS DE ESTE MANUAL
ANTES DE USAR ESTA MIRA
Crosman Corporation
7629 Routes 5 & 20
Bloomeld, NY 14469
Estados Unidos de América
www.crosman.com
1-800-7AIRGUN (724-7486)
Hecho en China
EL COMPRADOR Y EL USUARIO TIENEN EL DEBER DE OBEDECER TODAS LAS LEYES ACERCA DEL USO Y PROPIEDAD DE ESTA MIRA.
SIEMPRE SIGA TODAS LAS REGLAS DE SEGURIDAD DE LAS ARMAS DE FUEGO.
ESTE PRODUCTO CONTIENE UNA SUSTANCIA QUÍMICA QUE SE HA
DETERMINADO EN EL ESTADO DE CALIFORNIA QUE PROVOCA CÁNCER Y DEFECTOS DE NACIMIENTO Y OTROS
DAÑOS REPRODUCTIVOS.
INSTRUCCIONES DEL PUNTO ROJO
VER DE MODO DIRECTO AL SOL PUEDE OCASIONAR DAÑOS PERMANENTES
A LOS OJOS. NO INTENTE VER EL SOL A TRAVÉS DE ESTA MIRA DE RIFLE O CUALQUIER OTRO INSTRUMEN
TO ÓPTICO.
1. Conozca las piezas de su mira
A. Lente ocular
B. Ajuste de elevación (vertical)
C. Esfera de iluminación
D. Lente del objetivo
E. Ajuste (horizontal) de compensación de viento
F. Anillos de montaje Picatinny
A. Procedimiento de montaje
PRECAUCIÓN:
Asegúrese siempre de que su rie esté DESCARGADO, DESAMARTILLADO y que el seguro esté puesto antes de montar
la mira. Practique en todo momento procedimientos de manipulación segura.
1. Localice la posición de montaje adecuada en su rie
2. Aoje los tornillos de montaje (F) de la montura de anillo
3. Instale y ajuste la mira en una posición adecuada para satisfacer sus preferencias de disparo y, a continuación, apriete los
tornillos de montaje
B. Punto rojo
1.
Quite la tapa de la batería de la esfera de iluminación girando la tapa en sentido antihorario.
2. Instale en el compartimiento una batería de litio CR2025 de 3V con el lado “+” hacia arriba
3. Vuelva a colocar la tapa y apriétela girándola en sentido horario
4. Para iluminar el punto rojo, gire la esfera en sentido horario para el ajuste de baja potencia (1) y en sentido antihorario
para el ajuste de alta potencia (2).
C. Mantenimiento
• No intente lubricar ninguna parte de la mira.
• No desmonte la mira. No aoje ni quite ningún tornillo o pieza. Cualquier acción así o similar anulará la garantía.
• Limpie la lente con un paño de franela limpio para mantenerla limpia y seca. No utilice el dedo o la uña para tocar o limpiar
las lentes.
• Para mantener la vida de la batería, apague la iluminación cuando no esté usándola.
• Para un almacenamiento prolongado, extraiga la batería
INSTRUCCIONES DEL BÍPODE
2. Conozca las piezas de su bípode
A. Base de la montura
B. Tuerca de mariposa
C. Patas
D. Perilla de liberación del pivote
E. Anillo de bloqueo de la extensión
A. Cómo montar el bípode
1.
Aoje la tuerca de mariposa girándola en sentido antihorario.
2. Ajuste la barra cruzada de la base de montaje en la ranura del riel Picatinny.
3. Apriete la tuerca de mariposa girándola en sentido horario.
B. Cómo usar el bípode
1.
Para plegar y desplegar las patas, deslice las perillas de liberación de los pivotes hacia abajo al tiempo que bascula la pata
del bípode a la posición deseada.
2. Para extender completamente las patas del bípode, gire el anillo de bloqueo de la extensión en sentido antihorario hasta
que la pata se extienda. Para reducir la longitud, empuje la pata hasta que alcance su altura deseada. Sosteniendo la pata
en su sitio, apriete el anillo de bloqueo de la extensión.
C. Cómo cuidar de su bípode
• Mantenga el bípode apartado de sustancias químicas agresivas.
• Siempre use un paño suave humedecido con alcohol para limpiar el polvo o la suciedad del bípode.
Page is loading ...
-
 1
1
-
 2
2


Ask a question and I''ll find the answer in the document
Finding information in a document is now easier with AI
in other languages
Related papers
-
Crosman CPMDWC (2011) Owner's manual
-
-
-
-
-
-
-
-
-