Dyna-Glo DGU505BAE-D User manual

Category
Small kitchen appliances
Type
User manual
1
Vertical Electric
Analog Smoker
MODEL #DGU505BAE / DGU505BAE-D
Français p. 28
Español p. 55
ATTACH YOUR RECEIPT HERE
Serial Number ________________________________ Purchase Date _________________________________
70-10-560
Rev. 4/20/16
Questions, problems, missing parts? Before returning to your retailer, call our
customer service department at 1-877-447-4768, 8:30 a.m. – 4:30 p.m. CST,
Monday – Friday or e-mail us at [email protected].
UL 1026 - sixth edition, 2012
Electric Household
Cooking and Food
Serving Appliances
CSA C22.2 No. 64-10
(reafrmed 2014)
Household Cooking and
Liquid-Heating Appliances
FOR OUTDOOR
USE ONLY
Use only with Class A GFI
(Ground Fault Interrupter)
3
TABLE OF CONTENTS
Safety Information ...........................................................................................................................3
Package Contents ...........................................................................................................................8
Hardware Contents .........................................................................................................................9
Preparation Before Assembly ........................................................................................................ ..9
Assembly Instructions ..................................................................................................................10
Operating Instructions ...................................................................................................................17
Tips On Smoking ...........................................................................................................................21
Care and Maintenance ..................................................................................................................23
Troubleshooting ...........................................................................................................................24
Replacement Parts List ................................................................................................................26
Warranty ......................................................................................................................................27
Please read and understand this entire manual before attempting to assemble, operate or install the
product. If you have any questions regarding the product, call our customer service department at
1-877-447-4768, 8:30 a.m.- 4:30 p.m. CST, Monday - Friday.
SAFETY INFORMATION
CAUTION
• When using electrical appliances, basic precautions should always be followed to
reduce the risk of re, electrical shock, and injury to persons.
DANGER
• Failure to follow these instructions could result in re or burn hazard which could
cause property damage, personal injury or death.
Assembler/Installer: This instruction manual contains important information necessary for the
proper assembly and safe use of this appliance. Read and follow all warnings and instructions
before assembling and using this appliance. Leave these instructions with the consumer.
Consumer/User: Follow all warnings and instructions when using this appliance.
SAVE THESE INSTRUCTIONS
4
IMPORTANT SAFEGUARDS
READ ALL INSTRUCTIONS, PRIOR TO USING THIS SMOKER
DO NOT use this product for anything other than its intended purpose. It is NOT intended for
commercial use. It is NOT intended to be installed or used in or on a recreational vehicle and/or boat.
DO NOT operate this smoker with a damaged cord or plug or after the smoker malfunctions, has
been dropped, or is damaged in any manner.
DO NOT use smoker within 10 feet (3 m) of a swimming pool, puddle, pond or other body of water.
• Keep smoker and electric controller dry and out of rain at all times.
A minimum clearance of 36 in. (92 cm) to combustible material is required on the front, sides and
back. It is very important to always maintain
proper clearances to combustibles.
• When using avoring wood, add a sufcient
amount at the start of the cooking process, in
order to avoid re-adding wood during the cooking
process. Adding wood while operating may
splash hot water and cause serious injury.
• Check the water level at least every 2 hours. A
sizzling sound may indicate a low water level.
Follow instructions in this manual for adding
water while operating (see Page 17).
DO NOT use the appliance during an
electrical storm.
• Connect to properly grounded outlets only.
• Use only with a Class A GFI (Ground Fault Interrupter) protected circuit.
Arrange the power cord away from trafc areas to ensure that it is not tripped over.
• To disconnect the smoker, turn the smoker off by turning the control dial to O (OFF),
and removing the plug from the outlet.
DO NOT obstruct the ow of ventilated air for the appliance.
DO NOT use metal foil on the cooking grates. Doing so may result in damage to the smoker.
DO NOT use this appliance as a heater.
DO NOT use charcoal with this appliance. This appliance is not designed for use with charcoal
and a re will result if charcoal is used during operation. The re will create an unsafe condition
and damage the smoker.
• Use caution when opening the door of the smoker while in operation. Keep hands, face and body
safe from hot steam or are-ups. DO NOT inhale smoke.
• If you must dispose of ashes in less time than it takes for the ashes to completely cool down, then
remove the ashes from the appliance using insulated oven mitts or gloves and completely soak the
ashes with water before disposing of them in a noncombustible container.
DO NOT wear loose clothing while operating the smoker. Tie back long hair while operating the smoker.
ALWAYS wear shoes that fully cover your feet while operating the smoker.
SAFETY INFORMATION
36 in.
36 in.
92 cm
92 cm
5
DO NOT touch hot surfaces. Use handles or knobs.
• To protect against electrical shock do not immerse cord, plugs, or thermostat control assembly in
water or other liquid.
• Close supervision is necessary when any appliance is used by or near children.
• Unplug from outlet when not in use and before cleaning. Allow to cool before putting on or taking
off parts.
DO NOT operate any appliance with a damaged cord or plug or after the appliance malfunctions or
has been damaged in any manner. Return appliance to the nearest authorized service facility for
examination, repair, or adjustment.
• The use of accessory attachments not recommended by the appliance manufacturer may
cause injuries.
DO NOT use indoors.
DO NOT let cord hang over edge of table or counter, or touch hot surfaces.
• Do not place on or near a hot gas or electric burner, or in a heated oven.
• Extreme caution must be used when moving an appliance containing hot oil or other hot liquids.
Always attach plug to appliance rst, then plug cord into the wall outlet. To disconnect, turn the
control dial to O (OFF), then remove plug from wall outlet.
DO NOT use appliance for other than intended use.
• Use extreme caution when removing trays or disposing of hot grease.
DO NOT clean with metal scouring pads. Pieces can break off the pad and touch electrical parts,
creating a risk of electric shock.
• Fuel, such as charcoal briquettes, is not to be used with appliance.
• Use only on properly grounded outlet.
• Be sure that handles are assembled and fastened properly. See instructions regarding handles on
Page 11.
SAVE THESE INSTRUCTIONS.
SAFETY INFORMATION
WARNING
• DO NOT use 16 or 18 gauge extension cords. Damage to household wiring and/or
re could result.
THE USE OF AN EXTENSION CORD IS NOT RECOMMENDED.
READ ALL INSTRUCTIONS, PRIOR TO USING AN EXTENSION CORD WITH THIS SMOKER
• Use only OUTDOOR type with 3 prong grounding plug, rated for 15 amperes or more, approved by
UL, marked with a W-A and a tag stating “Suitable for Use with Outdoor Appliance”.
• Use the shortest length extension cord required. Do not connect 2 or more extension cords
together.
• Do not let cord hang over edge of table top or other items where it can be pulled by children or
tripped over.
6
SAFETY INFORMATION
Ground Fault Interrupter
• Since 1971 the National Electric Code (NEC) has required Ground Fault Interrupter
devices on all outdoor circuits.
• If your residence was built before 1971, check with a qualied electrician to determine if
a Ground Fault Interrupter protector exists.
• Do not use this appliance if the circuit does not have Class A GFI protection.
• Do not plug this appliance into an indoor circuit.
GENERAL SAFETY
READ ALL INSTRUCTIONS, PRIOR TO USING THIS SMOKER
• This appliance is for outdoor use only in well-ventilated areas. DO NOT operate it under a roof, in a
building, garage or any other enclosed area, or under overhead construction.
• Before each use check that no dead leaves or debris are under the appliance.
• Keep a re extinguisher near this product at all times.
Always unplug the smoker when not in use.
Allow the smoker and its components to cool completely before conducting any routine cleaning
or maintenance.
DO NOT use water or other liquid spray to clean the smoker without rst unplugging the unit.
Allow the smoker to cool to 115°F (45°C) before moving or storing. Use caution when lifting and
moving the appliance to avoid back strain or back injury.
DO NOT move the appliance while it is in use.
• When not in use, the smoker should be kept out of the elements or protected with a cover. Allow
the smoker to completely cool before placing the cover. Store this appliance in a dry, protected
location when possible.
• Use of accessory attachments not recommended by the appliance manufacturer may lead to injury
or property damage.
7
SAFETY INFORMATION
WARNING
To Avoid Serious Injury:
• While cooking, the smoker must be on a level, stable, noncombustible surface in an area
clear of combustible material, including long or dry grass.
• The use of alcohol, prescription or nonprescription drugs may impair the user’s ability to
properly assemble and safely operate this appliance.
DO NOT move the appliance while it is in use.
DO NOT store and use this appliance near gasoline or other combustible liquids or where
other combustible vapors may be present.
• The smoker should only be used in well ventilated areas.
DO NOT use this appliance as a heater.
DO NOT leave the appliance unattended while in use. Keep children and pets away from
the appliance at all times.
• This appliance will be hot during and after use. Use insulated oven mitts or gloves for
protection from hot surfaces or splatter from cooking liquids.
WARNING
CALIFORNIA PROPOSITION 65
1. Combustible by-products produced when using this product contains chemicals
known to the State of California to cause cancer, birth defects, or other
reproductive harm.
2. This product contains chemicals, including lead and lead compounds, known to
the State of California to cause cancer, birth defects or other reproductive harm.
Wash your hands after handling this product.
DANGER
In case of re, unplug smoker from outlet and allow re to burn out. Do not use
water to put out a re in this or another electrical appliance.
To avoid electrical shock disconnect electric cord before cleaning smoker. Never
immerse electric controller or heating element in any liquid.
To avoid the possibility of burns make sure the smoker is completely cooled before
removing and/or cleaning electric controller and heating element.
DO NOT use steel wool or wire brushes to clean the inside of the appliance. Pieces
can break off and touch electrical parts creating a risk of electric shock.
17
OPERATING INSTRUCTIONS
READ ALL INSTRUCTIONS PRIOR TO USING THE SMOKER FOR THE FIRST TIME
Before Initial Use:
Remove all packaging, hang tags, plastic straps, and sales stickers if present. Do not use sharp tools.
Wash cooking grates with warm, soapy water, rinse and allow to completely dry before placing them
back into the smoker.
Prior to initial use, it is important to “season” your smoker. Seasoning helps eliminate potential
factory residue that occurs during production and also enhances avoring, durability and overall
performance. Refer to Page 19 for instructions on how to season the smoker
Before Each Use:
READ ALL INSTRUCTIONS PRIOR TO USING THE SMOKER
• The smoker must be on a level, stable, noncombustible surface in an area clear of combustible
material, including long or dry grass.
Avoid moving the smoker over bumpy or uneven surfaces. Damage to the smoker may occur
as a result.
• To prevent household circuit breakers from tripping, keep electric smoker controls and cord
connections dry and do not use other electrical products on the same circuit.
• Make sure the grease tray, wood chip box and water bowl are clean and empty and placed back
into the smoker according to the instructions.
• Lightly coat each cooking grate with vegetable oil or vegetable oil spray, to prevent foods from
sticking to the grates during cooking.
DO NOT cover the cooking grates with metal foil.
WARNING
Failure to follow all manufacturers instructions could result in serious personal
injury and/or property damage.
Use care when operating your smoker.
To avoid possible are-ups or grease res, clean and empty the water bowl and
grease pan before use.
Read and follow all the information and safeguards in this product guide before
attempting to assemble or operating this smoker.
CAUTION
• Do not use sharp or pointed tools to clean smoker.
• Do not use abrasive oven cleaners, steel wool or metal brushes to clean porcelain
grates or smoker body. They will damage the nish.
• Replace damaged part(s) only with Dyna-Glo certied replacement parts. Do not
attempt to repair damaged parts.
18
OPERATING INSTRUCTIONS
Safety Guidelines
• Refer to the “Troubleshooting Section”, on Pages 24 and 25, for operational problems.
DO NOT open the smoker door while operating, unless it is necessary. Opening the door will allow
heat to escape and prolong the cooking time.
DO NOT USE CHARCOAL. This appliance is not designed for use with charcoal and a re will
result if charcoal is used during operation. The re will create an unsafe condition and damage
the smoker.
Wood Chips must be used to create the smoke and avor.
• In order to maintain optimal performance, cleaning the smoker after each use is highly
recommended. Wait until the smoker has completely cooled before cleaning. Refer to the
Care and Maintenance section on Page 23.
Control Dial Operating Instructions
O - Off
1 - Low Temperature Setting
2 - Medium Temperature Setting
3 - High Temperature Setting
NOTE: Always leave the water bowl in place while operating the smoker. If additional water is
needed during the cooking process, carefully pour water into the drip pan opening. DO NOT remove
the water bowl to add water. Avoid splashing water onto the heating element. Serious damage to the
heating element could result, along with are-ups and electrical failure.
The probe of the temperature control dial must be properly inserted into the external housing of
the heating element and the dial should be set to the O (OFF) position before plugging the cord
into an electrical (GFI) outlet. Refer to assembly instructions on Page 14 for inserting the
thermostat control.
1
2
3
Temperature Indicator Light
19
OPERATING INSTRUCTIONS
Seasoning the Smoker (Before Initial Use)
To season your smoker, follow these steps WITHOUT the use of food:
1. Place desired avoring woods in wood chip box and ll to ¾ full. DO NOT put water
in water bowl.
2. With the smoker door closed, turn the control dial to 3 (High) and maintain this burner setting
for 2 hours.
3. Once seasoning is complete, your smoker’s interior will have a durable, seasoned coating.
4. Allow the smoker completely cool, before cleaning out the wood chip box.
Cooking with the Smoker:
Turn the control dial clockwise (show clockwise icon) to set the desired temperature. The dial
can be turned to any position between 1 (Low) and 3 (High). Turn the dial up (to increase
the temperature) or down (to decrease the temperature), as needed, to ne-tune the desired
temperature.
NOTE: The burner will not turn on until the dial is set to "1" (Low). The indicator light, near the
control dial, will turn on and remain on until the smoker temperature has reached the desired setting.
Once the desired temperature is reached, the indicator light will turn off. The thermostat will
continue regulating the desired temperature by automatically cycling the burner on and off during
use. The internal temperature may uctuate plus or minus 10-15°F (5-8°C) as the appliance cycles
to maintain correct cooking temperature setting. Refer to Page 22 for more information on cooking
temperatures.
Using the Wood Chip Box:
The wood chip box is designed to provide a sustainable amount of smoke and avor during the cook-
ing process. Fill the box at least ½ to ¾ full with desired wood chips or wood pellets. Anything more
or less than this amount may not create the appropriate amount of smoke for adding avor. Refer
to Page 21 for the types of wood chips that are recommended for various foods. To add more wood
chips or pellets during the cooking process, simply open the side access door and place a small
handful of chips or pellets on the loader. Closing the door will allow the chips or pellets to fall into the
wood chip box. Do not use wood chunks or charcoal. NOTE: The use of wood chips or wood pellets
is not required during the cooking process.
NOTE: Always operate the smoker with the wood chip box in place – regardless of whether or not
wood chips are used.
Using the Water Bowl:
The use of water in the bowl is not required, but the water bowl MUST be in place during operation.
To use the bowl, ll to at least ¾ full with warm water, before turning on the smoker. Cold water may
prolong the cooking process. Do not overll the water bowl. Doing so may cause the water to splash
inside the smoker. IMPORTANT: Always cook with both the water bowl and wood chip box in place,
regardless of whether or not they are lled.
CAUTION
The smoker becomes HOT during use. Use heat resistant gloves while accessing the
inside of the smoker.
20
OPERATING INSTRUCTIONS
• In order to maintain optimal performance, cleaning the smoker after each use is highly recommended.
• Wait until the smoker has completely cooled before cleaning.
• Plastic or bristle brushes may be used for cleaning stubborn stains.
DO NOT use steel wool or wire brushes. Pieces can break off and touch electrical parts creating a
risk of electric shock.
• Clean the controller casing and heating element by wiping with a damp cloth. Use a mild detergent.
• Completely dry the controller casing and heating element before use. Failure to do so, may cause
damage to the controller and prevent the smoker from working properly.
• Clean the cooking grates with warm soapy water or with a water & baking soda solution. Non-
abrasive scouring powder can be used for stubborn stains.
• Clean the grease tray and water bowl with a damp cloth and warm soapy water. Allow the liquids
inside the water bowl and grease tray to cool completely before cleaning.
Avoid cleaning the cooking surfaces, while the smoker is still hot.
• Follow all warnings and safety precautions before removing meat from smoker or preparing the
unit for storage. Please see Page 3 for important warnings and safeguards.
CAUTION
• Do not use sharp or pointed tools to clean smoker.
• Do not use abrasive oven cleaners, steel wool or metal brushes to clean porcelain
grates or smoker body. They will damage the nish.
• Replace damaged part(s) only with Dyna-Glo certied replacement parts. Do not
attempt to repair damaged parts.
21
Pairing wood chips with a specic type of food will depend on the preferences of the user.
This page can be used as a general guideline for acquiring the ideal avor.
• Hardwoods such has hickory, pecan, apple, cherry or mesquite typically burn slower and produce
more smoke over longer periods of time.
• To prolong the burn cycle for wood chips, pre-soak them in a separate bowl of water for at least 30
minutes, and/or wrap the chips in perforated aluminum foil.
• Most smoke avoring occurs within the rst hour of cooking. Adding wood chips after the rst
hour is typically not necessary unless extra smoke avoring is desired.
Here's a list of the most popular smoking woods and a little information about each.
Type of Wood
Apple
Almond
Ash
Citrus
Cherry
Fruitwood
Grapevine
Hickory
Maple
Mesquite
Oak
Pecan
Suggested Food
All meats
All meats
Fish and red meat
Pork and chicken
Pork and Beef
Pork, poultry and sh
Poultry, game and lamb
Pork and beef
Pork and Poultry
Beef, chicken and sh
Red meats, game, ribs
and sh
Ribs and red meat
Comments
Mild and sweet avor with a slight hint of fruity avor.
Each species of apple wood should offer a slightly different
avor. Apple smoke produces an attractive browning effect.
Produces a sweer smoke with a natural nutty avor.
Very light avor.
Lemon and orange wood produce a light but fruity avor.
Light and fruity avor.
Wood such as peach, pear and plum produce a mild but
sweet smoke with a hint of fruity avor.
Grapevine wood produces a lot of smoke. A little wood goes
a long way. It produces a tart avor that has a hint of fruit.
Hickory produces a very strong avor so it is recommended
to start using only a little amount.
Light and sweet.
This wood burns very hot so be aware. Much like hickory,
mesquite produces a strong avor.
Another wood that produces a heavy smoke. Start slow
with this wood.
Produces a light smoke that offers a sweet and nutty avor.
22
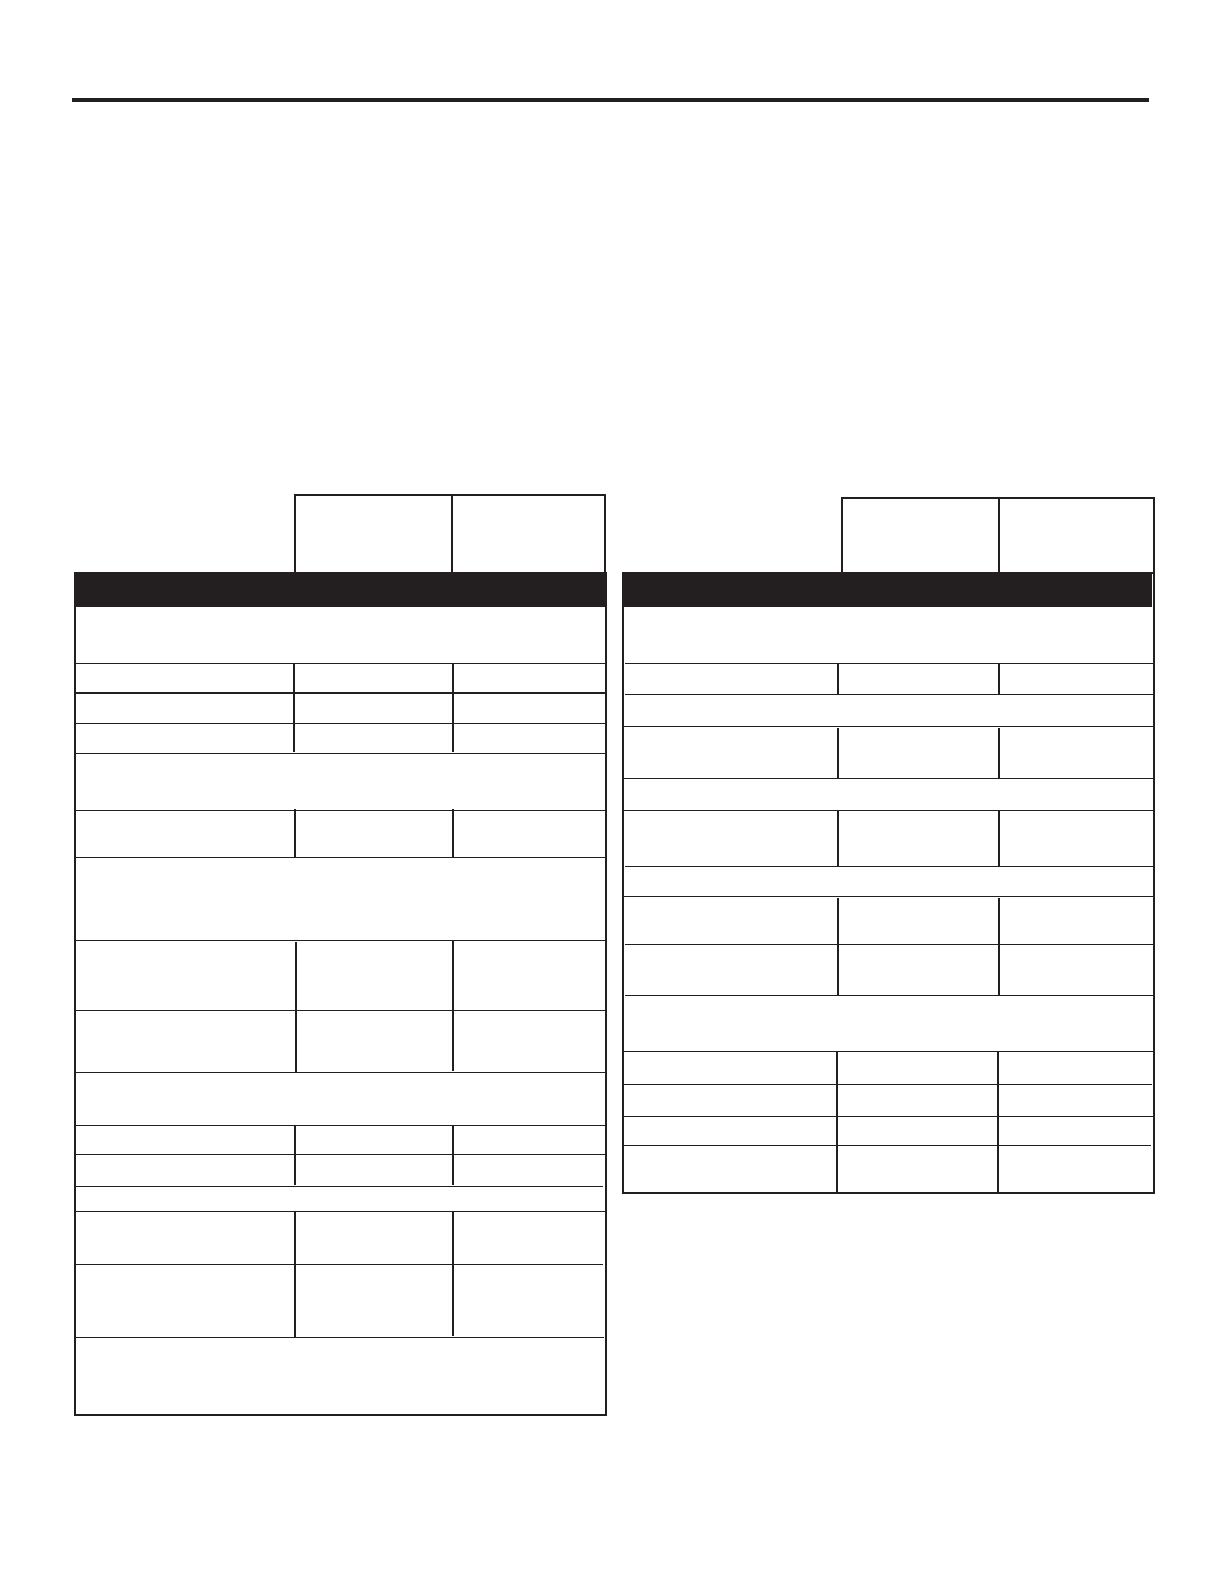
SUGGESTED SMOKING AND MEAT TEMPERATURES
Meat, Poultry, Fish
Game
Suggested Smoking
Temperatures
Safe Minimum Food
Temperatures
Beef, veal and lamb
(pieces and whole cuts)
Medium-rare 225°F (107.2°C) 145°F (63°C)
Medium 225°F (107.2°C) 160°F (71°C)
Well done 225°F (107.2°C) 170°F (77°C)
Pork
(ham, pork loin, ribs)
Pork (pieces and 225 - 240°F 160°F (71°C)
whole cuts) (107.2 - 115.6°C)
Ground meat and meat mixtures
(burgers, sausages, meatballs, meatloaf, casseroles
and mechanically tenderized beef)
Beef, veal (including 250 - 275°F
mechanically tenderized), (121 - 135°C) 160°F (71°C)
lamb and pork
Poultry (chicken & turkey) 250 - 275°F 165°F (74°C)
(121 -135°C)
Poultry
(chicken, turkey, duck)
Pieces 250°F (121°C) 165°F (74°C)
Whole 250°F (74°C) 165°F (74°C)
Seafood
Fish 225 - 240°F 158°F (70°C)
(107.2 - 115.6°C)
Shellsh (shrimp, lobster, 225 - 240°F
crab, scallops, clams, (107.2 - 115.6°C) 165°F (74°C)
mussels and oysters)
Since it is dicult to use a food thermometer to check the temperature of
shellsh, discard any that do not open when cooked.
Chops, steaks and roasts
(deer, elk, moose, caribou/reindeer, antelope and pronghorn)
Well done 225°F (107.2°C) 170°F (77°C)
Large Game
Bear, bison, musk ox 250 - 300°F 165°F (74°C)
walrus, etc. (121 - 149°C)
Small game
Rabbit, muskrat, 225 - 240°F
beaver, etc. (107.2 - 115.6°C) 165°F (74°C)
Ground Meat
Ground meat and 250 - 300°F
meat mixtures (121 - 149°C) 165°F (74°C)
Ground venison 250 - 300°F
and sauage (121 - 149°C) 165°F (74°C)
Game birds/waterfowl
(wild turkey, duck, goose, partridge and pheasant)
Whole 250°F (121°C) 165°F (74°C)
Breasts and roasts 250°F (121°C) 165°F (74°C)
Thighs, wings 250°F (121°C) 165°F (74°C)
Stung(cookedalone 250°F(121°C) 165°F (74°C)
or in a bird)
Suggested Smoking
Temperatures
Safe Minimum Food
Temperatures
Please understand that these are only guidelines. All smokers are different. Take into consideration
other variables such as weather conditions, wind, ambient temperature, etc. and things can vary by
as much as an hour or more.
Learn to tell doneness visually as well as with temperature and time and you will be a much better
chef with the smoker.
For more information on food safety call:USDA Meat and Poultry Hotline at 1-888-MPHOTLINE
(888-674-6854) In Washington, DC
Or visit the USDA website at www.fsis.usda.gov
23
CARE AND MAINTENANCE
AFTER USE SAFETY AND MAINTENANCE
WARNING
• Use caution when lifting and moving the smoker to avoid strain injuries.
Two people are recommended to lift or move the smoker.
DO NOT store the smoker near gasoline or other combustible liquids or where
combustible vapors may be present. Keep the area around the smoker clear and free
of combustible materials and vapors.
DO NOT store this smoker in an area accessible to children or pets. Store the
smoker in a dry, protected location.
DO NOT allow anyone to conduct activities around the smoker following use until
it has cooled. It is hot during operation and remains hot for a period of time following use.
DO NOT leave hot ashes unattended until the smoker cools completely.
• The smoker becomes extremely hot – allow the smoker to cool completely before
handling. Allow the smoker to cool before removing and cleaning the grease pan.
• Dispose of cold ashes by wrapping them in heavy-duty aluminum foil and putting
them in a noncombustible container. If you must dispose of the ashes in less time
than it takes for them to completely cool, remove the wood chip box from the smoker with
heat resistant gloves, place the ashes in heavy-duty foil and soak them completely with
water before disposing of them in a noncombustible container. Always use protective oven
mitts or heat resistant gloves when accessing the inside of the smoker during and after use.
CAUTION
All care and maintenance procedures are to be performed while the smoker is turned
off, unplugged and cooled. Always perform maintenance by a qualied service person.
To clean the inside and outside of the smoker cabinet, simply use a damp cloth.
Spray-washing with a water hose is not recommended. Moisture should be wiped away
and not allowed to stand inside or on top of the smoker. Once cleaned, you may prefer to
lightly coat the interior of the smoker cabinet with cooking oil or cooking spray.
If rust is present on the exterior surface of the smoker, clean the area with steel wool or
emery cloth and use heavy-duty, heat-resistant paint.
NEVER apply additional paint to the interior of the smoker.
24
TROUBLESHOOTING
If you have any questions regarding the product, please call customer service at 1-877-447-4768,
8:30 a.m. – 4:30 p.m., CST, Monday – Friday.
PROBLEM POSSIBLE CAUSE CORRECTIVE ACTION
No heat
from smoker
Circuit breaker trips
or fuse blows
Smoker does
not generate
enough heat
Smoker is turned off
No power
Faulty controller or heating
element
Another appliance is
plugged into the same circuit
as the smoker (too many
appliances using the
same circuit).
Moisture or water in the
controller, cord connection
or outlet connection
Damaged or frayed cord
Damaged electrical connection
Smoker was not pre-heated
sufciently or temperature was
set too low
Door left open or unlatched
Improper extension cord
Turn on the smoker
Check for any tripped circuit breakers
and reset the breaker, if needed
Check for faulty or tripped GFI (Ground
Fault Interrupter) at the outlet. Reset the
GFI or replace, if needed.
If breaker or GFI continues to trip, use
a different outlet on a separate breaker
circuit.
Try another working appliance in
the outlet.
Replace controller or heating element
Find another outlet on a separate circuit
Keep all connections dry and free from
moisture. DO NOT use this appliance in
the rain or when snow is falling.
Turn the smoker off, unplug the smoker
and check the cord for damage. Replace,
if needed.
Replace controller
Pre-heat for 15-20 minutes. Increase
temperature settings via controller
Close the door and latch the door
before use.
Use cord rated for outdoor use at 15 amps
Very little or no
smoke coming
from smoker
Not enough wood chips
Wood chips are too small
Check wood chip level. Wood chip box
should be at least ¾ full
To generate proper amounts of smoke,
wood chips should be at least 1”-3”
(2.5cm-7.6cm) and no thicker than ¼”
(0.6cm). Wood shavings and wood
chunks are not recommended. DO NOT
use charcoal
25
TROUBLESHOOTING
PROBLEM POSSIBLE CAUSE CORRECTIVE ACTION
Flare-ups
Persistent
grease re
Meat contains excessive
amounts of fat
Cooking temperature is
too high
Grease build-up
Too much build-up on
grease drip tray and/or
grease cup
Trim the appropriate amount of fat
before cooking
Lower the temperature as needed
Clean the smoker, according to
the instructions
Turn off the smoker and open the door to
allow the re to burn out.
DO NOT use water to extinguish the
re. Personal injury my result.
Allow the smoker to completely cool
before cleaning the tray and cup.
26
REPLACEMENT PARTS LIST
For replacement parts, call our customer service department at 1-877-447-4768, 8:30 a.m. - 4:30 p.m.
CST, Monday - Friday or e-mail us at [email protected].
70-01-560 Printed in China
PART DESCRIPTION PART #
1 Smoker Cabinet
Assembly 70 - 01 - 375
2 Door Assembly with
Logo (No Temp Gauge) 70 - 01 - 370
3 Side Handle (L/R) 70 - 01 - 373
4 Temp Gauge
Assembly* 70 - 01 - 372
5 Cooking Grates 70 - 01 - 374
6 Door Handle
Assembly 70 - 01 - 371
7 Door Latch Bracket 70 - 01 - 352
8 Door Latch Handle
(without Sleeve) 70 - 01 - 353
9 Door Latch Handle
Sleeve 70 - 01 - 356
10 Leg 70 - 01 - 379
PART DESCRIPTION PART #
11 Air Outlet Tube
Assembly 70 - 01 - 381
12
Wood Chip Access
Door Handle*
13
Water Bowl
14 Wood Chip Box
70 - 01 - 383
70 - 01 - 427
70 - 01 - 428
15 Water Bowl & Wood
Chip Box Support 70 - 01 - 376
16 Cooking Grate Support 70 - 01 - 382
17 Grease Cup Assembly 70 - 01 - 380
18 Heating Element
Assembly 70 - 01 - 377
19 Thermostat Control
Assembly 70 - 01 - 378
20 Thermostat Shield 70 - 01 - 424
n/a Hardware Pack 70 - 09 - 506
n/a Instruction Manual 70 - 10 - 560
5
3
1
6
4
2
7
10
8
9
A
15
13
17
14
16
18
19
11
12
20
29
DYNA-GLO
®
FUMOIR NUMÉRIQUE ÉLECTRIQUE VERTICAL
ARRÊT!
NUL BESOIN DE REVENIR AU MAGASIN
Questions sur l’assemblage?
Besoin d’information sur des pièces?
Le produit est couvert par la garantie des fabricants?
Composez le numéro sans frais : 1 877 447-4768
du lundi au vendredi de 8 h 30 h à 16 h 30, HNC
Conservez ce Manuel du propriétaire et votre preuve d’achat en cas de besoin
Pour nous permettre de vous aider
Fournissez les renseignements ci-après :
Numéro de modèleDate d’achat N° de série du produit
LE NUMÉRO DE MODÈLE ET LE NUMÉRO DE SÉRIE DU PRODUIT FIGURENT SUR
L’ÉTIQUETTE INDIQUANT LE DÉBIT CALORIFIQUE DE VOTRE PRODUIT.
Lieu d’achat
82
70-01-560 Imprime in China
5
3
1
6
4
2
7
10
8
9
A
15
13
17
14
16
18
19
11
12
20
LISTA DE PIEZAS DE REPUESTO
  • Page 1 1
  • Page 2 2
  • Page 3 3
  • Page 4 4
  • Page 5 5
  • Page 6 6
  • Page 7 7
  • Page 8 8
  • Page 9 9
  • Page 10 10
  • Page 11 11
  • Page 12 12
  • Page 13 13
  • Page 14 14
  • Page 15 15
  • Page 16 16
  • Page 17 17
  • Page 18 18
  • Page 19 19
  • Page 20 20
  • Page 21 21
  • Page 22 22
  • Page 23 23
  • Page 24 24
  • Page 25 25
  • Page 26 26
  • Page 27 27
  • Page 28 28
  • Page 29 29
  • Page 30 30
  • Page 31 31
  • Page 32 32
  • Page 33 33
  • Page 34 34
  • Page 35 35
  • Page 36 36
  • Page 37 37
  • Page 38 38
  • Page 39 39
  • Page 40 40
  • Page 41 41
  • Page 42 42
  • Page 43 43
  • Page 44 44
  • Page 45 45
  • Page 46 46
  • Page 47 47
  • Page 48 48
  • Page 49 49
  • Page 50 50
  • Page 51 51
  • Page 52 52
  • Page 53 53

Dyna-Glo DGU505BAE-D User manual

Category
Small kitchen appliances
Type
User manual

Ask a question and I''ll find the answer in the document

Finding information in a document is now easier with AI