GE GFWN1100L1WW Owner's manual
- Category
- Washing machines
- Type
- Owner's manual

0
GEAppliances.com
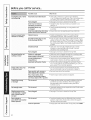
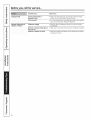
Safety Instructions ............. 2,s
Operating Instructions
Control Panels ...................... 4, 5
Control Settings ..................... 6, 7
Features ........................... 8-10
Loading and Using the Washer .... 10, 11
Cleaning the Washer ............. 12-14
Installation Instructions ..... 15-20
Preparing to Install Your Washer ...... 15
Rough-In Dimensions ................. 16
Location of Your Washer ............. 16
Unpacking Your Washer .............. 17
Drain Requirements .................. 18
Electrical Requirements ............... 18
Water Supplg Requirements .......... 18
Installing the Washer ............. 19, 20
Replacement Parts ................... 20
Troubleshooting Tips ......... 2t-24
Consumer Support
Warrantg ............................ 25
Service Telephone Numbers .......... 28
GFWN1000
WBVH5200
WBVH5300
WCVH6400
WCVH6800
WHDVH680
I
ENERGYSTAR
As an ENERGYSTAR® partner,
GE has determined that this
product meets the ENERGYSTAR®
guidelinesforenergg efficiencg.
Write the model and serial
numbers here:
Model #
Serial #
Youcan find them on 6 label on the
side of the washer.
49-90392
12/08/09 GE

IMPORTANT SAFETY INFORMATION.
READ ALL INSTRUCTIONS BEFORE USING.
WARNING! or.,,our in,:ormo ionin ,ismon.o mus minimi ris,
of fire or explosion, electric shock, or to prevent property damage, personal injury or
loss of life.
Theinstructions in this manual and all other literature included with this washer are
not meant to cover every possible condition and situation that may occur. Good, safe
practices and caution MUSTbe applied when installing, operating and maintaining
any appliance.
WATER HEATERSAFETY
Undercertain conditions,hydrogen gas may beproduced in a water heaterthat has not been usedfor two weeks
or more.Hydrogen gas can be explosiveunder thesecircumstances.
Ifthe hot water hasnot beenusedfor two weeksor more, preventthe possibilitgof damage or injurg bg
turning on all hot water faucets and allowingthem to run for severalminutes. Dothis before usingang electrical
appliance which isconnected to the hot water sgstem.Thissimple procedurewill allow ang built-up hgdrogen
gas to escape.Sincethe gas isflammable, do not smokeor usean openflameor applianceduringthis process.
PROPERINSTALLATION
Thiswasher must beproperly installed and located in accordance with the Installation Instructions beforeit is used.
[] Installor storewhere itwill not beexposed [] Properlyground washerto conformwith allgoverning
to temperatures belowfreezingor exposed codesand ordinances.Followdetailsin Installation
to the weather,which couldcausepermanent Instructions.
damage and invalidatethe warranty.
YOURLAUNDRYAREA
[] Keepthe area underneath and around gout
appliances free of combustible materials such as
lint, paper,rags and chemicals.
[] Donot leavethe washer door open.An open door
could entice children to hang on the door or crawl
insidethe washer.
[] Closesupervision isnecessarg ifthis appliance is
used bg or near children. Do not allow children to
plag on,with or insidethis or ang other appliance.

GEAppliunces.com
Usethis
appliance
onlyfor its
intended
purposeas
describedin
this Owner's
Manual.
WHEN USINGTHEWASHER
[]
[]
[]
[]
Never reach into washer while it is moving.
Wait until the machine has completelg stopped
before opening the door.
Do not mix chlorine bleach with ammonia
or acids such as vinegar and/or rust remover.
Mixing different chemicals can produce a toxic
gas which mag cause death.
Do not wash or drg articles that have been
cleaned in, washed in, soaked in or spotted
with combustible or explosive substances (such as
wax, oil, paint, gasoline, degreasers, drg-cleaning
solvents, kerosene, etc.)which mag ignite or
explode. Do not add these substances to the
wash water. Do not use or place these substances
around gour washer or drger during operation.
The laundry process can reduce the flame
retardancg of fabrics. To avoid such a result,
carefullg follow the garment manufacturer's
wash and care instructions.
Never attempt to operate this appliance
if it isdamaged, malfunctioning, partially
disassembled, or has missing or broken parts,
including a damaged cord or plug.
Do not slam the washer door closed. Do not trg
to force the door open when locked (LOCKED
indicator ON).This could result in damage to
the washer.
Thewasher isequipped with an electrical
overload protector. The motor will stop
if it becomes overheated. The washer will
automaticallg restart after a cool-down
period of up to 2 hours, if the washer
has not been manuallg turned off
during this time.
[]
To minimize the possibilitg of electric shock,
unplug this appliance from the power supplg
or disconnect the washer at the building's
distribution panel bg removing the fuse or
switching off the circuit breaker before
attempting ang maintenance or cleaning. NOTE:
Pressing the power button does NOTdisconnect
the appliance from the power supplg.
WHEN NOT IN USE
Turn off water faucets to relieve pressure on
hoses and valves and to minimize leakage if
a break or rupture should occur. Check the
condition of the fill hoses; GErecommends
changing the hoses everg 5 gears.
Before discarding a washer, or removing it
from service, remove the washer door to prevent
children from hiding inside.
[] Do not attempt to repair or replace any part of
this appliance unless specifically recommended
in this Owner's Manual, or in published user-repair
instructions that gou understand and have the
skills to carrg out.
[] Do not tamper with controls.
READANDFOLLOWTHISSAFETYINFORMATIONCAREFULLY.
SAVE THESE INSTRUCTIONS

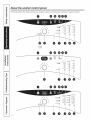
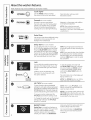
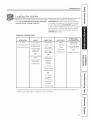
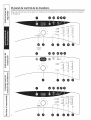
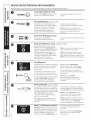
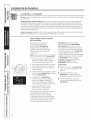
About the washer control panel.
Find the illustration that closely matches your mode! and see the cycle descriptions starting on page 6 for details.
(Onsome
models)
o
o •
WASH TEPIP
HOT
COrD
TAPCOLD
J
4
Page is loading ...

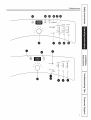
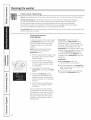
About the washer control panel.
Power
press to "wake up" the displag. Ifthe displag is active, press to put the washer into standbg mode.
NOTE: Pressing POWER does not disconnect the appliance from the power supply.
Wash Cycles
The wash cgcles are optimized for specific tgpes of wash loads. The chart below will help gou match
the wash setting with the loads. The GentleCleaff _lifters lightlg tumble the clothes into the water and
detergent solution to clean the load.
WHITES For heavilg to lightlg soiled white cottons, household linens, work and plag clothes.
COLORS/NORMAL For heavg to lightlg soiled colorfast cottons, household linens, work and plag
clothes.
STAINWASH For heavg soiled colorfast cottons, household linens, work and plag clothes.
EASYCARE Forwrinkle-free and permanent press items.
(PERMAPRESS}
(some models)
ACTIVEWEAR For active sports, exercise and some casual wear clothes. Fabrics include modern
(some models) technologg finishes and fibers such as spandex, stretch and micro-fibers.
DELICATES For lingerie and special-care fabrics with light to normal soil. Provides gentle
(some models) tumbling and soak during wash and rinse.
HANDWASH For items labeled hand-washable with light soils. Provides gentle rocking to mimic
the handwashing action.
WASHABLE Forthe washing of machine washable wool products, provided that theg are
WOOLS washed according to the instructions on the garment label. When selecting this
(some models) cgcle, gou must use a detergent suitable for washing wool.
MY CYCLE Pressto use,create or modifg custom wash cgcles.
(some models)
SPEEDWASH For lightlg soiled items that are needed in a hurrg. Cgcle time isapproximatelg
30 minutes, depending on selected options.
DRAIN & SPIN Drain and spin at any time.
RINSE& SPIN To quicklg rinse out ang items at ang time.
6

GEAppliances.com
Soil Level
Changing the SOIL LEVELincreases or decreases the wash time to remove different amounts of soil.
To change the SOIL LEVEL,press the SOIL LEVEL button until gou have reached the desired setting.
Spin Speed
Changing the SPIN SPEEDchanges the final spin speed of the cgcles. Alwags follow the fabric
manufacturer's care label when changing the SPIN SPEED.
To change the SPIN SPEED,press the SPIN SPEED button until gou have reached the desired setting.
Higher spin speeds are not available on certain cgcles, such as Delicates.
Higher spin speeds remove more water from the clothes and will help reduce drg time, but mag also
increase the possibilitg of setting wrinkles on some fabrics.
Wash Temp
Adjust to select the proper water temperature for the wash cgcle. The prewash and rinse water is
alwags cold to help reduce energg usage and reduce setting of stains and wrinkles.
Follow the fabric manufacturer's care label when selecting the wash temperature.
To change the wash temperature, press the WASH TEHP button until gou have reached the desired
setting. The Sanitized wash temperature is not available on certain cgcles, such as Delicates.
When selecting the Sanitize wash temperature (on some models), the washer increases the water
temperature to sanitize and kill more than 99% of mung common bacteria found in home laundrg. The
sanitize wash temperature is onlg available on Stain Wash and Whites wash cgcles. For best results,
select
the heavg soil setting when using the Sanitize wash temperature setting.
NOTE: The first !0 seconds of the wash fill is always cold. This feature assists in conditioning the fabric
and preventing stains from setting on garments.
START/PAUSE
Pressto start o wash cgcle. If the washer is running, pressing it once will pause the washer and unlock
the door. Pressagain to restart the wash cgcle.
NOTE:If the washer is paused and the cycle is not restarted within 2 hours, the current wash cycle will
be cancelled.
NOTE:The washer performs automatic system checks after pressing the STARTbutton. Water will flow
in 45 seconds or less.You may hear the door lock and unlock before water flows; this is normal.

About the washer features.
NOTE:Features may not be available on all washer models.
Cycle Signal
Usethe SIGNALbutton to change Pressthe button until gou reach
the volume ofthe end ofcgcle signal, the desiredvolume.
Prewash Ion some models)
Prewashisan extra wash before
the main wash. Useit for heavilg soiled
clothes or for clothes with a care label
that recommends prewashing before
washing. Besureto add high-efficiencg
detergent, or the proper wash additive
to the prewash dispenser.
NOTE:When selecting prewash,
it is recommended to use powder
detergent in the main wash (detergent)
compartment.
Extra Rinse
Usean extra rinsewhen additional rinsing
isdesiredto remove excessdirt and
detergent from soiled loads.
Delay Start (on some models)
Youcan delag thestart of a wash cgcle
for 10-18 hours,depending on the model.
Pressthe DELAYSTARTbutton to choose
the numberof hoursgou want to delag
the start of the cgcle,then pressthe START
button.Themachine willcount down and
start automaticallg at the correct time.
NOTE:Ifyou forget to fully closethe door,
a remindersignalwill beepremindingyou
to do so.
NOTE:Ifyou open thedoor when the delay
iscounting down, the machine willenter
thepausestate.Youmustclosethe door
and pressSTARTagain in order to restart
thecountdown.
Lock
Youcan lock the controls to prevent ang
selections from being made. Or gou can
lockthe controls after gou have started
a cgcle.
HOLD 3 SECSTO
LOCK & UNLOCK
CONTROL PANEL
Children cannot accidentally start
the washer by touching pads with
this option selected.
To lockthe washer,pressand hold
the DELAYSTARTbutton for 3 seconds
(onsome models useSIGNALbutton).
To unlock the washer controls, press
and hold the DELAYSTARTbutton for
3 seconds.
Thecontrol lock icon on the displag will
light up when itison.
NOTE:The POWERbutton can still be
used when the machine is locked.
ii_iii_iiill_I i_ _ !_ ii_i_
MY CYCLE (on some models)
Tosavea favoritecgcle,setthe desired
settingsforwash cgcle,soillevel,spinspeed
and washtemp settingsand holddownthe
MYCYCLEbuttonfor3seconds.Abeepwill
soundto indicatethecgclehasbeensaved.
To usegour custom cgcle,pressthe
MYCYCLEbutton beforewashing a load.
Tochange the saved cgcle,set the desired
settings and hold down the MYCYCLE
button for 3 seconds.
NOTE: When using MY CYCLE, wash
options cannot be modified after the
cycle has been started.
NOTE:If you change wash options with
MYCYCLEbefore starting the cycle, the
MYCYCLElight will turn off and you will
be returned to the base cycle.
8
BASKET CLEAN
BasketClean isa cgcle that freshens up
the insideof gour washer.Thecgcle uses
bleachor other availablewashing
machine cleanersand morewater to
refresh gout washer. UseBasketClean
once evergmonth to reduceodor and
residuebuildup insidethe washer.
Formore information on BasketClean,
referto the Careand Cleaningsection
on page 12.

GEAppliances.com
The Dispenser Drawer
Slowlyopen the dispenser drawer by pulling
it out untilit stops.
After addinglaundryproducts,slowlydose
thedispenserdrawer.Closingthe drawertoo
quicklycouldresultin earlydispensingof the
bleach,fabric softeneror detergent.
Youmay seewater in thebleachand fabric
softenercompartmentsat theendof thecycle.
Thisis a resultofthe flushing/siphoningaction
and ispart of thenormaloperationof the
washer.
ThePrewashCompartment(onsomemodels)
i Only usethe PrewashCompartmentifyou
are selectingthe Prewashcyclefor heavily
soiledclothes.Add measureddetergent or
prewashadditiveto the back left prewash
compartment of thedispenserdrawer.
[] Detergentor prewashadditive isflushed
from thedispenserinthe prewashcycle
(ifselected).
NOTE:Liquiddetergentwill drain intothe
washerdrumas itis added.
[] Detergentusagemay needto be adjusted
for water temperature,water hardness,size
and soillevelofthe load.Avoidusingtoo
muchdetergent inyour washerasit can lead
to oversudsinganddetergent residuebeing
lefton the clothes.
Pew@Detergent
NormalHEL
Det_
2XHELiquid
DetergentSetting{
Imostcommon
setting),,
3XHE
Lic
Deterge
Settin(
Appearancemayvary
The Detergent Compartment
[]High-efficiency detergent is required
for this washer. Usethe detergent
manufacturer's recommendedamount.
Thedetergentselectioninsertmust beplaced
inthe detergent compartment in a specific
positionaccordingto what type ofdetergent
you are using.
m PowderDetergent-Placethe insert
in therear position.ThePowderIcons_
mustline up on center whenthe insert
isinthe powderposition.
[] Liquid Detergent- Youwill needto adjust
the insertaccordingto the type ofLiquid
Detergentyou are using.Theiconson the
sideof the detergentcompartment must line
up onthe center whenthe insert isin
position.
NOTE:Not allmodels havethe2x and 3x
detergentsettings.Somehaveonlyregular
HEdetergentsettings.Youmust reducethe
amount of detergent for2x or 3x detergent
per bottleinstructions.
Hovethe insert by pullingit up and replace
it bysliding itdown betweeneitherthe rear
or front detergent compartment moldedrails,
asdesired,for powderor liquiddetergent.
[] Add measureddetergent to thefront left
detergent compartment ofthe dispenser
drawer.
[]
[]
Detergentisflushedfrom the dispenser
at the beginningof thewash cycle.Either
powderedor liquid detergent canbe used.
Detergentusagemay needto beadjusted
for water temperature,water hardness,
sizeand soillevelof the load.Avoidusingtoo
muchdetergent in your washeras itcan lead
to oversudsingand detergent residuebeing
left onthe clothes.
[] Usingmoredetergent than the
recommendedquantity cancause
residuebuildupon your washer.
Onsomemodels,theLiquidBleach
Compartmentisinthecenter.
The Liquid Bleach Compartment
IMPORTANT:The bleach compartment
position varies by model.Besure to identify
thecorrect compartment for bleachbefore
using.
tf desired,measureout the recommended
amount of liquid bleach,not to exceed
1/5 cup(80ml),and pour into the center
compartment labeled"LIQUIDBLEACH"
markedwith this symbol,/_,.
Donot exceedthe maximumfill line.Overfilling
cancauseearlydispensingofthebleachwhich
couldresultin damagedclothes.
NOTE:Donotusepowderedbleachin the
dispenser.
Onsomemodels,theLiquidBleach
Compartmentisontheright. 9

About the washer features.
Onsomemodels,theFabricSoftener
Compartmentisontheright.
The Fabric Softener Compartment
IMPORTANT:The fabric softener compartment
position varies by model. Be sure to identify
the correct compartment for fabric softener
beforeusing.
tf desired,pour the recommendedamount
of liquid fabric softenerintothe comportment
labeled"FABRICSOFTENER."
Useonly liquidfabric softener inthe dispenser.
Dilutewith water to themaximum fill line.
Donot exceedthe maximumfill line.Overfilling
cancauseearlydispensingofthefabric softener
which could stain clothes.
NOTE:Donotpour fabricsoftenerdirectly
on thewash load.
Onsomemodels,theFabricSoftener
Compartmentisinthecenter.
Loading and using the washer.
Always follow fabric manufacturer's core label when laundering.
Sorting Wash Loads
Sort laundry into loads that can be washed together.
Colors Soil Fabric Lint
Whites Heavy Delicates Lint Producers
Lights Normal Easy Care Lint Collectors
Barks Light Sturdy Cottons
10
[] Combine large and small items in a load. Load large items first. Large items should not be more than
half the total wash load.
[] Washing single items is not recommended. This may cause an out-of-balance load. Add one or two
similar items.
[] Pillows and comforters should not bemixed with other items. This may cause an out-of-balance load.
Pre Clothes
[] To avoid snags during washing.
Follow these steps to maximize garment care.
Closegarment zippers, snaps, buttons and hooks.
Mend seams, hems, tears.
Empty all items from pockets.
Remove nonwashable garment accessories such as ornaments and nonwashable trim materials.
[] To avoid tangling, tie strings, draw ties and belt-like materials.
[] Brush away surface dirt and lint; treat spots and stains.
[] Promptly wash wet or stained garments to maximize results.
[] Mix garments using recommended maximum load sizes on page !!.
[] Use nylon mesh garment bags to wash small items.
[] Wash multiple garments at one time for best results.

GEAppliances.com
Loading the Washer
Wash drum may be fully loaded with loosely added
items. Do not wash fabrics containing flammable
materials (waxes, cleaning fluids, etcJ.
To add items after washer has started, press
START/PAUSEand wait until the door is unlatched.
The washer may take up to 30 seconds to unlock
the door after pressing START/PAUSEdepending
on the machine conditions. Do not try to force open
the door when it is locked. After the door unlocks,
open gently. Add items, close the door and press
START/PAUSEto restart.
Maximum Lauding Sizes*
WORKWEAR
4 Jeans
5 Workwear Shirts
5 Workwear Pants
LINENS
2 Bath Sheets
10 Bath Towels/
12 Washcloths
7 Hand Towels/
2 Terrycloth
Bath Mats
OR
2 Flat Queen-Sized
Sheets
2 Fitted Queen-
Sized Sheets
4 Pillowcases
MIXEDLOAD
4 Pillowcases
2 Hand Towels
2 Flat Sheets/
2 Fitted Sheets
2 Bath Towels/
4 Washcloths
OR
6 Shirts (Men's
or Women's)
4 Pair Pants
(Khakis
or Twills)
5 T-Shirts
7 Pairs of Boxers
4 Pairs of Shorts
OR
6 T-Shirts
4 Pairsof
Sweatpants
4 Sweatshirts
2 Hoodies
7 Pairs of Socks
DELICATES**
7 Bras
7 Panties
3 Slips
2 Camisoles
4 Nightgowns
SPEEDWASH
(2-4 GARMENTS}
2 Casual Wear
Work Shirts
! Pair Casual Wear
Work Pants
OR
3 Soccer Uniforms
*Exceeding maximum recommended load sizes may affect cleaning performance and garment care.
**Using a nylon mesh bag for small items is recommended.
11

Cleaning the washer.
Careand Cleaning
Exterior: ImmediatelLl wipe off anLl spills. Wipe with damp cloth. Do not hit surface with sharp objects.
Moving and Storage: Askthe service technician to remove water from drain pump and hoses.
Do not store the washer where it will be exposed to the weather. When moving the washer,
the tub should be kept stationurg bLlusing the shipping bolts removed during installation.
See Installation Instructions in this book. If these parts are not available, theg can be ordered
bg visiting our Website at GEAppliunces.com or bg calling 800.GE.CARES.
Long Vacations: Be sure the water supplg is shut off at the faucets. Drain all water from the hoses if the
weather will be below freezing.
Cleaning the interior
of the Washer
To clean the interior of the washer, select
the BasketClean feature on the control
panel. The cgcle will use more water,
in addition to bleach, to refresh gout
washer.
NOTE:Readthe instructions below
completelLl before starting the
BasketCleancgcle.
1. Remove any garments or objects from
the washer and ensure the washer
basket is emptLl.
2. Open the washer door and pour
one cup or 250 ml of liquid bleach
or other washing machine cleaner
into the basket.
. Closethe door and select the
BasketClean cgcle. Pushthe START
button.
4. When the BasketClean cLlcle is
working, Llouwill see CLn on the
displuLl.The cLlcle will complete in
about 90 minutes. Do not interrupt
the cLlcle.
5. After the cgcle is complete, leave
the door open slightlLl for better
ventilation.
If for anLlreason the cLlcle needs to
be interrupted, the door will not open
immediatelLl. Forcing open the door at
this stage mall cause water to flood.
The door will open after the water is
drained to a level where it would not
flood the floor.
BasketClean mall be interrupted
bll pressing the START/PAUSEbutton
in between cllcles. A power outage in
the house might also interrupt the cllcle.
When the power supplll is back, the
BasketClean cllcle resumes where it had
stopped. When interrupted, be sure to run
a complete BasketClean cllcle before
using the washer. If the POWER button
is pressed during BasketClean, the cllcle
will be lost.
IMPORTANT:
[] Run BasketClean with 1 Cup
(250 ml) of bleach once a month.
[] After the completion of a BasketClean
cllcle, the interior of llour washer mall
have a bleach smell.
[] It is recommended to run a light color
load after the BasketClean cllcle.
12

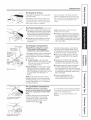
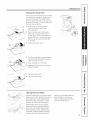
GEAppliances.com
Pour
spout
Cleaning the Pump Filter
Due to the nature of the front-load washer,
it issometimes possible for small articles
to pass to the pump. The washer has a
filter to capture lost items so they are not
dumped to the drain. To retrieve lost items,
clean out the pump filter.
1. Using a coin or flat screwdriver
in the notch on the door, open
the access door.
2. Place a shallow pan or dish under
the pump access door and towels
on the floor in front of the washer to
protect the floor. It is normal to catch
about a cup of water when the filter
is removed.
3. Pull down the pour spout.
o
5o
5.
Turn the pump filter counterclockwise
and remove the filter. Open slowly to
allow the water to drain.
Clean the debris from the filter.
Replace the filter and turn clockwise.
Tighten securely.
Pump
7. Flip up the pour spout.
8. Close the access door.
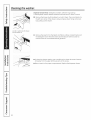
Cleaning the Door Gasket
Open the washer door. Using both hands,
press down the door gasket. Remove any
foreign objects if found trapped inside
the gasket. Hake sure there is nothing
blocking the holes behind the gasket.
While holding down the door gasket,
inspect the interior gasket by pulling it
down with your fingers. Remove any
foreign objects if found trapped inside
this gasket. Hake sure there is nothing
blocking the holes behind the gasket.
When you are finished cleaning
the door gasket, remove your
hands and the gasket will return
to the operating position.
13

Cleaning the washer,
Locktab isvisible onlyafter drawer
hasbeenpulledout
Dispenser Drawer Area: Detergent and fabric softener mag build up
in the dispenser drawer. Residue should be removed once or twice a month.
[] Remove the drawer bg first pulling it out until it stops. Then reach back into
the left rear corner of the drawer cavitg and press down firmlg on the lock
tab, pulling out the drawer.
I Remove the inserts from the bleach and fabric softener compartments and
the detergent insert. Rinsethe inserts and the drawer with hot water to
remove traces of accumulated laundrg products.
J
[] To clean the drawer opening, use a small brush to clean the recess. Remove
all residue from the upper and lower parts of the recess.
[] Return inserts to the proper compartments. Replace the dispenser drawer.
14

Installati
I structi
her
j If you hove any questions, call 800.GE.CARE5(800.452.2757) orvisitour Website at:6EApplionces.com J
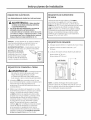
BEFORE YOU BEGIN
Read these instructions completely and carefully.
. IH PORTANT - Savetheseinstructions
for local inspector's use.
" IM PORTJ_NT - Observe all governing
codes and ordinances,
. Note to Installer - Be sure to leave these
instructions with the Consumer.
, Note to Consumer - Keepthese instructions
for future reference.
, Skill level - Installation of this appliance requires
basic mechanical and electrical skills.
, Completion time - 1-3 hours
, Proper installation isthe responsibility of the installer.
, Product failure due to improper installation is not
covered under the Warranty.
FOR YOUR SAFETY:
-_kWARNING
, This appliance must be properly grounded and
installed as described inthese Installation Instructions.
, Do not install or store the appliance in an area where
it will be exposed to water/weather. Seethe Location
of Your Washer section.
NOTE:This appliance must be properly
grounded, and electrical service to the washer
must conform with local codes and ordinances
and the latest edition of the National Electrical
Code, ANSI/NFPA 70.
TOOLS REOUIRED FOR
WASHER INSTALLATION
[] !/4" nut driver
[] 3/8" socket with ratchet
[] 3/8" open-end wrench
[] Adjustable wrench or 7/!6" socket with ratchet
[] Adjustable wrench or 9/!6" open-end wrench
[] Channel-lock adjustable pliers
[] Carpenter's level
PARTS SUPPLIED
[] CableTie
[] Water Hoses(2)
[] HoseGuide
STACK BRACKET KIT
A stack bracket kit is available at additional cost.
It can be ordered in the United States by visiting
our website at GEAppliances.com or calling
800.GE.CARES.Order kit #WE25X!00!8 or GEFLSTACK.
15

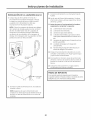
Installation Instructions
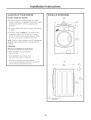
LOCATION OF YOUR WASHER
Do Not Install the Washer:
1.In an area exposed to dripping water or outside
weather conditions. The ambient temperature should
never be below 60°F (15.6°C)for proper washer
operation.
2.In an area where it will come in contact with curtains
or drapes.
3.On carpet. The floor MUSTbe a hard surface with
a maximum slope of 1/2" per foot (1.27cm per
30 cm).To make sure the washer does not vibrate
or move, you may have to reinforce the floor.
NOTE:If floor is in poor condition, use 3/a" impregnated
plywood sheet solidly attached to the existing floor
covering.
IMPORTANT:
Minimum Installation Clearances
. When installed in alcove: Sides, Rear,
Top = 0" (0 cm)
, When installed in closet: Sides, Rear,
Top = 0" (0 cm), Front = 1" (2.54 cm)
• Closet door ventilation openings required:
2 louvers each 60 square in. (387 cm2),located 3"
(7.6cm) from top and bottom of door
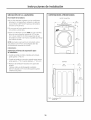
ROUGH-IN DIMENSIONS
FRONT
27.0"
._ (68.6cm) _-
20.4"(51.9cm) _l
ELECTRONICTRANSPARENTVBOR_1
%_ ® OOo J
2.2"
(5.6cm)
40.6"*
(103.1cm)
SIDE
3&6"
(772 cm)
1,6"
_" (3.9cm)
........................................[ t ......
39.1"
(99.2crn)
40.6"*
(103.1cm)
*NOTE:With pedestal,62.6"
Stacked,84"
16

Installation Instructions
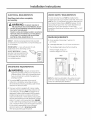
UNPACKING THE WASHER
WARNING: Recycleor destroy the carton
and plastic bagsafter the washer isunpacked. Make
materials inaccessibleto children. Childrenmight use
them for play. Cartonscovered with rugs, bedspreads
or plasticsheets can become airtight chambers causing
suffocation.
1. Cut and removethe top and bottom packaging straps.
2. While it isin the carton, carefully lay the washer on its
side.DONOTlay the washer on its front or back.
3. Turndown the bottom flaps-remove all basepackaging,
including the cardboard, styrofoam bose andstyrofoam
tub support (insertedin center of base).
NOTE:If you ere installing e pedestal, proceed to
the installation instructions that come with the pedestel.
4. Carefully return the washer to an upright position and
remove the carton.
5. Carefully move the washer to within 4 feet (122cm)
of the final location.
6. Removethe following from the back sideof the washer:
/4bolts
/4plastic spacers(including rubber grommets)
/4power cord retainers
NOTE:Failureto remove the shipping braces can cause
the washer to become severely unbalanced.
Suveall bolts for future use.
NOTE:If you must transport the washer at a later date,
you must reinstallthe shipping support hardware to prevent
shipping damage. Keepthe hardware in the plastic bag
provided.
Incuseyou misplaceyour shipping bolts, replacements
are uvuilubleut udditionul cost. Theycan be ordered in the
United Stutesbyvisiting our website ut GEAppliunces,com
or culling 800,GE.CARES,Order kit #WH49×10039,
17

Installation Instructions
ELECTRICAL REQUIREMENTS
Read these instructions completely
and carefully.
_ZkWARNING: TOREDUCETHERISKOF
FIRE,ELECTRICALSHOCKAND PERSONALINJURY:
. DONOTUSEAN EXTENSIONCORDORANADAPTER
PLUGWITH THISAPPLIANCE.
Washer must be electrically grounded in accordance
with local codes and ordinances, or in the absence
of local codes, in accordance with the NATIONAL
ELECTRICALCODE,ANSI/NFPANO. 70.
CIRCUIT- Individual,properly polarizedand grounded
15-amp branch circuit fused with 15-amp time-delay fuse
or circuit breaker.
POWERSUPPLY- 2-wire, with ground, 120-volt,
single-phase,60-Hz,alternating current.
grounded 3-prong receptacle to be
located sothe power supply cord
isaccessible when the washer is
in an installed position.
GROUNDING REQUIREMENTS
WARNING: Improperconnection of the
equipment grounding conductor can result in a risk
ofelectrical shock.Checkwith a licensedelectrician
ifyou are in doubt asto whether the appliance is
properly grounded.
1. Thewasher MUSTbe grounded. Inthe event of
malfunction or breakdown,grounding will reduce
the riskof electricalshockby providing a path of least
resistancefor electricalcurrent.
2. Sinceyour washer isequipped with a powersupply
cord havingan equipment-grounding conductor and
a grounding plug,the plug MUSTbe plugged into an
appropriate, copper-wired receptaclethat isproperly
installedand grounded in accordancewith all local
codesand ordinances or inthe absence of local codes,
with the National ElectricalCodes,ANSI/NFPA70 (latest
edition).If in doubt, calla licensedelectrician. DONOT
cut off or alter the grounding prong on the power supply
cord. Insituationswhere a two-slot receptacle ispresent,
it isthe owner's responsibilityto havea licensed
electricianreplaceit with a properly grounded
three-prong grounding-type receptacle.
WATER SUPPLY REQUIREMENTS
Hot and cold water faucets MUSTbe installed within
/42inches(107cm) of your washer's water inlet. Thefaucets
MUSTbe 3/4" (1.9cm)garden hose-type so inlet hosescan
be connected. Water pressure MUSTbe between 10 and
120 pounds per square inch.Yourwater department can
advise you of your water pressure.The hotwater
temperature should be set to deliverwater at 120°to 1/40°F
(48°-60°0.
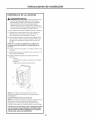
DRAIN REQUIREMENTS
1. Draincapable of eliminating 17gals (64.3L)
per minute.
2. A standpipe diameter of !-!//4" (3.!8 cm) minimum.
3. Thestandpipe height abovethe floor should be:
Minimum height: 2/4"(61cm)
Maximum height: 96" (24/4cm)
BACK
f
96 in.
(244 cm)
Max.
NOTE:The drain hose attached to the washer can reach
a 58" (1/47cm) high standpipe. For a higher standpipe,
contact an authorized parts distributor.
18

Installation Instructions
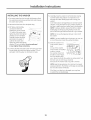
INSTALLING THE WASHER
1. Runsome water from the hot and coldfaucets to flush
the water linesand remove particlesthat might clog up
the water valve screens.
2. Removethe inlethosesfrom the plastic bag.
3. (90°elbow end)Carefullg
connect the inlet hose
marked HOTto the outside
"H" outlet ofthe water valve.
Tighten bg hand,then tighten
another 2/3 turn with pliers.
Carefullgconnect the other
inlet hoseto the inside"C"
outlet of the water valve.
Tighten bg hand;then tighten
another 2/3 turn with pliers.Do not crossthreed
or over-tighten these connections.
4. Connectthe inlet hoseendsto the HOTand COLDwater
faucets tightlg bg hand,then tighten another 2/3 turn
with pliers.Turnthe water on and checkfor leaks.
5.
Carefullg move the washer to its final location.Gentlg
rock the washer into position. It isimportant not to
damage the rubber levelinglegswhen moving gour
washer
to its final location. Damaged legscan increasewasher
vibration. It mag be helpfulto sprag window cleaner on
the floor to help move gout washer into its final position.
NOTE:To reducevibration, ensure that all four rubber
leveling legsare firmlg touching the floor. Pushand
pull on the back right and then back left of gour washer.
NOTE:Donot usethe dispenser drawer or door to lift
the washer.
.
NOTE:If gou are installing into a drain pan, gou can use
a 2z_-inchlong 2x4to leverthe washer into place.
With the washer in its
final position, place a
level
on top of the washer
(if the washer is installed
under a counter,
the washer should not
be able to rock).Adjust
the front leveling legs
up or down to ensure the washer is resting solid. Turn
the lock nuts on each leg up towards
the base of the washer and snug with a wrench.
NOTE:Keepthe leg extension at a minimum to prevent
excessivevibration. Thefarther out the legsare extended,
the more the washer will vibrate.
Ifthe floor isnot levelor isdamaged, gou mag have
to extend the rear leveling legs.
19

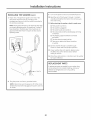
Installation Instructions
INSTALLING THE WASHER Icont.}
7. Attach the U-shaped hose guide to the end of the
drain hose. Placethe hose in a laundrg tub or
standpipe and secure it with the cable tie provided in
the enclosure package.
NOTE:Placingthe drain hose too far down the drain pipe
can cause a siphoning action. No morethan 7 inches of
hoseshould be in the drain pipe.There must be an air
gap around the drain hose.A snug fit can also cause a
siphoning action.
CableTie/ CableTiej_
1
\\
\
\
CableTie
8. Plug the power cord into a grounded outlet.
NOTE:Check to be sure the power is off at the circuit
breaker/fuse box before plugging the power cord into
an outlet.
.
10.
11.
12.
13.
14.
Turn on the power at the circuit breaker/fuse box.
Read the rest of this Owner's Manual. It contains
valuable and helpful information that will save gou
time and moneLI.
Before starting the washer, check to make sure:
[] Main power isturned on.
[] Thewasher isplugged in.
[] Thewater faucets are turned on.
[] Theunit isleveland all four levelinglegsare firmlg
on the floor.
[] Theshipping support hardware isremoved
and saved.
[] The drain hoseis properlg tied up.
[] Thereare no leaksat the faucet, drain line
or washer.
Run the washer through a complete CLICle.
Check for water leaks and proper operation.
If LlOUrwasher does not operate, please review
the BeforeYouCallForServicesection before
calling for service.
Place these instructions in a location near the washer
for future reference.
REPLACEMENT PARTS
If replacement parts are needed for LlOUrwasher,theLI
can be ordered in the United States bLIvisiting our
Website at GEAppliances.com or bg calling
800.GE.CARES.
2O

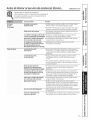
Beforeyou call for service... GEAppliances.com
Troubleshooting Tips
Save time and money! Review the charts on the
following pages first and you may not need to call for
service.
PossiOleCo.se WhatToOo
Not draining Load is out of balance . Redistributeclothesand run drain & spinor rinse&spin.
Not spinning _ Increaseload sizeifwashing small load containing heavg
Not agitating and light items.
Pump clogged • Seepage !3 on how to cleanthe Pump Filter.
Drain hose is kinked or • Straighten drain hoseand make surewasher isnot
improperly connected sitting on it.
Household drain may _ Checkhousehold plumbing. Youmag need to call
be clogged a plumber.
Drain hosesiphoning; drain hose _ Ensurethere isan air gap between hose anddrain.
pushed too far down the drain
Leaking water Door gasket is damaged . Checkto see ifgasket isseated and not torn. Objects
left in pockets mag cause damage to the washer (nails,
screws,pens, pencils).
Door gasket not damaged . Water maUdrip from the door when the door isopened.
Thisisa normal operation.
. Carefullgwipe off rubber door seal.Sometimesdirt or
clothing isleft inthis sealand can causea small leak.
Check back left of washer • Ifthis area iswet, gou have oversudsingcondition.
for water Uselessdetergent.
Fillhoses or drain hose is _ Makesure hoseconnections are tight at washer and
improperly connected faucets and make sureend of drain hoseiscorrectlg
inserted in and secured to drain facilitg.
Household drain may _ Checkhousehold plumbing. Youmag need to call
be clogged a plumber.
Dispenser clogged _ Powdersoap mag cause clogs insidethe dispenser and
cause water to leakout the front of the dispenser.Remove
drawer and clean both drawer and insideof dispenser box.
Pleasereferto Cleaningthe Washer section.
Incorrect use of detergent _ UseHEand correct amount of detergent.
Dispenser box crack _ Ifnew installation,checkfor crackon insideof dispenserbox.
Clothes too wet Load is out of balance . Redistributeclothesand run drain & spinor rinse&spin.
Increaseload sizeifwashing small load containing heavg
and light items.
Themachine willslow the spinspeeddown to 410 rpm if
it hasa hard time balancingthe load.Thisspeedisnormal.
Seepage !3 on how to cleanthe Pump Filter.
Thedrg weight of the load should be lessthen 16 lb.
Straighten drain hoseand make surewasher isnot
sitting on it.
Checkhousehold plumbing. Youmag need to call
a plumber.
Ensurethere isan air gap between hose and drain.
Pump clogged
Overloading
Drain hose is kinked or
improperly connected
Household drain may
be clogged
Drain hosesiphoning; drain hose
pushed too far down the drain
21
Page is loading ...
Page is loading ...
Page is loading ...
Page is loading ...
Page is loading ...
Page is loading ...
Page is loading ...
Page is loading ...
Page is loading ...
Page is loading ...
Page is loading ...
Page is loading ...
Page is loading ...
Page is loading ...
Page is loading ...
Page is loading ...
Page is loading ...
Page is loading ...
Page is loading ...
Page is loading ...
Page is loading ...
Page is loading ...
Page is loading ...
Page is loading ...
Page is loading ...
Page is loading ...
Page is loading ...
Page is loading ...
Page is loading ...
Page is loading ...
Page is loading ...
-
 1
1
-
 2
2
-
 3
3
-
 4
4
-
 5
5
-
 6
6
-
 7
7
-
 8
8
-
 9
9
-
 10
10
-
 11
11
-
 12
12
-
 13
13
-
 14
14
-
 15
15
-
 16
16
-
 17
17
-
 18
18
-
 19
19
-
 20
20
-
 21
21
-
 22
22
-
 23
23
-
 24
24
-
 25
25
-
 26
26
-
 27
27
-
 28
28
-
 29
29
-
 30
30
-
 31
31
-
 32
32
-
 33
33
-
 34
34
-
 35
35
-
 36
36
-
 37
37
-
 38
38
-
 39
39
-
 40
40
-
 41
41
-
 42
42
-
 43
43
-
 44
44
-
 45
45
-
 46
46
-
 47
47
-
 48
48
-
 49
49
-
 50
50
-
 51
51
-
 52
52


GE GFWN1100L1WW Owner's manual
- Category
- Washing machines
- Type
- Owner's manual
Ask a question and I''ll find the answer in the document
Finding information in a document is now easier with AI
in other languages
Related papers
Other documents
-
Groupe Brandt BWF618DS Owner's manual
-
 Rustica Hardware PFC-OB Installation guide
-
Midea MLP1GS User guide
-
Haier XQG50-QF800 Owner's manual
-
Hotpoint VBSR3100DCWW Owner's manual
-
Frigidaire LTF2940EE0 Installation guide
-
-
-
Frigidaire LTF8000FE0 Installation guide
-
Hotpoint VLSR1090G5WW Owner's manual
