
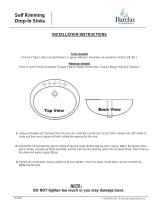
Congratulations!
You have purchased a quality product designed for long lasting beauty. The following instructions will take you step-
by-step through the installation process and care of your product. We recommend reading the entire instruction
booklet before beginning.
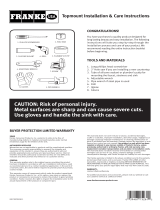
Caution: Risk of personal injury. Metal surfaces are sharp and can cause severe cuts. Use gloves and handle
sink and tools with care.
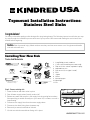
Installing Your New Sink
Tools And Materials
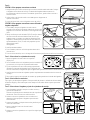
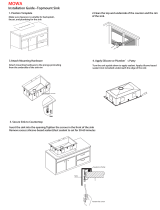
Step 1: Remove existing sink
1. Leave the faucet and drain outlet in place
2. Shut off water supply valves (usually under sink).
3. Release any water that may be in the supply lines by opening faucet valves
(the same way you would normally turn your water on). Let water run until it
stops owing.
4. Disconnect the supply lines from the water supply valves.
5. Disconnect the drain tting from the waste trap.
6. Remove clips around underside of old sink.
7. Lift sink out with faucet and drain tting still in place.
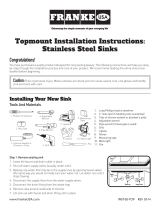
Topmount Installation Instructions:
Stainless Steel Sinks
KINDREDINST-TOP 01/15
1. Long Phillips head screwdriver
2. 2” hole saw (if installing new countertop)
3. Tube of silicone sealant or plumber’s putty
4. Adjustable wrench
5. Pipe wrench (if steel pipe is used)
6. Drill
7. Jigsaw
8. Gloves
9. Measuring tape
10. Work light
11. File
1. Phillips Screwdriver
3. Silicone Sealant or
Plumber’s Putty
2. Hole Saw
4. Adjustable
Wrench
9. Measuring
Tape
6. Drill
7. Jigsaw
5. Pipe Wrench
8. Gloves
10. Work Light
11. File
Supply valves
Waste trap
Supply
line
Step 1
US
A

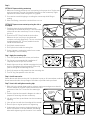
Step 2:
OPTION A: Prepare existing countertop
1. Make sure existing countertop cut-out opening is the proper size. Set the new
sink into opening. The sink rim should rest evenly on the countertop. Slight
adjustments can be made using a le or a jigsaw.
2. Use caution to avoid chipping or cracking the countertop while ling or
sawing.
3. After nal tting, remove the new sink from cut-out.
OPTION B: Prepare a new countertop using the sink as
a template
1. Carefully place the sink upside down on the
countertop at the desired position. Trace the outline
of the sink onto the countertop. Do not cut along
this line.
2. Draw a line 3/8” (9mm) inside the sink outline.
Measure the cut-out line you just drew and
compare to all sink dimensions. The cut-out should
be approximately 3/4” (19mm) smaller than the
overall sink dimensions.
3. Verify both measurements.
4. Drill a pilot hole inside the cutting line.
5. Using a jigsaw, cut along the inside line to create
the opening in the countertop.
Step 3: Apply the mounting clips
1. Turn sink upside down onto a clean, soft surface.
2. Six clips are recommended for installation. If
required, two extra clips are included.
3. Attach clips over the pre-drilled mounting slot in the
sink rim (see diagram for placement). Ensure clip
jaws are facing the outside edge of sink.
4. Verify clip snaps are fully seated into the mounting slot.
5. Turn all clip jaws parallel to the sink rim.
Step 4: Install accessories
Attach faucet and drains to the sink. Use plumber’s putty or silicone sealant under the
faucet base and under the top ange of the drain to provide a leak-proof seal.
Step 5: Insert sink and tighten mounting clips
1. With sink in the upside-down position, place a continuous and generous bead of
silicone sealant or plumber’s putty around the entire
perimeter of the rim. This serves as a watertight
seal.
2. Position clips back as noted in diagram in order to
prepare for inserting sink into countertop.
3. Lift sink, turn face-up and lower into the countertop
opening.
4. Line up front rim with the front edge of the counter.
5. Return clips to original position for tightening.
6. Underneath the countertop, begin tightening clips
with a screwdriver in an even fashion, alternating
sides while tightening until the entire rim is sealed.
Length
Widt h
Step 2
Countertop
Using a 2" hole saw, drill
a hole on the inside of the
line that was traced using
the cut-out template.
Countertop
Using a jigsaw, cut along outline
traced on countertop.
1
4
5
2
OPTION B: 1
4
2
5
Countertop
Sink
Integrated
installation
rail
Front rim
Clip
Clip
Clip
Clip
Clip
Clip
Step 3: 1-4 5
Faucet base
Top ange
of drain
Step 4
Slowly tighten
the clip with
a screwdriver
Push
up
Sink
Sink
Drop in
position
CountertopCountertop
Apply a bead of silicone
sealant or plumber’s putty
around the rim.
Countertop
Countertop
1
5
6
2
Step 5: 1
5
6
2

7. Do not overtighten. It is only necessary to draw the rim down snugly to the countertop.
8. Wipe excess sealant from perimeter with a wet cloth.
Step 6: Final Steps
1. Connect and tighten hot and cold faucet supply lines, strainer, drain and trap assembly. Note: Depending on the
location of sink drain holes, it may be necessary to adjust the drain pipe ttings under the sink to accommodate
the new sink installation.
2. Turn on water supply and examine all connections for leaks. If leak appears, tighten joint slightly. Do not overtighten.
3. With stopper in place, ll sink and examine area under sink and around drain ange for leaks.
4. Remove stopper and let water drain while examining drain connections for leaks.
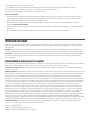
CARE INSTRUCTIONS
For best results, opt for a mild liquid soap and a wet cloth to gently clean your sink. Avoid using harsh chemicals and
rough brushes/sponges. After cleaning, rinse thoroughly and towel dry.
Stains: On mirror nish surfaces, use a metal polish recommended for stainless steel. All other nishes can be
cleaned with mild abrasives. Always rub with the grain where applicable.
Caution: Steel wool pads leave tiny particles that may cause rust spots. Chlorine bleach can cause corrosion and
pitting. Drain cleaners with sulfuric or hydrochloric acid can attack stainless steel.
Buyer Protection Limited Warranty
Kindred USA warrants its sinks and accessories to be free from manufacturing defects in material and workmanship,
under the normal residential use for which it was intended, for the lifetime of the product.
Marine & Outdoor Use: Kindred USA sinks and accessories are not warranted for marine or outdoor installation.
General: This warranty applies only to the original owner, providing the product has been installed in accordance with
our installation instructions, used as recommended and in a normal residential application. In the event of a warranty
claim, the owner will be required to provide proof of purchase (sales receipt). This warranty covers all components
which make the product operational. Kindred USA, at its option, may repair or replace the product or components
necessary to restore the product to good working condition. Kindred USA reserves the right to inspect the installation
prior to the actual replacement of the product or component part. This warranty does not cover misuse or abuse,
accidental damages, scuffs or scratches, improper installation, abnormal usage, negligence or damage caused
by improper maintenance or cleaning. Normal wear of parts is excluded from the warranty. Damage caused by
impurities or acts beyond our control are not covered. Any product or part which has been repaired or altered in any
manner outside of Kindred USA’s factory, unless previously authorized in writing by Kindred USA, will void warranty.
Any replacement excludes transportation and any labor re-installation costs. This warranty does not allow recovery
of incidental or consequential damages such as loss of use, delay, property damage or other consequential damage,
and Kindred USA accepts no liability for such damages. The Kindred USA warranty is limited to the above conditions
and to the warranty period specied herein and is exclusive. Kindred USA DISCLAIMS all other warranties, expressed
or implied, including IMPLIED WARRANTIES OF MERCHANTABILITY AND/OR FITNESS FOR A PARTICULAR
PURPOSE. This warranty gives you specic legal rights that vary from state to state.
Additional Information: For additional information about warranty, products and accessories, please contact our
Kindred USA Customer Service Team.
Phone: 1-888-847-9634
Email: ks-customerservice.us@franke.com
Address: 800 Aviation Parkway, Smyrna, TN 37167
Page is loading ...
Page is loading ...
Page is loading ...
-
 1
1
-
 2
2
-
 3
3
-
 4
4
-
 5
5
-
 6
6


Ask a question and I''ll find the answer in the document
Finding information in a document is now easier with AI
in other languages
- español: KINDRED EZS704NB Manual de usuario
Related papers

Other documents
-
Swiss Madison SM-VS272 User guide
-
Barclay Products 4-181WH Installation guide
-
 Barclay Products 4-2068WH Installation guide
-
Pegasus KS33 Installation guide
-
Barclay CS520 Installation guide
-
 MOWA H2522-GD Installation guide
-
Franke CUX11027-ADA User manual
-
Polaris Sinks P6T8132MX-ENS Installation guide
-
Linkasink D056 SH Installation guide
-
 FrankeUSA 16340036 Installation guide


