Kenmore 66561652100 Owner's manual
- Category
- Microwaves
- Type
- Owner's manual
This manual is also suitable for

®
Edition
ULTRA WAVETMMicrowave Hood Combination
Combinacibn Microondas Campana de
ULTRA WAVETM
Models/Modelos 665.61652, 665.61654, 665.61659
.J
\
q
qlq
qBq
I
qq
4619-652-60632/8184142 Sears, Roebuck and Co., Hoffman Estates, IL 60179 www.sears.com

Table of
Contents
Warranty ............................................................ 2
We Service What We Sell ................................. 3
Microwave Oven Safety ................................... 4
Getting to Know Your
Microwave Oven ............................................... 7
How your Kenmore ULTRA WAVE TM
microwave hood combination works ............. 7
Radio interference .......................................... 7
Testing your dinnerware or cookware ............ 8
Operating tips ................................................ 8
Electrical connection ...................................... 8
Microwave oven features ............................... 9
Control panel features ................................. 10
Using the cooking rack ................................ 13
Using the exhaust fan .................................. 13
Using the cooktop/countertop light ............. 14
Setting the clock .......................................... 14
Using the kitchen timer ................................ 15
Using ADD ONE MINUTE ............................ 16
Changing preset cooking times ................... 16
Microwave Oven Use ..................................... 17
Cooking at high cook power ....................... 17
Cooking at different cook powers ............... 18
Cooking in stages ........................................ 20
Progress bar ................................................. 21
Using AUTO COOK ..................................... 22
Using AUTO REHEAT .................................. 23
Using ULTRA DEFROST TM ........................... 24
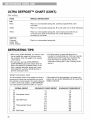
ULTRA DEFROST TM chart ............................ 25
Defrosting tips .............................................. 26
Using BREAD DEFROST ............................. 27
Using BEVERAGE ........................................ 27
Sensor Cooking .......................................... 28
Using HOLD WARM .................................... 29
Microwave Oven Care .................................... 30
Installing and caring for filters ..................... 31
Replacing the cooktop and oven lights ....... 32
Cooking Guide ................................................ 33
Questions and Answers ................................. 35
Troubleshooting .............................................. 36
Service ............................................. Back Cover
Microwave
Hood
Combination
Warranty
FULL ONE-YEAR WARRANTY ON
MICROWAVE HOOD COMBINATION
For one year from the date of purchase, if this
Kenmore Microwave Hood Combination fails due to a
defect in material or workmanship , Sears wil! repair it
free of charge.
FULL FIVE-YEAR WARRANTY ON THE
MAGNETRON
For five years from the date of purchase, if the
magnetron in this Kenmore Microwave Hood
Combination fails due to a defect in material or work-
manship, Sears will repair it free of charge.
The above warranty coverage applies only to
Microwave Hood Combinations which are used for pri-
vate household purposes.
WARRANTY SERVICE IS AVAILABLE BY SIMPLY
CONTACTING THE NEAREST SEARS STORE OR
SERVICE CENTER IN THE UNITED STATES.
This warranty applies only while this product is in use
in the United States.
This warranty gives you specific legal rights, and you may
also have other rights which vary from state to state.
Sears, Roebuck and Co.
Dept. 817WA,
Hoffman Estates, IL 60179
For service, please reference the service
numbers on the back page of this manual.
Modifications not authorized by the manufacturer
may void user!s authority to operate this device.
Please record your model,s
information.
Whenever you call to request service for your appli-
ance, you need to know your complete model number
and serial number. You can find this information on the
model and serial number label/plate (see "Microwave
oven features" in the "Getting to Know Your Microwave
Oven" section). A!so, record the other information
shown below.
2
Model Number
Serial Number
Purchase Date

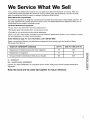
We Service What We Sell
Your purchase has added value because you can depend on Sears HomeCentral ®,for service. With over
12,000 trained repair specialists and access to over 4.2 million parts and accessories, we have the tools,
parts, knowledge and skills to ensure our pledge: We Service What We Sell.
Sears Maintenance Agreements
Your Kenmore appliance is designed, manufactured and tested to provide years of dependable operation. Yet
any major appliance may require service from time to time. The Sears Maintenance Agreement offers you an
outstanding service program, affordably priced.
The Sears Maintenance Agreement
• Is your way to buy tomorrow's service at today's price.
• Eliminates repair bills resulting from normal wear and tear.
• Provides for non-technical and instructional assistance.
• Even if you don't need repairs, provides an annual Preventive Maintenance Check, at your request, to ensure
that your appliance is in proper running condition.
Some limitations apply. For more information, call 1-800-827-6655
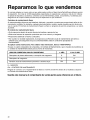
Here's a comparative Warranty and Maintenance Agreement chart showing you the benefits of Sears
Microwave Oven Service.
YEARS OF OWNERSHIP COVERAGE 1ST YR. 2ND YR. THRU 5TH YR.
Replacement of defective parts other than magnetron W MA
Replacement of magnetron W W
Annual preventive maintenance check at your request MA MA
W - WARRANTY
MA - MAINTENANCE AGREEMENT
Contact your Sears salesperson or local Sears Service Center today and purchase a Sears Maintenance
Agreement.
Keep this book and the sales slip together for future reference.

Microwave Oven Safety
Your safety and the safety of others are very important.
We have provided many important safety messages in this manual and on your appliance. Always read and
obey all safety messages.
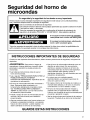
This is the safety alert symbol.
This symbol alerts you to potential hazards that can killor hurt you and others.
All safety messages willfollow the safety alert symbol and either the word "DANGER" or
"WARNING." These words mean:
You can be killed or seriously injured if you don't
immediately follow instructions.
You can be killed or seriously injured if you don't
follow instructions.
All safety messages willtell you what the potential hazard is, tell you how to reduce the chance of injury,
and tell you what can happen if the instructionsare not followed.
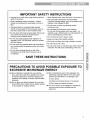
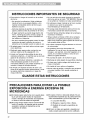
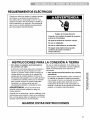
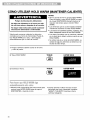
IMPORTANT SAFETY INSTRUCTIONS
When using electrical appliances basic safety precautions should be followed, including the following:
WARNING: To reduce the risk of burns, electric
shock, fire, injury to persons, or exposure to
excessive microwave energy:
• Read ait instructions before using the microwave
oven.
• Read and follow the specific "PRECAUTIONS TO
AVOID POSSIBLE EXPOSURE TO EXCESSIVE
MICROWAVE ENERGY" found in this section.
• The microwave oven must be grounded. Connect
only to propedy grounded outlet. See
"GROUNDING INSTRUCTIONS" found in this
section and in the provided installation instructions.
• Install or locate the microwave oven only in
accordance with the provided Installation
Instructions.
• Some products such as whole eggs in the shell
and sealed containers - for example, closed glass
jars - may explode and should not be heated in
the microwave oven.
• Use the microwave oven only for its intended use
as described in this manual. Do not use corrosive
chemicals or vapors in the microwave oven. This
type of oven is specifically designed to heat, cook,
or dry food. It is not designed for industrial or
laboratory use.
• As with any appliance, close supervision is
necessary when used by children.
• Do not operate the microwave oven if it has a
damaged cord or plug, if it is not working properly,
or if it has been damaged or dropped.
• The microwave oven should be serviced only by
qualified service personnel. Call an authorized
service company for examination, repair, or
adjustment.
• See door surface cleaning instructions in the
"Microwave Oven Care" section.
• To reduce the risk of fire in the oven cavity:
- Do not overcook food. Carefully attend the
microwave oven if paper, plastic, or other
combustible materials are placed inside the oven
to facilitate cooking.
- Remove wire twist-ties from paper or plastic bags
before placing bags in oven.
- If materials inside the oven should ignite, keep
oven door closed, turn oven off, and disconnect
the power cord, or shut off power at the fuse or
circuit breaker panel.
- Do not use the cavity for storage purposes. Do
not leave paper products, cooking utensils, or
food in the cavity when not in use.
• Suitable for use above both gas and electric
cooking equipment.
SAVE THESE INSTRUCTIONS
4

IMPORTANT SAFETY INSTRUCTIONS
• Intended to be used above ranges with maximum
width of 36 inches.
• Clean Ventilating Hoods Frequently - Grease
should not be allowed to accumulate on hood or
filter.
• Oversized foods or oversized metal utensils
should not be inserted in the microwave oven as
they may create a fire or risk of electric shock.
• Do not clean with metal scouring pads. Pieces can
burn off the pad and touch electrical parts
involving a risk of electric shock.
• Do not use paper products when appliance is
operated in the "TOP BROWN" mode (on models
with this feature).
• Do not store any materials other than manufactur-
er's recommended accessories in this oven when
not in use.
• Do not store anything directly on top of the
microwave oven when the microwave oven is
in operation.
• When flaming foods under the hood, turn the fan on.
• Use care when cleaning the vent-hood filter.
Corrosive cleaning agents, such as lye-based oven
cleaners, may damage the filter.
• Do not cover or block any openings on the
microwave oven.
• Do not store this microwave oven outdoors.
Do not use the microwave oven near water - for
example, near a kitchen sink, in a wet basement, or
near a swimming pool, and the like.
• Do not immerse cord or plug in water.
• Keep cord away from heated surfaces.
• Do not let cord hang over edge of table or counter.
• Do not mount over a sink.
• Do not cover racks or any other part of the oven with
metal foil. This will cause overheating of the oven.
SAVE THESE INSTRUCTIONS
PRECAUTIONS TO AVOID POSSIBLE EXPOSURE TO
EXCESSIVE MICROWAVE ENERGY
(a) Do not attempt to operate this oven with the
door open since open-door operation can result
in harmful exposure to microwave energy. It is
important not to defeat or tamper with the safety
interlocks.
(b) Do not place any object between the oven front
face and the door or allow soil or cleaner residue
to accumulate on sealing surfaces.
(c) Do not operate the oven if it is damaged. It is
particularly important that the oven door close
properly and that there is no damage to the:
(1) Door (bent),
(2) Hinges and latches (broken or loosened),
(3) Door seals and sealing surfaces.
(d) The oven should not be adjusted or repaired by
anyone except properly qualified service
personnel.

ELECTRICAL REQUIREMENTS
Observe all governing codes and ordinances. A
120 Volt, 60 Hz, AC only, 15- or 20-amp fused
electrical supply is required. (A time-delay fuse or
circuit breaker is recommended.) It is recommend-
ed that a separate circuit serving only this appli-
ance be provided.
Electrical Shock Hazard
Plug into a grounded 3 prong outlet.
Do not remove ground prong.
Do not use an adapter.
Do not use an extension cord.
Failure to follow these instructions can
result in death, fire, or electrical shock.
GROUNDING INSTRUCTIONS
• For all cord connected appliances:
The microwave oven must be grounded. In the
event of an electrical short circuit, grounding
reduces the risk of electric shock by providing an
escape wire for the electric current. The microwave
oven is equipped with a cord having a grounding
wire with a grounding plug. The plug must be
plugged into an outlet that is properly installed and
grounded.
WARNING: Improper use of the grounding plug
can result in a risk of electric shock.
Consult a qualified electrician or serviceman if the
grounding instructions are not completely under-
stood, or if doubt exists as to whether the microwave
oven is properly grounded.
Do not use an extension cord. If the power supply
cord is too short, have a qualified electrician or
serviceman install an outlet near the microwave oven.
• For a permanently connected appliance:
The microwave oven must be connected to a
grounded, metallic, permanent wiring system, or an
equipment grounding conductor should be run with
the circuitconductors and connected to the
equipment grounding terminal or lead on the
microwave oven.
SAVE THESE INSTRUCTIONS
6

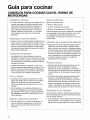
Getting to Know Your
Microwave Oven
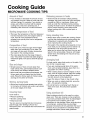
This section discusses the concepts behind microwave cooking. It also shows you the basics you need
to know to operate your microwave oven. Please read this information before you use your oven.
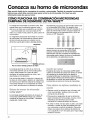
HOW YOUR KENMORE ULTRA WAVE TMMICROWAVE
HOOD COMBINATION WORKS
Microwave energy is not hot. It causes food to make
its own heat, and it's this heat that cooks the food.
Microwaves are like TV waves, radio waves, or
light waves. You cannot see them, but you can see
what they do.
A magnetron in the microwave oven produces
microwaves. The microwaves move into the oven
where they contact food as it turns on the turntable.
Magnelzon
\
_Ovencavity
Metalfloor Glassturntable
The glass turntable of your microwave oven lets
microwaves pass through. Then they bounce off a
metal floor, back through the glass turntable, and
are absorbed by the food.
Microwaves pass through most glass, paper, and
plastics without heating them so food absorbs the
energy. Microwaves bounce off metal containers
so food does not absorb the energy.
The ULTRA WAVE Inverter Microwave System is
proven technology that delivers a constant stream of
microwave power - true high, medium and low
power.
Normally, microwave ovens operate on HIGH power
only. For example, to achieve a 50% power level
(medium) in a typical microwave oven, the oven
operates 50% of the time at HIGH power and 50%
of the time OFE
0%
In contrast, microwave ovens utilizing the ULTRA WAVE
Inverter Microwave System deliver the selected power
level continuously. This constant stream of microwave
power helps to minimize overcooking of foods and
messy food spatters.
The ULTRAWAVETM InverterMicrowave System features
Sensor Cooking functions. A humidity sensor in the oven
cavly detects moisture and humidity emitted from food
as it heats. The sensor adjusts cooking times to various
types and amounts of food. Sensor cooking takes the
guesswork OL_of microwave cooking.
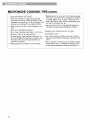
• Always cook food for the shortest cooking time
recommended. Check to see how the food is cooking.
• To help make sure the food is evenly cooked, stir,
turn over, or rearrange the food about halfway
through the cooking time.
• If you do not have a cover for a dish, use wax
paper, or microwave-approved paper towels or
plastic wrap. Remember to turn back a corner of
the plastic wrap ¼to _ in. (6.35 to 12.7 mm) to
vent steam during heating or cooking.
RADIO INTERFERENCE
Using your microwave oven may cause interference
to your radio, TV, or similar equipment. When there
is interference, you can reduce it or remove it by:
• Cleaning the door and sealing surfaces of the oven.
• Adjusting the receiving antenna of the radio or
television.
• Moving the receiver away from the microwave oven.
• Plugging the microwave oven into a different outlet
so that the microwave oven and receiver are on
different branch circuits.

TESTING YOUR DINNERWARE OR COOKWARE
Test dinnerware or cookware before using. To test
a dish, put it into the oven with 1 cup (250 mL) of
water beside it. Cook at 100% cook power for one
minute. If the dish gets hot and water stays cool,
do not use it. Some dishes (melamine, some
ceramic dinnerware, etc.) absorb microwave
energy, and may become too hot to handle or may
slow cooking times. Cooking in metal containers not
designed for microwave use could damage the oven,
as could containers with hidden metal (twist-ties, foil
lining, staples, metallic glaze or trim).
OPERATING TIPS
• Never lean on the door or allow a child to swing on
it when the door is open.
• Use hot pads. Microwave energy does not heat
containers, but the heat from the food can make
the container hot.
• Do not use newspaper or other printed paper in
the oven.
• Do not dry flowers, fruit, herbs, wood, paper,
gourds, or clothes in the oven.
• Do not start a microwave oven when it is empty.
Product life may be shortened. If you practice
programming the oven, put a container of water in
the oven. It is normal for the oven door to look
wavy after the oven has been running for a while.
• Do not try to melt paraffin wax in the oven. Paraffin
wax will not melt in a microwave oven because it
allows microwaves to pass through it.
• Do not operate the microwave oven unless the
glass turntable is securely in place and can rotate
freely. The turntable can rotate in either direction.
Make sure the turntable is correct-side up in the
oven. Handle your turntable with care when
removing it from the oven to avoid possibly
breaking it. If your turntable cracks or breaks,
contact your dealer for a replacement.
• When you use a browning dish, the browning dish
bottom must be at least _, in. (5 mm) above the
turntable. Follow the directions supplied with the
browning dish.
• Never cook or reheat a whole egg inside the shell.
Steam buildup in whole eggs may cause them to
burst, and possibly damage the oven. Slice hard-
boiled eggs before heating. In rare cases, poached
eggs have been known to explode. Cover
poached eggs and allow a standing time of one
minute before cutting into them.
• For best results, stir any liquid several times during
heating or reheating. Liquids heated in certain
containers (especially containers shaped like
cylinders) may become overheated. The liquid may
splash out with a loud noise during or after heating
or when adding ingredients (coffee granules, tea
bags, etc.). This can damage the oven.
• Microwaves may not reach the center of a roast.
The heat spreads to the center from the outer,
cooked areas just as in regular oven cooking. This
is one of the reasons for letting some foods (for
example, roasts or baked potatoes) stand for a
while after cooking, or for stirring some foods
during the cooking time.
• Do not deep fry in the oven. Microwavable utensils
are not suitable and it is difficult to maintain
appropriate deep-frying temperatures.
• Do not overcook potatoes. At the end of the
recommended cooking time, potatoes should be
slightly firm because they will continue cooking
during standing time. After microwaving, let
potatoes stand for 5 minutes. They will finish
cooking while standing.
ELECTRICAL CONNECTION
If your electric power line or outlet voltage is less
than 110 volts, cooking times may be longer. Have a
qualified electrician check your electrical system.

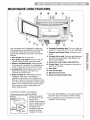
MICROWAVE OVEN FEATURES
®
@
Your microwave oven is designed to make your
cooking experience as enjoyable and productive
as possible. To help get you up and running
quickly, the following is a list of the oven's basic
features:
1. Door Handle. Pull to open door.
2. Door Safety Lock System. The oven will not
operate unless the door is securely closed.
3. Window with Metal Shield. Shield prevents
microwaves from escaping. It is designed as a
screen to allow you to view food as it cooks.
4. Cooking Rack (PN 8184052). Use for extra
space when cooking in more than one
container at the same time.
5. Glass Turntable (PN 4393751) (not shown).
Included in oven cavity - see below for
installation instructions. This turntable turns
food as it cooks for more even cooking. It must
be in the oven during operation for best cooking
results. The turntable is sunken into the cavity
floor to give you more cooking space and
better cooking results.
®
6. Cooktop/Countertop Light. Turn on to light your
cooktop or countertop or turn on as a night light.
7. Charcoal and Grease Filters. Included in oven
cavity.
8. Cooking Guide Label. Use as a quick reference
for Auto Cook, Auto Reheat, Ultra Defrost, and
Sensor Cook settings.
g. Exhaust Fan and Cooktop Light Switches.
10. Control Panel. Touch the pads on this panel to
perform all functions.
11. Vent Grille.
12. Oven Cavity Light.
13. Microwave Inlet Cover.
14. Model and Serial Number Plate.
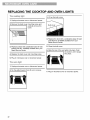
• Remove tape from hub _N 8183949).
Raised, • Place the support
cul (PN 8184102) on the
lin_ cavity bottom.
• Place the turntable on
the hub. Make sure the
raised, curved lines in
the center of the
turntable bottom are
between the three
"spokes" of the hub.
• The rollers (PN 4393861) on the support should fit
inside the ridge on the bottom of the turntable.
• The turntable turns both clockwise and counter-
clockwise. This is normal.

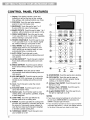
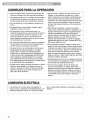
CONTROL PANEL FEATURES
1. Display. This display includes a clock and
indicators to tell you the time of day, cooking
time settings, and cooking functions you chose.
2. POPCORN. Touch this pad when popping
popcorn in your microwave oven.
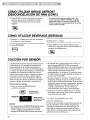
3. BEVERAGE. Touch this pad to heat 1 or 2
8-ounce (250 mL) cups of a beverage.
4. BAKED POTATO. Touch this pad to bake 1 to 4
potatoes, without entering a cook power or time.
5. FRESH VEGETABLE. Touch this pad to cook
1 to 4 cups (250 mL to 1 L) of a fresh vegetable,
without entering a cook power or time.
6. FROZEN VEGETABLE. Touch this pad to cook
1 to 4 cups (250 mL to 1 L) of a frozen vegeta-
ble, without entering a cook power or time.
7. HOLD WARM. Touch this pad to keep hot,
cooked foods warm in your microwave oven.
HOLD WARM can be used by itself, or it can
automatically follow a cooking cycle.
8. AUTO COOK. Touch this pad to cook
microwavable foods without entering times and
cook powers.
9. ULTRA DEFROST TM. Touch this pad to defrost
frozen foods without entering times and cook
powers.
10. BREAD DEFROST. Touch this pad to defrost
frozen bread without entering a cook power or
time.
11. AUTO REHEAT. Touch this pad to reheat
microwavable foods without entering times and
cook powers.
12. ADD ONE MINUTE. Touch this pad to cook for
1 minute, at 100% cook power, or to add extra
minutes to your cooking cycle at the set cook
power.
13. Clock. Touch this pad to enter the correct
time of day.
14. KITCHEN TIMER. Touch this pad to set or
cancel the Kitchen Timer.
15. Number pads. Touch Number pads to enter
cooking times, cook powers, quantities, weights,
or food categories.
16. COOK TIME. Touch this pad followed by
Number pads to set a cooking time.
17. POWER. Touch this pad after the cooking time
has been set, followed by a Number pad to set
the amount of microwave energy released to
cook the food. Also touch this pad to lengthen
or shorten a preset cooking time.
18. TURNTABLE ON/OFF. Touch this pad to turn
your turntable on or off.
®
®
® I
® I
....
..................®
..............
@
@
I ,{9
@
,o o .....@
19. START/ENTER. Touch this pad to start a function.
20. OFF/CANCEL Touch this pad to erase an
incorrect command, cancel a program during
cooking, or to clear the display.
21. (Exhaust Fan) ON/OFF. Touch this pad to turn
the fan on or off.
22. (Exhaust Fan) 2 SPEEDS. Touch this pad to
choose one of 2 fan speeds.
23. (Light) ON/NIGHT/OFF. Touch this pad to turn
the light or night light on or off.
NOTES:
• If you have entered all settings for a function but
do not touch START/ENTER in 5 seconds, the
START? indicator light will show.
• If you choose a function but do not touch another
command pad within 1 minute, the display returns
to the time of day and you have to start over.
10

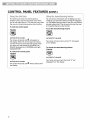
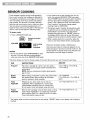
CONTROL PANEL FEATURES (CONT.)
Your microwave oven comes with audible
signals that can guide you when setting and
using your oven:
• _ A programming tone will sound each
time you touch a pad. TOUCH
• _ One long tone signals the end of a r $1"_'1"A1
Kitchen Timer countdown.
• [; II II IFaS Fourtonessignaltheend
of a cooking cycle.
• I"_)))I1"_)))I Two quick, short tones sound once
every minute for the first 15 minutes after an
end-of-cooking signal as a reminder if the
food has not been removed from the oven.
• [_[_ Two quick, short tones will sound
while entering and exiting from a hidden
feature (for example, Child Lock).
• I_][_1 _] Three tones sound if you have
made an incorrect entry.
To disable the programming tone:
TOUCH
G
and hold for 5 seconds
To turn the programming tone back on:
TOUCH
G
and hold for 5 seconds
To disable all audible signals except the
end-of-timer signal:
TOUCH
and hold for 5 seconds
To turn signals back on:
TOUCH
and hold for 5 seconds
You can stop the oven during a cycle by opening
the door. The oven stops heating and the fan stops,
but the light stays on. To restart cooking, close the
door and
If you do not want to continue cooking:
• Close the door and the light goes off.
OR
• TOUCH
NOTE: Before setting a function, touch OFF/
CANCEL to make sure no other function is on. If a
sensor cooking function is interrupted while
"SENSE" is displayed, the oven will return to
standby mode.
When heating plates of food with a cook time that
you set, you can heat two 11-in. (28 cm) plates side
by side or one dish larger than the turntable. You
can heat 2 more plates on the Cooking Rack for a
possible total of 4 plates. For best results, halfway
through cooking turn the plates halfway around until
the food in the front is in the back. Do the same
when heating a larger (9- to 13-in. [23 to 33 cm])
casserole. When heating 4 dinner plates turn as
described above and switch the top plates with the
bottom plates.
To heat 2 bottom plates together or one larger dish,
the turntable should not be turning. You
can shut the turntable off by touching
TURNTABLE ON/OFF. If you touch
TURNTABLE ON/OFF before starting to set the
cooking function, your oven will prompt you to enter
a cooking time without you needing to touch COOK
TIME. Your turntable will be turned back on when
cooking is over or when you touch OFF/CANCEL
NOTE: You cannot turn off the turntable when using
an "auto" function.
NOTE: Two tones will sound when audible signals
are turned on or off. This will work only when the
oven is not performing some other function.
11

CONTROL PANEL FEATURES (CONT.)
IJs @ 1,1¢ecNId,
The Child Lock locks the control panel so
children cannot use the microwave oven when
you do not want them to. This will work only when
the oven is not performing some other function.
To lock the control panel:
TOUCH
®
and hold for 5 seconds
Two tones will sound and PI will appear on
the display. When the control panel is locked,
3 tones will sound and LOCK will appear when
you touch any pad except for (Exhaust Fan)
ON/OFF, (Exhaust Fan) 2 SPEEDS and (Light)
ON/NIGHT/OFE
To unlock the control panel:
TOUCH
®
and hold for 5 seconds
Two tones will sound and _1 will be cleared from
the display.
6=wn Is
You can set your microwave oven to display your com-
mands as you enter them without turning the magnetron
on. This feature helps you learn to use your oven witho@
actually cooking food. This will work only when the oven
is not performing some other function.
To set the demo/learning feature:
TOUCH
and hold for 5 seconds
Two tones will sound and a small "d" will appear
on the display.
To cancel the demo/learning feature:
TOUCH
and hold for 5 seconds
Two tones will sound and the small "d" will
disappear from the display.
12

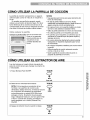
USING THE COOKING RACK
The Cooking Rack gives you extra space when
cooking in more than one container at the same
time.
If you need a replacement rack, you can order
one from your Sears Service Center. Please
reference the service numbers on the back page
of this manual. Make sure to have your model
number when ordering.
ac
Insert the rack securel
into the rack supports
on the side walls of
the oven.
NOTES:
• Use oven mitts to remove items from microwave
oven.
• Do not store the metal rack in the oven. Arcing
and damage to the oven could result if someone
accidentally starts the oven.
• Do not operate the oven with the metal rack
stored on the floor of the oven. Damage to the
interior finish will result.
• Use rack only in the microwave oven.
• Do not use rack with browning dish.
• Do not let food container on rack touch the top
or sides of the oven.
• Do not cook foods directly on rack. Put them in
microwave-safe containers first.
• Do not place a metal cooking container on rack.
• Only use the Cooking Rack when cooking at
more than one level.
• Remove the Cooking Rack before placing
package of popcorn in oven.
USING THE EXHAUST FAN
The two pads on the bottom left of the control
panel control the 2-speed exhaust fan.
1. Touch (Exhaust fan) ON/OFE
TOUCH
O
Wd/OR=
(once)
2. Choose fan speed.
NOTE: If the temperature from the range or
cooktop below the oven gets too hot, the
exhaust fan in the vent hood will automatically
turn on at the HIGH setting to protect the oven.
It may stay on up to an hour to cool the oven.
When this occurs, the (Exhaust Fan) ON/OFF
pad will not turn the fan off.
TOUCH
O
A
V
ZS_S
3. Turn off fan when desired.
TOUCH
O
m/01F
13

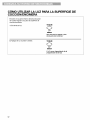
USING THE COOKTOP/COUNTERTOP LIGHT
The pad on the bottom right of the control panel
controls the cooktop/countertop light.
1. Turn on light.
TOUCH
O
m
(once for regular light, twice for night light)
2. Turn off light when desired.
TOUCH
O
m
(1 or 2 times, depending on light setting)
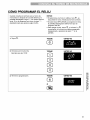
SETTING THE CLOCK
When your microwave oven is first plugged in, or
after a power failure, the display will flash ":". If a
time of clay is not set, ":" will flash until you touch
any pad.
1. Touch 0.
NOTES:
,,' If you touch in an invalid time and touch (_),
3 tones will sound. Enter the correct time.
,,' If you touch OFF/CANCEL while setting the clock,
the display will show the last time of day set.
• To turn off the clock, touch (_), Number pad 0,
and 1_) again. The set time will disappear and ":"
will show on the display.
TOUCH
G
YOU SEE
2. Enter the time of day.
Example for 12:00:
TOUCH
G
O
G
G
YOU SEE
3. Complete your entry. TOUCH
G
OR
YOU SEE
14

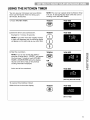
USING THE KITCHEN TIMER
You can use your microwave oven as a kitchen
timer. Use the Kitchen Timer for timing up to
99 minutes, 99 seconds.
NOTE: The oven can operate while the Kitchen Timer
is in use. To see the Kitchen Timer while the oven is
cooking, touch KITCHEN TIMER.
1. Touch KITCHEN TIMER.
TOUCH YOU SEE
2. Enter the time to be counted down.
Example for 1 minute, 30 seconds:
NOTE: If you enter more than 4 digits, the first
4 digits will disappear and the following digit(s)
will appear on the right side as you enter them.
TOUCH
G
O
YOU SEE
3. Start the countdown.
NOTE: If you do not do this step within 5
seconds of doing Step 2, "START?" will appear.
You then have 1 minute to touch KITCHEN
TIMER or START/ENTER before the display
returns to the time of day or the previous
cooking information displayed.
At the end of the countdown:
TOUCH
OR
®
YOU SEE
YOU SEE
While the timer is the active display:
(one long tone will sound)
TOUCH YOU SEE
(time of day)
15

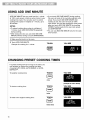
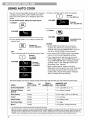
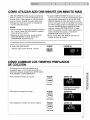
USING ADD ONE MINUTE
ADD ONE MINUTE lets you cook food for 1 minute
at 100% cook power or add an extra minute to your
cooking time cycle. You can also use it to extend
cooking time cycles in multiples of 1 minute, up to
99 minutes.
NOTES:
• To extend cooking time cycles in multiples of
1 minute, touch ADD ONE MINUTE repeatedly
during cooking.
• After closing the door, you can enter ADD ONE
MINUTE without having to touch START/ENTER.
• If you touch ADD ONE MINUTE during cooking,
the oven will cook at the currently selected cook
power. If you touch ADD ONE MINUTE after
cooking is over, the oven will cook at 100%
cook power. You can also change the cook power
after you touch ADD ONE MINUTE by touching
POWER, Number pads for the new cook power,
and START/ENTER.
• You can use ADD ONE MINUTE only for the cook
time function.
1. Make sure the food is in the oven.
2. Touch ADD ONE MINUTE.
Example for cooking for 1 minute:
TOUCH YOU SEE
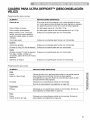
CHANGING PRESET COOKING TIMES
If a preset cooking time is too long or too short, you
can lengthen or shorten the cooking time after
choosing AUTO COOK, AUTO REHEAT or ULTRA
DEFROST TM.
To lengthen cooking time:
TOUCH
once
YOU SEE
To shorten cooking time:
TOUCH
twice
To reset to the original cooking time:
TOUCH
three times
(example for auto reheat)
YOU SEE
YOU SEE
16

Microwave Oven Use
This section gives you instructions for operating each function. Please read these instructions carefully.
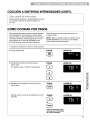
COOKING AT HIGH COOK POWER
1. Put your food in the oven and close the door.
2. Touch COOK TIME. TOUCH YOU SEE
3. Enter the cooking time. YOU SEE
Example for 1 minute, 30 seconds:
4. Start the oven.
TOUCH
O
O
G
TOUCH YOU SEE
®
At the end of the cooking time: YOU SEE
You can change the cooking time any time
during cooking by repeating Steps 2, 3, and 4.
(four tones will sound)
17

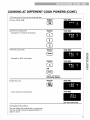
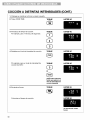
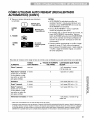
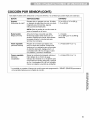
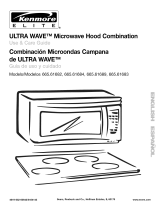
COOKING AT DIFFERENT COOK POWERS
The following chart gives the percentage of cook
power each Number pad stands for, and the cook
power name usually used. It also tells you when to
use each cook power. Follow recipe or food package
instructions if available.
For best results, some recipes call for different cook
powers. The lower the cook power, the slower the
cooking. Each Number pad also stands for a
different percentage of cook power. Many
microwave cookbook recipes tell you by number,
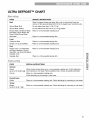
percent, or name which cook power to use. NOTE: Refer to a reliable cookbook for cooking times.
COOK POWER NAME WHEN TO USE IT
10=100% of full power High • Quick heating convenience foods and foods with
(automatic) high water content, such as soups, beverages
and most vegetables
9=90% of full power • Cooking small tender pieces of meat, ground
meat and poultry pieces
• Heating cream soups
8=80% of full power • Heating rice, pasta or casseroles
• Cooking and heating foods that need a cook
power lower than high such as meat loaf
7=70% of full power Medium-High • Reheating a single serving of food
• Cooking fish fillets
6=60% of full power • Cooking sensitive foods, such as cheese and egg
dishes, pudding and custards
• Cooking nonstirrable casseroles, such as lasagna
5=50% of full power Medium • Cooking ham, whole poultry, whole fish and pot
roasts
• Simmering stews
4=40% of full power • Heating bread, rolls and pastries
3=30% of full power Medium-Low, • Defrosting bread, fish, meats, poultry and pre-
Defrost cooked foods
2=20% of full power • Melting chocolate, butter and marshmallows
• Softening ice cream
1=10% of full power Low • Taking chill out of fruit
• Softening butter and cheese
NOTE." Once cook time has been entered, you can also use the POWER pad as a second Kitchen
Timer by entering "0" for the cook power. The oven will count down the cooking time you set without
cooking.
18

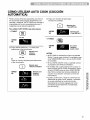
COOKING AT DIFFERENT COOK POWERS (CONT.)
1. Put your food in the oven and close the door.
2. Touch COOK TIME. TOUCH YOU SEE
3. Enter the cooking time. TOUCH YOU SEE
Example for 7 minutes, 30 seconds:
4. Set the cook power.
Example for 50% cook power:
O
O
G
TOUCH YOU SEE
5. Start the oven.
TOUCH YOU SEE
OR
(repeat until desired
cook power appears)
TOUCH
®
YOU SEE
At the end of the cooking time:
You can change the cooking time or cook power
any time during cooking by repeating Steps 2, 3
and/or 4 and 5.
YOU SEE
(four tones will sound)
19

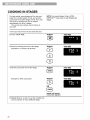
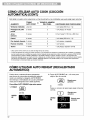
COOKING IN STAGES
For best results, some recipes call for one cook
power for a certain length of time, and another
cook power for another length of time. Your oven
can be set to change from one to another
automatically, for up to 3 stages.
You can set your chosen cook functions in
any order.
NOTE: You cannot Sensor Cook, ULTRA
DEFROST TM, Auto Cook or Auto Reheat with
stages.
1. Put your food in the oven and close the door.
2. Touch COOK TIME. TOUCH YOU SEE
3. Enter the cooking time for the first stage. TOUCH YOU SEE
Example for 7 minutes, 30 seconds:
4. Set the cook power for the first stage.
TOUCH YOU SEE
Example for 50% cook power:
TOUCH YOU SEE
OR
(repeat until desired
cook power appears)
5. Repeat Steps 2, 3, and 4 to set the cooking time
and cook power for each additional stage.
2O
Page is loading ...
Page is loading ...
Page is loading ...
Page is loading ...
Page is loading ...
Page is loading ...
Page is loading ...
Page is loading ...
Page is loading ...
Page is loading ...
Page is loading ...
Page is loading ...
Page is loading ...
Page is loading ...
Page is loading ...
Page is loading ...
Page is loading ...
Page is loading ...
Page is loading ...
Page is loading ...
Page is loading ...
Page is loading ...
Page is loading ...
Page is loading ...
Page is loading ...
Page is loading ...
Page is loading ...
Page is loading ...
Page is loading ...
Page is loading ...
Page is loading ...
Page is loading ...
Page is loading ...
Page is loading ...
Page is loading ...
Page is loading ...
Page is loading ...
Page is loading ...
Page is loading ...
Page is loading ...
Page is loading ...
Page is loading ...
Page is loading ...
Page is loading ...
Page is loading ...
Page is loading ...
Page is loading ...
Page is loading ...
Page is loading ...
Page is loading ...
Page is loading ...
Page is loading ...
Page is loading ...
Page is loading ...
Page is loading ...
Page is loading ...
Page is loading ...
Page is loading ...
Page is loading ...
Page is loading ...
-
 1
1
-
 2
2
-
 3
3
-
 4
4
-
 5
5
-
 6
6
-
 7
7
-
 8
8
-
 9
9
-
 10
10
-
 11
11
-
 12
12
-
 13
13
-
 14
14
-
 15
15
-
 16
16
-
 17
17
-
 18
18
-
 19
19
-
 20
20
-
 21
21
-
 22
22
-
 23
23
-
 24
24
-
 25
25
-
 26
26
-
 27
27
-
 28
28
-
 29
29
-
 30
30
-
 31
31
-
 32
32
-
 33
33
-
 34
34
-
 35
35
-
 36
36
-
 37
37
-
 38
38
-
 39
39
-
 40
40
-
 41
41
-
 42
42
-
 43
43
-
 44
44
-
 45
45
-
 46
46
-
 47
47
-
 48
48
-
 49
49
-
 50
50
-
 51
51
-
 52
52
-
 53
53
-
 54
54
-
 55
55
-
 56
56
-
 57
57
-
 58
58
-
 59
59
-
 60
60
-
 61
61
-
 62
62
-
 63
63
-
 64
64
-
 65
65
-
 66
66
-
 67
67
-
 68
68
-
 69
69
-
 70
70
-
 71
71
-
 72
72
-
 73
73
-
 74
74
-
 75
75
-
 76
76
-
 77
77
-
 78
78
-
 79
79
-
 80
80


Kenmore 66561652100 Owner's manual
- Category
- Microwaves
- Type
- Owner's manual
- This manual is also suitable for
Ask a question and I''ll find the answer in the document
Finding information in a document is now easier with AI
in other languages
Related papers
-
 Kenmore Elite Ultra Wave 665.61683 Owner's manual
-
Kenmore 66561622100 Owner's manual
-
-
-
-
-
Kenmore Elite 721.80889 User manual
-
-
-
