Safety Information
Connect Electricity . . . . . . . . . . . . . . .4
Proper Disposal . . . . . . . . . . . . . . . . .3
Safety Precautions . . . . . . . . . . . . . . .2
Operating Instructions
Automatic Icemaker . . . . . . . . . . . .10
Controls . . . . . . . . . . . . . . . . . . . . . . .5
Ice and Water Dispenser . . . . . . . . .11
Shelves, Bins and Racks . . . . . . . .6–8
Storage Drawers . . . . . . . . . . . . . . .8, 9
Care and Cleaning . . . . . . . .12, 13
Replacing the Light Bulbs . . . . . . .13
Installation Instructions . . . .14, 15
Troubleshooting Tips
Before You Call For Service . . .17–19
Normal Operating Sounds . . . . . . .16
EXPORT 197D3352P001 49-60100 12-00 JR
Write your model and serial numbers here:
Model # _____________________
Serial # _____________________
Find these numbers on a label inside
the refrigerator compartment at the top
on the right side behind the controls.
Réfrigérateurs
Côte à côte
Manuel d’utilisation
et d’installation
La section française commence à la page 21
Frigoríficos
Lado a lado
Models 20, 22 and 25
Owner’s Manual and
Installation Instructions
Manual del propietario
e instalación
La sección en español empieza en la página 41
Refrigerators
Side by Side

2
IMPORTANT SAFETY INFORMATION.
READ ALL INSTRUCTIONS BEFORE USING.
WARNING!
Use this appliance only for its intended purpose as described in this Owner’s Manual.
SAFETY PRECAUTIONS
When using electrical appliances, basic safety precautions should be followed, including the following:
■
■This refrigerator must be properly installed
and located in accordance with the Installation
Instructions before it is used. Also see the
How to
Connect Electricity
section.
■
■Do not attempt to stand on top of the refrigerator.
Doing so may result in bodily injury or damage to
the refrigerator.
■
■Do not allow children to play with the refrigerator
or tamper with the controls.
■
■Do not allow children to climb, stand or hang on
the shelves in the refrigerator. They could damage
the refrigerator and seriously injure themselves.
■
■Do not touch the cold surfaces in the freezer
compartment when hands are damp or wet.
Skin may stick to these extremely cold surfaces.
■
■Do not store or use gasoline or other flammable
vapors and liquids in the vicinity of this or any
other appliance.
■
■In refrigerators with automatic icemakers, avoid
contact with the moving parts of the ejector
mechanism, or with the heating element that
releases the cubes. Do not place fingers or hands
on the automatic icemaking mechanism while
the refrigerator is plugged in.
■
■Installation of the icemaker must be done by
a qualified service technician.
■
■Keep fingers out of the “pinch point” areas;
clearances between the doors and between the
doors and cabinet are necessarily small. Be careful
closing doors when children are in the area.
■
■Unplug the refrigerator before cleaning and
making repairs.
NOTE: We strongly recommend that any servicing be
performed by a qualified individual.
■
■
Before replacing a burned-out light bulb, the
refrigerator should be unplugged
in order to avoid
contact with a live wire filament. (A burned-out
light bulb may break when being replaced.)
NOTE: Turning the freezer control to the 0 position does not
remove power to the light circuit.
■
■Do not refreeze frozen foods which have thawed
completely.

3
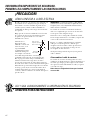
DANGER! RISK OF CHILD ENTRAPMENT
PROPER DISPOSAL OF THE REFRIGERATOR
Child entrapment and suffocation are not problems
of the past. Junked or abandoned refrigerators are
still dangerous…even if they will sit for “just a few
days.” If you are getting rid of your old refrigerator,
please follow the instructions below to help prevent
accidents.
Before You Throw Away Your Old Refrigerator
or Freezer:
■Take off the doors and discard separately.
■Leave the shelves in place so that children may not
easily climb inside.
■If the refrigerator has a lock, make it unusable.
CFC Disposal
Your old refrigerator may have a cooling system
that used CFCs (chlorofluorocarbons). CFCs are
believed to harm stratospheric ozone.
If you are throwing away your old refrigerator,
make sure the CFC refrigerant is removed for
proper disposal by a qualified servicer. If you
intentionally release this CFC refrigerant you
can be subject to fines and imprisonment under
provisions of environmental legislation.

4
IMPORTANT SAFETY INFORMATION.
READ ALL INSTRUCTIONS BEFORE USING.
WARNING!
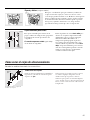
HOW TO CONNECT ELECTRICITY
The power cord of this appliance is equipped with
an earthing plug which mates with a standard
earthed wall outlet to minimize the possibility of
electric shock hazard from this appliance.
Have the wall outlet and circuit checked by a
qualified electrician to make sure the outlet is
properly earthed.
Where an unearthed wall outlet is encountered,
it is your personal responsibility and obligation to
have it replaced with a properly earthed wall outlet.
The refrigerator should
always be plugged into
its own individual
electrical outlet.
This provides the
best performance
and also prevents
overloading house
wiring circuits which could cause a fire hazard from
overheated wires. Please refer to the rating plate on
the refrigerator for the correct voltage, wattage and
frequency. If the product plug does not fit your
outlet, the product should be fitted with a new plug.
IMPORTANT: The refitting of electric plugs and cables should
be done by a qualified technician or service agent. In some
countries the refitting of electric plugs and cables is only
permitted when the work is completed by a qualified technician.
If the power supply cord becomes damaged, it must
be replaced by a qualified service agent in order to
avoid a safety hazard.
Never unplug your refrigerator by pulling on the
power cord. Always grip plug firmly and pull straight
out from the outlet.
Repair or replace immediately all power cords that
have become frayed or otherwise damaged. Do not
use a cord that shows cracks or abrasion damage
along its length or at either end.
When moving the refrigerator away from the wall,
be careful not to roll over or damage the power cord.
Mains lead replacement
If the mains lead on your refrigerator needs
replacing at any time, it must be replaced by a
special lead which is obtainable from your local
dealer. A charge will be made for the replacement
of the mains lead if you have damaged the lead.
The refrigerator must be positioned so that the plug
is accessible.
READ AND FOLLOW THIS SAFETY INFORMATION CAREFULLY.
SAVE THESE INSTRUCTIONS
Insure proper earthing
exists before using.
Earthing plug

5
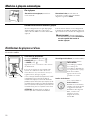
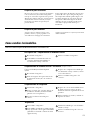
Initially, set the fresh food control at 5 and the freezer control at 5 and allow
12 hours for the temperature to stabilize.
Several adjustments may be required. Adjust the controls one increment at a
time, and allow 12 hours after each adjustment for the refrigerator to reach
the temperature you have set.
Setting the freezer control to 0 stops cooling in both the fresh food and freezer
compartments but does not shut off electrical power to the refrigerator.
Control settings will vary based on personal preferences, usage, and
operating conditions and may require more than one adjustment.
9 IS COLDEST
0 IS OFF
FREEZER FRESH FOOD
5
8
9
4
3
2
1
0
6
7
5
8
9
4
3
2
1
6
7
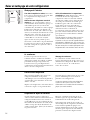
About the controls on the refrigerator.
Ambient Room Temperature Limits
This refrigerator is designed to operate in ambient temperatures specified by
its Temperature Class which is marked on the rating plate.
Temperature Symbol Ambient Temperature
Class Maximum Minimum
Extended-
Temperate SN 32°C 10°C
Temperate N 32°C 16°C
Subtropical ST 38°C 18°C
Tropical T 43°C 18°C
NOTE: Internal temperature may be affected by such factors as the location of the refrigerator,
ambient temperature and frequency of door openings. Adjust temperature controls as required
to compensate for these
factors.
9 IS COLDEST
0 IS OFF

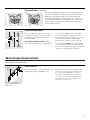
Rearranging the Shelves
To Remove
To Replace
6
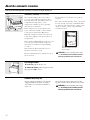
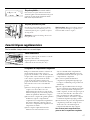
About the refrigerator shelves and bins.
Bins on the Fresh Food Compartment Door
Adjustable bins can easily be carried from
refrigerator to work area.
To remove:
Lift the front of the bin up, then
pull out.
To replace or relocate:
Engage the bin in the
molded supports of the door, and push in.
Bin will lock in place.
The snugger
helps prevent tipping, spilling or
sliding of small items stored on the door shelf.
Place a finger on either side of the divider
near the rear and move it back and forth to
fit your needs.
Refrigerator Shelves:
Lift up and out
Tilt up
Insert
top hook
Lower to
lock in place
To Remove
Freezer Shelves:
Not all features are on all models.
Snugger
To Remove
Freezer Baskets:
Remove the basket by pulling it forward,
lifting up the front, and sliding it past the
stop
location.
WARNING: Poor performance may occur if
freezer baskets are not used. Storage of items in
the freezer without using baskets may result in
poor temperature performance due to restrictions
of air flow within the freezer compartment.

Deep Door Shelves
Detachable shelf extenders deepen and
enclose fixed door shelves, providing more
storage room and greater storage flexibility.
To remove:
Lift the shelf extender straight up
then pull out.
To replace:
Engage the shelf extender in the
molded supports on the door and push in.
It will lock in place.
Quick Space Shelf
(on some models)
This shelf splits in half and slides under itself for
storage of tall items on the shelf below.
Slide-Out Spillproof Shelf
(on some models)
The slide-out spillproof shelf allows you to
reach items stored behind others. The special
edges are designed to help prevent spills from
dripping to lower shelves.
Make sure you push the shelves all the way back in
before you close the door.
Spillproof Shelves
(on some models)
Spillproof shelves have special edges to help
prevent spills from dripping to lower shelves.
7

8
About the storage drawers.
Not all features are on all models.
About the additional features.
Not all features are on all models.
Storage Drawers
Excess water that may accumulate in the
bottom of the drawers should be wiped dry.
Adjustable Humidity Drawers
Slide the control all the way to the
High
or
setting to provide high humidity
recommended for most vegetables.
Slide the control all the way to the
Low
or
setting to provide lower humidity levels
recommended for most fruits.
ShelfSaver
™
Rack
Use this rack to store beverage cans for
easy access.
It can also hold a 9″ x 13″ baking dish.
Loading the Freezer Compartment
Load so that at least 15 mm of space remains
clear between stacks of packages and 15 mm
to 25 mm of space between the top of any
stack and any shelf or basket above it.
Packages may hang over the front of shelves
but must remain 15 mm from doors.
■Food to be frozen must not be placed
in direct contact with food in storage.
If food is to be frozen every day, it may
be necessary to reduce the quantity to
be frozen.
■If a quantity of food needs to be frozen,
set the freezer control to its coldest setting.
After the food is frozen, reset the freezer
control to its initial position.
■Food is most quickly frozen on the middle
three shelves of the freezer compartment
and most slowly in the freezer door shelves.
■Do not store commercially quick-frozen
food longer than the time recommended
by the food manufacturers.
■If the power to the appliance is shut off for
an extended time or if the refrigerating
system fails, do not open the doors unless
absolutely necessary. When it is necessary,
close them as quickly as possible so the
frozen food will stay frozen as long as
possible.
■The freezer door storage shelves marked
with a two-star label are only appropriate
for the storage of previously frozen food.
Effervescent drinks should not be stored in the
freezer compartment.

About storage drawer removal.
Not all features are on all models.
Drawer Removal
Drawers can easily be removed by tilting up
slightly and pulling past
stop
location.
If the door prevents you from taking out
the drawers, the refrigerator will need to
be rolled forward until the door opens
enough to slide the drawers out. In some
cases, when you roll the refrigerator out,
you will need to move the refrigerator to
the left as you roll it out.
When replacing the drawers, make
sure you slide them through the
drawer guides.
Drawer
Guides
9
Convertible Meat Drawer
The convertible meat drawer has its own
cold air duct to allow a stream of cold air
from the freezer compartment to flow
around the drawer.
The variable temperature control
regulates
the air flow from the freezer compartment.
Set control lever
up
to convert the drawer
to normal refrigerator temperature and
provide extra vegetable storage space. Cold
air duct is turned off. Variable settings
between these extremes can be selected.
Set control lever
down
to the coldest setting
to store fresh meats. If lever is left in meat
position for a long period of time, some frost
may form on the inside of the drawer.
Normal
Coldest
Divider
Trivet
Trivet and Divider
(on some models)
The trivet is designed to keep your fruits and vegetables off
the floor of the drawer and away from any moisture that
might form. The divider will keep the larger fruits and
vegetables from falling or rolling onto the more delicate
ones. By lifting straight up on the divider, you can detach it
from the trivet and adjust it from side to side, then push
down and into position.

10
Automatic Icemaker
(on some models)
The icemaker will produce seven cubes
per cycle—approximately 100–130 cubes
in a 24-hour period, depending on freezer
compartment temperature, room
temperature, number of door openings
and other use conditions.
If the refrigerator is operated before the
water connection is made to the icemaker,
set the power switch in the
O
position.
When the refrigerator has been connected
to the water supply, set the power switch to
the
I
position.
The icemaker will fill with water when it cools
to freezing. A newly-installed refrigerator
may take 12 to 24 hours to begin making
ice cubes.
Throw away the first few batches of ice to
allow the water line to clear.
Be sure nothing interferes with the sweep of
the feeler arm.
It is normal for several cubes to be joined
together.
If ice is not used frequently, old ice cubes will
become cloudy, taste stale, and shrink. If the
ice cubes become stuck in the icemaker, turn
off the icemaker, remove cubes and turn
icemaker back on.
WARNING: Connect to potable water supply
only. Installation of the icemaker must be
done by a qualified service technician.
There is an upper freezer shelf
above the icemaker that can be
used for storage.
Ice Storage Drawer
Icemaker Accessory Kit
To access ice,
pull the drawer out.
To remove the drawer,
pull it straight out and
lift it past the
stop
location.
If your refrigerator did not come already
equipped with an automatic icemaker,
an icemaker accessory kit is available at
extra cost.
Check the back of the refrigerator for the
specific icemaker kit needed for your model.
WARNING: Connect to potable water supply
only. Installation of the icemaker must be
done by a qualified service technician.
Icemaker
Feeler Arm
Power
Switch
Green
Power Light
About the automatic icemaker.
A newly-installed refrigerator may take 12–24 hours to begin making ice.

11
About the ice and water dispenser.
On some models
Ice Storage Drawer on Dispenser
Models
To remove:
Set the icemaker power switch to the
O
position. Pull the drawer straight out
and then lift past the
stop
position.
To replace:
When replacing the drawer, make sure to
push it firmly into place. If it does not go all
the way back, remove it and rotate the drive
mechanism 1/4 turn. Then push the drawer
back again.
Rotate
Drive
Mechanism
Important Facts About Your Dispenser
■Do not add ice from trays or bags to
the storage bin. It may not crush or
dispense well.
■Avoid overfilling glass with ice and use
of narrow glasses. Backed-up ice can jam
the chute or cause the door in the chute
to freeze shut. If ice is blocking the chute,
poke it through with a wooden spoon.
■Beverages and foods should not be quick-
chilled in the ice storage bin. Cans, bottles
or food packages in the storage bin may
cause the icemaker or auger to jam.
■Some crushed ice may be dispensed even
though you selected
CUBED ICE.
This
happens occasionally when a few cubes
have been left in the crusher.
■After crushed ice is dispensed, some water
may drip from the chute.
■Sometimes a small mound of snow will
form on the door in the ice chute. This
condition is normal and usually occurs
when you have dispensed crushed ice
repeatedly. The snow will eventually
evaporate.
CAUTION: Some products such as water ices should
not be consumed too cold.
To Use the Dispenser
Select
CUBED ICE , CRUSHED ICE
or
WATER .
Press the glass gently against the top of the
dispenser cradle.
The spill shelf is not self-draining. To reduce
water spotting, the shelf and its grille should
be cleaned regularly.
If no water is dispensed when the refrigerator is first
installed, there may be air in the water line system.
Press the dispenser arm for at least two minutes to
remove trapped air from the water line and to fill the
water system. To flush out impurities in the water
line, throw away the first six glassfuls of water.
CAUTION: Never put fingers or any other
objects into the ice crusher discharge opening.
Locking the Dispenser (on some models)
Press the
LOCK CONTROL
pad for 3 seconds to lock
the dispenser and control
panel. To unlock, press
and hold the pad again
for 3 seconds.
Dispenser Light
This pad turns the
night
light
in the dispenser on and
off. The light also comes on
when the dispenser cradle is
pressed. If this light burns
out, it should be replaced
with a 6 watt maximum,
12 volt DC bulb.
Spill Shelf

12
Condenser
There is no need for routine condenser
cleaning in normal home operating
environments. However, in environments
that may be particularly dusty or greasy, the
condenser should be cleaned periodically
for efficient refrigerator operation.
Cleaning the condenser:
The condenser is located inside the back
of the refrigerator. To access it, first unplug
the refrigerator. Then remove the access
cover. The condenser is on the right side.
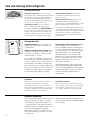
Care and cleaning of the refrigerator.
Cleaning the Outside
The dispenser drip area,
(on some models)
beneath the grille, should be wiped dry. Water
left in this area may leave deposits. Remove
the deposits by adding undiluted vinegar to
the well. Soak until the deposits disappear or
become loose enough to rinse away.
The dispenser cradle
(on some models).
Before cleaning, lock the dispenser by
pressing and holding the
LOCK CONTROL
pad
for 3 seconds. Clean with warm water and
baking soda solution—about a tablespoon
(15 ml) of baking soda to a quart (1 liter)
of water. Rinse thoroughly and wipe dry.
The door handles and trim.
Clean with a
cloth dampened with soapy water. Dry
with a soft cloth.
Keep the outside clean.
Wipe with a clean
cloth lightly dampened with kitchen
appliance wax or mild liquid dish detergent.
Dry and polish with a clean, soft cloth.
Do not wipe the refrigerator with a soiled dish cloth
or wet towel. These may leave a residue that can
erode the paint. Do not use scouring pads, powdered
cleaners, bleach or cleaners containing bleach
because these products can scratch and weaken
the paint finish.
Cleaning the Inside
To help prevent odors,
leave an open box of
baking soda in the fresh food and freezer
compartments.
Unplug the refrigerator before cleaning.
If this
is not practical, wring excess moisture out
of sponge or cloth when cleaning around
switches, lights or controls.
Use warm water and baking soda solution—
about a tablespoon (15 ml) of baking soda
to a quart (1 liter) of water. This both cleans
and neutralizes odors. Rinse and wipe dry.
After cleaning the door gaskets, apply a thin
layer of petroleum jelly to the door gaskets at
the hinge side. This helps keep the gaskets
from sticking and bending out of shape.
Drain opening in freezer compartment.
During
yearly cleaning, remove bottom freezer
basket and flush a solution of baking soda—
1 teaspoon (5 ml) and 2 cups (500 ml) of
hot (not boiling) water— through the drain
line with the help of a meat baster. This
will help eliminate odor and reduce the
likelihood of a clogged drain line. If drain
becomes clogged, use a meat baster and
baking soda solution to force the clog
through the drain line.
Avoid cleaning cold glass shelves with hot water
because the extreme temperature difference may
cause them to break. Handle glass shelves carefully.
Bumping tempered glass can cause it to shatter.
Do not wash any plastic refrigerator parts in
the dishwasher.
Dispenser drip area.
Be careful when moving the refrigerator away
from the wall. All types of floor coverings
can be damaged, particularly cushioned
coverings and those with embossed surfaces.
Pull the refrigerator straight out and return
it to position by pushing it straight in.
Moving the refrigerator in a side direction
may result in damage to the floor covering
or refrigerator.
When pushing the refrigerator back, make sure you
don’t roll over the power cord or icemaker supply line
(on some models).
Behind the Refrigerator

For long vacations or absences, remove food
and unplug the refrigerator. Move the freezer
control to the
O
position, and clean the
interior with a baking soda solution of one
tablespoon (15 ml) of baking soda to one
quart (1 liter) of water. Leave the doors open.
Set the icemaker power switch to the
O
position and shut off the water supply
to the refrigerator.
If the temperature can drop below freezing,
have a qualified servicer drain the water
supply system (on some models) to prevent
serious property damage due to flooding.
Replacing the light bulbs.
Turning the control to the O position does not remove power to the light circuit.
Fresh Food Compartment—Upper Light
Unplug the refrigerator.
The bulb is located behind the controls.
Replace with an appliance bulb of the
same or lower wattage.
Plug the refrigerator back in.
Fresh Food Compartment—Lower Light
(on some models)
This light is located above the top drawer.
Unplug the refrigerator.
Grasp the lip at the bottom of the light
shield and pull it up and forward.
After replacing with an appliance bulb
of the same or lower wattage, replace
the shield.
Plug the refrigerator back in.
Freezer Compartment
Unplug the refrigerator.
Remove the shelf just below light shield.
(The shelf will be easier to remove if it is
emptied first.)
Lift up on the light shield to remove.
After replacing with an appliance bulb of
the same or lower wattage, reinstall the
shield by hanging it from the three tabs.
Reinstall the shelf and plug the
refrigerator back in.
13
Preparing for Vacation
Preparing to Move
Secure all loose items such as grille, shelves
and drawers by taping them securely in place
to prevent damage.
Be sure the refrigerator stays in an upright position
during moving.
Dispenser
Unplug the refrigerator.
The bulb is located on the dispenser
under the control panel. Remove the
light bulb by turning it counterclockwise.
Replace the bulb with a bulb of the same
size and wattage.
Plug the refrigerator back in.

14
BEFORE YOU BEGIN
Read these instructions completely and carefully.
•
IMPORTANT
–
Save these
instructions for local inspector’s use.
•
IMPORTANT
–
Observe all
governing codes and ordinances.
• Note to Installer
–
Be sure to leave these
instructions with the Consumer.
• Note to Consumer
–
Keep these instructions
for future reference.
• Skill level – Installation of this appliance requires
basic mechanical skills.
• Completion time – Refrigerator Installation
15 minutes
• Proper installation is the responsibility of the
installer.
• Product failure due to improper installation is not
covered under the Warranty.
• Do not install the refrigerator where the temperature
will go below 16°C because it will not run often enough
to maintain proper temperatures.
• Install it on a floor strong enough to support it fully
loaded.
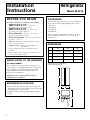
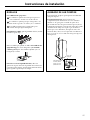
REFRIGERATOR LOCATION
Installation
Refrigerator
Instructions
Models 20, 22, 25
Allow the following clearances for ease of installation,
proper air circulation and plumbing and electrical
connections.
• Sides 4 mm
• Top 25 mm
• Back 25 mm
A door clearance of 19 mm is needed for a 90° door
opening which provides better access to the food
storage area.
CLEARANCES
If the refrigerator has an icemaker, it will have to be
connected to a cold drinking water line. An approved
water supply kit (containing tubing, shutoff valve,
fittings and instructions) is available at extra cost
from your local distributor.
Installation of the icemaker must be done by a
qualified service technician.
WATER SUPPLY TO THE ICEMAKER
(on some models)
*Height does not include hinge.
**Depth includes handle.
DIMENSIONS
20 22 25
A* 1689 mm 1689 mm 1746 mm
B 800 mm 851 mm 908 mm
C** 838 mm 838 mm 838 mm
D 1182 mm 1240 mm 1240 mm
A
B
C
D

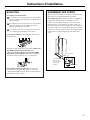
15
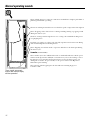
To remove the base
grille, open the doors
and then pull the
grille straight out.
5/16″Socket
Wrench
Raise
The rollers have 3 purposes:
Rollers adjust so the door closes easily when opened
about halfway.
Rollers adjust so the refrigerator is firmly positioned
on the floor and does not wobble.
Rollers allow you to move the refrigerator away from
the wall for cleaning.
To adjust the rollers, remove the base grille by pulling it
out at the bottom.
Turn the roller adjusting screws clockwise to raise the
refrigerator, counterclockwise to lower it. Use an
adjustable wrench (3/8″hex head bolt) or pliers.
To replace base grille, line up the clips on back of grille
between the bar and the bottom of the cabinet. Push
forward until grille snaps into place.
ROLLERS DOOR ALIGNMENT
After leveling, make sure that doors are even at the top.
To make the doors even, adjust the fresh food door. Using
a 5/16″socket wrench, turn the door adjusting screw to
the right to raise the door, to the left to lower it. (A nylon
plug, embedded in the threads of the pin, prevents the pin
from turning unless a wrench is used.) After one or two
turns of the wrench, open and close the fresh food door
and check the alignment at the top of the doors.
Installation Instructions

The new high efficiency compressor runs faster and will have a higher pitch hum or
pulsating sound while operating.
The fan circulating air inside the freezer which keeps the temperatures throughout.
Water dropping on the defrost heater causing a sizzling, hissing or popping sound
during the defrost cycle.
The flow of refrigerant through the freezer cooling coils sounds like boiling water
or a gurgling noise.
Cracking or popping of cooling coils caused by expansion and contraction during
defrost and refrigeration following defrost.
Water dripping as it melts from the evaporator and flows to the drain pan during
the defrost cycle.
Icemaker
(on some models)
The icemaker water valve will buzz when the icemaker fills with water. If the power
switch is in the
I
position it will buzz even if it has not yet been hooked up to water.
Keeping the power switch in the
I
position before it is hooked up to water can
damage the icemaker. To prevent this, set the power switch to the
O
position.
This will stop the buzzing.
The sound of cubes dropping into the bin and water running in pipes as
icemaker refills.
These sounds are normal
and are due mostly to highly
efficient operation.
16
Normal operating sounds.

17
Problem Possible Causes What To Do
Refrigerator does not
Refrigerator in defrost cycle. • Wait about 30 minutes for defrost cycle to end.
operate
Freezer control in
O
position. • Move the freezer control to a temperature setting.
Refrigerator is unplugged. • Push the plug completely into the outlet.
The fuse is blown/circuit •Replace fuse or reset the breaker.
breaker is tripped.
Vibration or rattling
Front rollers need adjusting. •See
Rollers.
(slight vibration
is normal)
Motor operates for
Normal when refrigerator • Wait 24 hours for the refrigerator to completely
long periods or cycles
is first plugged in. cool down.
on and off frequently.
Often occurs when large • This is normal.
(Modern refrigerators
amounts of food are
with more storage
placed in refrigerator.
space and a larger
Door left open. • Check to see if package is holding door open.
freezer require more
Hot weather or frequent • This is normal.
operating time. They
door openings.
start and stop often
Temperature controls • See
About the controls.
to maintain even
set at the coldest
temperatures.)
setting.
Fresh food or freezer
Temperature control not set • See
About the controls.
compartment too warm
cold enough.
Warm weather or frequent • Set the temperature control one step colder.
door openings. See
About the controls.
Door left open. •Check to see if package is holding door open.
Frost or ice crystals
Door left open. • Check to see if package is holding door open.
on frozen food
Too frequent or too long
(frost within package
door openings.
is normal)
Divider between fresh
Automatic energy saver •This helps prevent condensation on the outside.
food and freezer
system circulates warm
compartments
liquid around front edge
feels warm
of freezer compartment.
Automatic icemaker
Icemaker power switch • Set the power switch to the
I
position.
does not work
is in the
O
position.
(on some models)
Water supply turned off or • See
Installing the water line.
not connected.
Freezer compartment • Wait 24 hours for the refrigerator to completely cool down.
too warm.
Piled up cubes in the storage •Level cubes by hand.
bin cause the icemaker
to shut off.
Ice cubes stuck in icemaker. • Turn off the icemaker, remove cubes, and turn the
(Green power light on icemaker back on.
icemaker blinking).
Troubleshooting Tips
Save time and money! Review the charts on the following pages first
and you may not need to call for service.
Before you call for service…

18
Problem Possible Causes What To Do
Ice cubes have
Ice storage bin needs cleaning. • Empty and wash bin. Discard old cubes.
odor/taste
Food transmitting odor/taste • Wrap foods well.
to ice cubes.
Interior of refrigerator •See
Care and cleaning.
needs cleaning.
Slow ice cube freezing
Door left open. • Check to see if package is holding door open.
Temperature control not set •See
About the controls.
cold enough.
Door not closing
Door gasket on hinge side •Apply petroleum jelly on face of gasket.
properly
sticking or folding over.
Orange glow in
Defrost heater is on. • This is normal.
the freezer
Cube dispenser does not
Icemaker turned off or • Turn on icemaker or water supply.
work (on some models)
water supply turned off.
Ice cubes are frozen to • Remove cubes.
icemaker feeler arm.
Irregular ice clumps in • Break up with fingertip pressure and discard remaining clumps.
storage container.
• Freezer may be too warm. Adjust the freezer control to a colder
setting, one position at a time, until clumps do not form.
Dispenser is
LOCKED
. •Press and hold the
LOCK CONTROL
pad for 3 seconds.
Water has poor taste/odor
Water dispenser has not been •Dispense water until all water in system is replenished.
(on some models)
used for a long time.
Water in first glass is
Normal when refrigerator • Wait 24 hours for the refrigerator to completely cool down.
warm (on some models)
is first installed.
Water dispenser has not been • Dispense water until all water in system is replenished.
used for a long time.
Water system has been drained. •Allow several hours for replenished supply to chill.
Water dispenser does
Water supply line turned • See
Installing the water line.
not work (on some models)
off or not connected.
Air may be trapped in the •Press the dispenser arm for at least two minutes.
water system.
Dispenser is
LOCKED
. •Press and hold the
LOCK CONTROL
pad for 3 seconds.
Water is not dispensed
Water in reservoir is •Call for service.
but icemaker is working
frozen.
Troubleshooting Tips
Before you call for service…

19
Problem Possible Causes What To Do
No water or ice cube
Supply line or shutoff • Call a plumber.
production
valve is clogged.
Dispenser is
LOCKED
. •Press and hold the
LOCK CONTROL
pad for 3 seconds.
Refrigerator has odor
Foods transmitting • Foods with strong odors should be tightly wrapped.
odor to refrigerator.
• Keep an open box of baking soda in the refrigerator; replace
every three months.
Interior needs cleaning. • See
Care and cleaning.
Defrost water drainage •See
Care and cleaning.
system needs cleaning.
Moisture forms on
Not unusual during •Wipe surface dry.
outside of refrigerator
periods of high humidity.
Moisture collects inside
Too frequent or too
(in humid weather, air
long door openings.
carries moisture into
refrigerator when doors
are opened)
Interior light does
No power at outlet. • Replace fuse or reset the breaker.
not work
Light bulb burned out. •See
Replacing the light bulbs.
Water on kitchen floor or
Drain in the bottom of • See
Care and cleaning.
on bottom of freezer
the freezer clogged.
Cubes jammed in chute. •Poke ice through with a wooden spoon.
Hot air from bottom
Normal air flow cooling
of refrigerator
motor. In the refrigeration
process, it is normal that
heat be expelled in the
area under the refrigerator.
Some floor coverings are
sensitive and will discolor at
these normal and safe temperatures.
CUBED ICE was selected
Last setting was
CRUSHED ICE
. • A few cubes were left in the crusher from the previous setting.
but CRUSHED ICE
This is normal.
was dispensed
(
on some models)
Page is loading ...
Page is loading ...
Page is loading ...
Page is loading ...
Page is loading ...
Page is loading ...
Page is loading ...
Page is loading ...
Page is loading ...
Page is loading ...
Page is loading ...
Page is loading ...
Page is loading ...
Page is loading ...
Page is loading ...
Page is loading ...
Page is loading ...
Page is loading ...
Page is loading ...
Page is loading ...
Page is loading ...
Page is loading ...
Page is loading ...
Page is loading ...
Page is loading ...
Page is loading ...
Page is loading ...
Page is loading ...
Page is loading ...
Page is loading ...
Page is loading ...
Page is loading ...
Page is loading ...
Page is loading ...
Page is loading ...
Page is loading ...
Page is loading ...
Page is loading ...
Page is loading ...
Page is loading ...
Page is loading ...
-
 1
1
-
 2
2
-
 3
3
-
 4
4
-
 5
5
-
 6
6
-
 7
7
-
 8
8
-
 9
9
-
 10
10
-
 11
11
-
 12
12
-
 13
13
-
 14
14
-
 15
15
-
 16
16
-
 17
17
-
 18
18
-
 19
19
-
 20
20
-
 21
21
-
 22
22
-
 23
23
-
 24
24
-
 25
25
-
 26
26
-
 27
27
-
 28
28
-
 29
29
-
 30
30
-
 31
31
-
 32
32
-
 33
33
-
 34
34
-
 35
35
-
 36
36
-
 37
37
-
 38
38
-
 39
39
-
 40
40
-
 41
41
-
 42
42
-
 43
43
-
 44
44
-
 45
45
-
 46
46
-
 47
47
-
 48
48
-
 49
49
-
 50
50
-
 51
51
-
 52
52
-
 53
53
-
 54
54
-
 55
55
-
 56
56
-
 57
57
-
 58
58
-
 59
59
-
 60
60


Ask a question and I''ll find the answer in the document
Finding information in a document is now easier with AI
in other languages
- français: GE GSG20IBMFBB Le manuel du propriétaire
- español: GE GSG20IBMFBB El manual del propietario
Related papers
-
GE Profile 24 CustomStyle Owner's manual
-
GE BSS25JFRWW Owner's manual
-
-
-
-
-
-
GE TFT22JADWW Owner's manual
-
-