Page is loading ...

1
Questions, problems, missing parts? Before returning to your retailer, call our customer service department at 1-877-319-3757,
7 a.m. - 5 p.m., CST, Monday - Friday.
LAUNDRY TUB
FAUCET
Español p. 4
04-30-2012
www.homewerksww.com
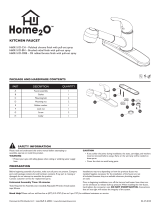
PACKAGE AND HARDWARE CONTENTS
PREPARATION
PART DESCRIPTION QUANTITY
A Faucet 1
SAFETY INFORMATION
Please read and understand this entire manual before
attempting to assemble, operate or install the product.
CAUTION
• If you solder the joints during installation of the faucet,
the seats, cartridges, and washers must be removed
before using a ame or the warranty will be voided on
these parts.
• Cover the sink drain to avoid losing parts.
WARNING
• Protect your eyes with safety glasses when cutting or
soldering water supply lines.
Before beginning assembly of product, make sure all parts
are present. Compare parts with package contents list and
hardware contents. If any part is missing or damaged, do
not attempt to assemble the product. Contact customer
service for replacement parts.
Estimated Assembly Time: 30 minutes
Tools Required for Assembly (not included): Adjustable
Wrench, Groove Joint Pliers, Pipe Wrench, Phillips Screw-
driver, Pipe Tape or Pipe Thread Compound, and Supply
Lines
Installations may vary depending on how the previous faucet
was installed. Supplies necessary for the installation of the
faucet are not all included; however, they are available
wherever plumbing supplies are sold.
Prior to beginning installation, turn off the hot or cold water
lines, then turn on the old faucet to release built-up pressure.
When installing the new faucet, hand tighten the connector
nuts. DO NOT OVERTIGHTEN. Connections that are too
tight will reduce the integrity of the system.
MODEL #3310-250-RB-B
A

2
PRODUCT SPECIFICATIONS
SPECIFICATIONS SPECIFICATIONS
Max. ow rate of aerator: 2.2 GPM (8.3 LPM) at 60 PSI 1/4-turn drip-free cartridge
Max. ow rate of hose end: 4.0 GPM (15.1 LPM) at 20 PSI 1/2" solder or female threaded inlets
ASME A112.18.1/CSA B125 Total weight of item: 1.87 lbs.
www.homewerksww.com
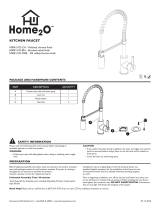
ASSEMBLY INSTRUCTIONS
OPERATION INSTRUCTIONS
1. Turn off water at the supply valve
under the sink or at the main
water supply, disconnect the
supply line, and remove old
faucet.
Clean and dry surface area
where new faucet will be
mounted.
1
2. Mount the faucet to the laundry sink either directly or using a mounting
block (not included).
The two (2) mounting tabs should face the FRONT of the laundry tub
(over the basin), the single tab should face the rear of the basin.
3. Attach the supply lines to the
faucet. Cold to the right side, hot to
the left.
Slide the union nuts over the supply
lines.
Install the union tailpieces to each
supply line.
If soldering the supply lines, remove
the rubber O-rings from the union
tailpiece, solder, and replace when
cool. If threading, cover all male
threads with thread sealant tape
(wrapped clockwise), or pipe joint
compound. Attach rmly but do not
over tighten.
C
3
4. Turn water supply or shut off
valve back on and check for
leaks.
Remove aerator from spout.
Turn on faucet and run at least
30 seconds to ush out water
line. Turn off faucet and replace
aerator.
REMOVE
AERATOR
4
Instructions for changing hose thread aerator:
Turn off water at handles.
1. Use an adjustable pliers to grasp the aerator housing
while holding the spout with your other hand.
2. Rotate aerator to the left to loosen.
3. Remove aerator with ngers.
4. Thread hose aerator onto spout making sure washer is
in place.
5. Tighten hose aertor by turning aerator to the right while
holding the spout in place. Do not over tighten.
6. Turn water on at handles, faucet will work as normal
with the hose thread aerator in place.
Instructions for connecting hose:
Use a standard 3/4" hose thread connector to attach the
hose to the threaded aerator, making sure the hose
washer is in place. Tighten by turning the hose connector
to the right. Do not overtighten.
If leaking occurs you can tighten the hose aerator more.
When removing the hose make sure water is turned off at
the faucet and that you have allowed the hose to drain. On
a long hose some water may remain in the hose and drain
out when you remove the hose.
Instructions for use:
Adjust water to proper temperature by turning on the hot
and cold water valves. Swivel faucet spout as needed to
add and remove items from the laundry tub.
Do not hang items like pails or buckets from the spout.

3
www.homewerksww.com
CARE AND MAINTENANCE
TROUBLESHOOTING
Clean periodically with a soft cloth. Avoid abrasive cleaners,
steel wool, and harsh chemicals as these will dull the nish
and void your warranty.
PROBLEM: Leaks underneath handle.
CAUSE: Bonnet has come loose or O-ring on cartridge is
dirty or twisted.
ACTION:
1. Move the handle to the off position. Unscrew the handle
screw and remove the handle.
2. Tighten the bonnet by turning it clockwise. Move the
cartridge stem to the on position. The leak should stop
draining out from around the cartridge stem.
3. If the leak does not stop, shut off the water supply. Remove
the bonnet by turning it counter-clockwise. Lift out the
cartridge valve. Inspect the larger O-ring on the cartridge
bonnet and the smaller O-ring on the cartridge stem.
Remove any debris from the O-rings. If either O-ring is
twisted, straighten it out. If either O-ring is damaged,
replace the cartridge by calling Customer Service.
4. Position the cartridge back into the faucet body. Make
sure the ridges on the two sides of the cartridge bonnet t
into the grooves on the two sides of the faucet body.
Tightly screw the bonnet onto the faucet body.
5. Re-install the handle.
PROBLEM: Water does not completely shut off.
CAUSE: Rubber valve seat is dirty, stuck, or broken.
ACTION:
1. Shut off the cold water supply. If leak stops, the problem
is on the cold side. If leak continues, the problem is on
the hot side. Shut off the hot water supply to determine if
both the cold and hot side have a problem.
2. Remove the handle on the problem side. Loosen the
bonnet by turning it counter-clockwise. Lift out the
cartridge assembly.
3. Inspect the rubber valve seat in the faucet body. If there
is debris or brass scrap on the surface of the seat,
remove it. If the rubber seat is stuck tightly in the water
inlet hole, push it gently with a ngertip so that it moves up
and down smoothly. The spring (smaller end up) must be
replaced underneath the valve seat. If the rubber valve
seat is worn out or broken, replace the cartridge by calling
Customer Service.
4. Replace the cartridge in the faucet body. Make sure that
the ridges on the two sides of the cartridge bonnet t into
the grooves on the two sides of the faucet body. Tightly
screw the bonnet onto the faucet body.
5. Re-install the handle.
PROBLEM: Faucet leaks around aerator.
CAUSE: Aerator incorrectly tted.
ACTION:
1. Unscrew the aerator by turning it clockwise. Inspect the
black rubber packing inside the aerator. The rubber
packing should be at.
2. Screw the aerator onto the spout end and tighten.
PROBLEM: Improper water pattern.
CAUSE: Aerator dirty or small parts inside aerator improperly
installed.
ACTION:
1. Remove the aerator from the spout end by turning it
clockwise.
2. Gently ush the small parts inside the aerator to clear
away any debris.
3. Re-install the small parts as shown in the exploded
diagram. Metal screens must be at and plastic
supporter must be straight.
4. Screw the aerator onto the spout end and tighten.

4www.homewerksww.com
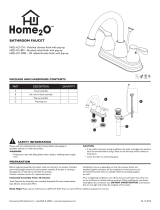
ROUGH-IN
PARTS LIST
For replacement parts, call our customer service department at 1-877-319-3757, 7 a.m. - 5 p.m., CST, Monday - Friday.
PART DESCRIPTION PART
NUMBER
1 Body –
2 Spring RP00413
3 Washer
4 Cartridge – hot RP00407
5 Cartridge – cold RP00408
6 Nut RP00412
7, 9 Handle with screw – hot RP00409
8, 9 Handle with screw – cold RP00410
10 C-ring
RP00426
11 O-ring
12 O-ring
13 Spout Nut
14 Spout
15 Aerator Washer
RP0041116 Aerator Diffuser
17 Aerator Shell
18 Screen Filter
RP0042419 Hose Adapter
20 O-ring
21 O-ring
RP00414
22 Union Tailpiece
23 Union Nut
24 Mounting Block Screw RP00427
20
15
16
17
8
5
14
13
12
11
10
24
21
97
6
4
32
1
9
22
23
18
19
4.56
"
2.69"
3.37" 1.42"
1.97"
7.
0
7
"
2.15"
7.45"
/