c d j - 7 0 0 m a n u a l • g e m i n i d j . c o m
18
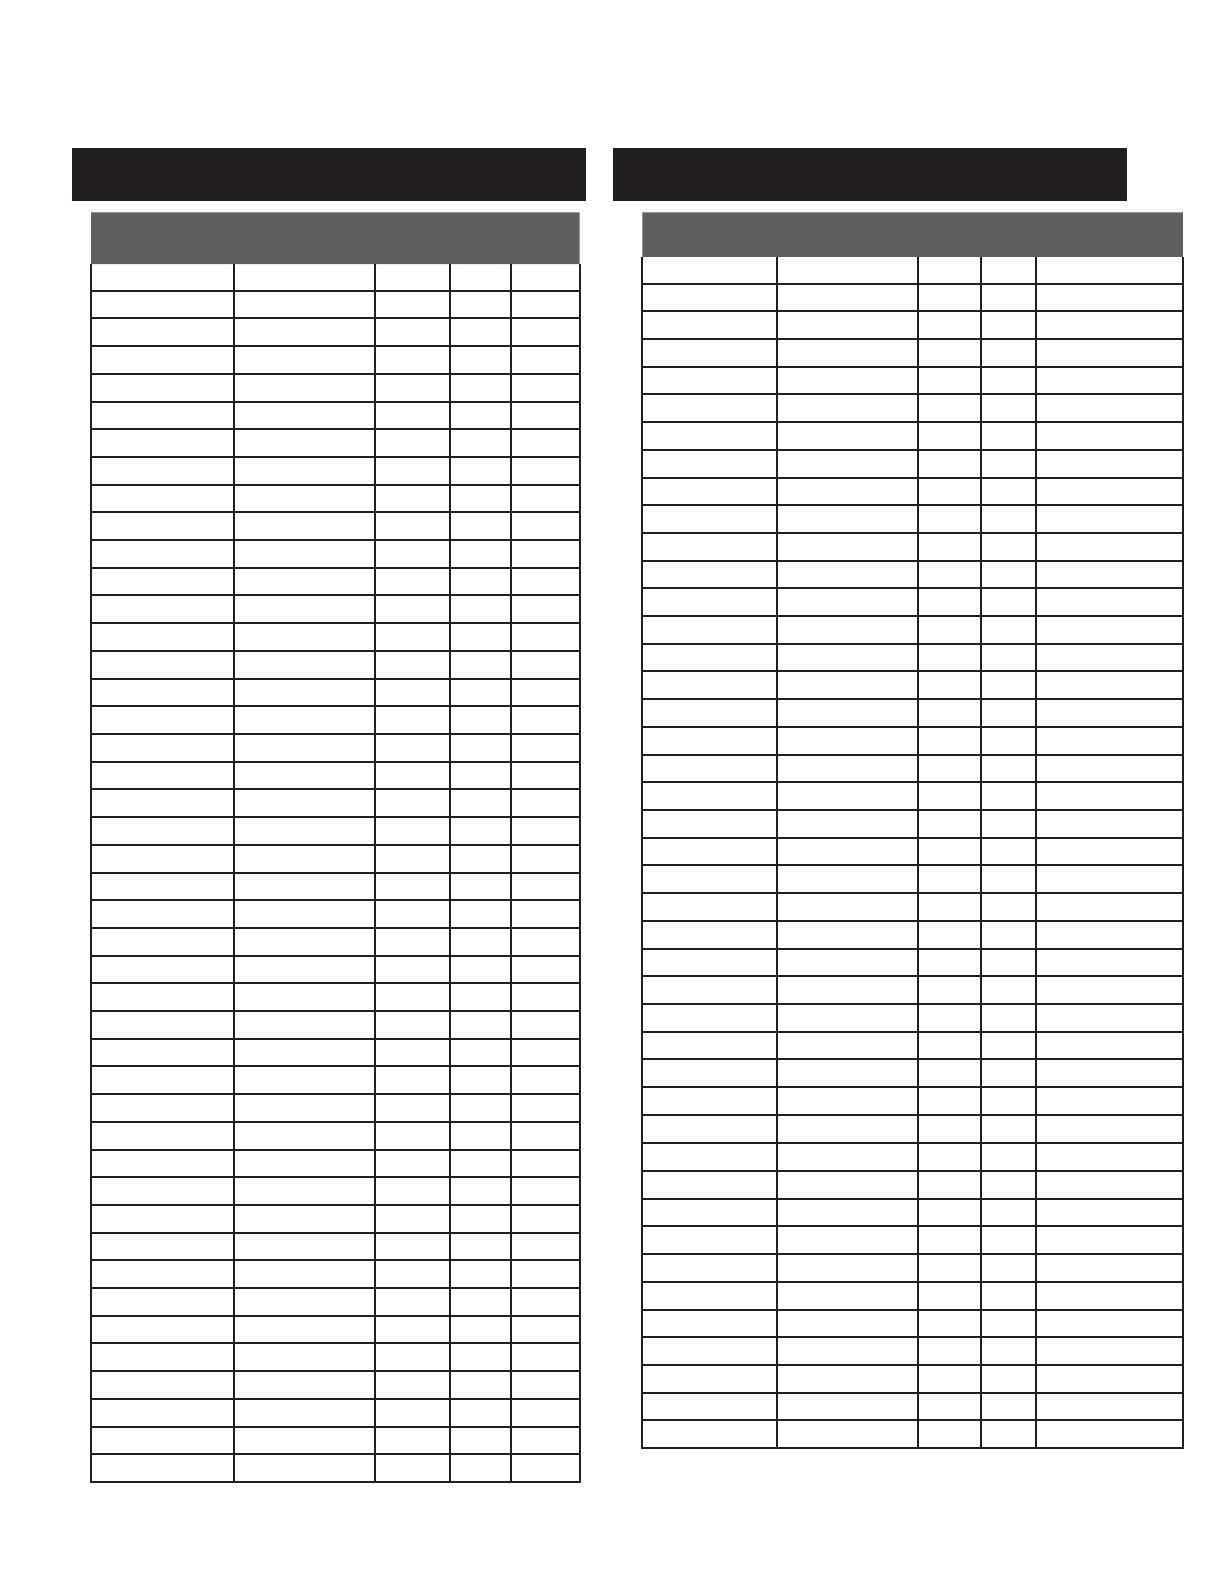
Controller
Parameter
Software
Parameter
Send
Number
Min
Value
Max
Value
Cue Cue 1 0 127
Play/Pause Play/Pause 2 0 127
+ (pitch bend) Pitch + 3 0 127
- (pitch bend) Pitch - 4 0 127
HotCue 1 Cue 1 5 0 127
HotCue 2 Cue 2 6 0 127
HotCue 3 Cue 3 7 0 127
Memo Memo 8 0 127
Track Search << Track reverse 9 0 127
Track Seach >> Track forward 10 0 127
Browse Left Up in tracklist 11 0 127
Browse Right Down in tracklist 12 0 127
Master Tempo Master Tempo 13 0 127
Vinyl Scratch 14 0 127
Select Load Track 15 0 127
Loop In Loop In 16 0 127
Loop Out/Adjust Loop Out 17 0 127
Reloop/Exit Reloop 18 0 127
BPM BPM 19 0 127
Effect1 (wah) Effect1 (select) 20 0 127
Effect2 (flanger) Effect2 (select) 21 0 127
Effect3 (echo) Effect3 (select) 22 0 127
Back Folder Out 23 0 127
Wheel Touch Wheel Touch 24 0 127
Effect Param Effect Param 25 0 127
Time Elapsed/Remain 26 0 127
Autocue Autocue 27 0 127
LOCK LOCK 28 0 127
Range Range 29 0 127
Reverse Reverse 30 0 127
Slip Slip 31 0 127
Jogwheel Jogwheel 32 0, 63 63, 128
Pitch Slider PitchSlider 33 0 127
Track Skip << Prev. track 34 0 127
Track Skip >> Next track 35 0 127
Hold Effect On/Off 36 0 127
Eject Deck Select 37 0 127
Effect4 (wah) Effect4 (select) 38 0 127
Effect5 (trance) Effect5 (select) 39 0 127
Effect6 (bubble) Effect6 (select) 40 0 127
Dry/Wet Dry/Wet Effect 41 0 127
Start time Parameter 42 0 127
Stop time Parameter 43 0 127
Pitch Slider (14bit) Pitch Slider 44 0 127
*NOTE: 14-bit pitch slider allows for greater accuracy when transmitting pitch
information but may not be compatible with all DJ Software.
Controller
Parameter
Software
Parameter
Bit Byte Value
Cue Cue 1 1 1- on, 0 - off
Play/Pause Play/Pause 2 1 1- on, 0 - off
+ (pitch bend) Pitch + 3 1 1- on, 0 - off
- (pitch bend) Pitch - 4 1 1- on, 0 - off
HotCue 1 Cue 1 5 1 1- on, 0 - off
HotCue 2 Cue 2 6 1 1- on, 0 - off
HotCue 3 Cue 3 7 1 1- on, 0 - off
Memo Memo 8 1 1- on, 0 - off
Track Search << Track reverse 9 1 1- on, 0 - off
Track Seach >> Track forward 10 1 1- on, 0 - off
Browse Left Up in tracklist 11 1 1- on, 0 - off
Browse Right Down in tracklist 12 1 1- on, 0 - off
Master Tempo Master Tempo 13 1 1- on, 0 - off
Vinyl Scratch 14 1 1- on, 0 - off
Select Load Track 15 1 1- on, 0 - off
Loop In Loop In 16 2 1- on, 0 - off
Loop Out/Adjust Loop Out 17 2 1- on, 0 - off
Reloop/Exit Reloop 18 2 1- on, 0 - off
BPM BPM 19 2 1- on, 0 - off
Effect1 (wah) Effect1 (select) 20 2 1- on, 0 - off
Effect2 (flanger) Effect2 (select) 21 2 1- on, 0 - off
Effect3 (echo) Effect3 (select) 22 2 1- on, 0 - off
Back Folder Out 23 2 1- on, 0 - off
Wheel Touch Wheel Touch 24 3 1- on, 0 - off
Time Elapsed/Remain 26 3 1- on, 0 - off
Autocue Autocue 27 3 1- on, 0 - off
LOCK LOCK 28 3 1- on, 0 - off
Range Range 29 3 1- on, 0 - off
Reverse Reverse 30 3 1- on, 0 - off
Slip Slip 31 3 1- on, 0 - off
Track Skip << Prev. track 34 4 1- on, 0 - off
Track Skip >> Next track 35 4 1- on, 0 - off
Hold Effect On/Off 36 4 1- on, 0 - off
Eject Deck Select 37 4 1- on, 0 - off
Effect4 (wah) Effect4 (select) 38 4 1- on, 0 - off
Effect5 (trance) Effect5 (select) 39 4 1- on, 0 - off
Effect6 (bubble) Effect6 (select) 40 5 1- on, 0 - off
Jog wheel Jog wheel 64-71 8 Min = 0, Max= 225
Effect Parameter Effect Parameter 72-79 9 Min = 0, Max= 255
Dry/Wet Dry/Wet Effect 80-87 10 Min = 0, Max= 255
Start time Parameter 88-95 11 Min = 0, Max= 255
Stop time Parameter 96-103 12 Min = 0, Max= 255
Pitch Slider Pitch Slider 104-117 13, 14 Min = 0, Max= 800
m i d i d e v i c e m e s s a g e s ta b l e h i d d e v i c e m e s s a g e s ta b l e
m i d i co n t r o l s


