3com Bigpicture 1689 User manual
- Category
- Security cameras
- Type
- User manual
This manual is also suitable for

This manual covers installation and operating instructions for the following 3Com
®
Bigpicture
TM
products:
• Videophone Camera & Capture Card
3Com, the 3Com logo, and U.S. Robotics are registered trademarks; Bigpicture and the Bigpicture
logo are trademarks of 3Com Corporation or its subsidiaries. Windows and NetMeeting are
registered trademarks of Microsoft Corp. Kai’s Photo Soap Special Edition is a trademark of
MetaCreations. Digital Video Producer is a trademark of Asymetrix. VDOPhone, VDOLive, and
VDOMail are trademarks of VDOnet Corp. iVisit is a trademark of BoxTop Interactive. Any other
trademarks or service marks used in this manual are the property of their respective owners.
Copyright © 1997 3Com Corporation or its subsidiaries
7770 North Frontage Rd.
Skokie, IL 60077-2690

TABLE OF CONTENTS
ii
Introduction 1
Installation 2
Determining Your Version of Windows 95 2
Inserting the Video Capture Card into Your Computer 4
Connecting Your NTSC Camera to Your Video Capture Card 8
Connecting a Camcorder or Other NTSC Device to Your Video Capture Card 9
Installing the Video Capture Card’s Drivers 10
Software Installation 19
Bigpicture Software Summary 24
The Bigpicture Application Launcher 28
Internet Security Issues 30
Troubleshooting and Online Help Resources 35
IRQ Conflicts: Freeing an IRQ 37
IRQ Conflicts: Altering PCI BIOS Settings 39
System Locking: Readjusting the Video Capture Card’s Memory Address 40
If Plug and Play Does Not Detect Your Capture Card 41
Online Help Resources 42


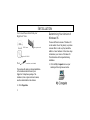
INTRODUCTION
1
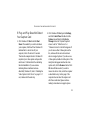
ongratulations! You have purchased a
powerful (and fun!) video communications
tool. 3Com is known worldwide for reliable
and easy-to-use networking and data
communications tools. Now you can count on
3Com for the same quality in digital video
applications.
3Com, the leader in networking, now puts
digital video right inside your PC. With the
simple, compact camera and standards-based
video capture card included in your
Bigpicture package, you can grab still
pictures, use Kai’s Photo Soap Special
Edition
™
to put finishing touches on images,
removing “red eye” or sunlight glare from
digital photos, or edit video footage into a real
mini-movie with Asymetrix Digital Video
Producer
™
.
With the addition of a modem, you can
conduct Internet and “point to point” H.324
video phone calls using VDONet’s
VDOPhone
™
. VDOMail
™
makes sending
video and audio to friends and family as easy
as sending regular text e-mail. BoxTop’s
iVisit
™
gives you further Internet video
capabilities. Microsoft’s NetMeeting
™
lets you
communicate with both audio and H.323
video, collaborate on virtually any Windows-
based application, exchange graphics on an
electronic whiteboard, and much more.
This manual will guide you through installation
of the hardware and software included in your
Bigpicture video package. Have fun!
C

INSTALLATION
2
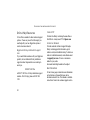
You’ll need these items from your
Bigpicture
TM
box:
NTSC camera video capture card
Bigpicture CD-ROM
Plus: screwdriver (not included)
This section will guide you through installation
of the hardware and software in your
Bigpicture Videophone package. The
hardware (video capture card and camera)
must be installed before the software.
Determining Your Version of
Windows 95
There are different versions of Windows 95
on the market. One of the primary ways these
versions differ is in the way they handle the
addition of new hardware. Follow these steps
to determine your version of Windows 95.
This information will be important during
installation.
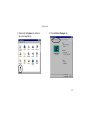
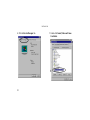
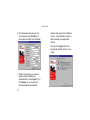
1. Click the My Computer icon on your
desktop with the right mouse button.
2. Click Properties.

INSTALLATION
3
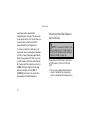
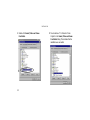
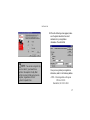
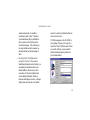
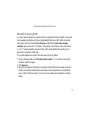
3. In the “System Properties” screen, look at
the system information under the General
tab (circled in the following screen image).
The number following the text “Microsoft
Windows 95” will end with “950”, “950a”,
or “950b”. This indicates your version of
Windows 95. Write this number on the
blank below for future reference. Then
click OK.
Windows 95 version _________________

INSTALLATION
4
Inserting the Video Capture
Card into Your Computer
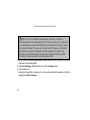
NOTE: Before installing your
capture card, write down the card’s
serial number in this space:
________________________________
You will find the serial number
underneath the bar code on the white
sticker on the capture card and on your
Bigpicture package. If you ever need to
call our technical support department,
the technical support representative
will ask you for this serial number.
This number will help him or her
identify your capture card.
Your video capture card supports Plug and
Play installation, the fastest, easiest way to
add new hardware to your PC. Windows 95
should do all the work of detecting your new
hardware.
TIP: Before you unplug anything,
label the cords or make a sketch of how
things are connected. This can be
helpful when you plug things back in
later.
1. Turn off your computer and unplug it from
the electrical outlet.
2. Unplug any peripheral devices (printer,
monitor, keyboard, mouse, etc.) from the
computer.

INSTALLATION
5
CAUTION: To avoid risk of
electric shock, make sure your
computer and all peripheral devices are
turned off and unplugged from
electrical outlets.
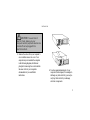
3. Remove the screws from your computer’s
cover and then remove the cover. Your
computer may not resemble the computer
in the following diagrams, but the basic
principle for removing the cover should be
the same. Refer to your computer’s
documentation if you need further
instructions.
4. Touch an unpainted metal part of your
computer (the back panel, for example) to
discharge any static electricity you may be
carrying. Static electricity can damage
electronic components.

INSTALLATION
6
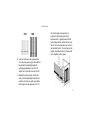
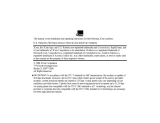
5. There should be two types of expansion
slot inside your computer, ISA and PCI
(see the following diagrams). Find an
empty PCI slot inside your computer. PCI
slots are usually white plastic grooves lined
with silver metal. ISA slots are usually
longer black plastic grooves lined with
silver metal.

INSTALLATION
7
PCI ISA
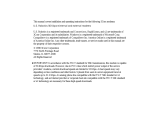
6. Unscrew and remove the expansion slot
cover (the long, narrow piece of metal that
keeps dust from entering through the
opening perpendicular to the slot). Be
careful not to drop the screw into the PC.
7. Holding the video capture card at each
corner, with the gold edge facing the slot,
push the card down as gently as possible
until it snaps into the expansion slot. You
will need to apply some pressure to
properly fit the capture card into the
expansion slot. A gentle back-and-forth
motion helps seat the card all the way into
the slot. If you feel resistance, do not force
the card into the slot. The card may not be
properly aligned with the slot. Remove the
card completely and try again.

INSTALLATION
8
8. Screw the video capture card firmly into
place using the screw you removed in step
6.
9. Replace the computer’s cover. Fasten it
with the screws you removed in step 3.
10. Plug the computer’s power cord back into
the computer and reattach your peripherals
to the computer.
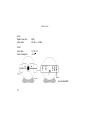
Connecting Your NTSC Camera
to Your Video Capture Card
You can use the NTSC video camera
included in your Bigpicture package, a
camcorder (not included), or a VCR (not
included) to channel video signals into your
capture card. If you wish to use a camcorder
or VCR, go to “Connecting a Camcorder or
Other NTSC Device to the Video Capture
Card” on page 10.
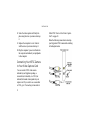
Make the following connections to hook up
your Bigpicture NTSC camera while referring
to the diagram below.

INSTALLATION
9
1. Plug the Bigpicture camera’s yellow RCA-
type video plug into the yellow RCA-type
video jack on the capture card.
2. Plug the camera’s power cord into the
power jack located just under the video
jack on the capture card.
3. Plug the camera’s 1/8-inch audio output
plug into the sound card’s MIC or
AUDIO IN jack. Refer to your sound
card’s documentation for further
information.
4. Go to “Installing the Video Capture Card’s
Drivers” on page 11.
Connecting a Camcorder or
Other NTSC Device to Your
Video Capture Card
In addition to the NTSC camera included with
your capture card, you can connect any
NTSC compliant device to the video capture
card. In this manner, you could hook up a
camcorder, VCR, laserdisc player, or other
NTSC video device. You should consult the
device’s manual for specific information about
connecting the device to a source other than a
television. The device must be NTSC
compliant to be used with this product.
If your device is NTSC compliant, you should
be able to run an RCA male to RCA male
cable from the device’s video out jack to the
capture card’s video in (yellow) jack. Please

INSTALLATION
10
consult your device’s manual if this
configuration does not apply. The power jack
on the capture card is of no concern when you
are using a device other than the NTSC
camera included in your Bigpicture kit.
To connect your device’s audio out to your
sound card, connect a phono plug to miniature
1/8-inch (3.5 mm) phone plug adapter (Radio
Shack catalog number 274-330a) to one end
of an RCA male to RCA male cable. Plug the
RCA male end of the cable into your device’s
AUDIO OUT jack. Plug the 1/8-inch plug
into the sound card’s 1/8-inch MIC or
AUDIO IN jack (refer to the sound card’s
documentation for further information).
Installing the Video Capture
Card’s Drivers
NOTE: If you wrote “950B” in the
blank on page 4, go to “Video Capture
Card Driver Installation with Windows
95 Version 950B” on page 15.
Video Capture Card Driver Installation
with Windows 95 Versions 950 and
950A
1. Turn on your computer. When Windows
restarts, it will detect the video capture
card. You should see the following screen.

INSTALLATION
11
NOTE: If you do not see the
preceding screen, your Plug and Play
installation was not successful. See “If
Plug and Play Does Not Detect Your
Capture Card” (page 43).
2. Click Driver from disk provided by
hardware manufacturer.
3. Click OK and insert the Bigpicture CD
into your CD-ROM drive.
4. When you see the “Install From Disk”
screen, type D:\ and then press ENTER.
(If your CD-ROM drive uses a letter other
than D, type that letter in place of D.)
Windows will install the drivers for your
video capture card.

INSTALLATION
12
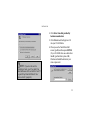
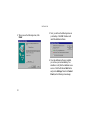
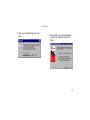
5. Next, you will see the following screen on
your desktop. Click OK. Windows will
install the additional software.
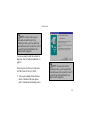
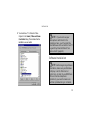
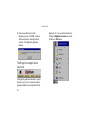
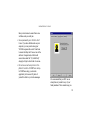
6. Once the additional software is installed,
you will see your normal desktop. You
should now verify that the installation was a
success. Click the Windows Start button
and point to Settings. Then click Control
Panel (see the following screen image).

INSTALLATION
13
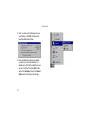
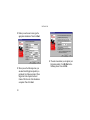
7. Double-click the System icon (circled in
the screen image below).
8. Click the Device Manager tab.

INSTALLATION
14
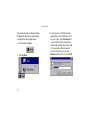
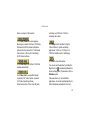
9. Double-click Sound, Video and Game
Controllers.
10. You should see “U.S. Robotics Video
Capture” in the Sound, Video and Game
Controllers listing. This indicates that the
installation was successful.

INSTALLATION
15
NOTE: If you do not see your
video capture card listed in the
preceding screen, your Plug and Play
installation was not successful. See “If
Plug and Play Does Not Detect Your
Capture Card” (page 43).
You are now ready to install the software for
Bigpicture. Turn to “Software Installation” on
page 20.
Video Capture Card Driver Installation
with Windows 95 Version 950B
1. Turn on your computer. When Windows
restarts, it will detect the video capture
card. You should see the following screen.
NOTE: If you do not see the
preceding screen, your Plug and Play
installation was not successful. See “If
Plug and Play Does Not Detect Your
Capture Card” (page 43).

INSTALLATION
16
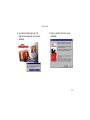
2. When you see the following screen, click
Finish.
3. Next, you will see the following screen on
your desktop. Click OK. Windows will
install the additional software.
4. Once the additional software is installed,
you will see your normal desktop. You
should now verify that the installation was a
success. Click the Windows Start button
and point to Settings. Then click Control
Panel (see the following screen image).

INSTALLATION
17
5. Double-click the System icon (circled in
the screen image below).
Page is loading ...
Page is loading ...
Page is loading ...
Page is loading ...
Page is loading ...
Page is loading ...
Page is loading ...
Page is loading ...
Page is loading ...
Page is loading ...
Page is loading ...
Page is loading ...
Page is loading ...
Page is loading ...
Page is loading ...
Page is loading ...
Page is loading ...
Page is loading ...
Page is loading ...
Page is loading ...
Page is loading ...
Page is loading ...
Page is loading ...
Page is loading ...
Page is loading ...
Page is loading ...
Page is loading ...
Page is loading ...
Page is loading ...
Page is loading ...
Page is loading ...
Page is loading ...
Page is loading ...
Page is loading ...
Page is loading ...
Page is loading ...
Page is loading ...
Page is loading ...
Page is loading ...
Page is loading ...
-
 1
1
-
 2
2
-
 3
3
-
 4
4
-
 5
5
-
 6
6
-
 7
7
-
 8
8
-
 9
9
-
 10
10
-
 11
11
-
 12
12
-
 13
13
-
 14
14
-
 15
15
-
 16
16
-
 17
17
-
 18
18
-
 19
19
-
 20
20
-
 21
21
-
 22
22
-
 23
23
-
 24
24
-
 25
25
-
 26
26
-
 27
27
-
 28
28
-
 29
29
-
 30
30
-
 31
31
-
 32
32
-
 33
33
-
 34
34
-
 35
35
-
 36
36
-
 37
37
-
 38
38
-
 39
39
-
 40
40
-
 41
41
-
 42
42
-
 43
43
-
 44
44
-
 45
45
-
 46
46
-
 47
47
-
 48
48
-
 49
49
-
 50
50
-
 51
51
-
 52
52
-
 53
53
-
 54
54
-
 55
55
-
 56
56
-
 57
57
-
 58
58
-
 59
59
-
 60
60


3com Bigpicture 1689 User manual
- Category
- Security cameras
- Type
- User manual
- This manual is also suitable for
Ask a question and I''ll find the answer in the document
Finding information in a document is now easier with AI
Related papers
-
3com PCI Faxmodem Installation guide
-
-
-
-
-
-
-
 US Robotics 56 Kbps F User manual
-
 US Robotics 005687-03 - User manual
-


Other documents
-
SPT 40052 Operating instructions
-
 US Robotics 56K Faxmodem Installation guide
-
 T'nB CAJRCA10 Datasheet
-
US Robotics 56K Faxmodem Owner's manual
-
 US Robotics USR5660A Installation guide
-
Matrox Rainbow Runner User manual
-
Dolphin SG2010 Reference guide
-
 Wiley 978-0-470-98660-8 Datasheet
-
Multi-Tech Systems MT128PCI-SV User manual
-


