Page is loading ...

tender vibes
®
TRAVEL BASSINET | MOISÉS DE VIAJAR
©2009 Kolcraft
®
Enterprises, Inc. All Rights Reserved. B27-R4 11/08

2
READ ALL INSTRUCTIONS BEFORE ASSEMBLY AND USE OF
PRODUCT. Failure to follow these warnings and the
instructions could result in serious injury or death. Make sure
bassinet is fully assembled and secure before use.
IMPORTANT SAFETY INFORMATION:
When NOT to Use Your Bassinet
• FALL HAZARD - To help prevent falls, do not use this
product when the infant begins to push up on hands and
knees or is 3 months old or weighs 15 lbs. (6.8 kg), which-
ever comes first.
• Accidents can happen quickly, so check your child frequently.
• CAUTION: Toys intended to be assembled by adult!
Preparing Your Bassinet for a Safe Sleep Environment
• AVOID SUFFOCATION HAZARDS: Use ONLY bassinet
pad and sheet provided by Kolcraft. If you choose to ignore
this warning, you must use a sheet designed to fit the
dimensions of this bassinet mattress. Make sure the sheet
securely tucks at least 2” (5 cm.) under the bassinet pad on
all sides to avoid entanglement.
• Infants can suffocate in gaps between an extra pad and
side of bassinet/cradle & on soft bedding.
• NEVER USE additional mattresses, pillows, comforters,
padding or sheets.
•STRANGULATION HAZARDS: Strings can cause
strangulation! Do not place items with a string around a
child’s neck, such as hood strings or pacifier cords. Do
not suspend strings over a bassinet or cradle or attach
strings to toys.
• DO NOT place more than one infant in bassinet.
Other Things to Avoid
• DO NOT carry or move bassinet with child in it.
•
DO NOT use around pets or other children without wheel
locks on.
• DO NOT use in a motor vehicle.
WARNING
Continued on next page

3
• NEVER use near stairs or steps.
• To reduce the risk of SIDS (Sudden Infant Death
Syndrome), pediatricians recommend healthy infants be
placed on their back to sleep unless otherwise advised
by a physician.
• ALWAYS attach clips tightly to the bassinet frame according to
instructions. Check frequently.
• DO NOT add additional strings or straps to attach to crib or
bassinet.
FCC Statement (United States Only)
This equipment has been tested and found to comply with
the limits for a Class B digital device, pursuant to Part 15 of the
FCC Rules. These limits are designed to provide reasonable
protection against harmful interference in a residential installation.
This equipment generates, uses and can radiate radio frequency
energy and, if not installed and used in accordance with the
instructions, may cause harmful interference to radio communications.
However, there is no guarantee that interference will not occur in a
particular installation. If this equipment does cause harmful
interference to radio or television reception, which can be determined
by turning the equipment off and on, the user is encouraged to try to
correct the interference by one or more of the following measures:
•Reorient or relocate the receiving antenna.
•Increase the separation between the equipment and receiver.
•Consult the dealer or experienced radio / TV technician for help.
Note: Changes or modifications not expressively approved by
the manufacturer responsible for compliance could void the user’s
authority to operate the equipment.

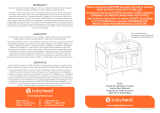
Parts List Lista de partes
6
To Assemble Bassinet Stand Para ensamblar la base del moisés
Insert casters into the bottom of the frame
legs placing the four locking casters into the
frame tubes.
Inserte las ruedas en la parte inferior en el
soporte de las patas, situando las dos ruedas
de cierre en los tubos de el soporte.
Stand frame on the casters and unfold to
open it. Push down on the side locks to
secure frame.
Ponga el soporte en pie sobre las ruedas y
despliéguelo para abrirlo. Presione en los
cierres laterales para asegurar el soporte.
1
2
1
2
How to Assemble Your Bassinet / Cómo ensamblar su moisés
Frame
Soporte
Tender Vibes
®
Electronics with Music
Electrónicos de Tender
Vibes
®
con música
Bassinet
Moisés
Canopy with Toys*
Toldo con juguetes*
Tool Needed: Phillips Screwdriver
Herramienta necesitado: Destornillador de estrella
Continued on next page
Continuación en la página siguiente
Bassinet Pad & Sheet
Colchoncito del
moisés y sábana
Locking Casters (4)
Ruedas con cierre
Locking Casters
Ruedas con cierre
*Toys may vary
*Juguetes pueden variar
Basket
Canasata
Basket Rods (2)
Varillas de Canasta

7
Make sure frame lock is straight before use.
Asegúrese de que el cierre del soporte está
recto antes de usar la cuna.
1
To Attach Basket Para unir la canasta
3
Hang the elastic loop at the end of each
corner of the basket onto the screw at the
top of the frame.
Cuelgue el lazo elástico en el extremo de
cada esquina de la cuna, en el tornillo en la
parte superior del soporte.
Slide the basket rods through the bottom of
the basket holes and insert the ends into the
frame. The basket rods can be used on
either end of the frame.
Deslice las barras de la cuna a través de la
parte inferior del agujero de la cuna e inserte
los extremos en el soporte. Las barras de la
cuna se pueden usar en cualquier extremo
del soporte.
Pull basket taut so it covers the basket rod
and does not bunch.
Jale de la cesta hasta que esté tensa de man-
era que cubra la barra de la cesta y esté lisa.
1
2
3
Basket Rod
Varillas de canasta
Basket Rod
Varillas de
canasta
2

8
1
2
4
To Assemble Bassinet Para ensamblar el moisés
Do not remove floorboard from bassinet
cover. Open the support bars and clip each
leg into the hooks on the floorboard.
No saque la tabla del suelo de la cubierta del
moisés. Abra las barras de soporte y ajuste cada
pata en los enganches en la tabla del suelo.
Fasten all the snaps on bassinet cover to
floorboard.
Asegure todos los broches de la cubierta del
moises a la tabla de la base.
CAUTION: Do not use this product if all
snaps cannot be completely fastened.
PRECAUCIÓN: No use este producto si los
broches no estan completamente asegurados.
Replace bassinet pad in bassinet, making
sure bassinet is flat and firmly in place.
Ponga el colchoncito dentro del moisés.
Presione el colchoncito asegurándose que
esté plano y se encuentre fijo en su sitio.
CAUTION:
Fitted bassinet sheet should
securely wrap at least 2” (5 cm) beneath entire
pad to reduce chance of entanglement.
PRECAUCIÓN: La sábana ceñida del moisés
debe quedar bien sujeta 5 cm. (2 pulgadas) por
debajo y alrededor del colchón para disminuir
el riesgo de que el bebé quede enredado.
NOTE: See page 16 for instructions to order
replacement parts.
NOTA: Mire la página 16 para instrucciones
como encargar sábanas de susituta.
Open bassinet locking attachment clips on
the bottom of the bed. Place U-shaped
balance clips onto the top rail.
Abra los clips de unión de cierre de la cuna
en la parte inferior de la cama. Sitúe los clips
de balance en forma de U en el raíl superior.
1
2
3
4
Hooks
Ganchos
U-shaped balance clips
los clips de balance en forma de U
Continued on next page
Continuación en la página siguiente
U-Shaped balance clips
Clips de balance en
forma de U
Locking attachment clips
clips de unión

To Install Batteries in Tender
Vibes
®
Electronics
Para instalar las pilas en el
mecansimo electronico
Unscrew battery cover door with a Phillips
screwdriver.
Desatornille la cubierta de las pilas con un
destornillador de estrella.
Insert 3 “AA” batteries as shown
(not included).
Inserte 3 pilas “AA” como se muestra (no
están incluidas).
Screw battery door back into place.
Vuelva a atornillar la cubierta de las pilas en su
sitio.
CAUTION: Do not mix old and new
batteries. Do not mix alkaline, standard
(carbon-zinc) or rechargeable
(nickel-cadmium) batteries. Remove batteries
before storing this product for a prolonged
period of time.
Never open battery compartment near your
child.
PRECAUCIÓN: Por favor no mezcle pilas
usadas con pilas nuevas. No mezcle pilas
alcalinas, pilas estándar (zinc-carbono) con
pilas recargables (níquel-cadmio). Sáquele las
pilas si va a guardar el producto por un
período de tiempo prolongado.
No abra nunca el compartimento de las pilas
cerca de su hijo.
1
2
1
9
2
“AA”
3
5
Close the locking attachment clips to secure
bassinet bed to frame.
Cierre los clips de unión para asegurar la
cama de la cuna al soporte.
NOTE: Pull up to ensure secure.
NOTA: Jale hace arriba para asegurar que
este seguro
5

10
Attach the Tender Vibes
®
electronics with
Music onto the bracket by pushing down-
ward. Make sure the speaker side faces the
interior of the bassinet.
Una el Tender Vibes
®
con Music electronic al,
soporte presionando hacia abajo. Asegúrese
de que el lado de la bocina está mirando
hacia el interior del moisés.
TO REMOVE: Pull up on the Tender Vibes
®
electronics.
PARA REMOVER: Estire del dispositivo elec-
trónico Tender Vibes
®
.
2
2
To Attach Tender Vibes
®
Electronics
Para sujetar el mecanismo
electrónico
CAUTION:
Toys to be assembled by an
adult.
PREAUCIÓN:
Los juguetes deben ser
ensamblados por un adulto.
The electronic unit will clip onto the bracket
at the front of the bassinet. The bassinet skirt
will have an open slit in the fabric.
La unidad electrónica se sujetará a la
abrazadera frente al moisés. La falda del
moisés tendrá una abertura en la tela.
Locate the bracket on the front of the
bassinet frame.
Localice el soporte en el frente de la
estructura del moisés.
1
1
To Attach Canopy Para sujetar el toldo
Attach canopy by snapping ends to the frame.
Una el toldo abrochando los extremos a la
estructura.
Velcro fabric together.
Una el material usando el Velcro.
1
2
2
1

11
To Use Brakes
Para usar los frenos
Push levers on casters down to lock.
Oprima las palancas en las ruedas, hacia
abajo para asegurarlas.
Pull levers up to unlock.
Jale las palancas hacia arriba para soltarlas.
How to Properly Use Your New Bassinet / Cómo usar su nuevo moisés correctamente
WARNING
Avoid accidents. Do not use the
bassinet with the wheels unlocked
around stairs or other children.
ADVERTENCIA
Evite accidentes. No use el moisés
cerca de escaleras o de otros niños sin
poner los frenos.
1
2
3
Pull back canopy fabric over bassinet frame.
Jale la tela del toldo sobre el marco del
moisés.
NOTE: Canopy fabric is not removable from
canopy frame.
NOTA: El tejido de la cubierta no se puede
remover de la estructura de la cubierta.
3

12
TO REMOVE BASSINET COVER
PARA REMOVER LA CUBIERTA DEL MOISÉS
Unsnap the clips around bassinet frame to remove
bassinet.
Desabroche the clips alrededor del marco del moisés
para quitar el moisés.
Remove canopy and bassinet pad.
Remueva la cubierta y el colchón.
Unsnap bassinet cover from bassinet floor board.
Desabroche la cubierta del moisés de la tabla de la base.
Remove bassinet cover from floorboard.
Remueva la cubierta del suelo.
TO WASH BASSINET COVER
PARA LAVAR LA CUBIERTA DEL MOISÉS
Hand wash bassinet cover with water and mild soap.
Lave de mano la cubierta del moisés con agua y jabó
suave.
Line Dry. Do not dry this bassinet cover in clothes dryer.
This may shrink the cover.
Tiéndala a secar. No ponga a secar la cubierta del
moisés en la secudora. Esto puede encoger la cubierta.
CAUTION: For the safety of your child, it is vital that the
bassinet cover is re-mounted completely and correctly.
PRECAUCIÓN: Para la seguridad de sus niños, es de
vital importancia que la cubierta del moisés sea vuelta a
instalar completamente y en la forma correcta.
Care & Maintenance / Cuidado & Manteniniento
1
2
3
4
Continued on next page
Continuación en la página siguiente
1
4
To Use Tender Vibes
®
Electronics
Para usar el mecanismo electrónico
Press the “Vibrate” button to turn on Tender
Vibes
®
. Press the “+” and “-” buttons to
adjust speed of vibrations. Press the
“Vibrate” button again to turn off.
Pulse el botón “Vibrate” para conectar el
Tender Vibes“. Pulse los botones “+” y “-”
para ajustar la velocidad de las vibraciones.
Pulse el botón “vibrate” de nuevo para apa-
garlo.
Press the “Music” button to turn on Music.
Press the “+” and “-” buttons to adjust
volume of music. Press the “Music” button
again to turn off.
Pulse el botón “Music” para conectar la
música. Pulse los botones “+” y “-” para
ajustar el volumen de la música. Pulse el
botón “Music” de nuevo para apagarla.
1
2
1
2

13
TO PROPERLY RE-MOUNT THE BASSINET
COVER
PARA VOLVER INSTALAR LA CUBIERTA DEL
MOISÉS
Replace floorboard into bassinet cover
with snaps and hooks facing up.
Reemplace el suelo en la cubierta del moisés
con los cierres y ganchos mirando hacia arriba.
Turn bassinet over and slide plastic anchor
through slits to secure bassinet cover.
Gire el moisés y deslice el ancla de plástico a
través de las ranuras para asegurar la
cubierta del moisés.
Turn bassinet upright and place folded
bassinet frame on floorboard and inside
bassinet cover.
Ponga el moisés en posición recta y sitúe el
marco sin desplegar en el suelo del moisés y
dentro de la cubierta del moisés.
1
2
3
Slits
Ranuras
1
2
Continued on next page
Continuación en la página siguiente
Canopy Clip Canopy Frame
1
2
TO REMOVE BASSINET CANOPY FROM
FRAME FOR CLEANING
PARA REMOVER EL TOLDO DEL MOISÉS
DE LA ESTRRUCTURA PARA LIMPIADO
To remove the canopy from the canopy
frame, hold the clip area and pull up or back
on the canopy frame until the notch on the
frame pops out of the clip.
Para remover el toldo de la estructura del
toldo, sujete el área del clip y jale hacia arri-
ba o hacia atrás en la estructura del toldo
hasta que la ranura en la estructura salga del
clip.
Slide the canopy off the frame.
Deslice el toldo fuera de la estructura.
To clean, hand wash canopy with water and
mild soap.
Pliegue el toldo con agua y jabón suave.
Line dry. Do not dry canopy in clothes dryer.
It may shrink canopy.
Seque colgado. No seque el toldo en la
secadora de ropa. Puede que haga encoger
el toldo.
1
2

14
Pull up bassinet frame to unfold support bars
and clip each support leg into the hooks on
the floorboard.
Estire del marco del moisés para desplegar
las barras de soporte y ajuste cada pata de
soporte a los ganchos en el suelo del moisés.
Fasten all snaps on bassinet cover to
floorboard.
Asegure todos los broches de la cubierta del
moisés a la tabla de la base.
Attach canopy and replace bassinet pad in
bassinet, making sure pad is flat and firmly in
place.
Una la cubierta y ponga el colchoncito dentro
del moisés. Presione el colchoncito
asegurándose que esté plano y se encuentre
fijo en su sitio.
CAUTION: Fitted bassinet sheet should
securely wrap at least 2" (5 cm) beneath entire
pad to reduce chance of entanglement.
PRECAUCIÓN: La sábana ceñida del moisés
debe quedar bien sujeta 5 cm. (2 pulgadas)
por debajo y alrededor del colchón para
disminuir el riesgo de que el bebé quede
enredado.
Open bassinet locking attachment clips on
the bottom of the bed. Place U-shaped bal-
ance clips onto the top rail.
Abra los clips de unión de cierre de la cuna
en la parte inferior de la cama. Sitúe los clips
de balance en forma de U en el raíl superior.
Close the locking attachment clips to secure
bassinet bed to frame.
Cierre los clips de unión para asegurar la
cama de la cuna al soporte.
NOTE: Pull up to ensure secure.
NOTA: Jale hace arriba para asegurar que
este seguro
5
6
7
8
7
U-shaped balance clips
los clips de balance en forma de U
6
Hooks
Ganchos
4
5
3
4

15
Limited Warranty / Garantía limitada
Kolcraft
®
warrants this product to be free of defects in materials and workmanship, as
follows: For a period of ONE YEAR from the date of purchase, Kolcraft will repair or
replace, at its option, the defective product. If you have a problem or are not satisfied
with this product, please contact the Consumer Service Department at Kolcraft.
REPAIR OR REPLACEMENT AS PROVIDED UNDER THIS WARRANTY IS THE EXCLUSIVE
REMEDY OF THE CONSUMER. KOLCRAFT SHALL NOT BE LIABLE FOR ANY
INCIDENTAL OR CONSEQUENTIAL DAMAGES FOR BREACH OF ANY EXPRESS OR
IMPLIED WARRANTY ON THIS PRODUCT, EXCEPT TO THE EXTENT REQUIRED BY APPLI-
CABLE LAW. ANY IMPLIED WARRANTY OF MERCHANTABILITY OR FITNESS FOR A PAR-
TICULAR PURPOSE ON THIS PRODUCT IS LIMITED TO THE DURATION OF THIS WAR-
RANTY.
Some states do not allow the exclusion or limitation of warranties set forth above, so the
above exclusions may not apply to you. This warranty gives you specific legal rights, and
you may also have other rights which vary from state to state. We sincerely thank you for
your purchase of this Kolcraft product.
To obtain warranty service, please call Kolcraft’s Consumer Service Department at
1-800-453-7673 in U.S. and Canada, 1-910-944-9345 outside U.S. and Canada or contact
us via email at [email protected]
If the product is returned to Kolcraft’s Consumer Service Department for repair or
replacement, it must be shipped prepaid and adequately insured.
For further information visit www.kolcraft.com
RECALL WEBSITE
: HELP KEEP YOUR CHILD SAFE. Check www.recall.gov to see if any
products you use with your child or any of your child's toys have been recalled.
Kolcraft
®
garantiza que este producto estará libre de defectos en materiales y fabricación
de la siguiente manera: Por un período de UN AÑO después de la fecha de compra,
Kolcraft reparará o reemplazará, a su opción, el producto defectuoso. Si usted tiene un
problema o no está satisfecho con este producto, por favor diríjase al Departamento de
Servicio al Consumidor de Kolcraft.
LA REPARACIÓN O EL REEMPLAZO SEGÚN SE DISPONE EN ESTA GARANTÍA ES EL
REMEDIO EXCLUSIVO DE CONSUMIDOR. KOLCRAFT NO SE HARÁ RESPONSABLE DE
NINGÚN DAÑO INCIDENTAL O EMERGENTE POR VIOLACIÓN DE CUALQUIER
GARANTÍA EXPRESA O IMPLÍCITA DE ESTE PRODUCTO, SALVO EN LA MEDIDA
REQUERIDA POR LA LEY APLICABLE. CUALQUIER GARANTÍA IMPLÍCITA DE
COMERCIABILIDAD O IDONEIDAD PARA UN FIN EN PARTICULAR DE ESTE PRODUCTO
ESTÁ LIMITADA EN DURACIÓN AL TÉRMINO DE ESTA GARANTÍA.
Algunos estados no permiten la exclusión o limitación de garantías según se dispone
anteriormente, de manera que es posible que las antedichas exclusiones no sean
aplicables a usted. Esta garantía le otorga derechos legales específicos y es posible que
también disponga de otros derechos, los cuales pueden variar de un estado a otro. Le
agradecemos sinceramente por haber comprado este producto Kolcraft.
Para obtener servicio de garantía, llame al Departamento de Servicio al Consumidor de
Kolcraft al 1-800-453-7673 en Estados Unidos y Canada; fuera de Estados Unidos y
Canada: 1-910-944-9345 o envianos un mensaje por correo electrónico a
Si el producto se devuelve al Departamento de Servicio al Consumidor de Kolcraft para
ser arreglado o reemplazado, debe mandarse con el flete pagado y debidamente
asegurado.
Para mayor información visítenos en www.kolcraft.com
SITIO DE WEB DE HACER VOLVER: MANTENGA A SU HIJO SEGURO. Compruebe
www.recall.gov para ver si cualquiera de los productos que utiliza con su hijo o cualquiera
de sus juguetes han sido retirados.

Circle the Part You Need
Marque con un círculo el repuesto
que necesita
Las piezas de repuesto se pueden ver un
poco diferentes de como se muestran abajo.
Replacement parts may look slightly
different than what is shown below.
17
Replacement Parts List / Lista de piezas de repuesto
Basket Rod
Varillas de Canasta
$2.00 each/cada uno
Tender Vibes
®
Electronics with Music
Electrónicos de Tender
Vibes
®
con música
$9.00
Canopy with Toys
Toldo con juguetes
$15.00
Vinyl Pad
Panel de vinilo
$14.00
Fitted Sheet
La sábana cenida
$9.00
Floorboard
El suelo
$10.00
Bassinet Frame
Marco del moisés
$20.00
Bassinet Cover
La cubierta del moisés
$27.00
Locking Caster
Ruedas con cierre
$3.00 each/cada uno
Frame
Soporte
$15.00
Basket
Canasata
$12.00

18
Replacement Parts Order Form / Formulario para ordenar piezas de repuesto
Model Number -
No de modelo
Date of Manufacture -
Fecha de fabricación
Total -
Total
:
Shipping & Handling* -
Gastos de envío
*:
$5.00
Sales Tax** -
Impuestos
**:
Total Due -
Total a pagar
:
*$15.00 outside the continental U.S.
*U.S. $15,00 para fuera de continente de EE.UU
**NC Residents Only 7%
**Residentes de North Carolina nomas 7%
❑
Check or money order (in US dollar) enclosed (payable to Kolcraft
Enterprises, Inc.)
Cheque o giro adjunto (a nombre de Kolcraft Enterprises, Inc.)
❑
Charge to credit card
Cobrar a la tarjeta de crédito
❑ Visa ❑ Mastercard
Account# -
Cuenta No
:
3 Digit Security Code -
3 numeros de código de dígito de seguridad
:
Expiration Date -
Fecha de vencimiento
:
/
Signature -
Firma
:
Ship to -
Enviar a
:
Name - Nombre
Address - Dirección
City, State, Zip - Ciudad, Estado, Código postal
( )
Telephone - Teléfono
Email Address - Correo electrónico
Complete the following form. Your
model number and date of manufacture
must be included on the form to ensure
proper replacement parts.
Complete el siguiente formulario. Debe
incluir en el formulario el número de su
modelo y fecha de fabricación para
asegurarse de que obtenga las piezas de
repuesto adecuadas.
/