Set DCS Privacy Codes
•
To select a DCS privacy code:
1. After selecting a channel, press the Mode/Power
button until the DCS icon appears and the small
numbers flash on the display (01 through 83).
2. Press using the Channel Up or Channel Down button to select a DCS
privacy code. You can hold the Up or Down button for fast advance.
3. When DCS privacy code is displayed, choose one of the following:
a. Press the Mode/Power button to enter the new setting and
proceed to other functions.
b. Press the Lock button to enter the new setting and return to
Standby mode.
c. Do not press any buttons for 15 seconds to enter the new setting
and return to Standby mode.
NOAA* All Hazards Radio Channels
•
You can use your microTALK radio to listen to NOAA All Hazards Radio
channels transmitting in your area.
To listen to All Hazards Radio channels:
1. Press the Mode button until the All Hazards
Radio icon and the currently selected All Hazards
Radio channel are displayed.
2. Use the Channel Up or Channel Down
button to change All Hazards Radio channels.
3. The All Hazards Radio icon will continue to
be displayed when All Hazards Radio is on.
Choose one of the following:
a. Press Mode button to proceed to other functions.
b. Press the Lock button to exit All Hazards Radio
channel mode and return to Standby mode.
*National Oceanographic and Atmospheric Administration
Voice Activated Transmit (VOX)
•
In VOX mode, your microTALK
®
radio can be used “hands-free,” automatically
transmitting when you speak. You can set the VOX sensitivity level to fit the
volume of your voice and avoid transmissions triggered by background noise.
To turn VOX mode on or off:
1. Press the Mode/Power button until the VOX icon
flashes on the display. The current On or Off
setting is displayed.
2. Press the Channel Up or Channel Down
button to turn VOX On or Off.
3. Choose one of the following:
a. Press the Mode/Power button to enter the
selected On or Off setting and proceed
to other functions.
b. Press the Lock button to enter the selected On
or Off setting and return to Standby mode.
To set VOX sensitivity:
1. Press the Mode/Power button until the VOX icon
flashes and the current sensitivity level is displayed.
The current VOX sensitivity level is displayed
with letters “LE” and a Number 1 through
5, with Number 5 being the most sensitive
level and Number 1 being the least
sensitive level.
2. Press the Channel Up or Channel Down
button to change the setting.
3. Choose one of the following:
a. Press the Mode/Power button to enter the
selected setting and proceed to other functions.
b. Press the Lock button to enter the selected
setting and return to Standby mode.
Customer Assistance WarrantyIntroduction
OperationOperation
Mode Functions
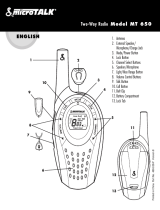
8
9
Channel Buttons
Mode/Lock Button
DCS Privacy Code
If CTCSS is turned on at the channel
selected, the display will flash the DCS
icon and “OFF.” To switch from CTCSS to
DCS, press the Channel Up or Channel
Down button while the display is flashing
“OFF.” The display will then show the
small numbers flashing and you will then
be able to proceed to step 2.
VOX Icon
Channel Button
Mode/Power
Channel Button
Mode/Power
VOX Sensitivity Level
Nothing Comes Close to a Cobra
®
Mode/Power
Hazards Radio Icon
Channel Buttons