Page is loading ...

four-line
users
guide
B450D
business
speakerphone
with display
CONTACTING TELEDEX
MAIL 6311 San Ignacio Avenue
San Jose, California, 95119
TELEPHONE (408) 363-3100
FAX (408) 363-3136
INTERNET www.teledex.com
EMAIL sales@teledex.com
Copyright © 2002 Teledex LLC. All Rights Reserved.
Part# 600-0480-55

FCC Information . . . . . . . . . . . . . . . . . . . . . . . . . . . . . . . . . . . . .3-4
Important Safety Instructions . . . . . . . . . . . . . . . . . . . . . . . . . . . . . .....5
Getting Started . . . . . . . . . . . . . . . . . . . . . . . . . . . . . . . . . . . . . . . . . .....6
Package Contents . . . . . . . . . . . . . . . . . . . . . . . . . . . . . . . . . . . . . ....6
Features . . . . . . . . . . . . . . . . . . . . . . . . . . . . . . . . . . . . . . . . . . . .....6
Location of Controls and Features . . . . . . . . . . . . . . . . . . . . .7-10
Top and Rear View . . . . . . . . . . . . . . . . . . . . . . . . . . . . . . . . . . . . . ....7
Descriptions and Functions . . . . . . . . . . . . . . . . . . . . . . . . . . . .8-9
LCD Displays . . . . . . . . . . . . . . . . . . . . . . . . . . . . . . . . . . . . . . . . . . . .10
Installation . . . . . . . . . . . . . . . . . . . . . . . . . . . . . . . . . . . . . . . . . . . . . . .11-14
Selecting a Location . . . . . . . . . . . . . . . . . . . . . . . . . . . . . . . . . . . . . . .11
Installing the Battery . . . . . . . . . . . . . . . . . . . . . . . . . . . . . . . . . . . . . . .11
Connecting Your Phone Lines . . . . . . . . . . . . . . . . . . . . . . . . . . . . . . . .12
Desktop Installation . . . . . . . . . . . . . . . . . . . . . . . . . . . . . . . . . . . . . . .13
Wall Mounting . . . . . . . . . . . . . . . . . . . . . . . . . . . . . . . . . . . . . . . . . . . .13
Loss of AC power . . . . . . . . . . . . . . . . . . . . . . . . . . . . . . . . . . . . . . . . .14
Telephone Setup . . . . . . . . . . . . . . . . . . . . . . . . . . . . . . . . . . . . . . . . . . .15-17
Programming the Telephone Settings . . . . . . . . . . . . . . . . . . . . . . . .15-17
Basic Operation . . . . . . . . . . . . . . . . . . . . . . . . . . . . . . . . . . . . . . . . . . . .18
Making or Answering a Call . . . . . . . . . . . . . . . . . . . . . . . . . . . . . . . . . .18
Last Number Redial . . . . . . . . . . . . . . . . . . . . . . . . . . . . . . . . . . . . . . .18
Placing a Call on Hold . . . . . . . . . . . . . . . . . . . . . . . . . . . . . . . . .18
Speed Dial . . . . . . . . . . . . . . . . . . . . . . . . . . . . . . . . . . . . . . . . . . . . . . . .19-20
Storing Numbers . . . . . . . . . . . . . . . . . . . . . . . . . . . . . . . . . . . . . . . . . .19
Using the Speed Dial Directory . . . . . . . . . . . . . . . . . . . . . . . . . . . . . . .19
Dialing with One-touch Memory . . . . . . . . . . . . . . . . . . . . . . . . . . . . . . 19
Reviewing One-touch memory . . . . . . . . . . . . . . . . . . . . . . . . . . . . . . . 20
Editing a Speed Dial Number . . . . . . . . . . . . . . . . . . . . . . . . . . . . . . . .20
Cloning a Speed Dial Number . . . . . . . . . . . . . . . . . . . . . . . . . . . . . . . .20
Erasing a Speed Dial Number . . . . . . . . . . . . . . . . . . . . . . . . . . . . . . . .20
TABLE OF CONTENTS
1
Caller ID . . . . . . . . . . . . . . . . . . . . . . . . . . . . . . . . . . . . . . . . . . . . . . . . . .21-22
Reviewing Caller ID Records . . . . . . . . . . . . . . . . . . . . . . . . . . . . . . . . .21
Caller ID Callback . . . . . . . . . . . . . . . . . . . . . . . . . . . . . . . . . . . . . . . . .21
Saving Caller ID to Speed Dial Memory . . . . . . . . . . . . . . . . . . . . . . . . .22
Deleting Caller ID Records . . . . . . . . . . . . . . . . . . . . . . . . . . . . . . . . . .22
Additional Features . . . . . . . . . . . . . . . . . . . . . . . . . . . . . . . . . . . . . . . .23-25
Conference Calling . . . . . . . . . . . . . . . . . . . . . . . . . . . . . . . . . . . . . . . .23
Using the Speakerphone or Headset . . . . . . . . . . . . . . . . . . . . . . . . . . .23
Pause . . . . . . . . . . . . . . . . . . . . . . . . . . . . . . . . . . . . . . . . . . . . . . . . . .23
Mute . . . . . . . . . . . . . . . . . . . . . . . . . . . . . . . . . . . . . . . . . . . . . . . . . . .24
Tone . . . . . . . . . . . . . . . . . . . . . . . . . . . . . . . . . . . . . . . . . . . . . . . . . . .24
Flash . . . . . . . . . . . . . . . . . . . . . . . . . . . . . . . . . . . . . . . . . . . . . . . . . .24
Quitting . . . . . . . . . . . . . . . . . . . . . . . . . . . . . . . . . . . . . . . . . . . . . . . .24
Adjusting the Volume . . . . . . . . . . . . . . . . . . . . . . . . . . . . . . . . . . . . . .25
Message Waiting . . . . . . . . . . . . . . . . . . . . . . . . . . . . . . . . . . . . . . . . .25
Care and Maintenance . . . . . . . . . . . . . . . . . . . . . . . . . . . . . . . . . . . . . . .26
Glossary . . . . . . . . . . . . . . . . . . . . . . . . . . . . . . . . . . . . . . . . . . . . . . . . . .27
Troubleshooting . . . . . . . . . . . . . . . . . . . . . . . . . . . . . . . . . . . . . . . . . . . .28
TABLE OF CONTENTS
2
IMPORTANT: To receive Caller ID information on incoming telephone calls, you must
subscribe to the Caller ID service provided by your local telephone company; there is a
fee for this service and it may not be available in all areas.

Interference Information: Part 15 of FCC Rules
This equipment generates, uses, and can radiate low-level radio frequency energy. It
has been tested and found to comply with the limits for a Class B digital device in
accordance with the specifications in Part 15J of the FCC Rules, which are designed to
provide reasonable protection against such interference in a residential installation. If
this equipment does cause interference to radio or television reception—which can be
determined by unplugging it from the telephone line—the user is encouraged to try to
correct the interference by one or more of the following measures:
Where it can be done safely, reorient the radio or TV receiving antenna. To the extent
possible, relocate the television, radio, or other receiver with respect to the telephone
equipment.
If your telephone product runs on AC power, plug your product into an AC outlet that’s
not on the same circuit as the one used by the radio or television. If necessary, the user
should consult the dealer or an experienced radio/television technician for additional
suggestions.
SAFETY INSTRUCTIONS
4
Your B450D telephone is registered with the Federal Communications Commission and
it complies with part 15J and Part 68 of the FCC Rules and Regulations. Modifying or
tampering with the telephone’s internal components can cause a malfunction and might
invalidate the telephone’s warranty and void your FCC authorization to operate it.
The FCC requires us to provide you with the following information:
1. The FCC requires that you connect to a nationwide telephone network through a
modular telephone outlet that is Part 68 compliant. The B450D telephone cannot be
used with coin service provided by the telephone company. Connection to party
lines is subject to state tariffs. Check with your local telephone company.
2. FCC rules require that upon request you provide the following information to the
phone company:
A. The line (telephone number) to which you will connect the telephone equipment,
and
B. The FCC Registration Number and Ringer Equivalence Number (REN). These
numbers can be found on a label on the back or bottom of you telephone
equipment.
The REN is useful to determine the number of devices you may connect to your
telephone line and still have all devices ring when your telephone number is
called. In most cases (but not all areas), the sum of REN’s of all the devices
connected to one line should not exceed (5) five. The B450D telephone utilizes
high sensitivity ringer circuits, which will function reliably with up to twelve
telephones installed.
3. If it is determined that your telephone equipment is malfunctioning, the FCC requires
that it not be used and be unplugged from the modular outlet until the problem has
been corrected. Repairs to this telephone equipment can be made only by the
manufacturer or its authorized agents, or by others who may be authorized by the
FCC. Unauthorized repairs void registration and warranty.
4. The telephone company may discontinue service if the telephone is determined to
cause harm to the telephone network. In this case, the telephone company will:
A. If possible, notify the customer in advance that the service is being discontinued.
B. Provide the customer with the opportunity to correct the situation.
C. Inform the customer of their right to file a complaint with the FCC.
Your local telephone company may make changes in its facilities, equipment,
operations, or procedures that could affect the proper functioning of your equipment.
If they do, you will be notified in advance to give you an opportunity to maintain
uninterrupted telephone service.
5. The B450D telephone is Hearing Aid Compatible.
6. When programming/testing emergency numbers and/or making test calls to
emergency numbers:
A. Remain on the line and briefly explain to the dispatcher the reason for the call
before hanging up.
B. Perform such activities in the off-peak hours, such as early morning or late
evening.
FCC INFORMATION
3

PACKAGE CONTENTS
Check to be sure that you have all the following components in the package:
1. Telephone base
2. Handset
3. Handset coiled cord
4. 4 conductor telephone line cord (qty. 2)
5. Short telephone line cord
6. Desk/Wall mount bracket
7. AC power adapter
8. Screwdriver for battery door
9. This instruction manual
FEATURES
• Up to 4 line capability
• 8 one-touch speed dial memories
• Desk or wall mountable
• Caller ID
• Speakerphone
• Up to 32 two-touch speed dial memories
• Last number redial
• Line status indication
• Hold
• Conference calling
• Headset compatible
• Mute
• Pause
• Temporary tone dialing
• Flash
• Call timer
• Automatic line selection
• Incoming call list
• Digital speaker volume control
• LCD displays date, day and month
• Ringer on/off and volume control
GETTING STARTED
6
This symbol is to alert you to important operating or servicing instructions that may appear in the user’s
manual. Always follow basic safety precautions when using this product to reduce the risk of injury, fire, or
electrical shock.
When using this product, basic safety precautions should always be followed to reduce the risk of fire, electric shock and injury to
persons, including the following:
1. Read and understand all instructions.
2. Follow all warnings and instructions that are marked on the product.
3. Use only with class 2 power source DC 9V 300mA.
4. Unplug this product from the wall outlet before cleaning. Do not use liquid cleaners or aerosol cleaners. Use a damp cloth
for cleaning.
5. Do not use this product near water; for example, near a bathtub, wash bowl, kitchen sink or laundry tub, in a wet basement or
near a swimming pool.
6. Do not place this product on an unstable cart, stand, or table. The product may fall, causing serious damage to the product.
7. Slots and openings in the cabinet back or bottom are provided for ventilation. To protect it from overheating, these openings
must not be blocked or covered. The openings should never be blocked by placing the product on the bed, sofa, rug, or other
similar surface. This product should never be placed near or over a radiator or heat register. This product should not be
placed in an enclosed environment unless proper ventilation is provided.
8. Do not allow anything to rest on the power cord. Do not locate this product where the cord will be abused by animals or
persons walking on it.
9. Do not overload wall outlets and extension cords—this can result in risk of fire or electrical shock.
10. Never push objects of any kind into this product through cabinet slots as they may touch dangerous voltage points or short
out parts that could result in a risk of fire or electrical shock. Never spill liquid of any kind on the product.
11. To reduce the risk of electrical shock, do not disassemble this product. Instead, take it to a qualified service person when
service or repair work is required. Opening or removing covers may expose you to dangerous voltages or other risks.
Incorrect re-assembly can cause electrical shock when the appliance is subsequently used.
12. Unplug all cords and refer servicing to qualified service personnel under the following conditions:
A. When the power supply cord or plug is damaged or frayed.
B. If liquid has been spilled into the product.
C. If the product has been exposed to rain or water.
D. If the product does not operate normally by following the operating instructions. Adjust only those controls covered in the
operating instructions. Improper adjustment of other controls may result in damage and require work by a qualified
technician to restore the product to normal operation.
13. Avoid using a telephone (other than a cordless type) during an electrical storm. There may be a remote risk of electric shock
from lightning.
14. Do not use a telephone to report a gas that is near the leak.
IF YOUR PRODUCT UTILIZES BATTERIES, THE FOLLOWING ADDITIONAL PRECAUTIONS SHOULD BE OBSERVED:
1. Use only the type and size of batteries specified in the users manual.
2. Do not dispose of the batteries in a fire. The cells may explode. Check with local codes for possible special disposal
instructions.
3. Do not open or mutilate the batteries. Released electrolyte is corrosive and may cause damage to the eyes or skin. It may
be toxic if swallowed.
4. Exercise care in handling batteries in order not to short the battery with conducting materials such as rings, bracelets and
keys. The battery or conductor may overheat and cause burns.
5. Do not attempt to recharge the batteries that are with or identified for use with this product. The batteries may leak corrosive
electrolyte or explode.
6. Do not attempt to rejuvenate the batteries provided with or identified for use with this product by heating them. Sudden
release of the battery electrolyte may occur causing burns or irritation to eyes or skin.
7. When replacing batteries, all batteries should be replaced at the same time. Mixing fresh and discharged batteries could
increase internal cell pressure and rupture the discharged batteries.
8. When inserting the batteries into this product, the proper polarity or direction must be observed. Reverse insertion of
batteries can cause charging, which may result in leakage or explosion.
9. Remove the batteries from this product if the product will not be used for a long period of time (several months or more)
since during this time the batteries could leak, damaging the product.
10. Discard “dead” batteries as soon as possible since they are more likely to leak in a product.
11. Do not store this product, or the batteries provided with or identified for use with this product, in high temperature areas.
12. If your product uses a rechargeable battery, charge the battery(ies) only in accordance with the instructions and limitation
specified in the Users Manual.
SAVE THESE INSTRUCTIONS
IMPORTANT SAFETY INSTRUCTIONS
5

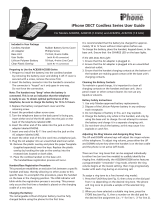
Descriptions and Functions
Dial Pad
Used in the conventional manner for dialing.
One Touch Memory Keys [M1] ... [M8]
Eight keys that automatically dial a stored number when pressed. Each key
stores a number (up to 28 digits) plus a name of up to 16 characters.
Directory Key [DIR]
When pressed, reviews a directory list of two-touch speed dial memories.
Each dial memory stores a number (up to 28 digits) plus a name of up to 16
characters.
Save Key [SAVE]
Used to save a phone number and name into one-touch memory or the
directory.
Caller ID Key [CID]
Used to review the caller ID list.
Up and Down Keys [UP] [DOWN]
Used to move up or down through the caller ID list or the speed dial directory.
Previous Key [PREV]
Used to review Caller ID entries for one of the four phone lines, the [PREV]
key also moves the cursor left and erases a digit.
Next Key [NEXT]
Used to review Caller ID entries for one of the four phone lines, the [NEXT]
key also moves the cursor right.
Dial Key [DIAL/ENTER]
Press to dial a one-touch memory number, directory memory number, or a
caller ID number. Also used to accept a change in telephone settings.
Delete Key [DEL]
Used to erase a caller ID, total caller ID in a particular line, all caller ID, a
directory memory, or a one-touch memory.
Change Key [CDF]
Used to change one-touch memory, directory memory, or caller ID dial back
format.
LOCATION OF CONTROLS AND FEATURES
8
B450D Top View
LOCATION OF CONTROLS AND FEATURES
7
B450D Rear View:
One touch memory keys
LCD Display
New Call Indicator
Up Key
Down Key
Dial/Enter Key
Quit Key
Save Key
Flash Key
Mute Key
Speaker Key
Hold KeyVolume Up/Down Keys
Redial/Pause
Key
Conference
Key
Change Key
Delete Key
Line Keys
Dial Pad
Line 1/2 Jack
Line 3/4 Jack
Power Input Jack
Directory Key
Next Key
Caller ID Key
Handset Catch
Menu Key
Previous Key

Conference Key [CONF]
Used to join lines on hold to an active line to make conference call.
Volume Up and Down Keys [] []
Press to increase or decrease speakerphone, handset, headset or ringer
volume between four levels.
New Call Indicator
The New Call Indicator flashes slowly to indicate there are new calls.
LCD Displays
When the telephone is not in use, the LCD displays
the total Caller ID records on all lines or the number of
new calls, if any.
If a line is put on hold by this telephone (eg. Line 1),
the display shows the line number and its status as
shown here. Other telephones connected to this line
will know the line is in use.
When the telephone is not in use, if a line is being
used by another telephone, the display shows the line
number and its status.
When the telephone is not in use, if a line is ringing,
the display shows Caller ID information. After 3 rings
the display will show the line number and its status.
While a line is connected, the LCD display will show
the line currently in use and which device (handset,
speaker, or headset) is being used.
If multiple events are valid, the display will alternate between the messages.
LOCATION OF CONTROLS AND FEATURES
10
Menu Key [MENU]
Press to enter the menu which allows you to change telephone settings.
Quit Key [QUIT]
Used to quit caller ID review, directory review, one-touch memory review or
telephone setup.
Redial/Pause Key [REDIAL/P]
The telephone will automatically redial the last number dialed when this button
is pressed. It can also be used to program a pause of 4 seconds into a dialing
sequence stored into a speed dial memory.
Flash Key [FLASH]
The [FLASH] key is used to access telephone company services, like call
waiting.
Speaker Key [SPEAKER]
The [SPEAKER] key
is used to begin or end a call using the speaker or
headset instead of the handset. The LED on the [SPEAKER] key indicates the
status of the speakerphone or headset.
If the LED is off, the speakerphone
and headset are inactive. If the LED is steadily lit, either the speakerphone or
headset is in use. If either the speakerphone, headset, or handset is muted
the LED will flash slowly.
Mute Key [MUTE]
While on a call, if you want to say something that you do not want to be heard
by the person on the line, press [MUTE] to temporarily turn off the handset,
speakerphone, or headset microphone.
Line Keys [LINE 1] … [LINE 4]
Press a line key to alternately go on or off hook. The LEDs on the line keys
indicate the status of the line. If the LED is off, the line is on hook and inactive
or the line is not connected to the phone line. If the LED is lit steadily, the line
is in use, either by this phone or another phone connected to that line. If the
line is on hold, the LED will flash slowly. When the line is ringing, it will flash
quickly. If there is no line connected to the phone, when you press the line key
it will light briefly and then turn off, no connection will be indicated on the LCD.
Hold Key [HOLD]
Press [HOLD] to put an active line on hold.
LOCATION OF CONTROLS AND FEATURES
9
20 TOTAL CALLS
3:27
PM
1/18
HOLD: LINE 1
3:27
PM
1/18
BUSY: LINE 2
3:27
PM
1/18
RING: LINE 1
3:27
PM
1/18
LINE 4 : SPEAKER
3:27
PM
1/18

12
Selecting a Location
The phone may be used on a desk or mounted on a wall. Select a location
that meets the following requirements:
1. Near an electrical outlet.
2. Near a telephone line wall jack
3. Away from any electrical machinery, appliances, and metal walls or filing
cabinets.
Installing the battery
1. In order to install the battery, make
sure the desk/wall mount is not
attached to the base of the telephone.
2. Loosen the screw fastening the battery
compartment cover using the provided
screwdriver and remove it from the
back of the B450D.
3. Attach a standard 9V battery to the
contacts inside the compartment and
insert the battery into the
compartment.
4. Replace the battery compartment
cover.
Low battery:
If the backup battery is not installed or the battery is
low, the “Battery Low” icon will appear in the upper
left corner and flash.
INSTALLATION
11
20 TOTAL CALLS
3:27
PM
1/18
LOW
Battery Compartment Cover
9V Battery Contacts
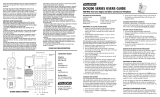
Connecting Your Phone Lines
Single Line Jacks Two-Line Jacks
Four Single Line Jacks
Wherever you intend to locate your
phone, have your local telephone
company install as many telephone
lines and wall jacks as necessary to
enable you to connect it. If possible,
have 2 two-line (RJ14) wall jacks
installed instead of (4) single-line
(RJ11) wall jacks (see illustrations).
If you have four single-line wall jacks,
you will need to use two line couplers
(not included) to provide the required 2
two-line RJ14 telephone jacks. The
two-line couplers can be purchased in
most electronic stores.
INSTALLATION
RJ 11 JACK RJ 11 JACK
LINE 1 LINE 2
L1/L2 L3/L4
RJ 14 JACK RJ 14 JACK
LINES 1&2 LINES 3&4
L1/L2 L3/L4
L1/L2 L3/L4
SET TIMER DIAL PAGEAL L MSG
STO RE SHIFT
CO NF DN D PAG E ICM
!"
ER ASE CA LL ID C ALLS
n
RJ 11 JACK RJ 11 JACK RJ 11 JACK RJ 11 JACK
LINE 1 LINE 2 LINE 3 LINE 4
TWO-LINE COUPLER TWO-LINE COUPLER
L1 /L2 L3/L4
Note: When
installing only
two single line
jacks, the only
active lines will
be Line 1 and
Line 3.

Loss of AC power
In case of no AC power, the B450D will operate under battery power. To
extend the life of battery operation, some functions of the machine will be
disengaged.
Use only the handset to answer or make calls. Line 1 is the only line that will
remain accessible under battery power.
The keys that are operational under battery power: [M1] ... [M8], [CID], [DIR],
[UP], [DOWN], [DEL], [PREV], [NEXT], [MENU], [SAVE], [QUIT], [CDF],
[REDIAL], [], [], [FLASH], and the dial pad.
The functions that are operational under battery power: LCD display, machine
setup, Line 1 ringer, Line 1 Caller ID, Caller ID review, Caller ID redial, memory
store, memory review, memory dial, manual dial, flash, handset, and volume
control.
INSTALLATION
14
Desktop Installation
1. If you desire, you can attach the desk/wall mount to the base to elevate the
angle of view to better see the display and keys (install the opposite
direction as shown below for wall mounting).
2. Connect the telephone lines as shown in the section “Connecting your
telephone lines.”
3. Insert the AC adapter cable into the jack on the rear of the telephone.
4. Plug the AC adapter into the wall electrical power outlet.
5. Plug one end of the handset coiled cord into the handset. Plug the other
end of the cord into the handset jack located on the left side of the phone
base.
6. Place the handset in the handset cradle.
Wall Mounting
The telephone may be installed on the studs of a standard wall phone plate.
1. Connect the telephone lines as shown in the section “Connecting your
telephone lines.” If you are installing on a wall mount plate, use the
provided short line cord. You can only install 2 lines unless you purchase
another short line cord.
2. Insert the AC adapter cable into the jack on the rear of the telephone.
3. Plug the AC adapter into the wall
electrical power outlet.
4. Attach the desk/wall mount to the base of
the telephone as shown. Make sure the
cables run through the cable grooves in
the mount so they do not impede wall
mounting.
5. Slip the phone onto the wall, lining up the
wall mounting holes over the wall plate
posts or screws, and then slide the
telephone down so it is firmly in place.
6. Plug one end of the handset coiled cord
into the handset. Plug the other end of
the cord into the handset jack located on
the left side of the phone base.
7. Place the handset in the handset cradle.
INSTALLATION
13

8. Press [Down] or [PREV] to decrease the setting, [UP] or [NEXT] to
increase the setting, or use the dial pad to key in the value (press [1] for
AM and [2] for PM). The default time/date setting is 12:00 am 1/01. The
range of Time/date settings is 12:00am 1/01 – 11:59pm 12/31. The local
clock will also be updated automatically when a caller ID is received.
9. Press [DIAL/ENTER] or [MENU] to advance to next
setting. The display will show “TONE DIALING” with
“Tone” flashing, if it is still set to the default.
10. Press [Down], [PREV], [UP] or [NEXT] to switch from Tone to “PULSE
DIALING.” The default setting is Tone.
Note: If you are unsure which type of phone system you have, set it to
Tone. If this setting does not work, change the setting to Pulse.
11. Press [DIAL/ENTER] or [MENU] to advance to next
setting. The display will show “FLASH TIME = msec”
and the current flash setting.
12. Press [Down] or [PREV] to decrease the setting, [UP] or [NEXT] to
increase the setting in increments of 100msec, or use the dial pad to key
in the value. The default setting is 600msec. The range of flash time
settings is 100msec – 1500msec.
13. Press [DIAL/ENTER] or [MENU] to advance to next
setting. The display will show “RINGER 1 TONE” with
the current ringer tone number flashing above it.
14. Press [Down], [PREV], [UP] or [NEXT] to increase or decrease the ringer
tone on line 1. The range of ringer tone settings is 1-8.
15. Press [DIAL/ENTER] or [SAVE] to choose the next line.
The display will show “RINGER 2 TONE” with the
current setting flashing above it. Repeat the same
procedure for the other three lines.
16. Press [DIAL/ENTER] or [MENU] to advance to next
setting. The display will show “RINGER 1 ON.”
17. Press [Down], [PREV], [UP] or [NEXT] to switch
between Line 1 ring On and Line 1 ring Off. The default setting is all lines
on.
18. Press [DIAL/ENTER] or [SAVE] to advance to next
setting. The display will show “RINGER 2 ON.”
16
Programming the Telephone Settings
You may need to go through most of the settings, even if you only to need to
change some of the settings. At any time during telephone programming,
press [DIAL/ENTER] or [SAVE] to save the new settings and advance to the
next one, press [MENU] to save and skip to the next setting group, press
[DEL] to go back to the previous setting group, or press [QUIT] to leave the
telephone programming menu.
1. Press [MENU]. The display will say “SET CONTRAST”
and the current contrast setting will flash.
2. Press [Down] or [PREV] to decrease the setting, [UP] or [NEXT] to
increase the setting, or use the dial pad to key in the value. The default
setting is 3. The range of contrast settings is 1-5.
3. Press [DIAL/ENTER] or [MENU] to advance to next
setting. The default setting is “PRIORITY = AUTO.”
4. Press [Down] or [PREV] to decrease the setting, [UP]
or [NEXT] to increase the setting, or use the dial pad to key in the value
(press [5] for auto priority). The range of priority line settings is line
1/2/3/4/auto.
Note: If the priority line is set to line 1 for example, Caller ID for line 1 will
have priority, message waiting [VMI] on line 1 is enabled, and VMI
on line 2, 3, & 4 is disabled. If the priority line is set to auto, the
telephone will allocate priority to a line automatically depending on
need. Message waiting [VMI] on all lines are disabled on auto
priority.
5. Press [DIAL/ENTER] or [MENU] to advance to next
setting. The default setting is “HEADSET OFF.”
6. Press [Down], [PREV], [UP] or [NEXT] to switch between Headset On and
Headset Off.
Note: If the headset is enabled (Headset On), the speakerphone will be
disabled.
7. Press [DIAL/ENTER] or [MENU] to advance to next
setting. The display will show “SET TIME/DATE.” The
current time and date setting will display with the hour flashing.
TELEPHONE SETUP
15
SET CONTRAST
3
FLASH TIME = MSEC
600
TONE DIALING
RINGER 1 ON
RINGER 1 TONE
RINGER 2 TONE
PRIORITY = AUTO
HEADSET OFF
SET TIME/DATE
3:27
PM
1/18
TELEPHONE SETUP
RINGER 2 ON

Making or Answering a Call
Using auto-line selection:
1. Press [SPEAKER] or pick up the handset. The B450D will select an
appropriate line and connect the line. The call timer will start 2 seconds
after the phone is connected to the line.
2. To end the phone call, press the active line, press [SPEAKER] or replace
the handset in the cradle.
Picking the line yourself:
1. If you want to choose the line yourself, press the desired line key (eg. Line
2). The B450D will connect the proper line and turn on the speakerphone.
2. To end the phone call, press [SPEAKER] or return the handset to the base.
Answering a call during an existing conversation:
1. If a call comes in, the LED for the ringing line will flash. If you are using the
handset, the ringer will switch to the lowest volume and ring. If you are
using the speakerphone, the ringer will be muted.
2. Caller ID information, if any, will be displayed after one ring.
3. To answer the new call, press the ringing line. The telephone will switch to
that line. The line you were using previously will be disconnected. Or, you
can put the current call on hold and then pick up the ringing line.
4. The timer will start 2 seconds after the telephone is connected to the line.
Last Number Redial
1. Press [REDIAL/P].
2. The telephone will automatically connect an available line and dial out the
last number dialed.
3. To end the phone call, press the active line, press [SPEAKER] or replace
handset.
Placing a Call on Hold
1. While a line is active (eg. Line 3), press [HOLD].
2. The call is put on hold, the Line 3 LED will flash and the display will show
“HOLD: LINE 3.”
3. Press the line key for the line ([LINE 3]) to continue the conversation.
BASIC OPERATION
18
19. Repeat the same procedure for the other three lines.
20. Press [DIAL/ENTER] or [MENU] to advance to next
setting. The display will say “LOCAL AREA CODE.”
Tip: If within your local area you are required to dial 10
digits (888-555-1212) to dial a local number, use the “Regional Area
Code” programming. In this case, do not program a “Local Area Code.”
If you dial 7 digits locally, do not program any “Regional Area Codes.”
When you finish entering the local area code, press [MENU] to skip
regional area code programming.
21. Press [Down] or [PREV] to decrease the setting, [UP] or [NEXT] to
increase the setting followed by [DIAL/ENTER] or [SAVE] to advance to
the next digit, or use the dial pad to key in the value. The default setting
has no local area code.
22. Press [DIAL/ENTER] or [MENU] to advance to next
setting. The display will show “REGIONAL AC #1.”
23. Press [Down] or [PREV] to decrease the setting, [UP] or [NEXT] to
increase the setting followed by [DIAL/ENTER] or [SAVE] to advance to
the next digit, or use the dial pad to key in the value. The default setting
has no regional area codes.
24. Press [DIAL/ENTER] or [SAVE] to advance to next
setting. The display will show “REGIONAL AC #2.”
25. Follow the same procedure for regional area code 2-6
as with regional area code 1.
26. Press [DIAL/ENTER], [MENU] or [QUIT] to exit.
TELEPHONE SETUP
17
REGIONAL AC #2
---
LOCAL AREA CODE
---
REGIONAL AC #1
---

Reviewing one-touch memory
1. Press and hold a one-touch memory key (eg. [M1]). The display will show
the name and number stored in that location.
Note: Be careful. Releasing the button too soon will dial the number.
2. If you wish to dial the number, either press the same memory key again,
press [DIAL/ENTER], press [SPEAKER], or press an available line key, or
pick up the handset. The B450D will connect the line and dial out the
number.
Editing a Speed Dial Number
1. During one-touch memory or directory memory review,
press [CDF]. The LCD will show “EDIT NUMBER” and
then the current number is displayed.
2. Press [PREV] or [DEL] to remove an incorrect digit.
3. Use the dial pad to enter the new number(s). Press [SAVE] or
[DIAL/ENTER] when you are satisfied with the number you are editing.
4. The LCD will say “EDIT NAME” and then the current name is displayed.
5. Press [NEXT] to move the cursor right (e.g. to add a space). Press [PREV]
or [DEL] to remove an incorrect letter.
6. Use the dial pad to enter the new letter(s). Press [SAVE] or [DIAL/ENTER]
when you are satisfied with the name you are editing.
Cloning a Speed Dial Number
1. During one-touch or directory memory review, press
[SAVE]. The display will show “SAVE TO?”
2. Press either a one-touch memory location (eg. [M1]) or
[DIR], whichever place you wish to store the number.
Note: One-touch memory locations accept duplicate phone numbers, but the
Directory does not.
Erasing a Speed Dial Number
1. During one-touch or directory memory review, press
[DEL]. The LCD will display “ERASE THIS ITEM?”
2. Press [DEL] to confirm. “ITEM IS ERASED” is
displayed. This speed dial location is now available to store a new number.
Note: Entries can only be deleted individually. Group delete is not available.
SPEED DIAL
20
Storing Numbers
1. Press [SAVE]. The display will show “SAVE TO?”
2. Press either a one-touch memory location (eg. [M1]) or
[DIR], whichever place you wish to store the number.
The memory location is displayed in the LCD briefly. Then the LCD will
display “Enter number.”
3. Use the dial pad to enter the phone number you are storing. Press [PREV]
or [DEL] to remove a wrong digit. Press [DIAL/ENTER] or [SAVE] when
you are satisfied with the number you are storing.
4. The LCD will display “ENTER NAME.”
5. Use the dial keys to enter name (as shown below). Press [NEXT] to move
the cursor right (such as to add a space). Press [Pre] or [DEL] to remove a
wrong letter. Press [DIAL/ENTER] or [SAVE] when you are satisfied.
Note: A maximum
of 8 one-
touch and
32 speed
dial entries
can be
stored in the
Directory.
Using the Speed Dial Directory
1. Press [DIR]. The LCD will display “Dir. item” and the
number of memories stored in the directory.
2. Press [UP] or [DOWN] to move through the directory list or enter a two digit
memory location using the dial pad.
3. Once you have found the number you wish to dial, press [DIAL/ENTER],
press [SPEAKER], press an unused Line key, or pick up the handset. The
B450D will connect the line and dial out the selected number.
4. To end the phone call, press the active Line key, press [SPEAKER], or
return the handset to its cradle.
Dialing with one-touch memory
1. Press a memory key (eg. [M1]).
2. The telephone will connect the line and dial out the stored number.
SPEED DIAL
19
EDIT NUMBER
ERASE THIS ITEM?
DIR. ITEM = 18
SAVE TO?
SAVE TO?
Key 1st 2nd 3rd 4th 5th 6th 7th 8th
Press Press Press Press Press Press Press Press
1 , + ’ & . ()1
2ABC2ABC2
3DEF3DEF3
4 GH I 4GH I 4
5JKL5JKL5
6MNO6MNO6
7PQRS 7 PQR
8TUV8TUV8
9WX Y Z 9 WX Y

Saving Caller ID to Speed Dial Memory
1. During caller ID review, the LCD will display a Caller ID entry. If the dial
format is not correct, press [CDF] to change the dial
format.
2. Press [SAVE]. The display will ask “Save to?”
3. Press either a one-touch memory location (eg. [M1]) or
[DIR], whichever place you wish to store the number.
Note: One-touch memory locations accept duplicate phone numbers, but the
Directory does not.
Deleting Caller ID Records
Deleting a single record
1. During caller ID review, press [DEL]. The display will
ask “ERASE THIS ITEM?”
2. Press [DEL] to confirm.
Deleting records from one phone line
1. To erase all caller ID entries from a particular
telephone line, during Caller ID review press [PREV] or
[NEXT] to read total Caller ID on that line (eg. Line 1)
“LINE 1 LIST = 02.”
2. Press [DEL]. The display will ask “ERASE LINE 1?”
3. Press [DEL] to confirm. The screen will display “LINE
1 ERASED” and then return to the idle display.
Deleting all records
1. To erase all caller IDs, press [PREV] or [NEXT] to read
total Caller ID in the callers list: “CALLERS LIST = 04.”
2. Press [DEL]. The display will ask “ERASE ALL
CALLS?”
3. Press [DEL] to confirm. The screen will display “ALL
CALLS ERASED” and then return to the idle display.
Tip: You may wish to review all Caller ID messages before erasing them.
CALLER ID
22
Reviewing Caller ID Records
1. Press either [CID], [UP] or [DOWN]. The LCD displays
“CALLERS LIST” and the number of entries received.
2. Press [PREV] or [NEXT] to read the number of Caller
ID entries received on a particular telephone line.
3. Press [UP] or [DOWN] to scroll through the caller ID list. The call counter
will switch between the call number and the call line.
4. If the caller ID number matches the local area code setting, the phone
number will be displayed in 7 digit format. If caller ID number matches
regional area code setting, the phone number will be displayed in 10 digit
format. If not matching, the phone number will be displayed in 11 digit
format.
5. When reviewing caller ID records, new calls are always reviewed first.
Once a new caller ID has been viewed, it will not be reviewable until all
new caller ID entries have been reviewed.
Note: Repeat calls on the same telephone line will not
be displayed multiple times, instead the display
will show “RPT” to indicate Caller IDs have been
received from the phone number multiple times.
To review the latest Caller ID
1. Press [CID].
2. Press [DIAL/ENTER].
Caller ID Callback
1. During caller ID review, the LCD will display a Caller ID entry. While
viewing the Caller ID you wish to call, either press [DIAL/ENTER], or press
an available line key, or pick up the handset. The B450D will connect the
line and dial the number.
2. To end the phone call, press the Line key for the line you are using, press
[SPEAKER], or return the handset to its cradle.
Note: If the dial format is not correct, press [CDF] to change the dial format.
The three dial formats are 1-888-555-1212, 888-555-1212 and 555-
1212. The caller ID number is displayed based on the local area code
and regional area code setting, as described above. Certain numbers,
such as those unable to fit the 888-555-1212 format, are not
changeable.
CALLER ID
21
CALLERS LIST = 04
CALLERS LIST = 04
LINE 1 LIST = 02
ERASE THIS ITEM?
ERASE LINE 1?
JOHN SMITH
3:27
PM
1/18
CALL #
NEW
02
RPT
1-234-567-8910
SAVE TO?
3:27
PM
1/18
L2
1-234-567-8910

Mute
1. To mute the speakerphone, headset, or handset microphone, press
[MUTE]. The Speaker LED will flash and the display will say “MUTE.”
2. To un-mute the microphones, press [MUTE] again. The display will briefly
show “Mic On.”
Tone
If you have Pulse telephone service, you may find it necessary to dial a
number using Tone dialing because some specialized communications
services, such as telephone banking or retrieving voice mail, require tone
signaling. Your phone has the ability to temporarily change from Pulse to Tone
dialing.
1. Dial the desired number in Pulse mode.
2. Press the [*] key to dial any additional digits using Tone signaling. This
temporary tone dialing ends when you terminate the call.
Flash
The [FLASH] key supports custom-calling services that you have subscribed
to from your local telephone company (such as call waiting or three-party
conference calling).
The Flash duration is programmable. See “Telephone Setup” for more
information about changing the Flash break length. The default is 600msec.
Quitting
Use the [QUIT] button to quit any process and return the telephone to idle
mode. Quit does not end a call.
ADDITIONAL FEATURES
24
Conference Calling
1. Only two lines can be joined for a conference call. To place a conference
call, select a line and dial the number. Place this line on hold. Select a
second line and dial the number. Place this line on hold.
2. Press the [CONF] button to connect the two held lines.
3. To discontinue the conference but remain the connection to one of the lines
(eg. Line 3), press [LINE 3]. The B450D will switch to [LINE 3] and
disconnect the other line.
4. To end the phone call, press the Line key for the line you are using, press
[SPEAKER], or return the handset to its cradle.
Using the Speakerphone or Headset
A headset can only be used in place of the speakerphone. It is user
programmable that if the headset is enabled, the speakerphone is disabled.
See “Telephone Setup” on page 15 for information about changing this setting.
1. Press [SPEAKER] to turn on the speakerphone or the headset. The
Speaker LED indicator will light.
2. To end the phone call, press [SPEAKER]. The Speaker LED indicator light
will turn off.
Headset jack
1. Plug a headset with a 2.5mm plug in the jack on the left side of the base,
next to the handset jack.
2. In order for the headset to work, change the headset setting to ON (see
“Telephone Setup” starting on page 15).
Pause
You may use this feature to create a dialing pause between digits during a call.
The Pause function is most useful for programming dialing delays in long
number sequences of certain speed dial numbers such as voice mail codes
and international phone numbers.
If you press the [REDIAL/P] key when storing a number, you add a 4-second
delay to the dialing sequence (you may do this more than once to create a
longer delay). You may insert a pause anywhere in the number.
ADDITIONAL FEATURES
23

Your B450D telephone has been designed to give years of trouble-free service.
It is a sensitive electro-mechanical instrument. To assure its longevity, please
read the following maintenance instructions:
1. Keep the B450D away from heat as high temperatures can shorten the life
of the electrical components and distort or melt its plastic parts.
2. The B450D should be kept free of dust and moisture. If it gets wet, wipe it
dry immediately. Liquids can contain minerals that can corrode electronic
circuits.
3. Handle your B450D gently and carefully. Dropping it can cause serious
damage to circuitry or the plastic case, which may result in malfunctions.
4. Do not use any type of chemical or any abrasive powder to clean the outer
casing. Use only mild detergents on a soft, damp cloth to clean the B450D
telephone.
5. The B450D has built-in surge protection circuits that meet or exceed FCC
requirements. However, an incident such as a lightning strike at or near the
telephone lines, could cause serious damage.
6. If the B450D is installed in an area with frequent or severe electrical
storms, it is suggested that the telephone be disconnected during these
storms or that additional surge suppression equipment be added to the
installation.
7. In the case of trouble with the telephone, do not attempt to repair the
telephone yourself. It is the responsibility of users requiring service to
report the need for service to our Service Department. They will make the
necessary arrangements for repair or replacement.
26
CARE AND MAINTENANCE
25
Adjusting the Volume
Use the [] and [] buttons to adjust the volume:
• If the speakerphone is turned on, press [] and [] to adjust the
speakerphone volume up and down.
• If the handset is picked up, press [] and [] to adjust the handset volume
up and down.
• If the headset is turned on, press [] and [] to adjust the headset volume
up and down.
• If the phone is either idle or ringing, press [] and [] to adjust the ringer
volume up and down.
Message Waiting
Based on the priority settings that you have selected (see “Telephone Setup”
starting on page 15), the phone will receive VMI (or visual message indication)
for one or none of the four lines.
If you subscribe to voice mail from the telephone
company and if there are voice mail messages that
have been left in the voice mailbox on the priority
line, the display will show “MESSAGE WAITING.”
Note: This function requires voice mail subscription
from the local telephone company. Furthermore, the local phone
company must provide a type of voice mail signaling called “FSK”
(Frequency Shift Key). Not all telephone companies have the visual
message waiting feature (or the deactivate signal) available. Please
contact your local telephone company to check if this is available in
your area.
If it is necessary to manually cancel VMI indication:
1. While “MESSAGE WAITING” is on the display, press [ DEL].
2. The B450D will display “CANCEL MSG WAIT?”
3. Press [DEL] to confirm, or [QUIT] to quit without cancelling VMI indication.
4. After [DEL] is pressed, the display will show “MSG WAIT CLEARED” and
return to the idle mode.
ADDITIONAL FEATURES
MESSAGE WAITING
3:27
PM
1/18

No dial tone. The phone will not dial out.
• Check that you have plugged the AC power adapter into a working AC
power outlet.
• Confirm that the AC power adapter is firmly plugged into the DC jack
located on the back of the unit.
• Check all telephone cord connections.
• Try another wall jack.
Can’t hear the ring signal.
• Check the ringer volume controls. At the lowest level the ring may not be
heard.
Can’t hear the ring signal on some of the lines.
• Make sure the ringer is not programmed off on those lines (see “Telephone
Setup”).
While on a call I hear another call on the line, or interference.
• Make sure all wiring is twisted pair.
• Check the wiring for bad connections.
Handset doesn’t appear to be working.
• Make sure the handset cord is solidly connected at both ends.
The caller’s name and/or number don’t appear on the display.
• Make sure you have subscribed to Caller ID name/number service from the
telephone company.
• Caller ID service may not work when the phone is connected to a Private
Branch Exchange (PBX).
• The call is coming from an area not supplying Caller ID data. “Unknown
number” will appear on the display.
• The caller has requested that their phone number be suppressed from
Caller ID service. “Blocked Number” or “Unknown number” will appear on
the display.
• You answered the call before the Caller ID data was displayed, which
usually occurs after the second ring.
Can’t make phone calls
• Check and make sure the phone is set to the correct type of service, either
Tone or Pulse.
TROUBLESHOOTING
27
GLOSSARY
28

/