Ricoh SP 8300DN User manual
- Category
- Laser/LED printers
- Type
- User manual
This manual is also suitable for

Read this manual carefully before you use this machine and keep
it handy for future reference. For safe and correct use, be sure to
read the Safety Information in "Read This First" before using the
machine.
For information not in this manual, refer to
the HTML/PDF files on the supplied
CD-ROM.
Replenishing and Replacing Consumables
Troubleshooting
Printing
Getting Started
User Guide


TABLE OF CONTENTS
1. Getting Started
Before You Start..................................................................................................................................................5
How to Read the Manuals.............................................................................................................................5
List of Options.................................................................................................................................................6
Model-Specific Information...........................................................................................................................7
Guide to Names and Functions of Components..............................................................................................9
Guide to Components....................................................................................................................................9
Guide to the Names and Functions of the Printer's Control Panel...........................................................11
Using the Screen on the Control Panel...........................................................................................................14
How to Use the [Home] Screen..................................................................................................................14
How to Use the Screens on the Control Panel...........................................................................................16
Switching Screen Patterns...........................................................................................................................18
Adding Icons to the [Home] Screen...........................................................................................................19
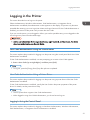
Logging in the Printer........................................................................................................................................21
User Code Authentication Using the Control Panel..................................................................................21
User Code Authentication Using a Printer Driver......................................................................................21
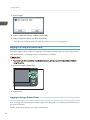
Logging In Using the Control Panel............................................................................................................21
Logging Out Using the Control Panel.........................................................................................................22
Logging In Using a Printer Driver................................................................................................................22
Logging In Using Web Image Monitor......................................................................................................23
Logging Out Using Web Image Monitor...................................................................................................24
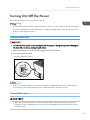
Turning On/Off the Power..............................................................................................................................25
Turning On the Power..................................................................................................................................25
Turning Off the Power..................................................................................................................................25
Saving Energy..............................................................................................................................................26
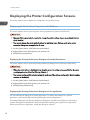
Displaying the Printer Configuration Screens.................................................................................................28
Displaying the Printer Driver Properties with Windows.............................................................................28
Displaying the Printer Driver Properties with Mac OS X...........................................................................30
2. Printing
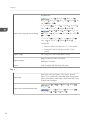
Paper Specification..........................................................................................................................................31
Supported Paper for Each Input Tray.........................................................................................................31
Supported Paper for Each Output Tray.....................................................................................................37
Notes about Paper Thickness......................................................................................................................43
1

Print Area......................................................................................................................................................44
Loading Paper..................................................................................................................................................46
Precautions for Loading Paper....................................................................................................................46
Unusable Paper............................................................................................................................................46
Paper Storage..............................................................................................................................................47
Loading Paper into Paper Trays..................................................................................................................48
Loading Paper into the Bypass Tray...........................................................................................................50
Loading Paper into Tray 3 (LCT).................................................................................................................51
Loading Paper into the Large Capacity Tray (LCT)...................................................................................53
Loading Orientation-Fixed Paper or Two-Sided Paper............................................................................54
Standard Printing..............................................................................................................................................56
Printing with Windows (PCL 6/PostScript 3).............................................................................................56
Printing with Windows (PCL 5c/5e)..........................................................................................................56
Printing with Mac OS X...............................................................................................................................57
Printing on Both Sides of Sheets..................................................................................................................58
Combining Multiple Pages into Single Page.............................................................................................59
Printing on Envelopes.......................................................................................................................................61
Loading Envelopes.......................................................................................................................................61
Printing on Envelopes with Windows (PCL 6/PostScript 3).....................................................................63
Printing on Envelopes with Windows (PCL 5c/5e)...................................................................................63
Printing on Envelopes with Mac OS X........................................................................................................64
Storing a Document.........................................................................................................................................65
Storing a Document with Windows............................................................................................................65
Storing a Document with Mac OS X..........................................................................................................66
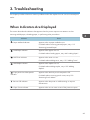
3. Troubleshooting
When Indicators Are Displayed......................................................................................................................69
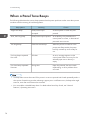
When a Panel Tone Beeps..............................................................................................................................70
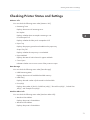
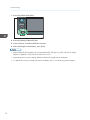
Checking Printer Status and Settings..............................................................................................................71
When an Indicator for the [Check Status] Key Is Lit......................................................................................73
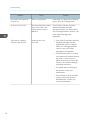
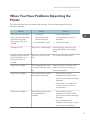
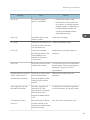
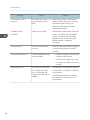
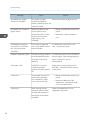
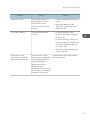
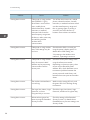
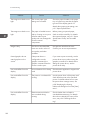
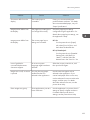
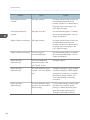
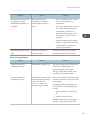
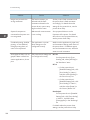
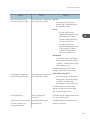
When You Have Problems Operating the Printer..........................................................................................75
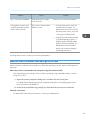
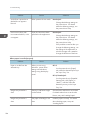
When the Image Density Changes.................................................................................................................80
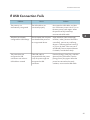
If USB Connection Fails...................................................................................................................................81
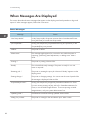
When Messages Are Displayed.....................................................................................................................82
2

Status Messages..........................................................................................................................................82
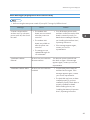
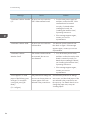
Alert Messages (Displayed on the Control Panel)....................................................................................83
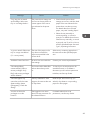
Alert Messages (Printed on Error Logs and Reports)................................................................................86
Checking the Error Log....................................................................................................................................96
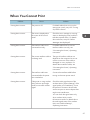
When You Cannot Print...................................................................................................................................97
When the Data In Indicator Does Not Light Up or Flash..........................................................................99
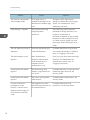
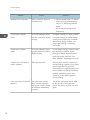
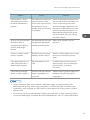
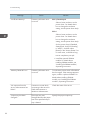
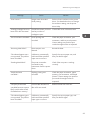
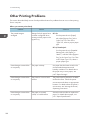
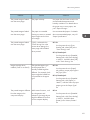
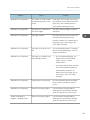
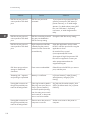
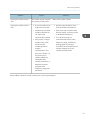
Other Printing Problems.................................................................................................................................100
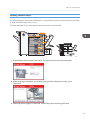
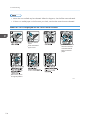
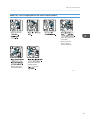
Removing Jammed Paper..............................................................................................................................112
Locating Jammed Paper............................................................................................................................113
When R1–R5 Is Displayed for the 1000-Sheet Finisher........................................................................114
When R1–R4 Is Displayed for the 3000-sheet finisher.........................................................................115
When R5 - R8 Is Displayed for the 3000-sheet finisher........................................................................116
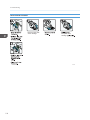
Removing Jammed Staples...........................................................................................................................117
1000-Sheet Finisher..................................................................................................................................118
3000-sheet Finisher..................................................................................................................................119
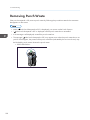
Removing Punch Waste.................................................................................................................................120
4. Replenishing and Replacing Consumables
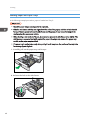
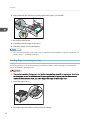
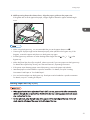
Adding Toner.................................................................................................................................................121
Replacing Other Consumables.....................................................................................................................124
Adding Staples...............................................................................................................................................125
Trademarks.....................................................................................................................................................126
3

4

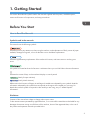
1. Getting Started
This section describes the symbols used in the manuals supplied with the printer, available options,
names and functions of components, and setup procedures.
Before You Start
How to Read the Manuals
Symbols used in the manuals
This manual uses the following symbols:
Indicates points to pay attention to when using the machine, and explanations of likely causes of paper
misfeeds, damage to originals, or loss of data. Be sure to read these explanations.
Indicates supplementary explanations of the machine's functions, and instructions on resolving user
errors.
This symbol is located at the end of sections. It indicates where you can find further relevant information.
[ ]
Indicates the names of keys on the machine's display or control panels.
(mainly Europe and Asia)
(mainly North America)
Differences in the functions of Region A and Region B models are indicated by two symbols. Read the
information indicated by the symbol that corresponds to the region of the model you are using. For
details about which symbol corresponds to the model you are using, see p.7 "Model-Specific
Information".
Disclaimer
Contents of this manual are subject to change without prior notice.
To the maximum extent permitted by applicable laws, in no event will the manufacturer be liable for any
damages whatsoever arising out of failures of this machine, losses of the registered data, or the use of
this product and operation manuals provided with it.
5

Make sure that you always copy or have backups of the data registered in this machine. Documents or
data might be erased due to your operational errors or malfunctions of the machine.
In no event will the manufacturer be responsible for any documents created by you using this machine or
any results from the data executed by you.
Notes
The manufacturer shall not be responsible for any damage or expense that might result from the use of
parts other than genuine parts from the manufacturer with your office products.
For good output quality, the manufacturer recommends that you use genuine toner from the
manufacturer.
Some illustrations in this manual might be slightly different from the machine.
About IP address
In this manual, "IP address" covers both IPv4 and IPv6 environments. Read the instructions that are
relevant to the environment you are using.
List of Options
This section provides a list of options for this printer and the names commonly used in this manual.
Option name Description
Paper Feed Unit PB3130 1000-sheet paper feed unit
LCIT PB3140 2000-sheet paper feed unit
LCIT RT3020 1200-sheet paper feed unit
Bridge Unit BU3060 Bridge unit
Finisher SR3090 1000-sheet finisher
Finisher SR3120 3000-sheet finisher
Punch Unit PU 3030 NA
Punch Unit PU 3030 EU
Punch Unit PU 3030 SC
Punch unit
Output Jogger Unit Type 9002A Output jogger unit
Memory Unit Type L 512MB SDRAM module
1. Getting Started
6

Option name Description
Hard Disk Drive Option Type 8300 Hard disk
Gigabit Ethernet Board Type A
Giabit Ethernet Board Type C
Gigabit Ethernet board
IEEE802.11a/g Interface Unit Type M
IEEE802.11 Interface Unit Type P
IEEE802.11a/g Interface Unit Type L
Wireless LAN interface board
IEEE 1284 Interface Board Type A IEEE 1284 interface board
SD card for NetWare printing Type N NetWare card
VM Card Type U VM card
Model-Specific Information
This section explains how to identify the region to which your printer belongs.
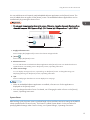
There is a label on the rear of the printer, located in the position shown below. The label contains details
that identify the region to which your printer belongs. Read the label.
CQT652
The following information is region-specific. Read the information under the symbol that corresponds to
the region of your printer.
(mainly Europe and Asia)
Before You Start
7

If the label contains the following, your printer is a region A model:
• CODE XXXX -22, -27
• 220–240 V
(mainly North America)
If the label contains the following, your printer is a region B model:
• CODE XXXX -17
• 120–127 V
• Dimensions in this manual are given in two units of measure: metric and inch. If your printer is a
Region A model, refer to the metric units. If your printer is a Region B model, refer to the inch units.
1. Getting Started
8

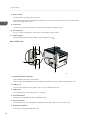
Guide to Names and Functions of Components
Guide to Components
• Do not obstruct the ventilation holes by placing objects near or against them. If the printer
overheats, a fault might occur.
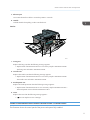
Front and right view
1
7 6 5
34
11
10
9
8
2
CQT300
1. Standard output tray
Printed pages are output here.
2. Upper right cover
Open this cover to remove jammed paper.
3. Bypass tray extension
When loading paper larger than A4 , pull out the bypass tray extension.
4. Bypass tray
Up to 100 sheets of plain paper can be loaded.
5. Right cover (Duplex unit)
Open this cover to remove jammed paper, or to replace Maintenance Kit B (the fusing unit and transfer unit).
6. Handle
Pull out this handle when lifting the printer.
7. Tray 1, Tray 2
Up to 550 sheets of plain paper can be loaded in each tray.
Guide to Names and Functions of Components
9

8. Power switch
Use this switch to turn the power on and off.
Perform the shutdown procedure before turning the power off. For details about how to shut down the printer,
see p.25 "Turning Off the Power".
9. Front cover
Open this cover to replace the toner or Maintenance Kit A (the development unit).
10. Control panel
See p.11 "Guide to the Names and Functions of the Printer's Control Panel".
11. Paper support
Extend the paper support when printing on paper larger than A3 .
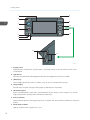
Rear and left view
8
213 4
5
6
7
CQT302
1. Optional interface board slot
Optional interface boards can be inserted.
Insert an optional Gigabit Ethernet board, wireless LAN interface board, or IEEE 1284 interface board.
2. USB port A
Connect external devices to the printer, such as a card authentication device.
3. USB port B
Use a USB cable to connect the printer to a computer.
4. Controller board
Slide this out to install the hard disk or SDRAM module.
5. Power connector
Connect the power cord to the printer. Insert the other end of the cable into an electrical outlet.
6. Expansion card slots
Remove the cover and install the SD cards.
1. Getting Started
10

7. Ethernet port
Use a network interface cable to connect the printer to a network.
8. Handle
Hold this handle when pulling out the controller board.
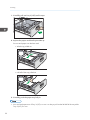
Interior
3 2
1
4
CQT301
1. Fusing unit
Replace the fusing unit when the following message appears:
• "Replacement of Maintenance Kit B is now necessary. Replace Maintenance Kit B."
The fusing unit is included in Maintenance Kit B.
2. Transfer unit
Replace the transfer unit when the following message appears:
• "Replacement of Maintenance Kit B is now necessary. Replace Maintenance Kit B."
The transfer unit is included in Maintenance Kit B.
3. Development unit
Replace the development unit when the following message appears:
• "Replacement of Maintenance Kit A is now necessary. Replace Maintenance Kit A."
The development unit is included in Maintenance Kit A.
4. Toner
Replace the toner when the following message appears:
• " No toner. Replace Toner Cartridge."
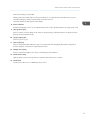
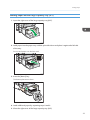
Guide to the Names and Functions of the Printer's Control Panel
This illustration shows the control panel of the printer with options fully installed.
Guide to Names and Functions of Components
11

1
2
3
4
5
6
7
8
9
13
10
11
12
14
CQT135
1. Display panel
Displays keys for each function, operation status, or messages. See p.16 "How to Use the Screens on the
Control Panel".
2. Light Sensor
The sensor that detects the ambient light level when the ECO Night Sensor function is enabled.
3. [Home] key
Press to display the [Home] screen. For details, see p.14 "How to Use the [Home] Screen".
4. [Suspend] key
Press this key to suspend a print job. The key lights up while the job is suspended.
5. [Check Status] key
Press to check the printer's system status, operational status of each function, and current jobs. You can also
display the job history and the printer's maintenance information.
6. Data In indicator
Flashes when the printer is receiving print jobs from a computer. The data in indicator is lit if there is data to be
printed.
7. Check Status indicator
Lights up or flashes when a printer error occurs.
1. Getting Started
12

Steady red: printing is not possible.
Flashing yellow: the printer will soon require maintenance or a replacement consumable such as a print
cartridge. Printing is possible, but print quality cannot be ensured.
Follow the instructions that appear on the display.
8. Power indicator
Remains lit while the power is on. It is unlit when the power is off or while the printer is in energy saver mode.
9. [Energy Saver] key
Press to switch to and from Sleep mode. See p.26 "Saving Energy". When the printer is in Sleep mode, the
[Energy Saver] key flashes slowly.
10. [Login/Logout] key
Press to log in or log out.
11. [User Tools] key
Press to change the default settings to meet your requirements. See "Displaying the Printer Configuration
Screens Using the Control Panel", Operating Instructions.
12. [Simple Screen] key
Press to switch to the simple screen. See p.18 "Switching Screen Patterns".
13. Media access lamp
Lights up when a memory storage device is inserted in the media slot or accessed.
14. Media slots
Use to insert an SD card or a USB flash memory device.
Guide to Names and Functions of Components
13

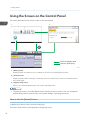
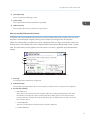
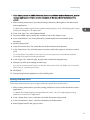
Using the Screen on the Control Panel
This section describes how to use the screen on the control panel.
1
2
3
Touch the display panel
Press the [Home] key
CQT659
1. [Home] screen
Displays function and shortcut icons. For details, see p.14 "How to Use the [Home] Screen".
2. [Printer] screen
Displays operation status, messages, and function menus. For details, see p.16 "How to Use the Screens on
the Control Panel".
3. [Supplies Info] screen
Allows you to check the printer status, such as toner and paper levels.
• The [Home] screen is set as the default screen when the printer is turned on. You can change this
default setting under Function Priority. See "System Settings", Operating Instructions.
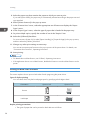
How to Use the [Home] Screen
To display the [Home] screen, press the [Home] key.
The icons of each function are displayed on the [Home] screen.
1. Getting Started
14

You can add shortcuts to frequently used embedded software applications to the [Home] screen. The
icons of added shortcuts appear on the [Home] screen. The embedded software applications can be
recalled easily by pressing the shortcut icons.
• Do not apply strong impact or force to the screen. Otherwise, it may be damaged. Maximum force
allowable is approx. 30 N (approx. 3 kgf). (N = Newton, kgf = Kilogram force. 1 kgf = 9.8 N.)
CQT657
5
1
2
3
4
1. Supply Information icon
Press to display the [Supplies Info] screen to check toner and paper levels.
2. [Printer]
Press to display the [Printer] screen.
3. Shortcut icon area
You can add shortcuts to embedded software applications to the [Home] screen. For details about how to
register shortcuts, see "Adding icons to the [Home] screen", Operating Instructions..
4. Home screen image
You can display an image such as a corporate logo on the [Home] screen. To change the image, see
"Displaying the image on the [Home] screen", Operating Instructions.
5. /
Press to switch pages when the icons are not displayed on one page.
• When an embedded software application is installed, a function icon for the application is
displayed on the [Home] screen.
• You can change the order of icons. For details, see "Changing the order of icons on the [Home]
screen", Operating Instructions.
System Reset
After finishing a job, the printer waits a specified length of time and then restores its settings to the default
values specified under Function Priority. This function is called "System Reset". For the procedure for
specifying default settings under Function Priority, see "System Settings", Operating Instructions.
Using the Screen on the Control Panel
15

To change the length of time that the printer waits before restoring its settings to their default values, use
the System Auto Reset Timer setting. See "System Settings", Operating Instructions.
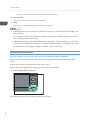
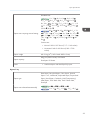
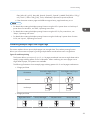
How to Use the Screens on the Control Panel
The display panel shows the operation status, messages, and function menus.
The function items displayed serve as selector keys. You can select or specify an item by lightly pressing
them.
When you select or specify an item on the display panel, it is highlighted such as . Keys
appearing as cannot be used.
• Do not apply strong impact or force to the screen. Otherwise, it may be damaged. Maximum force
allowable is approx. 30N (approx. 3 kgf). (N = Newton, kgf = Kilogram force. 1 kgf = 9.8N.)
The [Home] screen is set as the default screen when the printer is turned on.
1
4
2
8
5
3
6
7
QCT661
1. Operational status or messages
Displays current printer status, such as "Ready", "Offline", and "Printing...". Information about the print job
(user ID and document name) appears in this section.
2. [Print Jobs]
Press to display print jobs sent from a computer.
3. Supply Information
You can check the remaining toner and paper. Press to display the [Supplies Info] screen.
4. [Prt. From Dev.]
Press to display the screen for printing files stored on memory storage devices directly.
5. [Job Reset]
Press to cancel the current print job.
If you press it when Hex Dump is selected, Hex Dump is canceled.
1. Getting Started
16

6. [Job Operation]
Press to suspend a job being processed.
7. [Form Feed]
Press to print all the data left in the printer's input buffer.
8. [Other Functns.]
Press to display the error logs and status of spooled jobs.
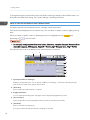
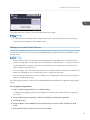
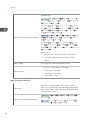
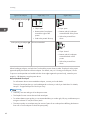
How to use the [Information] screen
To improve user’s environmental consciousness, you can configure the printer to notify users how much
they have conserved paper usage by utilizing various paper conserving function of the printer.
When user authentication is enabled, the screen is displayed when you log in to the printer. When user
authentication is not enabled, the screen is displayed after returning from Sleep mode or after a system
reset. The [Information] screen appears when the power is turned on, regardless of the authentication
settings.
CQT201
1
2
3
4
5
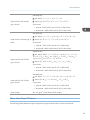
1. Message
A message from the administrator is displayed.
2. Total Print Pages
Total numbers of pages printed in the current count period and the previous count period are displayed.
3. Eco-friendly Indicator
• Paper Reduction:
Shows the amount of paper saved by using the duplex and combine printing functions. The value
indicates the percentage of paper saved from the total of all the paper used. As the percentage
increases, the stack of paper decreases and the flower grows. When the ratio is 76% or more, the
flower starts to bloom.
• 2 sided Utilization:
The ratio of 2-sided prints to the total number of prints is displayed.
• Combine Utilization:
Using the Screen on the Control Panel
17

The ratio of combined prints to the total number of prints is displayed.
4. Count periods
The current and previous count periods are displayed.
5. [Exit]
Press this to close the [Information] screen and return to operation.
• Depending on the printer settings, the [Information] screen may not be displayed. For details, see
Security Guide.
• You can also use Web Image Monitor to check the usage status. For details about how to check
them, see Web Image Monitor Help.
• Under [Eco-friendly Counter Period/Administrator Message] in [System Settings], you can check
"Count Period", "Administrator Message", "Display Information Screen", and "Display Time". Only
the administrator can change the settings. For details, see Security Guide.
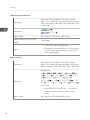
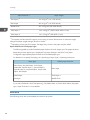
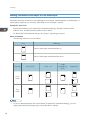
Switching Screen Patterns
This section explains how to switch to the simple screen and the keys that are displayed.
When you press the [Simple Screen] key, the screen changes from the initial display to the simple
screen.
Only the main functions are presented on the simple screen.
Letters and keys are displayed at a larger size, making operations easier.
1. Press the [Simple Screen] key.
CQT663
This illustration shows the simple display of the [Printer] screen.
1. Getting Started
18
Page is loading ...
Page is loading ...
Page is loading ...
Page is loading ...
Page is loading ...
Page is loading ...
Page is loading ...
Page is loading ...
Page is loading ...
Page is loading ...
Page is loading ...
Page is loading ...
Page is loading ...
Page is loading ...
Page is loading ...
Page is loading ...
Page is loading ...
Page is loading ...
Page is loading ...
Page is loading ...
Page is loading ...
Page is loading ...
Page is loading ...
Page is loading ...
Page is loading ...
Page is loading ...
Page is loading ...
Page is loading ...
Page is loading ...
Page is loading ...
Page is loading ...
Page is loading ...
Page is loading ...
Page is loading ...
Page is loading ...
Page is loading ...
Page is loading ...
Page is loading ...
Page is loading ...
Page is loading ...
Page is loading ...
Page is loading ...
Page is loading ...
Page is loading ...
Page is loading ...
Page is loading ...
Page is loading ...
Page is loading ...
Page is loading ...
Page is loading ...
Page is loading ...
Page is loading ...
Page is loading ...
Page is loading ...
Page is loading ...
Page is loading ...
Page is loading ...
Page is loading ...
Page is loading ...
Page is loading ...
Page is loading ...
Page is loading ...
Page is loading ...
Page is loading ...
Page is loading ...
Page is loading ...
Page is loading ...
Page is loading ...
Page is loading ...
Page is loading ...
Page is loading ...
Page is loading ...
Page is loading ...
Page is loading ...
Page is loading ...
Page is loading ...
Page is loading ...
Page is loading ...
Page is loading ...
Page is loading ...
Page is loading ...
Page is loading ...
Page is loading ...
Page is loading ...
Page is loading ...
Page is loading ...
Page is loading ...
Page is loading ...
Page is loading ...
Page is loading ...
Page is loading ...
Page is loading ...
Page is loading ...
Page is loading ...
Page is loading ...
Page is loading ...
Page is loading ...
Page is loading ...
Page is loading ...
Page is loading ...
Page is loading ...
Page is loading ...
Page is loading ...
Page is loading ...
Page is loading ...
Page is loading ...
Page is loading ...
Page is loading ...
Page is loading ...
Page is loading ...
Page is loading ...
Page is loading ...
-
 1
1
-
 2
2
-
 3
3
-
 4
4
-
 5
5
-
 6
6
-
 7
7
-
 8
8
-
 9
9
-
 10
10
-
 11
11
-
 12
12
-
 13
13
-
 14
14
-
 15
15
-
 16
16
-
 17
17
-
 18
18
-
 19
19
-
 20
20
-
 21
21
-
 22
22
-
 23
23
-
 24
24
-
 25
25
-
 26
26
-
 27
27
-
 28
28
-
 29
29
-
 30
30
-
 31
31
-
 32
32
-
 33
33
-
 34
34
-
 35
35
-
 36
36
-
 37
37
-
 38
38
-
 39
39
-
 40
40
-
 41
41
-
 42
42
-
 43
43
-
 44
44
-
 45
45
-
 46
46
-
 47
47
-
 48
48
-
 49
49
-
 50
50
-
 51
51
-
 52
52
-
 53
53
-
 54
54
-
 55
55
-
 56
56
-
 57
57
-
 58
58
-
 59
59
-
 60
60
-
 61
61
-
 62
62
-
 63
63
-
 64
64
-
 65
65
-
 66
66
-
 67
67
-
 68
68
-
 69
69
-
 70
70
-
 71
71
-
 72
72
-
 73
73
-
 74
74
-
 75
75
-
 76
76
-
 77
77
-
 78
78
-
 79
79
-
 80
80
-
 81
81
-
 82
82
-
 83
83
-
 84
84
-
 85
85
-
 86
86
-
 87
87
-
 88
88
-
 89
89
-
 90
90
-
 91
91
-
 92
92
-
 93
93
-
 94
94
-
 95
95
-
 96
96
-
 97
97
-
 98
98
-
 99
99
-
 100
100
-
 101
101
-
 102
102
-
 103
103
-
 104
104
-
 105
105
-
 106
106
-
 107
107
-
 108
108
-
 109
109
-
 110
110
-
 111
111
-
 112
112
-
 113
113
-
 114
114
-
 115
115
-
 116
116
-
 117
117
-
 118
118
-
 119
119
-
 120
120
-
 121
121
-
 122
122
-
 123
123
-
 124
124
-
 125
125
-
 126
126
-
 127
127
-
 128
128
-
 129
129
-
 130
130
-
 131
131
-
 132
132


Ricoh SP 8300DN User manual
- Category
- Laser/LED printers
- Type
- User manual
- This manual is also suitable for
Ask a question and I''ll find the answer in the document
Finding information in a document is now easier with AI
Related papers
Other documents
-
Master Lock 1500iD User manual
-
Samsung ProXpress M4580FX User guide
-
Sharp MX-C380P Operating instructions
-
Sharp MX-C400P User manual
-
Sharp MX-C300PL User manual
-
KYOCERA TASK/CS 9600 User guide
-
Lanier IM C530FB/IM C530F User guide
-
KYOCERA ECOSYS P8060cdn User guide
-
Triumph-Adler P-6040DN Owner's manual
-
Samsung SL-K705LX Owner's manual