Samsung SM P Series SM-P607T T-Mobile User manual
- Category
- Smartphones
- Type
- User manual
This manual is also suitable for


Table of Contents
My Carrier .......................................................3
Service ............................................................. 4
Device Functions ...........................................5
Setting Up Your Device ................................7
Turning Your Device On and Off .......................... 9
Locking and Unlocking Screen ............................ 9
Initial Device Configuration .................................... 9
Home Screen ................................................10
S Pen .............................................................. 11
Removing S Pen ..................................................... 11
Navigating with S Pen ........................................... 11
S Pen Shortcuts ..................................................... 11
S Pen Air View ........................................................12
Air Command ..........................................................12
Contacts ........................................................13
Creating a New Contact .......................................13
Adding a Number to an Existing Contact .........13
Deleting an Existing Contact ............................... 13
Messages ......................................................14
Create and Send a Message ..............................14
Connections .................................................15
Connecting to Bluetooth.......................................15
Connecting to Wi-Fi ............................................... 15
Smartphone Mobile HotSpot...............................16
USB Tethering .........................................................18

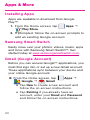
Apps & More .................................................20
Installing Apps ........................................................20
Samsung Smart Switch ........................................ 20
Gmail (Google Account) ....................................... 20
Setting Up Your Email Accounts .......................21
Internet ......................................................................22
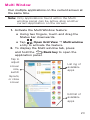
Multi Window ...........................................................23
Camera .....................................................................24
Lock Screen ............................................................ 25
Legal ...............................................................26
APPROVED FIRMWARE VERSIONS .................26
INFORMATION ABOUT SAFEGUARDING
HANDSETS .............................................................. 26
ADDITIONAL INFORMATION...............................27

3
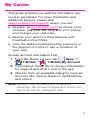
My Carrier
This guide provides you with the information you
need to get started. For more information and
additional support, please visit
www.t-mobile.com/support/ where you can:
● Register at my.t-mobile.com/ to check your
minutes, pay your bill, upgrade your phone,
and change your rate plan.
● Review your device’s User Manual and
troubleshooting FAQs.
● View the latest troubleshooting solutions in
the Support Forums or ask a question of
your own.
Access account information from:
1. From the Home screen, tap Apps
g
T-Mobile
g
T-Mobile My Account.
2. If prompted, follow the on-screen information
for support and what’s new in the app.
3. Choose from an available category such as:
Account Info, Device Support, Notifications,
and others.
Note: Devices and software are constantly
evolving—the screen images and icons you
see here are for reference only.

4
Service
If you are a new T-Mobile
®
customer and your
service has not yet been activated, call Customer
Care at 1-800-937-8997 and a T-Mobile Activations
representative will assist you.
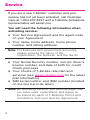
You will need the following information when
activating service:
● Your Service Agreement and the agent code
on your Agreement
● Your name, home address, home phone
number, and billing address
Note: For business and government accounts,
please provide the name of the
organization, the address, and the tax ID.
● Your Social Security number, current driver’s
license number, and date of birth for credit
check purposes
● Your choice of T-Mobile rate plan and
services (see www.t-mobile.com for the latest
plan information)
● SIM serial number and IMEI number (located
on the box barcode label)
Note: By activating service, you acknowledge that
you have read, understand, and agree to
be bound by each of T-Mobile’s Terms and
Conditions, and your Service Agreement.

5
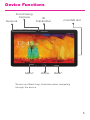
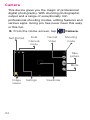
Device Functions
IR
Transmitter
Sensors
microSD slot
Front-Facing
Camera
Home
Back*Menu*
*Recent and Back keys illuminate when navigating
through the device.

6
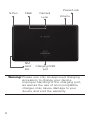
Camera
Lens
FlashS-Pen
Power/Lock
Volume
Charging/USB
port
SIM
card
slot
Warning! Please use only an approved charging
accessory to charge your device.
Improper handling of the charging port,
as well as the use of an incompatible
charger, may cause damage to your
device and void the warranty.

7
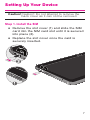
Setting Up Your Device
Caution! Caution!: Do not attempt to remove the
back cover as it can not be removed.
Step 1. Install the SIM
● Remove the slot cover (1) and slide the SIM
card into the SIM card slot until it is secured
into place (2).
● Replace the slot cover once the card is
securely inserted.

8
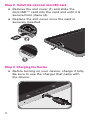
Step 2. Install the optional microSD card
● Remove the slot cover (1) and slide the
microSD™ card into the card slot until it is
secured into place (2).
● Replace the slot cover once the card is
securely inserted.
Step 3. Charging the Device
● Before turning on your device, charge it fully.
Be sure to use the charger that came with
the device.

9
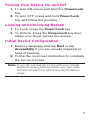
Turning Your Device On and Off
1. To turn ON, press and hold the Power/Lock
key.
2. To turn OFF, press and hold Power/Lock
key and follow the prompts.
Locking and Unlocking Screen
1. To Lock, press the Power/Lock key.
2. To Unlock, press the Power/Lock key then
swipe your finger across the screen.
Initial Device Configuration
1. Select a language and tap Next or tap
Accessibility if you are visually impaired or
hard of hearing.
2. Follow the on-screen instruction to complete
the set up process.
Note: If you do not set up or log into your Gmail
account during this process, you can later
access Gmail from within the Applications
page.

10
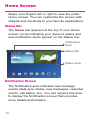
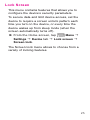
Home Screen
Swipe your fingers left or right to view the entire
Home screen. You can customize the screen with
widgets and shortcuts to your favorite applications.
Status Bar
The Status bar appears at the top of your Home
screen. Icons indicating your device’s status and
new notification alerts appear on the Status bar.
Notification
Area
Status Bar
Status Area
Notification Screen
The Notification area indicates new message
events (data sync status, new messages, calendar
events, call status, etc). You can expand this area
to display the Notification screen that provides
more detailed information.

11
S Pen
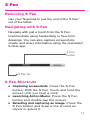
Removing S Pen
Use your fingernail to pull the end of the S Pen
™
out of the tablet.
Navigating with S Pen
Navigate with just a touch from the S Pen.
Communicate using handwriting or free-form
drawings. You can also capture screenshots,
create, and share information using the preloaded
S Note app.
S Pen
button
S Pen tip
S Pen Shortcuts
● Capturing screenshots: Press the S Pen
button. With the S Pen, touch and hold the
screen until you hear a click.
● Launching Action Memo: Press the S Pen
button and double-tap the screen.
● Selecting and capturing an image: Press the
S Pen button and draw a line around an
object to select it.

12
S Pen Air View
Air View allows you to access previews of content
without actually having to open it.
Simply use the S Pen to hover across the screen
to access the different preview capabilities.
Air Command
Air command allows you to quickly activate
frequently used applications or perform actions.
Screen
write
S Finder
Pen
Window
Scrap
booker
Action
Memo
● Action Memo: Link short notes to
applications.
● Scrap booker: Capture, save and categorize
clipped images.
● Screen write: Capture screenshots and write
or draw on them.
● S Finder: Search tablet contents.
● Pen window: Outline a window on the screen
to quickly access selected applications.

13
Contacts
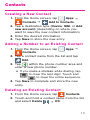
Creating a New Contact
1. From the Home screen, tap Apps
g
Contacts
g
Add to Contacts.
2. Tap a destination type (Device, SIM, or Add
new account) (depending on where you
want to save the new contact information).
3. Enter the desired information.
4. Tap Save to store the new entry.
Adding a Number to an Existing Contact
1. From the Home screen, tap Apps
g
Contacts.
2. Tap a contact name from the list and tap
Edit.
3. Tap within the phone number area and
enter a new phone number.
● If you make a mistake while dialing, tap
to clear the last digit. Touch and
hold to clear the entire sequence.
4. Tap Save to complete and store the new
entry.
Deleting an Existing Contact
1. From the Home screen, tap Contacts.
2. Touch and hold a contact name from the list
and select Delete
g
OK.

14
Messages
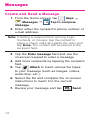
Create and Send a Message
1. From the Home screen, tap Apps
g
Messages
g
Tap to compose
message.
2. Enter either the recipient’s phone number or
e-mail address.
Note: If adding a recipient from among Logs,
Contacts, or Groups, tap the contact to
place a check mark alongside the entry and
tap Done. The contact will be placed in the
recipient field.
3. Tap the Enter message field and use the
on-screen keypad to enter a message.
4. Add more recipients by tapping the recipient
field.
5. Tap Attach to insert various file types
to your message (such as images, videos,
audio files, etc..).
6. Select the file and complete the on-screen
instructions to insert it to the current
message.
7. Review your message and tap Send.

15
Connections
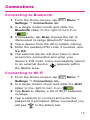
Connecting to Bluetooth
1. From the Home screen, tap Menu
g
Settings
g
Connections tab.
2. In a single motion touch and slide the
Bluetooth slider to the right to turn it on
(
ON
ON
).
3. If necessary, tap Scan. Review the list of
discovered in-range Bluetooth
®
devices.
4. Tap a device from the list to initiate pairing.
5. Enter the passkey/PIN code, if needed, and
tap OK.
6. The external device will then have to also
accept the connection and enter your
device’s PIN code. Once successfully paired
to an external device, appears within
the Status area.
Connecting to Wi-Fi
1. From the Home screen, tap Menu
g
Settings
g
Connections tab.
2. In a single motion touch and slide the Wi-Fi
slider to the right to turn it on (
ON
ON
).
3. Tap Scan to display a list of Wi-Fi networks
in-range.
4. Tap a network to connect and enter the
password if prompted. When connected you
will see in the status bar.

16
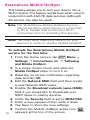
Smartphone Mobile HotSpot
This feature allows you to turn your device into a
Wi-Fi hotspot. The feature works best when used in
conjunction with 4G/LTE data services (although
3G service can also be used).
Note: The Smartphone Mobile HotSpot service
cannot be active when device is connected
to Wi-Fi. Please disconnect your Wi-Fi
connection prior to activating this service.
Note: You must have qualifying service on your
account in order to use the Mobile HotSpot.
To activate the Smartphone Mobile HotSpot
service for the first time:
1. From the Home screen, tap Menu
g
Settings
g
Connections tab
g
Tethering
and Mobile HotSpot.
2. In a single motion touch and slide the
Mobile HotSpot slider to turn it on.
3. Read the on-screen notification regarding
data and tap OK.
4. Edit the Network SSID field and then create
a new Network SSID name.
5. Enable the Broadcast network name (SSID)
field if you would like to broadcast your
SSID name to nearby devices.
6. Verify the Security field is set to WPA2 PSK.
7. Enter a new password then write it down.
8. Tap Save to store the new settings.
9. Confirm the Mobile HotSpot active icon
appears at the top of the screen.

17
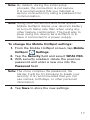
Note: By default, during the initial setup
process, the connection is not secure.
It is recommended that you maintain a
secure connection by using a password for
communication.
Note: Using your 4G service and Smartphone
Mobile HotSpot drains your device’s battery
at a much faster rate than when using any
other feature combination. The best way to
keep using the device as a HotSpot is to
have it connected to a power supply.
To change the Mobile HotSpot settings:
1. From the Mobile HotSpot screen, tap Mobile
HotSpot Settings.
2. Tap the Security field and select WPA2 PSK.
3. With security enabled, delete the previous
password and enter a new one into the
Password field.
Note: The more complex the password, the
harder it will be for intruders to break your
security. It is recommended that you not
use names, birthdays, or other personal
information.
4. Tap Save to store the new settings.

18
USB Tethering
This option allows you to share your device’s
mobile data connection via a direct USB
connection between your device and a single
computer. The Mobile HotSpot connectivity is a
wireless version of this same functionality and
allows you to provide Internet connectivity to
multiple devices.
● For more information on tethering with
operating systems, go to:
www.android.com/tether.
● You cannot mount your device’s microSD
card to your computer while using the USB
Tethering feature. If additional software or
USB drivers are required, go to:
www.samsung.com/us/support/downloads.
● When you connect your device to a
computer with a USB cable, you can either
share your mobile data connection via
tethering OR you can share files—you cannot
do both. Do not turn on tethering if you
want to use your computer to access your
device’s memory card.

19
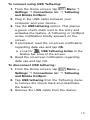
To connect using USB Tethering:
1. From the Home screen, tap Menu
g
Settings
g
Connections tab
g
Tethering
and Mobile HotSpot.
2. Plug in the USB cable between your
computer and your device.
3. Tap the USB tethering option. This places
a green check mark next to the entry and
activates the feature. A Tethering or HotSpot
active notification briefly appears on the
screen.
4. If prompted, read the on-screen notification
regarding data use and tap OK.
● Look for USB Tethering Active in the
Status bar area of the screen.
5. Read the on-screen notification regarding
data use and tap OK.
To disconnect USB tethering:
1. From the Home screen, tap Menu
g
Settings
g
Connections tab
g
Tethering
and Mobile HotSpot.
2. Tap USB tethering from the Tethering menu
to remove the check mark and deactivate
the feature.
3. Remove the USB cable from the device.
Page is loading ...
Page is loading ...
Page is loading ...
Page is loading ...
Page is loading ...
Page is loading ...
Page is loading ...
Page is loading ...
Page is loading ...
Page is loading ...
Page is loading ...
Page is loading ...
-
 1
1
-
 2
2
-
 3
3
-
 4
4
-
 5
5
-
 6
6
-
 7
7
-
 8
8
-
 9
9
-
 10
10
-
 11
11
-
 12
12
-
 13
13
-
 14
14
-
 15
15
-
 16
16
-
 17
17
-
 18
18
-
 19
19
-
 20
20
-
 21
21
-
 22
22
-
 23
23
-
 24
24
-
 25
25
-
 26
26
-
 27
27
-
 28
28
-
 29
29
-
 30
30
-
 31
31
-
 32
32


Samsung SM P Series SM-P607T T-Mobile User manual
- Category
- Smartphones
- Type
- User manual
- This manual is also suitable for
Ask a question and I''ll find the answer in the document
Finding information in a document is now easier with AI
Other documents
-
 Samsung SM T Series Galaxy Tab 4 8.0 T-Mobile User manual
-
T-Mobile T-MOBILE Franklin T9 Mobile Hotspot 4G LTE Wireless WiFi Band User manual
-
 Samsung Galaxy Galaxy Note 8 T-Mobile Reference guide
-
Samsung SGH-M919ZWATMB Quick start guide
-
Samsung Galaxy Avant User manual
-
-
 Samsung Galaxy SM-G900T T-Mobile Quick start guide
-
T-Mobile G2x Start Manual
-
LG LGP769BK Quick start guide
-
Samsung Galaxy SM-G965U T-Mobile Reference guide


