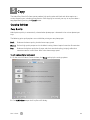
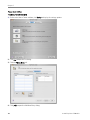
Kodak 5500 - EASYSHARE All-in-One Color Inkjet User manual
- Category
- Print & Scan
- Type
- User manual

EasyShare 5500
All-in-One Printer
User’s Guide
for Macintosh
Version 1.2.1, March 1, 2007

Eastman Kodak Company
Rochester, New York 14650
© Eastman Kodak Company, 2007
Kodak and EasyShare are trademarks of Eastman Kodak Company.
Macintosh is a trademark of Apple Inc., registered in the U.S. and other countries.
Windows is a registered trademark of Microsoft Corporation in the United States and other countries.
The Bluetooth word mark and logos are owned by the Bluetooth SIG, Inc. and any use of such marks is under license.
Wi-Fi® is a registered trademark of the Wi-Fi Alliance.
©1989-2007 I.R.I.S. (Image Recognition Integrated Systems), All Rights Reserved
P/N 1K2111

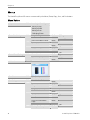
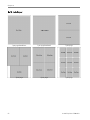
Table of Contents
Product Overview.................................................................................................................................... 1
Main Components.............................................................................................................................................. 1
Control Panel Layout......................................................................................................................................... 2
Status Lights........................................................................................................................................................ 3
LCD Display Screen........................................................................................................................................... 8
Memory Card Slots and USB Port ................................................................................................................. 9
Automatic Document Feeder ....................................................................................................................... 10
Home Center Software.................................................................................................................................... 11
Getting Started ......................................................................................................................................13
Connect Power ..................................................................................................................................................13
Install the Printhead .........................................................................................................................................13
Install Ink Cartridges ........................................................................................................................................15
Install the Duplexer ......................................................................................................................................... 16
Startup .................................................................................................................................................................17
Menus ................................................................................................................................................................. 18
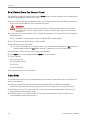
Demo Sheet.......................................................................................................................................................22
Transfer Photos ................................................................................................................................................22
Configuring Settings........................................................................................................................................23
Fax Connections...............................................................................................................................................28
Handling and Loading Paper............................................................................................................... 35
The Scanner Glass ...........................................................................................................................................35
Load Main Tray ................................................................................................................................................36
Load Photo Tray ...............................................................................................................................................37
Load Envelopes.................................................................................................................................................38
Load Labels........................................................................................................................................................39
Print .........................................................................................................................................................41
Print Photos from a Camera.......................................................................................................................... 41
Print Photos from the Control Panel ...........................................................................................................42
Index Print..........................................................................................................................................................42
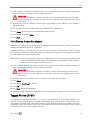
Print Photos from a Proofsheet ....................................................................................................................43
Tagged Photos (DPOF) ..................................................................................................................................43
Bluetooth Printing ........................................................................................................................................... 44
Layouts ...............................................................................................................................................................45
Setting Print Options...................................................................................................................................... 60
Previewing Photos .......................................................................................................................................... 64
User’s Guide i

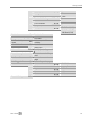
Table of Contents
Copy ....................................................................................................................................................... 69
Copying Settings..............................................................................................................................................69
Copy with Control Panel................................................................................................................................. 71
Scan ........................................................................................................................................................ 79
Scan Settings .................................................................................................................................................... 79
Scan with Control Panel................................................................................................................................. 85
Fax .......................................................................................................................................................... 89
Fax Functionality..............................................................................................................................................89
Entering Text ....................................................................................................................................................89
Print Fax Cover Page.......................................................................................................................................90
Print Fax Activity Report................................................................................................................................90
Setting Fax Options.........................................................................................................................................90
Sending a Fax.................................................................................................................................................. 108
Receiving a Fax............................................................................................................................................... 109
Maintenance ......................................................................................................................................... 111
General Care..................................................................................................................................................... 111
Clean the Scanner Glass................................................................................................................................112
Clean the Scanner Lid.....................................................................................................................................112
Format Memory Card.....................................................................................................................................112
Print Diagnostic Sheet....................................................................................................................................113
Ink Cartridges ...................................................................................................................................................113
Printhead .......................................................................................................................................................... 116
Support ..................................................................................................................................................121
Contact Kodak..................................................................................................................................................121
Limited Warranty ............................................................................................................................................121
Telephone Customer Support.....................................................................................................................123
Messages..........................................................................................................................................................125
Troubleshooting..............................................................................................................................................128
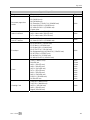
Appendix .............................................................................................................................................. 141
All-in-One Specifications ............................................................................................................................. 141
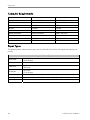
Computer Requirements ............................................................................................................................. 142
Paper Types .................................................................................................................................................... 142
Safety................................................................................................................................................................ 144
Regulatory Compliance................................................................................................................................145
Glossary................................................................................................................................................149
Index.......................................................................................................................................................151
ii Kodak EasyShare 5500 AiO

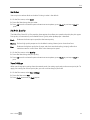
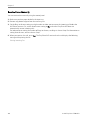
1 Product Overview
Product Overview
The Kodak EasyShare 5500 All-in-One (AiO) Printer allows you to print, copy, scan, and fax photos or
documents. Many functions can be operated directly from the Control Panel. You can print, store, manage,
and share your digital photos with family members and friends with the Kodak EasyShare software. You
can buy optional accessories to enhance your Kodak EasyShare AiO experience.
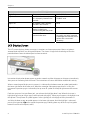
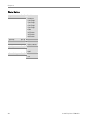
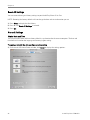
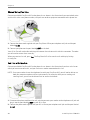
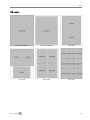
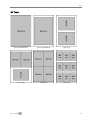
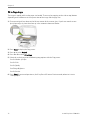
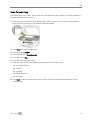
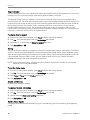
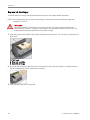
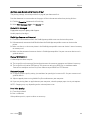
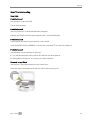
Main Components
1 Automatic Document Feeder 8 Paper-length Guide 14 Control Panel
2 Printer Access Door 9 Main Tray 15 Scanner Lid
3 Memory Card Indicator 10 Output Tray Extender 16 Rear Access Door
4 Memory Card Slots 11 Paper-width Guide 17 Phone Line Connectors
5 USB Port 12 Output Tray 18 Power Connector
6 Photo Tray Light 13 LCD Display 19 USB Port
7 Photo Tray
User’s Guide 1

Chapter 1
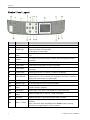
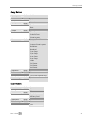
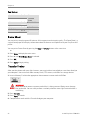
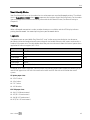
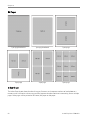
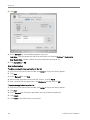
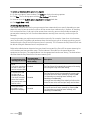
Control Panel Layout
Number Name Description
1
On\Off Button Turns your EasyShare AiO on or off.
2
On/Off Light
Green when Starting Up, Ready, or in Standby mode.
Flashes red when in an error state.
Is not lit when in Sleep mode.
3
Phonebook
Button
When in fax mode, the list of stored phone numbers is displayed on the
LCD.
4
Keypad
The keypad is used to dial phone numbers and entering alpha numeric
characters.
5
Fax Button Press to enter Fax mode. Lit when in Fax mode.
6
Copy Button Press to enter Copy mode. Lit when Copy mode.
7
Photo Button
Press to display the Print menu and toggle between viewing photos and the
Print menu.
8
Rotate Button Rotates photo on the LCD display, clockwise, 90 degrees.
9
Zoom
+ Button
When in Photo Preview mode, magnifies the photo to 1.5X. Subsequent
presses zoom in 0.5X increments to a maximum of 5X. When in Multiview,
displays the current photo in preview mode.
10
LCD Display Displays photos, messages, status, and menus.
11
Attention Light On or flashing for an error or warning condition.
12
Cancel/Back
Button
Moves the menu back one screen or cancels the current print job. Lit when
Cancel or Setup in progress.
13
Start Button Starts a copy, scan, print, or fax operation. Flashes when busy.
14
4-way Navigation
Button
Used to navigate Up
a, Down b, Left _, and Right `.
15
OK Button Used for selection in conjunction with the 4-way controller.
16
Zoom
– Button
When the EasyShare AiO is in Photo Preview mode, pressing enters
Multiview.
When a photo has been magnified with the Zoom
+ button, pressing
decreases the magnification in 0.5X increments.
2 Kodak EasyShare 5500 AiO

Product Overview
Number Name Description
17
Transfer Button
Transfers photos from connected PTP camera or inserted memory card or
USB flash drive. Lit when selected.
18
Scan Button Press to enter Scan mode. Lit when Scan mode.
19
Menu Button Displays the main menu screen.
20
Speed Dial
Buttons and
Displays
Pressing a speed dial button causes the EasyShare AiO to enter fax mode,
place the associated number into the display, and immediately begin
scanning and sending a fax to the associated number if paper is loaded in
the ADF or scanner glass.
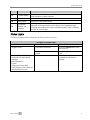
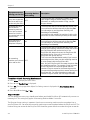
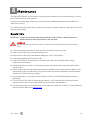
Status Lights
The following tables contain information on the EasyShare AiO lights.
All Lights on Control Panel
Light Status Cause Action/Solution
The printer is turned off.
Press the On/Off button to turn
the printer on.
All lights are off.
The Printer does not have power
applied.
Check the light on the power
cord.
The On/Off Light is flashing and
the Display has the following
message:
Kodak EasyShare
System
Starting Up (Please Wait)
The five boxes at the bottom are
flash walking left to right.
The Printer is Initializing.
None: Allow the Printer to
complete the initialization
process.
User’s Guide 3

Chapter 1
Power Light on Power Cord
Light Status Cause Action/Solution
The printer to power supply cord
is not properly connected to the
Power Supply.
Reseat the printer to power
supply cord.
The power supply to your wall
outlet cord is not properly
connected to your wall outlet.
Reseat the Power Supply to your
Wall Outlet Cord.
You do not have the appropriate
power available at your wall
outlet.
Test your wall outlet by plugging
a known working device into you
wall outlet. Have your wall outlet
checked by a qualified
electrician.
Power cord light is off.
There may be an issue with the
power supply.
Visit Kodak.com for additional
troubleshooting steps or contact
your local Kodak Call Center.
Power cord light is on.
The power cord and power
supply are properly connected
and ready to supply power to the
printer.
Ensure that the power cord is
properly plugged into the back of
the printer.
4 Kodak EasyShare 5500 AiO

Product Overview
On/Off Light
Light Status Cause Action/Solution
The printer is turned off.
Press the On/Off button to turn
the printer on.
The Printer does not have power
applied.
Check the light on the power
cord.
Light is off.
The printer needs attention.
Check to see if the Photo Tray
light is on. If the Photo Tray light
is on for more that 20 seconds
and the On/Off light does not
come on, disconnect the power
for 5 seconds and reconnect the
power. If the Photo Tray light
does not go out after 20 seconds
and the On/Off light comes on,
contact Kodak for assistance.
Light is a steady green.
The printer is properly powered
up, on, and ready.
None
The printer is busy.
None: Normal operation when
performing a print, copy, scan,
fax, or other job requests.
Light is a flashing green.
The printer is initializing.
None: Please wait and allow the
printer to complete the
initialization process (about 30
seconds). If the flashing green
persists, you may have an issue
with the printer. Visit Kodak.com
for additional troubleshooting
steps or contact your local
Kodak Call Center.
Light is a flashing yellow.
The printer has detected an error
condition.
Disconnect power for 5 seconds
and reconnect power. If the
condition persists, please check
the LCD display for additional
information. Contact Kodak
service for assistance.
Light is a flashing red.
The printer has detected an error
condition that needs your
attention.
Check the LCD display for a
message.
Flashing a rotating pattern of
red, yellow, and green.
The printer has not detected that
a Printhead is installed.
Please install a Printhead and
ink cartridges.
User’s Guide 5

Chapter 1
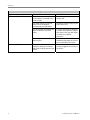
Photo Tray Status Light
Light Status Cause Action/Solution
The photo tray is not engaged.
Push the photo tray in to engage
if you want to print 4 x 6 inch
pictures.
Photo tray light is Off.
The printer is not turned on.
Press the On/Off button to turn
the printer on.
The photo tray is engaged.
Pull the photo tray out to
disengage if you do not want to
print 4 x 6 inch pictures.
Photo tray light is On.
The printer is powering up.
None: Please wait and allow the
printer to complete the
initialization process. If the
flashing green persists, you may
have an issue with the printer.
Visit Kodak.com for additional
troubleshooting steps or contact
your local Kodak Call Center.
6 Kodak EasyShare 5500 AiO

Product Overview
Attention Light
Light Status Cause Action/Solution
Light is off. No Error. None
Light is blinking steady. Recoverable Error.
Paper jam while printing.
Main tray empty.
Photo tray empty.
Carrier stall during pick.
Media size mismatch.
Media type mismatch.
Paper jam during pick.
Carrier stall while printing.
Change color ink cartridge.
Change black ink cartridge.
Color ink cartridge not readable.
Black ink cartridge not readable.
Change both ink cartridges.
Printhead not calibrated.
Calibration sheet needs
scanning.
Calibration sheet not detected.
Calibration sheet read error.
Back cover removed when idle.
Back cover removed while
printing.
Unit opened when idle.
Unit opened during printing.
Too many picture sources.
Proofsheet not detected.
Proofsheet read error.
Light is blinking rapidly. Warning
Color ink cartridge inserted
incorrectly.
Black ink cartridge inserted
incorrectly.
Color ink cartridge not installed.
Black ink cartridge not installed.
Ink cartridges not installed.
Printhead not installed.
Light is on. Non-Recoverable Error
Media sensor failure.
Printhead failure.
Scanner failure.
User’s Guide 7

Chapter 1
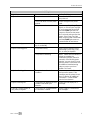
Card Slot Light
Light Status Cause Action/Solution
Light is off.
An SD/MMC card is not inserted
or is improperly inserted in the
card slot.
Remove and reinsert the
SD/MMC card.
Light is on.
An SD/MMC card is properly
inserted in the card slot.
None
Slow blink: The internal card
reader is initializing or
communicating with the printer.
None
Light blinks green.
Fast blink: There is a card or
communication error.
Remove the card and make sure
the card is not “write” protected
or damaged. Reinsert the card or
replace with a new card if
necessary.
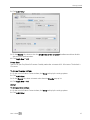
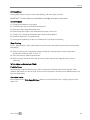
LCD Display Screen
The LCD screen displays photos, messages, instructions, and menu parameters. Menu navigation is
accomplished with the 4-way Navigation buttons. The screen is hinged at the back edge and can be
positioned from flat on the control panel surface to vertical.
Instructions displayed on photos appear up to four seconds and then disappear, or disappear immediately
after you start interacting with the screen. The instructions will return after fifteen seconds of inactivity.
When a second page of display text is present, it is indicated by the down arrow
b symbol, positioned in
the lower right corner of the menu area. When the second or subsequent page of text is in view, the
presence of a previous page is indicated by the up arrow
a symbol in the top of right corner of the menu
area.
Each time you press Navigate Down (
b), you advance the highlight down 1 row. When the last row is
highlighted, pressing
b causes page 1 to be replaced with page 2. When page 2 appears, the highlight is on
the top row. The up arrow
a symbol appears at the right edge. If a third page of menu parameters is
available, the down arrow
b symbol appears in the lower right corner. Until the highlight is advanced,
pressing Navigate Up (
a) returns you to the previous page. Holding down any of the 4-way Navigation
buttons causes them to repeat (scroll).
8 Kodak EasyShare 5500 AiO

Product Overview
Default Display Settings
Default settings are provided for each option. If you make changes to the settings, the changes remain as
long as you do not change modes. You can save the settings in each mode by navigating to Save Settings
and pressing OK. You may reset options to the master defaults by going to the main menu and selecting
Reset All Settings.
Photos
The LCD screen displays JPG images when you insert a memory card, camera, or USB device. However,
the following images will not be displayed.
File size greater than 8 MB
Image size greater than 12 megapixels
Image colorspace is not sRGB or adobeRGB
Progressive JPEG images
Memory Card Slots and USB Port
Your Kodak EasyShare All-in-One can access the memory cards used in most digital cameras. You can
insert the memory card into the EasyShare AiO, or connect your camera directly through one of the two
USB ports on the front panel, using a USB cable. Your Kodak EasyShare AiO can read the contents of the
memory card while it is still in the camera.
If your EasyShare AiO beeps three times when you plug a device into the USB Port, it means the device is
not supported.
User’s Guide 9

Chapter 1
Supported Memory Cards
Your Kodak EasyShare AiO can read the following memory cards.
xD-Picture Card
Memory Stick
Memory Stick Pro
Secure Digital Card/MultiMediaCard
Compact Flash type I and type II, including microdrives
Your EasyShare AiO also supports the following memory cards with Memory Stick and SD/MMC card slot
adapters you can purchase.
Memory Stick Duo
miniSD
MicroSD (TransFlash)
The Memory Card light is a green LED located near the memory card slots. It lights whenever you insert a
memory card, and flashes while the care is being read. The flashing serves as an indication to not remove
the card while it is being read, or written to, which could potentially damage the data on the card.
Automatic Document Feeder
The Automatic Document Feeder on the scanner has a tray capacity of 35 sheets of 20-24 lb plain paper.
The paper dimensions you can use are from 7 to 8.5 inches (17.8 to 6 cm) wide, and from 10 to 14 inches
(25.4 to 35.6 cm), including 8.5 x 11 pages. Paper is automatically detected when loaded.
CAUTION
The Automatic Document Feeder is for plain paper only and cannot feed photo paper.
NOTE: You can make 2-sided to 1-sided copies, but not full duplex copies.
10 Kodak EasyShare 5500 AiO

Product Overview
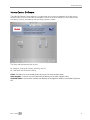
Home Center Software
The Kodak AiO Home Center software is an application that runs on the computer. It enables you to
configure your EasyShare AiO from the computer. You can also launch Kodak EasyShare software for
transferring, viewing, and working with your digital pictures/videos.
The Setup and Maintenance tabs let you:
Configure Settings for Printing, Scanning, and Fax.
Calibration and Printhead Cleaning
Select: Provides a list of connected printers where you can select another printer.
Order Supplies: Connects you to a Kodak web site where you can order supplies online.
View/Hide Status: Opens/closes a drawer that displays the configuration status of your Kodak EasyShare
AiO.
User’s Guide 11


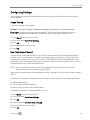
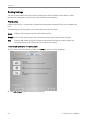
2 Getting Started
Getting Started
It is important to find a good location for your AiO Printer. Place the printer on a clean flat surface, in a dry
location, and out of direct sunlight. Make sure the printer has proper ventilation.
Avoid areas where ventilation ducts, open doors, or high traffic might expose the EasyShare AiO and paper
to high levels of dust and debris. Airborne particles can affect picture quality.
Allow enough space on all sides of the EasyShare AiO to let you connect and disconnect cables, change
the ink cartridges, and remove and load paper.
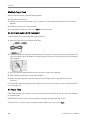
Connect Power
RISK OF ELECTRICAL SHOCK
Use only the AC power adapter included with your AiO printer. Other adapters or cords could
damage your printer or computer.
1 Connect the printer power cord to the AC power adapter, then to the back of the AiO printer.
2 Plug the AC adapter power cord into a power outlet.
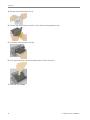
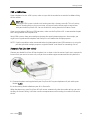
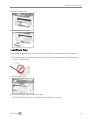
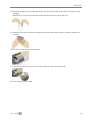
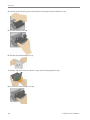
Install the Printhead
The printhead dispenses the ink from the cartridges onto the paper.
1 Make sure the EasyShare AiO is on.
2 Open the printer access door. The carriage moves to a center position.
User’s Guide 13

Chapter 2
3
Remove the printhead from its bag.
4 Remove and discard the clear plastic casing and the orange protective cap.
5 Place the printhead into the carriage.
6 Push against the back wall of the printhead until it clicks into place.
7 Install the ink cartridges.
14 Kodak EasyShare 5500 AiO

Getting Started
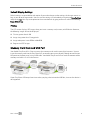
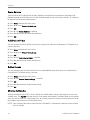
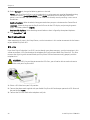
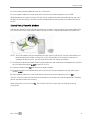
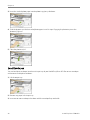
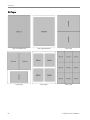
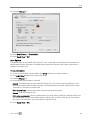
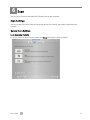
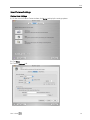
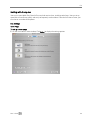
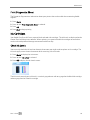
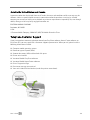
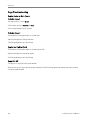
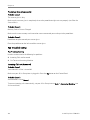
Install Ink Cartridges
After installing the printhead, you need to install the black and color ink cartridges.
1 Printhead
2 Color ink cartridge
3 Black ink cartridge
1 Tear open the black ink cartridge bag at the notch and remove the ink cartridge.
IMPORTANT: Insert the ink cartridge immediately to prevent any drying of the ink.
2 Remove and discard the orange cap.
IMPORTANT: Handle ink cartridge carefully to avoid ink transfer.
3 Insert the black ink cartridge into the printhead.
User’s Guide 15

Chapter 2
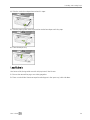
4
Press down on the ink cartridge until you hear it snap into position.
5 Tear open the color ink cartridge bag at the notch and remove the ink cartridge.
6 Remove and discard the orange cap.
7 Insert the color ink cartridge into the printhead.
8 Press down firmly on the cartridge until you hear it snap into position.
9 Close the printer access door.
NOTE: For the best quality prints, store ink cartridges in a location where the temperature does not
exceed 85° F (30° C).
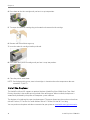
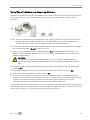
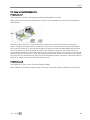
Install the Duplexer
The Kodak EasyShare AiO supports an optional duplexer (Kodak EasyShare 5000 Series Two-Sided
Printing Accessory) that enables printing on both sides of the paper. When installed, the duplexer is
automatically detected by the printer and computer system software.
The duplexer is limited to plain paper (no photo paper). The paper dimensions that can be used are from
6.9 to 8.5 inches (17.5 to 21.6 cm) wide and from 9.8 to 11.7 inches (24.9 to 29.7 cm) long.
You can purchase a duplexer and other accessories for your printer at
www.kodak.com/go/accessories.
16 Kodak EasyShare 5500 AiO
Page is loading ...
Page is loading ...
Page is loading ...
Page is loading ...
Page is loading ...
Page is loading ...
Page is loading ...
Page is loading ...
Page is loading ...
Page is loading ...
Page is loading ...
Page is loading ...
Page is loading ...
Page is loading ...
Page is loading ...
Page is loading ...
Page is loading ...
Page is loading ...
Page is loading ...
Page is loading ...
Page is loading ...
Page is loading ...
Page is loading ...
Page is loading ...
Page is loading ...
Page is loading ...
Page is loading ...
Page is loading ...
Page is loading ...
Page is loading ...
Page is loading ...
Page is loading ...
Page is loading ...
Page is loading ...
Page is loading ...
Page is loading ...
Page is loading ...
Page is loading ...
Page is loading ...
Page is loading ...
Page is loading ...
Page is loading ...
Page is loading ...
Page is loading ...
Page is loading ...
Page is loading ...
Page is loading ...
Page is loading ...
Page is loading ...
Page is loading ...
Page is loading ...
Page is loading ...
Page is loading ...
Page is loading ...
Page is loading ...
Page is loading ...
Page is loading ...
Page is loading ...
Page is loading ...
Page is loading ...
Page is loading ...
Page is loading ...
Page is loading ...
Page is loading ...
Page is loading ...
Page is loading ...
Page is loading ...
Page is loading ...
Page is loading ...
Page is loading ...
Page is loading ...
Page is loading ...
Page is loading ...
Page is loading ...
Page is loading ...
Page is loading ...
Page is loading ...
Page is loading ...
Page is loading ...
Page is loading ...
Page is loading ...
Page is loading ...
Page is loading ...
Page is loading ...
Page is loading ...
Page is loading ...
Page is loading ...
Page is loading ...
Page is loading ...
Page is loading ...
Page is loading ...
Page is loading ...
Page is loading ...
Page is loading ...
Page is loading ...
Page is loading ...
Page is loading ...
Page is loading ...
Page is loading ...
Page is loading ...
Page is loading ...
Page is loading ...
Page is loading ...
Page is loading ...
Page is loading ...
Page is loading ...
Page is loading ...
Page is loading ...
Page is loading ...
Page is loading ...
Page is loading ...
Page is loading ...
Page is loading ...
Page is loading ...
Page is loading ...
Page is loading ...
Page is loading ...
Page is loading ...
Page is loading ...
Page is loading ...
Page is loading ...
Page is loading ...
Page is loading ...
Page is loading ...
Page is loading ...
Page is loading ...
Page is loading ...
Page is loading ...
Page is loading ...
Page is loading ...
Page is loading ...
Page is loading ...
Page is loading ...
Page is loading ...
Page is loading ...
Page is loading ...
Page is loading ...
-
 1
1
-
 2
2
-
 3
3
-
 4
4
-
 5
5
-
 6
6
-
 7
7
-
 8
8
-
 9
9
-
 10
10
-
 11
11
-
 12
12
-
 13
13
-
 14
14
-
 15
15
-
 16
16
-
 17
17
-
 18
18
-
 19
19
-
 20
20
-
 21
21
-
 22
22
-
 23
23
-
 24
24
-
 25
25
-
 26
26
-
 27
27
-
 28
28
-
 29
29
-
 30
30
-
 31
31
-
 32
32
-
 33
33
-
 34
34
-
 35
35
-
 36
36
-
 37
37
-
 38
38
-
 39
39
-
 40
40
-
 41
41
-
 42
42
-
 43
43
-
 44
44
-
 45
45
-
 46
46
-
 47
47
-
 48
48
-
 49
49
-
 50
50
-
 51
51
-
 52
52
-
 53
53
-
 54
54
-
 55
55
-
 56
56
-
 57
57
-
 58
58
-
 59
59
-
 60
60
-
 61
61
-
 62
62
-
 63
63
-
 64
64
-
 65
65
-
 66
66
-
 67
67
-
 68
68
-
 69
69
-
 70
70
-
 71
71
-
 72
72
-
 73
73
-
 74
74
-
 75
75
-
 76
76
-
 77
77
-
 78
78
-
 79
79
-
 80
80
-
 81
81
-
 82
82
-
 83
83
-
 84
84
-
 85
85
-
 86
86
-
 87
87
-
 88
88
-
 89
89
-
 90
90
-
 91
91
-
 92
92
-
 93
93
-
 94
94
-
 95
95
-
 96
96
-
 97
97
-
 98
98
-
 99
99
-
 100
100
-
 101
101
-
 102
102
-
 103
103
-
 104
104
-
 105
105
-
 106
106
-
 107
107
-
 108
108
-
 109
109
-
 110
110
-
 111
111
-
 112
112
-
 113
113
-
 114
114
-
 115
115
-
 116
116
-
 117
117
-
 118
118
-
 119
119
-
 120
120
-
 121
121
-
 122
122
-
 123
123
-
 124
124
-
 125
125
-
 126
126
-
 127
127
-
 128
128
-
 129
129
-
 130
130
-
 131
131
-
 132
132
-
 133
133
-
 134
134
-
 135
135
-
 136
136
-
 137
137
-
 138
138
-
 139
139
-
 140
140
-
 141
141
-
 142
142
-
 143
143
-
 144
144
-
 145
145
-
 146
146
-
 147
147
-
 148
148
-
 149
149
-
 150
150
-
 151
151
-
 152
152
-
 153
153
-
 154
154
-
 155
155
-
 156
156
-
 157
157


Kodak 5500 - EASYSHARE All-in-One Color Inkjet User manual
- Category
- Print & Scan
- Type
- User manual
Ask a question and I''ll find the answer in the document
Finding information in a document is now easier with AI
Related papers
-
Kodak 5500 - EASYSHARE All-in-One Color Inkjet User manual
-
Kodak 5500 - EASYSHARE All-in-One Color Inkjet User manual
-
-
-
Kodak 5100 ALL-IN-ONE PRINTER User manual
-
-
-
-
Kodak EasyShare Photo Printer 500 User manual
-
Other documents
-
Lexmark P315 User manual
-
-
Canon PIXMA MP630 Owner's manual
-
Dell 964 All In One Photo Printer User guide
-
HP Samsung CJX-1000 Inkjet All-in-One Printer series User guide
-
Canon PIXMA MP620B Owner's manual
-
Olivetti ANY_WAY photo Owner's manual
-
Olivetti ANY_WAY bluetooth User manual
-
Canon PIXMA MX860 series On-Screen Manual
-
Olivetti ANY_WAY photo plus Owner's manual