Page is loading ...

Docking Alarm Clock for iPhone and iPod
CRX350iP


WARRANTY PROCEDURE
v1.5.2: DEC 2011
Please read the owner’s manual carefully and ensure that you have followed the correct installation and operating
procedures.
1. Please read this warranty card.
2. Keep your purchase receipt to enable you to proceed quickly in the event of a Warranty Service.
3. If you require Warranty Service, please contact the TEAC Customer Support Hotline at 1300 553 315 for
assistance. Please ensure that you have the model number, serial number and purchase receipt ready when
you call.
Please complete the section below and keep this information for your own records.
Owner’s Name
Owner’s Address
Postcode
Model Name/No. Serial No.
Dealer’s Name
Dealer’s Address
Postcode
Authorised Service Centres in Major Australian Cities
NSW
151 Arthur Street
Homebush West, NSW 2140
Queensland
Unit 1, 320 Curtin Ave West
Eagle Farm, QLD 4009
Western Australia
Unit 2, 50 Pilbara Street
Welshpool, WA 6106
South Australia
11 McInnes Street
Ridleyton, SA 5008
Victoria
282 Normanby Road
South Melbourne, VIC 3205
Thank you for selecting a TEAC product
.
If you should require assistance with your product regarding its setup
or operation, or if any difficulties arise, please call us directly for advice
between Monday to Friday at 8.30AM – 6PM AEST at the
TEAC Customer Support Hotline
1300 553 315
teacservicesupport@awa.com.au
www.teac.com.au

WARRANTY INFORMATION
v1.5.2: DEC 2011
Our goods come with guarantees that cannot be excluded under the Australian Consumer Law. You are
entitled to a replacement or refund for a major failure and for compensation for any other reasonably
foreseeable loss or damage. You are also entitled to have the goods repaired or replaced if the goods fail
to be of acceptable quality and the failure does not amount to a major failure.
Warranty Terms & Conditions
1. TEAC warrants that this product is free from defects in material and workmanship under normal domestic use with
reasonable care and skill. Maintenance and cleaning (i.e. laser head) is not covered by this warranty. The TEAC
warranty only applies to TEAC products purchased, used and serviced in Australia.
2. The benefits to the consumer given by this Warranty are in addition to other rights and remedies of the consumer
under a law in relation to goods or services to which the warranty relates, being the Australian Consumer Law.
3. Refund or replacement via your retailer is available for a period of 14 days after purchase for goods that have been
inspected and determined to have a major failure. Refund and exchange is not applicable for change of mind.
4. Subject to the terms herein, this warranty effectively covers the equipment as specified in the Warranty Periods
Table below from the date of purchase.
TEAC PRODUCT
WARRANTY PERIOD
LED/LCD TV 32” (80 cm) and above
1 Year (In-Home Service/ Pick up Available)*
All other TEAC products
1 Year (Carry-in Service)
5.
This service will only be provided as part of this warranty if all the following conditions are met;
In Home Service/Pick up* Service
a) The product is indicated in the Warranty Period Table.
b) The product is within the warranty period.
c) The product is located within the normal service area of the local TEAC Authorised Service Centre.
If TEAC determines that the product is not repairable on site, TEAC can complete the repair by taking the product to
a TEAC Authorised Service Centre.
Where In-Home service/Pick up* is not available, the purchaser is required to send the product to the nearest TEAC
Authorised Service Centre for repair. In this event, proof of purchase is required to support a warranty claim. After
the repair, the product will be available for collection by or return to the purchaser at a fee upon request. TEAC in-
home service can be made available at a fee upon request.
Carry-in Service
6. A 12-month replacement warranty is applicable to all Accessories such as Remote, Power Adaptors and Cables.
7. TEAC will ensure to the best of its abilities that all required parts are made available for any required service/repair.
8. TEAC Australia Pty Ltd and its Authorised Service Centres will use their best endeavours to complete product
repairs within a reasonable period based on available resources and workload during the time when service is
requested and performed.
9. Refurbished parts may be used to repair the product. In the case of a replacement, the product may be replaced,
with a refurbished unit of the same type or, if one is unavailable, a similar refurbished model with equal or better
features & specifications.
10. Please be advised that if the product presented for repair is capable of retaining user-generated data, the data may
be lost during servicing. Customers are strongly encouraged to back up all important information/data before
sending the product in for service/repair.
11. Service will be provided only during normal business hours and under safety conditions and circumstances. TEAC
and its authorised service agents can refuse any repair if safety, in relation to OH&S, becomes a concern to its staff
or authorised service agents’ personnel.
12. The warranty is void and warranty claims may be refused, subject to the Australian Consumer Law, if:
a) The product was not transported, installed, operated or maintained according to manufacturer instruction, or
b) The product was abused, damaged, tampered, altered or repaired by any unauthorised persons, or
c) Product failure is due to accidents during use, installation or transit, power surges, use of defective or
incompatible external devices, exposure to abnormal conditions such as excessive temperatures or humidity, or
entry of liquids, objects or creatures into the product.
13. No one is authorised to assume any liability on behalf of TEAC or impose any obligation on it, in connection with the
sale of any equipment other than as stated in this warranty and outlined above.
14. TEAC reserves the right to inspect and verify whether the product is exhibiting a major failure as claimed by
customers/retailers.
15. LCD dead pixel policy, please contact TEAC Customer Support Hotline on 1300 553 315 for assistance.

SAFETY PRECAUTIONS
CAUTION
The voltage supplied to the unit should match the voltage as printed on the AC
adapter. If you are in any doubt regarding this matter, consult an electrician.
Do not open the cabinet because this might result in damage to the circuitry or
electrical shock. If a foreign object should get into the unit, contact your dealer
or service company.
When removing the AC power plug from the wall socket, always pull directly on
the plug, never yank on the cord.
Placement of the device
Choose the installation location of your unit carefully. Avoid placing it in direct
sunlight or close to a source of heat. You should also avoid locations that are
subject to vibration, excessive heat, cold or moisture.
As the unit may become warm during operation, always leave sufficient space
around it for ventilation.
Do not place the unit on an amplifier, a receiver or any other device that
generates heat.
When the unit is turned on, if a TV is turned on nearby lines may appear on the
TV screen depending on the frequency of the broadcast. This is not a
malfunction of the unit or the TV. If you see such lines, move the unit and the
TV further apart.
Maintenance
If the surface of the unit gets dirty, wipe with a soft cloth or use a diluted mild liquid
soap. Allow the surface of the unit to dry completely before using.
For safety, disconnect the AC po
wer plug from the outlet before using
.
Never spray liquid directly on this unit.
Do not use thinner and alcohol as they could damage the surface of this unit.
4

TABLE OF CONTENTS
1. Introduction
Location of Controls --------------------------------------------------------
Getting Started --------------------------------------------------------
Clock Setting --------------------------------------------------------
2. FM Radio
Radio Operations --------------------------------------------------------
3. Music Playback
Playing from Apple iPod/iPhone -----------------------------------------
CD/MP3 Operation --------------------------------------------------------
Repeat and Random Play -------------------------------------------------
CD Programmed Play ---------------------------------------------------
---
MP3 Prog
rammed Play ----------------------------------------------------
4. Alarm and Sleep
Alarm Operations -------------------------------------------------------
Sleep Timer -------------------------------------------------------
5. Auxiliary Input
Audio Input via External Devices ------------------------------------------
6. Reference
Care and Maintenance -----------------------------------------------------
Troubleshooting Guide -----------------------------------------------------
Specifications
List of main parts
-------------------------------------------------------
6
7
7
9
11
12
13
14
15
16
18
18
19
20
21
5
Master Unit Manual Transformer Contact card
CUSTOMER SUPPORT HOTLINE:
www.teac.com.au
1300553315

LOCATION OF CONTROLS
1. SNOOZE/DIMMER BUTTON
2. STANDBY
BUTTON
3. FOLDER/PRESET - BUTTON
4. SLEEP BUTTON
5. FOLDER/PRESET + BUTTON
6. FUNCTION BUTTON
(iPod/AUX/Tuner/CD)
7. CLOCK ADJUST/MEMORY/ENTER
8. ALARM BUTTON
9. PLAY MODE BUTTON
10.
iPod/iPhone SKIP BACKWARD
;
RADIO TUNE - ; CLOCK
ADJUST BACKWARD;ALARM
MODE SELECT
BACKWARD;
ALARM VOLUME
ADJUST-
11.
iPod/iPhone SKIP FORWARD ;
RADIO TUNE+ ; CLOCK ADJUST
FORWARD; ALARM MODE
SELECT FORWARD; ALARM
VOLUME ADJUST+
12. /MENU BUTTON
13.
VOLUME + BUTTON
14. SYNC/DISPLAY BUTTON
15. VOLUME - BUTTO
N
16. iPod/iPhone PLAY/PAUSE
BUTTON
17. CD DOOR
18. FM ANTENNA
19. AUX IN JACK
20. DC INPUT JACK
21. DOCK FOR iPod/iPhone
6
1. INTRODUCTION
INTRODUCTION FM RADIO MUSIC PLAYBACK ALARM AND SLEEP AUXILIARY INPUT REFERENCE

0
GETTING STARTED
This CRX350iP is designed to operate on the included AC Adaptor.
AC Adaptor Operation
1. Insert one end of the AC adaptor into the DC JACK on the back of unit.
2. Connect the AC plug of the AC adaptor to an AC 100-240V (50-60Hz) power source.
Note: Unplug the AC adaptor and disconnect the DC Jack when the unit is not in
use for a long period of time.
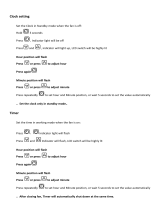
CLOCK SETTING
NOTE:
i. The Clock has to be set the first time you plug the unit in.
ii. The Clock is set to default in 24 Hour format mode.
iii. The Clock can only be set in Standby mode.
Setting the Time
To set the current time, for example 6:30 AM.
When you first plug the AC adaptor into the power outlet, the clock display will light up
flashing “- -:- -”.
1.) Press and hold the CLOCK ADJUST Button until “12H” appears and flashes in the
display. The display backlight will become brightened.
2.) Press the CLOCK ADJUST Button to confirm while “12H” is flashing. The hour
digits flash to prompt for input.
NOTE:
To switch to 24H format, press the
or buttons once when “12H” is flashing.
Press the CLOCK ADJUST Button to confirm and follow the instructions below to
set the curr
ent time.
3.) While the hour digits are flashing, repeatedly press the or buttons to
select the correct hour digits.
NOTE:
Make sure the hour is set so that AM or PM is displayed correctly. There is a PM
Indicator located underneath the Hour digit. The displayed time is PM when the
indicator is lit. The displayed time is AM when the indicator is off.
4.) Press the CLOCK ADJUST Button to confirm the hour setting (6). The minute
digits (00) will now flash to prompt for input.
5.) While the minute digits (00) are flashing, repeatedly press the
or Buttons
until the correct minute digits (30) are displayed.
7
INTRODUCTIONFM RADIOMUSIC PLAYBACKALARM AND SLEEPAUXILIARY INPUTREFERENCE

6.) Press the CLOCK ADJUST button again to complete the clock setting. It will revert
to STANDBY mode. The display backlight will become dim.
NOTE:
● If the CLOCK ADJUST button is not pressed while the hour or minute digits
are flashing, the unit will exit the clock setting mode and revert to Standby mode.
The Display will show flashing “- - : - -”. To set the time, start the clock setting
procedure from the beginning.
● When the unit is powered on, whenever you want to view the current time simply
press the SYNC/DISPLAY Button once. The Display will switch to the current
time and resume to current function mode in 10 seconds.
TIME SYNCHRONIZATION
The CRX350
iP features a “SYNC” Button that allows you to set the time using the
internal clock of the iPod/iPhone.
1. With the CRX350iP in iPod mode, dock an iPod/iPhone onto the 30 pin connector on
the unit. The authentication process will start and complete in a few seconds. The
display will show “AUEH” during authentication and revert to iPod mode in a few
seconds.
2. After completion of the authentication process, press and hold the “SYNC/DISPLAY”
Button until “SYNC” appears on the Display. The clock will be synced with the
iPod/iPhone time.
NOTE:
● An iPod /iPhone can only sync time
up to the nearest minute; it is possible to have up
to 59 seconds difference between the clock radio and synced iPod/iPhone.
● The iPod internal clock is automatically updated when synced with iTunes. We
recommend you sync the iPod with iTunes prior to docking to the unit to make sure
you have the most current time available.
● The iPhone receives constant updates from the phone service provider, so the
iPhone time will always be current.
● The SYNC function does not support earlier iPod models, like iPod mini, iPod 3G,
4G and iPod photo (4G /color display).
8
INTRODUCTION FM RADIO MUSIC PLAYBACK ALARM AND SLEEP AUXILIARY INPUT REFERENCE

RADIO OPERATIONS
TUNING THE RADIO
1.) Press
to turn on the unit. The CRX350iP will enter the iPod mode by default.
2.) To enter the TUNER mode press the FUNCTION Button twice. The FM station
frequency will appear on the Display.
3.) Repeatedly press the or
or
buttons to tune to a desired FM station.
4.) To automatically search for stations with strong signals, press and hold either the
or buttons for one second then release. The tuner will stop on the first
strong station signal it finds. The frequency reading of the tuned station will be
displayed.
5.) Adjust the sound level by pressing the VOLUME+ or VOLUME- Buttons. The
Volume Level reading will be displayed and revert back to the FM mode in 3
seconds.
NOTES:
Manual tune to select weaker stations that might be bypassed during the automatic
tuning.
If the automatic tuning does not stop on the exact frequency of the station, for
example, if it stops on 100.9 MHz instead of 100.8 MHz, use the manual tuning
method to "fine tune" to the exact frequency of the desired station.
If a station is broadcasting in Stereo, the unit will automatically receive the stereo
broadcast and (ST) will be displayed.
Hints for the Best Reception
To obtain the best FM Stereo reception, unwrap and fully extend the FM Antenna and
adjust the position of the wire for best station reception.
STORING THE RADIO STATION PRESETS
The CRX350iPallows you to store up to 20 FM stations for easy recall at any time.
1.) In FM mode, tune to the radio station you want to store in memory using the
buttons as described above.
9
.
FM
TUNER
MHz
2. FM RADIO
FM RADIOMUSIC PLAYBACKALARM AND SLEEPAUXILIARY INPUTREFERENCE

2.) Press the ENTER/MEMORY/CLOCK ADJUST button once. The preset channel
number "P - 01" and “MEMORY” will appear with “01” and “MEMORY” flashing on
the display.
3.) To change the preset channel number location, press the FOLDER/PRESET + or
FOLDER/PRESET - Buttons to scroll through the preset locations (P-01~P-20).
For example the preset channel number P-10 is selected for this station.
4.) To confirm the preset location, press the ENTER/MEMORY/CLOCK ADJUST
button again. The station at 103.2 MHz is now stored in preset channel number 10.
5.) To store more station presets, repeat steps 1 to 4 for up to 20 stations.
Note: You can overwrite a preset station by storing the new frequency in its place.
RECALL PRESET RADIO STATIONS
1.) Set the unit to the Tuner mode.
2.) Repeatedly press the FOLDER/PRESET + or FOLDER/PRESET - buttons to
recall the preset stations. Stop pressing until the desired preset channel number
appears on the display. The display will show the preset channel number briefly
and then revert to show the frequency of the preset radio station.
3.) Adjust the sound level by pressing the VOLUME+ or VOLUME- buttons. The
Volume Level reading will be displayed for 3 seconds before switching back to
display FM mode information.
4.) To turn off the unit, press
once. The display will become dim and the current
time will display.
10
FM RADIO MUSIC PLAYBACK ALARM AND SLEEP AUXILIARY INPUT REFERENCE

PLAYING FROM APPLE iPod/iPhone
CHARGING YOUR APPLE DEVICE
The CRX350iP will charge your iPhone or iPod when it is properly docked on the 30 pin
Docking Connector.
LISTENING TO MUSIC ON YOUR APPLE DEVICE
The CRX350iP works with all models of iPhone, iPod Touch, iPod Nano, iPod Video and
iPod Classic up to 160GB.
1.) Turn on the unit on by pressing the STANDBY
button.
2.) If the unit is not already in iPod mode, press the FUNCTION button until the display
shows “iPod”.
3.) Dock your Apple device carefully and securely onto the 30 pin Docking Connector.
Note: For iPhone and iPod Touch please turn on and unlock your device; for the
iPhone, enter the iPod app and select music for iPod before docking.
4.) After selecting your desired song, press the Play/Pause
button to start
play or pause.
5.) Press the button to advance to the next song. Press and hold the button during
playback for fast forward searching within the song.
6.) Press the
button to go to the starting
point of the current song or previous song.
Press and hold the button during playback for fast backward search within the song.
7.) Press the VOLUME+ or VOLUME-
buttons to adjust the volume output level.
You can also
8.) Repeatedly press the MENU button to navigate through the folders like Playlists,
Artists, Songs, Albums and etc.
9.) Press the FOLDER/PRESET + or FOLDER/PRESET – buttons to select the desired
item.
10.) Press the ENTER button to start playback.
11.) Playback on the iPhone will be suspended if there is an incoming call.
12.) Touch the Answer icon on the iPhone once to pick up the call.
13.) Touch the Speaker button on the iPhone once to answer the call in handsfree mode.
14.) Press the End Call Icon on the iPhone when you have finished answering the call.
Music will resume.
15.) Press and hold the
button until your iPhone/iPo
d turns off.
16.) Press the STANDBY
button to turn off the unit.
Note:
Adjust the built-in preset EQ of your Apple device to fine tune the sound quality to
suit your preferences.
The volume control slider on your iPhone or iPod Touch are disabled when docked.
Your Apple device will be charged as long as it remains docked.
11
3. MUSIC PLAYBACK
MUSIC PLAYBACKALARM AND SLEEPAUXILIARY INPUTREFERENCE

CD/MP3 OPERATION
The CRX50iP will play CD-R/RW discs on top of commercial music CDs.
●
●
●
●
●
Because of the non-standardized format definition/production of CD-R/RW, playback
quality & performance is not guaranteed.
The manufacturer is not responsible for the playability of CD-R/RW due to recording
conditions such as PC performance, writing software, media characteristics, etc.
The CD-R/RW that has no music data or non-MP3 files cannot be played back.
Do not make an empty folder. It may not work properly.
For the CRX350iP,the recommended recording bitrate for audio files is 128 kbps.
If files are recorded in other bitrates, for example at 320 kbps or in variable bitrates,
track-skidding may sometimes happen because of the recording conditions.
1. With the CRX350iP powered on, press the Function button repeatedly until CD is
displayed. The unit will start reading the TOC (table of contents) of the CD.
“
no” will appear on the display if no disc is loaded.
2. Open the CD tray by pulling the CD tray gently at the part marked “PULL OPEN”.
3. Insert a CD in place with the label facing upward and then close the CD tray.
4. The unit will start reading the disc. “rEAd” blinks. The total number of tracks on
the disc will be shown on the display after a few seconds.
Total Tracks On CD
Total Tracks On MP3
Note: The unit will take more time to read the Table of Contents on a MP3 CD as
it contains more songs.
5. Press once. The unit will start playing from the first track. The PLAY Indicator,
“►”, and the elapsed playing time will appear in the display.
CD Playback
MP3 Playback
Note: For MP3 playback, the current track no., folder no. and elapsed playing time
will be shown on the display one by one during playback.
6. Press during playback to pause. The PLAY Indicator, “►”, track no. and elapsed
playing time flash in the display.
7. Note: When the button is pressed during MP3 playback, The PLAY Indicator,
“►” will flash and the track number, folder number and elapsed time will show one by
one.
8. To resume playback press again. The PLAY Indicator, “►”, will stop flashing on
the
display.
9. To skip forward or backward tracks, press the Skip/Search / buttons.
10. For MP3 playback, press the FOLDER + or FOLDER- buttons to skip to the next or
previous folder. The first track no. of the selected folder will be displayed.
11. To stop playing, briefly press the
■ Button.
12
MUSIC PLAYBACK ALARM AND SLEEP AUXILIARY INPUT REFERENCE

REPEAT AND RANDOM PLAY
To select the desired playback mode, press the PLAY MODE button before or after
playing the disc.
Every time you press the PLAY MODE button the following playback function will be
selected consecutively and executed:
For CD: Repeat 1 → Repeat All → Random Play →Normal Play
For MP3: Repeat 1 → Repeat folder →Repeat All → Random Play → Normal Play
REPEAT PLAY MODE
1. REPEAT 1
When the PLAY MODE button is pressed once, the Repeat Indicator, “REPEAT”,
will be shown and flash on the LCD display. This single track of music will be
played repeatedly
until the ■ button is pressed.
2. REPEAT FOLDER (For MP3 CD)
When the PLAY MODE button is pressed twice, the Repeat Folder and Repeat
and “ Indicator, REPEAT”, will be shown with flashing on the LCD display.
The whole folder will be played continuously until the ■ button is pressed..
3. REPEAT ALL
When the PLAY MODE button is pressed 3 times, the Repeat Indicator, “REPEAT”,
will be shown steadily on the LCD display. The whole disc will be played
continuously until the ■ button is pressed.
4. To cancel the REPEAT function, press the PLAY MODE button repeatedly until
the Repeat Indicator, “REPEAT”, disappears from the LCD Display.
RANDOM PLAY MODE
This feature allows the track on the CD to be played in a random order. Random
playback will not work during program
playback.
1. In stop or playback mode, press the PLAY MODE button repeatedly until the
Random Indicator, “RANDOM” appears on the LCD display. A track is picked
at random and playback starts immediately.
2. To cancel the random play function, press the PLAY MODE button again, the
Random Indicator, “RANDOM”, will disappear from the LCD display. Playback
will continues on playing the current track.
3. To stop playback, press ■ once during Play or Pause mode.
4. To turn off the unit, press the STANDBY button once.
13
MUSIC PLAYBACKALARM AND SLEEPAUXILIARY INPUTREFERENCE

CD PROGRAMMED PLAY
For both CDs and MP3 CDs, up to 64 tracks can be programmed in your desired order.
The same track can be programmed more than once.
1. In Stop mode press the ENTER/MEMORY/CLOCK ADJ button once. The Program
Number “P-01” will briefly appear on the display. Track No. “00” and the Program
Indicator, “MEMORY”, will appear next and flash on the display.
2. While the “00” and “MEMORY” are flashing press or
to select a track you want to program. For example the first
track is selected.
3. Press the ENTER/MEMORY/CLOCK ADJ Button to confirm. The first track is now
saved. The Program Number will advance to “P-02” which briefly shows on the
LCD display. Track No. “00” and the Program Indicator “MEMORY” will flash on the
display to prompt for input.
4. Repeat steps 2 & 3 to program more tracks. Any attempt to program more than 64
tracks will result in the first programmed number appearing and the programming
will discontinue.
5. Press to start program play and press to stop.
6. Normally all the programmed tracks will be played through once and then playback
stops. However, you may use the REPEAT function to repeatedly play a certain track
(Repeat 1) or all tracks in the program (Repeat All). You may also tap
to go
directly to other tracks ahead or tap
twice to go back to previous track(s)
during program play.
7. After programmed playback stops, all the programmed tracks are retained in the
memory until the CD tray is opened. To restart programmed play, first press the
ENTER/MEMORY/CLOCK ADJ Button and then the
button.
8. To resume to normal playback, press the button once while programmed play has
been stopped.
9. To clear the program contents, open the CD tray.
Changing a Track in the Program Memory
In case you want to change the track in your programmed play, proceed in the following:
1. In programmed play Stop Mode, repeatedly press the ENTER/MEMORY/CLOCK
ADJ Button until the number you want to replace is displayed.
2. Select a track as described as in procedure 2 to 3 above
3. Press the ENTER/MEMORY/CLOCK ADJ Button to complete..
14
MUSIC PLAYBACK ALARM AND SLEEP AUXILIARY INPUT REFERENCE

MP3 PROGRAMMED PLAY
1. In Stop mode, press the ENTER/MEMORY/CLOCK ADJ Button once. The Program
Number “P-01” will briefly appear on the Display. Folder No. “F00” and the Program
Indicator, “MEMORY”, will appear and flash on the display.
2. Press the
buttons to select the desired folder (F02) while “F00” and
“MEMORY” are flashing.
3. Press ENTER/MEMORY/CLOCK ADJ button to confirm when the desired folder
appears and blinks on the display. Track No. “000” will blink on the display.
4. Select the track you want to program using the
buttons while “000” is
flashing and then press ENTER/MEMORY/CLOCK ADJ button again to enter the
track in memory.
For example the sixth track (006) is selected.
5. The Program Number will advance to “P-02” and briefly appear on the display.
Folder No. “F00” and the Program Indicator, “MEMORY”, will appear and flash on the
display to prompt for the next input.
6. Repeat procedure 2-5 above to program up to 64 tracks. Any attempt to program
more than 64 tracks will result in the first programmed number appearing and
the programming will stop.
7. Press
to start program play and press to stop.
8. Normally all the programmed tracks will be played through once and then stop.
However, you may use the REPEAT function to repeatedly play a certain track
(Repeat 1) or all tracks in the program (Repeat All). You may also tap
to go
directly to other tracks ahead or tap
twice to go back to previous track(s)
during program play.
9. After programmed playback stops, all the programmed tracks remain saved in the
memory unless the CD tray is opened. To restart programmed play, first press the
ENTER/MEMORY/CLOCK ADJ button and then the
button.
10. To clear the program contents, open the CD tray.
15
CD
MEMORY
CD
MEMORY
MUSIC PLAYBACKALARM AND SLEEPAUXILIARY INPUTREFERENCE

NOTES ON HANDLING COMPACT DISCS (CDs)
● Do not expose the CD to direct sunlight, high humidity or high temperatures for
extended periods of time.
● CDs should be returned to their cases after using.
● Do not attach label or seal to either side of the CD-R/RW disc. It may cause a
malfunction.
● Handle the CD by its edge. Do not touch the playing surface (glossy side).
● Fingerprints and dust should be carefully wiped off the playing surface of the CD
with a soft cloth. Wipe in a straight motion from the center to the outside of the CD.
● Never use chemicals such as record cleaning sprays, antistatic sprays or fluids,
benzene or thinner to clean CDs.
ALARM OPERATIONS
Your CRX350iP provides an Alarm Wakeup function to iPod/Phone, Radio, CD or Alarm.
SETTING ALARM TIME
Note: Alarm time can only be set in “POWER ON” mode after the current time is set.
1.) To set the wakeup time, press and hold the ALARM Button for approximately 2
seconds until the hour digit blinks and “AlARM” will light.
2.) When the hour digit blinks, press the or Buttons to adjust your desired hour
digit.
Note: For the 12 Hour format, make sure the Hour is set so that AM or PM is correctly
displayed.
There is a PM Indicator located underneath the Hour digit. The
displayed time is PM
when the indicator is lit. The displayed time is AM when the
indicator is off.
3.) Press the ALARM button to save the hour setting, the minute digits will blink.
4.) When the minute digits blink, press the or buttons to adjust your desired
minute digit.
5.) Press the ALARM button to save the wakeup setting.
SETTING THE WAKEUP MODE
6.) Following step 5 above, press the ALARM button once to enter the wake up
selection mode, then follow the steps below according to the desired Alarm mode.
Note: “EUNE” stands for Wake to Radio, “Cd” stands for Wake to CD, “IPOd”
stands for Wake to iPod/iPhone and “bUZZ” stands for Wake to Alarm Buzz.
i. Wake to Radio
- Repeatedly press the
or buttons until the “Radio Wakeup” Indicator,
“EUNE”, appears and blinks on the Display.
- Press the ALARM button again to enter the VOLUME setting mode. The Volume
Digit will blink on the display.
- Repeatedly press the
or buttons until the desired Volume level (10-30)
appears and blinks on the display then press the ALARM button to complete the
setting.
- Press the STANDBY
button to turn the CRX350iP off. The Radio will come on
when the set Alarm time is reached.
16
4. ALARM AND SLEEP
ALARM AND SLEEP AUXILIARY INPUT REFERENCE

ii. Wake to CD
- Repeatedly press the
or buttons until the “Wake to CD” Indicator, “Cd”,
appears and blinks on the display.
- Press the ALARM button again to enter the VOLUME setting mode. The
Volume Digit will blink on the display.
- Repeatedly press the
or buttons until the desired Volume level (10-30)
appears and blinks on the display then press the ALARM button to complete the
setting.
- Press the STANDBY button to turn off the unit. The Radio will come on when the
set Alarm time is reached.
iii. Wake to iPod/iPhone
- Repeatedly press the
or buttons until the “Wake to iPod” Indicator,
“IPOd”, appears and blinks on the display.
- Press the ALARM button again to enter the VOLUME setting mode. The volume
digit will blink on the display.
- Repeatedly press the
or buttons until the desired Volume level (10-30)
appears and blinks on the display then press the ALARM Button to complete the
setting.
- Press the STANDBY
button to turn off the unit. The iPod/iPhone will play
when the set Alarm time is reached.
iv. Wake to Alarm (bUZZ)
- Repeatedly press the
or buttons until the ALARM Indicator, “bUZZ”,
appears and blinks on the display.
- Press the ALARM button again to confirm. The display will show the chosen
Alarm time and then revert to the current function mode.
- Press the STANDBY
button to turn off the unit. The alarm will beep when
the set Alarm time is reached.
Note:
i. The Alarm Indicator will blink when the alarm time is reached and will keep on
sounding continuously until the unit is powered off by pressing the
Button.
ii. If you have chosen the “Wake to RADIO” alarm mode, make sure that you have
tuned to a station and adjusted the volume to a comfortable level.
iii. The volume level, except the beeping alarm, can be readjusted after waking up.
SNOOZE FUNCTION
When the alarm time is reached and the alarm is sounding, press the SNOOZE Button
once. The alarm will wait 9 minutes before sounding again.
TURNING ALARM ON/OFF
With the CRX-350iP in POWER ON and ALARM mode:
1. Briefly press the ALARM Button once to deactivate the alarm function. The Alarm
Indicator, “ALARM”, will disappear on th
e display.
2. Press the ALARM Button again to activate the alarm function. The chosen wakeup
time and “Wakeup” mode will be displayed on the Display for a few seconds, after
that the
display will revert to show the current mode. The Alarm Indicator, ALARM,
will appear steadily on the display.
17
ALARM AND SLEEPAUXILIARY INPUTREFERENCE

SLEEP TIMER
The sleep timer allows you to turn the unit off after a designated time is reached. You
can use the SLEEP Timer to fall asleep to Radio, CD or iPod/iPhone for 120, 90, 60, 30
or 15 minutes intervals.
1.) Turn on the unit and then play your favorite CD or dock your iPod/iPhone or
tune to the desired radio station and set the volume to a comfortable level.
2.)Press the SLEEP button. The display will show 120 minutes of playing time and then
return to the current function mode (CD, iPod/iPhone or FM mode) in a few seconds.
The unit will automatically turn off after 120 minutes has elapsed.
3). Press the SLEE
P Button repeatedly to select a sleep time. The unit will play for the
selected length of time then automatically turn off.
4.) To turn the unit off before the selected length of time, press and hold the STANDBY
Button at any time.
AUDIO INPUT VIA EXTERNAL DEVICES
The CRX350iP features an auxiliary audio signal input jack for connecting external audio
devices like MP3 players, CD players and older, non-dockable iPods (except iPod
shuffle 3
rd
gen) and listen to your external source through the speakers of this system.
1. Use an audio cable (not included) with one 3.5 mm stereo plug on each end of the
cable.
2. Plug one end into the AUX IN Jack on the unit and the other end of the cable
into the Line-out Jack or Headphone Jack of your external audio device.
3. Turn on the external audio device.
4. To select auxiliary audio input, first press the STANDBY
Button to turn the unit
on and then repeatedly press the FUNCTION Button until “AUX”
is displayed.
5. Adjust the volume control on the unit. Operate all other functions on the
auxiliary
device as usual.
Note:
(1) If you connected the Line Out Jack of your external device then you only need to
adjust the volume control on the CRX350iP. If you connected the Headphone Jack of
your external device then you may need to adjust both the volume control of your
external device and the volume control of this system to find the most desirable
volume setting.
(2) Press the STANDBY
button to turn off the unit when you finish listening.
Don't forget to switch off the power of your external device as well.
18
5. AUXILIARY INPUT
AUXILIARY INPUT REFERENCE

CARE AND MAINTENANCE
1. Avoid operating your unit under direct sunlight or in hot, humid or dusty places.
2. Keep your unit away from heating appliances and sources of electrical noise such as
fluorescent lamps or motors.
3. For better Clock and Display clarity, avoid operating the unit under direct sunlight or in
strong room illumination.
4. Unplug the unit from the electrical power outlet immediately in case of malfunction.
CLEANING THE UNIT
To prevent fire or shock hazard, disconnect your unit from the AC power source
when cleaning.
The finish on the unit may be cleaned with a dust cloth and cared for as other
furniture, Use caution when cleaning and wiping the plastic parts.
If the cabinet becomes dusty wipe it with a soft dry dust cloth. Do not use any wax or
polish sprays on the cabinet.
If the front panel becomes dirty or smudged with fingerprints it may be cleaned with
a soft cloth slightly dampened with a mild soap and water solution. Never use
abrasive cloths or polishes as these will damage the finish of your unit.
CAUTION: Never allow any water or other liquids to get inside the unit while cleaning
due to risk of electric shocks or damage to the unit.
19
6. REFERENCE
REFERENCE
/