Schneider LUNE D2W Bathroom Mirror User manual
- Type
- User manual
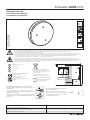
Schneider LUNE D2W Bathroom Mirror is a great choice for anyone looking for a stylish and functional addition to their bathroom. With its sleek design and energy-efficient LED lighting, this mirror is sure to make a statement in any space. The mirror also features a built-in demister pad which helps to prevent condensation from forming on the mirror's surface, making it perfect for use in steamy bathrooms. Additionally, the mirror's adjustable height and tilt settings allow you to customize it to your specific needs.
Here are some of the key features and benefits of the Schneider LUNE D2W Bathroom Mirror:


-
 1
1
-
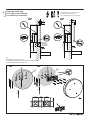 2
2
-
 3
3
-
 4
4
-
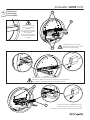
 5
5
-
 6
6
-
 7
7
-
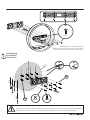
 8
8


Schneider LUNE D2W Bathroom Mirror User manual
- Type
- User manual
Schneider LUNE D2W Bathroom Mirror is a great choice for anyone looking for a stylish and functional addition to their bathroom. With its sleek design and energy-efficient LED lighting, this mirror is sure to make a statement in any space. The mirror also features a built-in demister pad which helps to prevent condensation from forming on the mirror's surface, making it perfect for use in steamy bathrooms. Additionally, the mirror's adjustable height and tilt settings allow you to customize it to your specific needs.
Here are some of the key features and benefits of the Schneider LUNE D2W Bathroom Mirror:
Ask a question and I''ll find the answer in the document
Finding information in a document is now easier with AI
in other languages
Related papers
Other documents
-
Schneider Electric Daily User manual
-
Celestron AstroMaster LT Telescope Series User manual
-
 Mizar MIZAR 114/900 User manual
-
JimsMaison GL-3041-12070 Installation guide
-
National Geographic 50/600 Telescope Owner's manual
-
National Geographic 9010000 Owner's manual
-
Celestron 21062 User manual
-
Bresser 9654100 Owner's manual
-
ADB SH 20 User manual
-
