Page is loading ...

Art. 31318
Instruction Manual
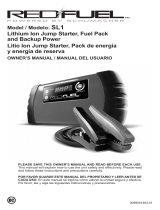
Multifunctional mini jump starter SMART PRO
EN
5-6 h
Li-Ion
67 Wh
18000 mAh
USB &
12 V / 1 A
OUTPUT
LED
1 W LED
90 Lumen
Green Power
Battery
Full Power
jump starting
3.5 L+
1-2 L+ Diesel
Ultimate Safe
SAFE
Heavy Duty Clamps
& Cable

IMPORTANT SAFETY INSTRUCTIONS ...........................................................................................3
PERSONAL PRECAUTIONS............................................................................................................3
PREPARATIONS BEFORE USAGE...................................................................................................4
THE STEPS TO CONNECT A BATTERY...........................................................................................4
FEATURES....................................................................................................................................5
CHARGING METHODS...................................................................................................................5
VEHICLE STARTING OPERATION INSTRUCTIONS..........................................................................6
DC POWER SUPPLY METHOD.......................................................................................................7
USING THE USB PORT..................................................................................................................8
FLASH LIGHT USING METHODS....................................................................................................8
DISPLAY MESSAGES....................................................................................................................9
MAINTENANCE INSTRUCTIONS...................................................................................................10
STORAGE INSTRUCTIONS...........................................................................................................10
SPECIFICATIONS.........................................................................................................................11
This manual will explain how to use the unit safely and effectively. Please read and follow these
instructions and precautions carefully.
2
CONTENTS

SAVE THESE INSTRUCTIONS
WARNING – RISK OF EXPLOSIVE GASES
To reduce the risk of battery explosion, follow these instructions and those published by the
battery manufacturer and the manufacturer of any equipment you intend to use in the vicinity
of a battery. Review cautionary markings on these products and on the engine.
3
IMPORTANT SAFETY INSTRUCTIONS
PREPARATIONS BEFORE USAGE
WORKING IN THE VICINITY OF A LEAD-ACID BATTERY IS DANGEROUS. BATTERIES
GENERATE EXPLOSIVE GASES DURING NORMAL OPERATION. IT IS IMPORTANT THAT YOU
FOLLOW THESE INSTRUCTIONS EACH TIME YOU USE THE UNIT.
1.1 Read the entire manual before using this
product. Failure to do so could result in
serious injury or death.
1.2 Keep out of reach of children.
1.3 Don’t use the device clip to clamp the hands.
1.4 Do not expose the unit to rain or snow.
1.5 Use only recommended attachments. Use of
an attachment not recommended may result
in a risk of fire, electric shock or injury to
persons or damage to property.
1.6 To reduce the risk of damage to the electric
plug or wire, please don't pull the charger
wire when disconnecting the unit.
1.7 Do not operate the unit with damaged cables
or clamps.
1.8 Do not operate the unit if it has received a
sharp blow, been dropped or otherwise
damaged in any way. Take it to a qualified
service person.
1.9 Do not disassemble the unit. Take it to a
qualified service person when service or
repair is required. Incorrect reassembly may
result in a risk of fire or electric shock.
WARNING! RISK OF EXPLOSIVE GASES
1.10 To reduce the risk of a battery explosion,
follow these instructions and those
published by the battery manufacturer and
the manufacturer of any equipment you
intend to use in the vicinity of the battery.
Review the cautionary markings on these
products and engines.
1.11 Do not set the unit on flammable materials,
such as carpeting, upholstery, paper,
cardboard, etc.
1.12 Never place the unit directly above battery
being jumped.
1.13 Do not use the unit to jump start a vehicle
while charging the internal battery.
WARNING!RISK OF EXPLOSIVE GASES.
A SPARK NEAR THE BATTERY MAY CAUSE
A BATTERY EXPLOSION. TO REDUCE THE
RISK OF A SPARK NEAR THE BATTERY:
2.1 NEVER smoke or allow a spark or flame
in the vicinity of a battery or engine.
2.2 Remove personal metal items such as rings,
bracelets, necklaces and watches when
working with a lead-acid battery. A lead-acid
battery can produce a short-circuit current
high enough to weld a ring to metal, causing
a severe burn.
2.3 Be extra cautious, to reduce the risk of
dropping a metal tool onto the battery.
It will cause spark or short-circuit the
battery or other electrical part that may
cause an explosion.
2.4 Do not permit the internal battery of the unit
to freeze. Never charge a frozen battery.
2.5 To prevent sparking, NEVER allow clamps to
touch together or contact the same piece of
metal.
2.6 Consider having someone nearby to come to
your aid when you work near a lead-acid
battery.
2.7 Have plenty of fresh water, soap and baking
soda nearby for use, in case battery acid
contacts your eyes, skin, or clothing.

4
WARNING! A SPARK NEAR THE BATTERY
MAY CAUSE A BATTERY EXPLOSION. TO
REDUCE THE RISK OF A SPARK NEAR THE
BATTERY:
4.1 Attach the output cables to the positive and
negative terminal as indicated below. Never
allow the output clamps to touch each other.
4.2 Position the DC cables to reduce the risk of
damage by the hood, door and moving or hot
engine parts. NOTE: If it is necessary to
close the hood during the jump starting
process, ensure that the hood does not
touch the metal part of the battery clips or
cut the insulation of the cables.
4.3 Stay clear of fan blades, belts, pulleys and
other parts that can cause injury.
PREPARATIONS BEFORE USAGE
WARNING! RISK OF CONTACT WITH
BATTERY ACID. BATTERY ACID IS A
HIGHLY CORROSIVE SULFURIC ACID.
3.1 Make sure the area around the battery is
well ventilated while the unit is in use.
3.2 Clean the battery terminals before using the
jump starter. During cleaning, keep airborne
corrosion from coming into contact with
your eyes, nose and mouth.
Use baking soda and water to neutralize the
battery acid and help eliminate airborne
corrosion. Do not touch your eyes, nose or
mouth.
3.3 Determine the voltage of the battery by
referring to the vehicle owner’s manual and
make sure that the output voltage is 12 V.
3.4 Make sure that the unit’s cable clamps make
tight connections.
2.8 Wear complete eye and body protection,
including safety goggles and protective
clothing. Avoid touching your eyes while
working near the battery.
2.9 If battery acid contacts your skin or clothing,
immediately wash the area with soap and
water. If acid enters your eye, immediately
flood the eye with cold running water for at
least 10 minutes and get medical attention
right away.
2.10 If battery acid is accidentally swallowed,
drink milk, the whites of eggs or water. DO
NOT induce vomiting. Seek medical
attention immediately.
2.11 Neutralize any acid spills thoroughly with
baking soda before attempting to clean up.
THE STEPS TO CONNECT A BATTERY
4.4 Check the polarity of the battery posts.
The POSITIVE (POS, P, +) battery post
usually has a larger diameter than the
NEGATIVE (NEG, N, -) post.
4.5 Before turning on device, connect the
POSITIVE (RED) clamp from the unit to the
POSITIVE (POS, P, +) of the battery. Connect
the NEGATIVE (BLACK) clamp from the unit to
the NEGATIVE (NEG, N, -) of the battery first.
Then start the device, that means completing
the preparatory work before the start.
4.6 After the start procedure, first remove the
NEGATIVE (BLACK) clamp from the unit of the
NEGATIVE (NEG, N, -) of the battery first and
then take off the POSITIVE (RED) of the unit of
the POSITIVE (POS, P, +). extreme.

1
2
3
4
5
6
87
9
10
12
11
5
IMPORTANT! AFTER PURCHASE, CHARGE
IMMEDIATELY FOR SIX HOURS AT LEAST
BEFORE THE FIRST TIME USE. AFTER EACH
USE, CHARGE IT AT ONCE. AND CHARGE IT
EVERY 3-6 MONTHS, TO KEEP THE
INTERNAL BATTERY FULLY CHARGED AND
PROLONG BATTERY LIFE.
6.1 To reduce the risk of electric shock,
unplug the unit’s wall charger from the
outlet before attempting any maintenance
or cleaning. Simply turning off the
controls will not reduce this risk.
6.2 When charging the device battery, work
in a well ventilated area and do not restrict
the ventilation in any way.
6.3 CHECK THE LEVEL OF THE DEVICE
BATTERY
To check the internal battery’s charge level,
make sure the unit is turned OFF,then press
the button. The battery indicator 5 will be
on showing the battery’s percent of charge.A
fully charged internal battery will have five
LEDS be on.
CHARGING METHODS
Only one LED being flashing if the power is
below 5 percent,please charge the device
battery fully.
6.4 CHARGE THE INTERNAL BATTERY USING
THE AC WALL CHARGER
WARNING! USE ONLY THE CHARGER
INCLUDED WITH THE UNIT TO CHARGE THE
INTERNAL BATTERY. USING ANY OTHER
CHARGER WILL DAMAGE THE UNIT.
DURING THE CHARGING PROCESS, DO NOT
USE THE DEVICE TO START THE CAR.
FIRST STEP: Plug one end of the AC wall
charger into the unit’s input socket 8.
SECOND STEP: Insert the other end of the
wall charger to a 100 V~240 V electrical wall
outlet. The battery indicator 5 will be on with
a flash. When the battery is completely
charged, five leds will be on without a flash.
Completing charging may take 5-6 hours.
THIRD STEP: When the battery is fully
charged, disconnect the wall charger from
the AC outlet, and then unplug the wall
charger from the unit.
FEATURES
Light button
Jump start button
12 V / USB button
Jump start function indicator
Battery indicator
Alarm indicator
1
2
3
4
5
6
7
8
9
10
11
12
13
14
15
16
17
18
Temperature alarm indicator
Charger input port
USB port
12 V / 10 A DC output port
Jump Starter output port
LED Light
Mini jump starter
Jump starter power clamp
DC port connector
AC wall charger
DC car charger
USB connector
No. Description No. Description No. Description

6
7.1 CONVENTIONAL STARTING PROCESS (THE
CAR HAS A BATTERY, AND THE BATTERY
IS UNDER VOLTAGE)
7.1.1 PREPARATIONS BEFORE STARTING
1. Turn off the vehicle ignition switch and the
power equipment.
2. Plug the power clamp connector into the
discharge clip interface 11 for emergency
power supply.
3. Lay the power clamp connector away from
any fan blades, belts, pulleys and other
moving parts.
7.1.2 STARTING PROCESS
FIRST STEP: Connect the POSITIVE (RED)
clamp to the vehicle POSITIVE battery post
and connect the NEGATIVE (BLACK) clamp to
the vehicle NEGATIVE battery post. Next,
press .
SECOND STEP: When the green light 4 is on,
it’s ready to turn on the vehicle ignition
switch to start the car.
NOTES:
The time for starting the car shall not
exceed 5 seconds.
VEHICLE STARTING OPERATION INSTRUCTIONS
If you need to start the car again, please
wait 1 minute. During the time, the yellow
light 4 will be on. After the yellow light turns
to green light, the car can be started again.
THIRD STEP: Once the car started, remove
the BLACK clamp FIRST and then remove the
RED clamp, one by one.
7.1.3 NOTES:
If the clamps are in reverse direction, after
pressing , an audio alarm will sound, the 4
turns red, alarm indicator 6 turns red and
flicker. Press and disconnect the clamp.
Then restart the starting process.
Press the first, and then connect the
clamp, an audio alarm will sound, the 4 turns
red, alarm indicator 6 turns red and
flicker.Disconnect the clamp. Then you can
restart the starting process.
Recharge the unit as soon as possible after
each use.
7.2 JUMP START PROCESS
If the vehicle’s battery voltage is below 4.8 V
or the vehicle has no battery, connect the
power clip connector first, and then press ,
the indicator 4 turns yellow and flicker. There
is a manual start procedure to enable the
jump start function.
6.5 CHARGE THE INTERNAL BATTERY USING THE
DC CARCHARGER
While driving, you may also use the 12 V DC
car charger(included) to charge the unit.
WARNING! DON’T USE THE DC CAR
CHARGER FOR A LONG TIME BUT IT CAN
BE USED IN EMERGENCY. DURING THE
CHARGING PROCESS, AVOID USING THE
UNIT TO START THE CAR.
FIRST STEP: Make sure the car is running.
SECOND STEP: Plug one end of the 12 V DC
charger into the unit’s input socket 8.
THIRD STEP: Insert the other end of the DC
charger to into the vehicle’s accessory outlet
(lighter socket). The battery indicator 5 will
be on with a flash. When the battery is
completely charged, the five LEDS will be on
without flash.
FOURTH STEP: When the battery is fully
charged, disconnect the charger from the
unit, then from the lighter socket of the
vehicle.
NOTE: Completely disconnect the charger
cable when the engine is not running.

IMPORTANT INDICATOR! THE FUNCTION IS
USED FOR MOST DC ACCESSORIES THAT
ARE EQUIPPED WITH A 12 V ACCESSORY
PLUG. THE SUPPLY CURRENT IS LESS THAN
OR EQUAL TO 10A. 12 V / 10 A DC POWER
CONTROL BUTTONS ARE .
8.1 12 V/10 A DC POWER OPERATING PROCESS
First step: Plug the 12 V / 10 A DC power
connector into the unit’s 12 V / 10 A DC
Output interface.
Second step: Plug the appropriate 12 V port
charger into the output port of 12 V / 10 A DC
power connector.
Third step: Plug the unit into the 12 V port
charger and turn on the unit (if required).
Fourth step: Press on the unit to unlock
the 12 V / 10 A function of DC power supply.
When the battery indicator 5 is lighted, it can
supply power.
FIFTH STEP: When finished, turn off the DC
device (if required) and disconnect the device.
DC POWER SUPPLY METHOD
Press and turn off the 12 V / 10 A function
of DC power supply.
NOTE:
Ensure that the charging device is in a shut
down state before charging.
As soon as the 12 V / 10 A output is no
longer needed for charging the power will shut
down automatically and the light 5 turns off.
After the 12 V / 10 A DC power supply finish
sending current, recommend to charge the
device immediately.
During operating the 12 V / 10 A DC power
supply of the device, charging the device can
extend its running time but delay the charging
time.
After turn-on the 12 V / 10 A output the light
5 turns on. When press the button again the 12
V / 10 A output turns off and the light 5 turns
off as well.
7
7.2.1 PREPARATIONS BEFORE STARTING
1. Turn off the vehicle ignition switch and the
power equipment.
2. Plug the power clamp connector into the
discharge clip interface 11 for emergency
power supply.
3. Lay the power clamp connector away from
any fan blades, belts, pulleys and other
moving parts.
7.2.2 MANUAL STARTING PROCESS:
FIRST STEP: connect the unit’s POSITIVE
(RED) clamp to the vehicle POSITIVE battery
post and connect the NEGATIVE (BLACK)
clamp to the vehicle NEGATIVE battery post.
WARNING! THIS OVERRIDES A SAFETY
FEATURE. It will energize the clamps and
cause sparking if they are touched together.
If the clamp connections are reversed,
damage to the unit, battery and possibly the
car’s electrical system will occur.
SECOND STEP: Press and hold for 5
seconds. When the indicator 4 turns green,
it’s ready to turn on the vehicle ignition
switch to start the car.
NOTES:
The time for starting the car shall not
exceed 5 seconds.
If you need to start the car again, please
wait 1 minute. During the time, the indicator
4 is yellow.
THIRD STEP: After the successful start, take
the black clamp and red clamp by turns and
then pack up the device.

8
IMPORTANT INDICATOR! THE FUNCTION IS
USED FOR MOST DC ACCESSORIES THAT
ARE EQUIPPED WITH A 5 V ACCESSORY
PLUG. THE SUPPLY CURRENT IS LESS
THAN OR EQUAL TO 2 A. USB POWER
CONTROL BUTTONS ARE .
9.1 USB POWER OPERATING FLOW
FIRST STEP: Press on the unit to start the
USB power function. The battery indicator 5
is lighted.
SECOND STEP: Plug one end (male head) of
the USB power connector into the USB
interface of the unit.
THIRD STEP: Plug the other end (micro) of
the USB power connector into your unit (turn
the unit on, if necessary).
Fourth step: When finished using the USB
port, turn off the device (if necessary) and
USING THE USB PORT
unplug the device. If the battery indicator 5
is still on, please press to turn off the
USB function.
Note:
As soon as the USB output is no longer
needed for charging the power will shut
down automatically and the light 5 turns off.
After the USB power supply is used,
recommend to charge the device
immediately.
During operating the USB power supply of
the device, charging the device can extend
its running time but delay the charging time.
After turn-on the USB output the light 5
turns on. When press the button again the
USB output turns off and the light 5 turns off
as well.
IMPORTANT INDICATOR! THE INTEGRATED
FLASHLIGHT OF THE DEVICE HAS THE
FUNCTIONS AS LIGHTING, WARNING AND
HELP. FLASHLIGHT CONTROL BUTTONS ARE
BUTTONS.
10.1 FLASHLIGHT OPERATING PROCESS PRESS :
Once time: Steady light;
FLASHLIGHT USING METHODS
Second time: Strobe light for warning and
help function;
Third time: The light turns off.
Note:
If the light is turned on for 8 hours, the
light turn off automatically.
During operating the light, the charging
time of the device will extend.

9
DISPLAY MESSAGES
1
2
3
4
5
6
7
8
9
10
11
12
13
14
15
Item Display content Equipment Status
Battery indicator 5 flicker at the end Battery voltage is low
Battery voltage is high
Battery temperature is high
Connected clamp is under
low-voltage
Connected clamp is under
high-voltage
Clamps are reversed
Short circuit of clamp
Car started with success
Wait 1 minute
Waiting time for start
exceeded
Charger temperature is
too low
In charging process, the
clamp is under current
Jump start prepares to start
Charger voltage is too high
Operation procedure error
of clamp
Temperature alarm7turn red and flicker
Jump start function indicator 4turns yellow and flicker
Jump start function indicator4turns red, alarm
indicator 6 turns red and flicker
Jump start function indicator4turns red, alarm
indicator 6 turns red and flicker
Jump start function indicator4turns red, alarm
indicator 6 turns red and flicker
Jump start function indicator4turns red, alarm
indicator 6 turns red and flicker
Battery indicator 5 flicker, alarm indicator6turn red
and light flicker
Battery indicator 5flicker, alarm indicator 6 turn red and
light flicker, jump start function indicator 4 turns red
Temperature alarm 7 turn blue and flicker
Jump start function indicator4turns green
Jump start function indicator4turns yellow
Jump start function indicator4turns green and
light flicker
Jump start function indicator4turns red, alarm
indicator6turns red and flicker
Battery indicator 5 flicker, alarm indicator 6 turn red
and light flicker (Start Jump Start, find the battery
voltage high, Jump Start function indicator 4 turn red)

10
13.1 Before long term storage, make sure that
the device is fully loaded, that is, when the
battery indicator 5 is all lighted.
13.2 Storage environment: the temperature
range is -20 ~ 60°C, dry and ventilated.
13.3 Never discharge the battery completely.
13.4 Charge it after each use.
13.5 Charge at least once every 3 to 6 months if
not in frequent use, to prevent
over-discharge.
STORAGE INSTRUCTIONS
12.1 After use and before performing
maintenance, unplug and disconnect the
unit.
12.2 Use a dry cloth to wipe all battery corrosion
and other dirt or oil from the battery
clamps, cords, and the outer case.
12.3 Do not open the unit, as there are no
user-serviceable parts; any servicing should
be performed by qualified service
personnel.
MAINTENANCE INSTRUCTIONS

SPECIFICATIONS
1.1 kg
233 x 104 x 53 mm
18000 mAh (67 Wh)
500 Times(80% DOD)
500 A for 20 Milliseconds
300 A (on 5 Seconds than need to stop 1 Minute)
18 times
14 V / 1 A
5 V / 2 A
1 W / 90 Lm, 1 W / 90 Lm
5~6 hours
12 V / 10 A
0°C~45°C (Continuous Charge Temperature )
-20°C~60°C (Continuous Discharge Temperature)
-20°C~60°C
Weight
Product Dim
Ternary Lithium Battery
Battery Cycle Life
Instant Amp
Cranking Amp
Using Cycles
Charger Spec
USB Output
LED Light
Full Charging Time
Cigar Lighter
Operating Temperature Range
Storage Temperature Range
Waste electrical products should not be disposed of together with household
waste. Please recycle where designated facilities exists. Check with your local
authority or retailer for recycling advice.
- The battery must be removed from the appliance before it is scrapped.
- The appliance must be disconnected from the main power supply when
removing the battery.
- The battery must be disposed of safely.
11

www.kraftwerktools.com
KRAFTWERK Europe AG
Mettlenbachstrasse 23
CH-8617 Mönchaltorf
Switzerland
Tel. +41-44 949 40 50
KRAFTWERK Sàrl.
25, rue du Stade
F – 67870 Bischoffsheim
France
Tel. +33-388 48 64 50
WARRANTY
We do not take responsibility for any damage caused by misuse or any use that is not in
compliance with the safety standards described herein.
CUSTOMER SERVICES
Contact your local importer of your specialized dealer to obtain address of our service
department.
FROM DATE OF PURCHASE RECEIPT
2 YEAR GUARANTEE
ON MATERIAL OR PRODUCTION DEFECTS
/