Page is loading ...

WESTFIRE · WF17 · WF18 · WF19
1
DANSK INGENIØRKUNST
DK: INSTALLATIONS-OG BRUGSVEJLEDNING
WF17 /UNIQ 17
WF18 /UNIQ 18
WF19 /UNIQ 19
UK:
INSTALLATION MANUAL AND OPERATING INSTRUCTIONS
D:
INSTALLATIONS- UND GEBRAUCHSANWEISUNG
F:
NOTICED’INSTALLATION ETD’UTILISATION

WESTFIRE · WF17 · WF18 · WF19
6
WESTFIRE · WF17 · WF18 · WF19
7
UK: INSTALLATION MANUAL AND OPERATING INSTRUCTIONS
–WESTFIRE WF17/UNIQ 17,WESTFIREWF18 /UNIQ 18WESTFIREWF19
This manual refers to the stove types listed abeove which have been tested in accordance with EN13240.
Congratulations on your purchase of a new wood burning stove from Westfire ApS. Please read this manual care-
fully in order to ensure that you get maximum enjoyment from your new stove and to prevent any problems.
For further information on installing and using fireplaces and wood burning stoves, please see the relevant bro-
chure on building regulations that applies to the country in which WF 17, WF 18 and WF 19 have been approved,
as well as the relevant brochure on the correct use of wood burning stoves available from your local stove sup-
plier or your chimney sweep.
INSTALLATION GUIDELINES
You must comply with all applicable national and local building regulations when installing your wood burning
stove. Please see the applicable regulations for full details. The regulations state that flammable floors beneath
closed hearths must be covered by a fire-proof material that extends a minimum of 30 cm in front of the stove
opening and a minimum of 15 cm on either side. The fire-proof material may be e.g. a steel plate, a glass plate,
tiles or artificial slate.
The floor on which the wood burning stove is to be installed must be sufficiently strong to carry the weight of
the stove.
The minimum distances to flammable materials are specified on the EN 13240 plaque on the back of the stove.
There are no rules regarding the minimum distance to non-flammable walls, but we recommend leaving a gap of
at least 10 cm behind the stove to make cleaning easier.
Combustion requires air, and fresh air must therefore be available in the room in which the stove is installed. Air
inlets must be positioned in such a way that they cannot be blocked. An air inlet may be a vent (the vent must be
open and the capacity of the vent sufficient when the stove is lit) or a fresh air system linked to the stove.
All wood burning stoves from Westfire are fitted with a smoke plate which ensures that the distance
travelled by the smoke is sufficient.
CHIMNEY CONNECTION
The chimney to which the stove is connected must have a diameter of at least 15 cm, which corresponds to an
area of 175 cm2.
The chimney must be sufficiently long to provide a good chimney draft, and to ensure that the smoke from the
stove will not cause a nuisance. The chimney must be fitted with an easily accessible cleaning hatch.
Minimum draft: The stoves have been tested with a draft of 12 Pa. Max. draft 25 Pa.
Flue gas flow 4.2 g/sec.
Flue gas temperature 272°C.
WF 17, WF 18 and WF 19 are fitted with both a top and rear outlet.
The chimney may be equipped with a regulation damper in the flue pipe to allow the draft to be regulated on
windy days. The damper must not be able to close fully, and must have a clearance of at least 20 cm2 of the total
clear opening of the pipe.
Other types of dampers may also be used, such as allowing air to enter the chimney by bypassing the stove.
OPERATING INSTRUCTIONS
The heat-resistant paint on the stove will harden the first time you light up the appliance. This process produces a
good deal of smoke and odour, and the room should therefore be well ventilated.
The stove door should be kept open during the first couple of firings and only closed once the stove has cooled
down to prevent the packing cord around the door from sticking and coming away from the door.
Once the heat-resistant paint has hardened, the stove door must be kept closed except when lighting the stove,
adding firewood or removing ash in order to prevent flue gas from escaping.
To light the stove
1. Place a few smaller pieces of dry wood (kindling) in the stove on top of the non toxic firelighters.
2. Fully pull open the air slider (secondary air) and the air slider on ash pan (it maybe necessary pull the ash pan
drawer open 1cm as well)
3. Light the firelighters close the door.
4. Once the fire has caught, add two pieces of wood measuring approx 20 cm with a combined weight of approx
1.4kg and close the door.
5. After approximately 5 minutes when the fire is burning brightly shut the air control on the ash pan.
6. After approximately another 7 minutes close the secondary air slider by 50% (50% open)
At nominal heat output, expect to refuel your stove approximately once an hour.
WF 17, WF 18 and WF 19 are designed for intermittent combustion (wood must be added often and the stove is
not designed for 24-hour use).
WF 17, WF 18 and WF 19 are equipped with a control valve for secondary air designed to ensure a plentiful
supply of oxygen during firing.
When lit, the stove will get very hot and due care must therefore be exercised. Please use a glove when
operating levers and dampers.
In the event of a chimney fire: Close the air damper and the stove door, and call 999 or your local fire department.
BASIC POSITIONS OF DAMPERS DURING OPERATION
WF 17, WF 18 and WF 19 have been approved in accordance with EN 13240. The nominal heat output of this stove is 5 kW.
WF 17, WF 18 and WF 19 have a test weight of 83 kg.
You will need to become familiar with your stove in order to be able to regulate the secondary air intake correctly,
as factors such as the quality and height of your chimney, the quality of your fuel and the external conditions
play a large role. It is easy to see whether the stove is functioning correctly, however. Incomplete combustion
may lead to a build-up of hard, shiny soot on the inside of your stove. This is prevented by the introduction of
additional secondary air.
It is important to check the draft conditions before lighting your stove. This may be done, for instance, by crum-
pling a piece of newspaper, placing it in the combustion chamber and lighting it. The draft conditions are good if
the smoke is drawn away through the chimney.
FUEL
Never use toxic wood such as chipboard, impregnated or painted wood. Always use dry firewood. The dryness of
the firewood plays an important role since the use of wet wood results in poor fuel economy and may cause tarry
soot to form.
Newly cut wood contains 60–70% water, making it totally unsuitable for use as firewood.
Newly cut wood should be stacked and air dried under cover for two years before being used as firewood.
Secondary air
WF 17 /UNIQ17, WF 18/UNIQ 18, WF19 75 % open
UK UK
Back(cm) Side(cm) Furniture in front (cm)
WF UNIQ 17 /18/ 19 17,5 cm 30 cm 85 cm

WESTFIRE · WF17 · WF18 · WF19
8
WESTFIRE · WF17 · WF18 · WF19
9
MAINTENANCE
Ash must be removed from the stove at regular intervals.
The stove must be completely cold before being cleaned. The outside should be cleaned using a dry cloth. The
inside of the stove should be cleaned once a year. To clean the inside, remove all ash, soot and tar residue from
the combustion chamber. The smoke plate should be removed as dirt and soot will collect behind it. The packing
cord in the door will wear over time and should therefore be checked.
The stove, the flue pipe connection and the chimney should be checked regularly by a qualified engineer. The
chimney must also be checked for blockages before relighting the stove if it has not been used for an extended
period of time.
The lacquer may wear thin in exposed places due to overheating. This, and other lacquer damage, may be
repaired using a special senotherm lacquer spray available at all stove outlets.
Ash must be stored in a non-combustible container and must not be mixed with other combustible waste.
The combustion chamber is lined with Skamol. These panels will wear over time and will therefore need
replacing. The same is true for the smoke plate.
A Skamol panel may crack if hit too hard by a piece of firewood. This has no effect on the function of the stove
(this is not the case with the smoke plate). The Skamol panels will only need to be replaced once they become
very worn and are no longer whole, or if they crack in several places.
The air damper and the stove door must be closed in the event of overheating.
OPERATING PROBLEMS
Soot forms on the window: The firewood may be too wet, or the intake of secondary air may be insufficient.
The wood burns too quickly: The chimney draft may be too strong, or there may be a leak near the door of the stove.
The stove fails to heat fully: The firewood may be too wet.
Smoke or odour: Weak chimney draft – check for blockages in the flue pipe/chimney and check the height of the
chimney in relation to the surroundings.
Soot in the chimney: The firewood may be too wet, or the intake of secondary air may be insufficient.
GUARANTEE
Your new stove is covered by a five year guarantee against manufacturing defects. Your receipt documents the
date of purchase. The guarantee does not cover damage caused by faulty operation such as overheating or the
stove being incorrectly connected, or damage which occurs as a result of external physical force.
The guarantee does not cover damage to replaceable parts, transport costs associated with repairs under warranty
or the installation/dismantling of the stove in connection with repairs under warranty.
Warning! Any unauthorised modification of the appliance is forbidden.
Only replacement parts recommended by Westfire ApS should be used for repairs.
UK UK
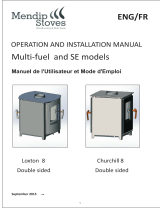
FIRE BRICK INSTALLATION SEQUENCE - WESTFIRE UNIQ 17/18/19
4.
8. 7.
3.5.
9.
Westfire Uniq 17,18 &19 completed fire chamber.
1) Fit Inner top turbulence baffle brick 10 – positioned on
secondary air pipe & between two retaining lugs on rear
panel of the fire chamber.
2) Fit rear brick 5 – push rear brick into place below stainless
steel tertiary air bar with the angled edge to the rear at
the bottom.
3) Fit base bricks 8, 7 either side of cast ash grate 6 and
fit metal spacer to front of stove. This should leave a 5mm
space for the log retail to fit into as the last procedure.
4) Fit side bricks 4 & 3 positioned on top base bricks 8 & 7.
5) Fit fire box baffle 2 (angled edge resting on the stainless
steel tertiary air bar) the baffle is supported with two metal
pins which fit into side bricks 4 & 3.
6) Slide log retainer 1 into positioned in front of base
bricks 8 & 7.
1.
6.
1. Log retainer
2. Firebox baffle
3. Side brick right
4. Side brick left
5. Rear fire brick right
6. Cast grate and Steel spacer
7. Base brick right
8. Base brick left
9. Top turbulence baffle
2.

16
TøMRERVEJ 3 | DK-6800 VARDE | TELEFON +45 7522 5352 | FAx +45 7522 1352 | WWW.WESTFIRE.DK | E-MAIL: INFO@WESTFIRE.DK
WESTFIRE 2009
Der tages forbehold for trykfejl 14078 Mediegruppen Reklamebureau
/