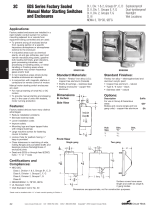
Eaton IF 1501 - EIB Series Circuit Breakers and Enclosures Owner's manual
- Type
- Owner's manual

EIB Series Circuit Breakers and Enclosures
Installation & Maintenance Information
SAVE THESE INSTRUCTIONS FOR FUTURE REFERENCE
IF 1501
APPLICATION
EIB Series Circuit Breakers and Enclosures are used to provide service entrance, feeder or branch circuit protection for lighting, heating,
appliance and motor circuits.
EIB Series Circuit Breakers and Enclosures provide disconnect means, short circuit protection and thermal time delay overload protection.
EIB Series Circuit Breakers and Enclosures are suitable for use in Class I, Groups B, C, D; Class II, Groups E, F, G; Class III; and Zones 1 & 2,
Group IIB + H2 hazardous (classified) locations, as defined by the National Electrical Code® as well as in damp, wet or corrosive locations. They
are suitable for NEMA Type 3, 4, 4X applications.
EIB Series Circuit Breakers and Enclosures should be installed, inspected, maintained and operated by qualified and competent personnel only.
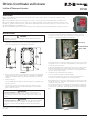
INSTALLATION
1. Select a mounting location that will provide suitable strength and rigidity for
supporting the circuit breaker enclosure, all contained wiring and devices. Figure 1
shows the mounting dimensions of the EIB Series Enclosures.
2. Remove cover bolts securing cover. Carefully open cover fully to prevent damage
to the machined joint and cover gasket. Remove circuit breaker cover (applicable
to EIB Enclosure furnished without circuit breaker) and mounting kit from inside
enclosure.
3. Install mounting feet.
Use four (4) 5/16-18 screws supplied to attach mounting feet to pre-drilled holes on
back wall of enclosure.
4. Securely fasten enclosure to the mounting location, then attach into conduit
system. Install approved conduit or cable sealing fittings in all conduit entries
within 18 inches of enclosure.
National Electrical Code® is a Registered Trademark of the National Fire Protection
Association.
5. EIB Enclosure furnished with circuit breaker:
A. To remove circuit breaker and mounting plate from enclosure, loosen four
(4) 1/4-20 x 1/2” screws that secure the circuit breaker mounting plate to the
enclosure. Lift out the mounting plate and circuit breaker.
C. Carefully pull wires in the enclosure, making sure they are long enough to make
the required connections. Strip away enough insulation from the end of each wire
to make the required connections.
D. Reinstall mounting plate and circuit breaker into the enclosure so that the circuit
breaker load terminals are on the bottom. Tighten the four (4) mounting plate
screws to provide a good ground connection between the mounting plate and the
enclosure. Now proceed to Step #7.
6. For EIB Enclosures furnished without circuit breaker:
Select circuit breaker from Table 1 (ordered separately).
A. Remove mounting plate from enclosure by loosening four (4) 1/4-20 x 1/2
screws that secure the mounting plate to the enclosure, and lift out.
B. Carefully pull wires in the enclosure, making sure they are long enough to make
the required connections. Strip away enough insulation from the end of each wire
to make the required connections.
C. Assemble circuit breaker to mounting plate using the proper holes indicated on
the mounting plate. Attach the circuit breaker cover (included with the EIB empty
enclosure) to the circuit breaker. Mounting hardware is provided in sealed plastic
bag.
FIGURE 1
!
WARNING
To avoid risk of electrical shock, electrical power must be OFF before and during
installation and maintenance.
!
CAUTION
To avoid risk of ignition: hazardous location information indicating Class and
Group listing of each device is marked on the nameplate of each enclosure. Any
device penetrating the enclosure must maintain the explosionproof integrity of the
enclosure.
!
CAUTION
To avoid risk of ignition: hammers or prying tools must not be allowed to damage
the flat machined joint surfaces or cover gasket. Do not handle covers roughly,
or place them on surfaces that might damage or scratch the flat machined joint
surfaces.
IF 1501 • 12/20 Copyright © 2020, Eaton’s Crouse-Hinds Division Page 1
FIGURE 2
Insulated Neutral
(Option S146)
FIGURE 3
Ground Lug

D. Reinstall mounting plate and circuit breaker into the enclosure so that the circuit
breaker load terminals are on the bottom. Tighten the four (4) mounting plate
screws to provide a good ground connection between the mounting plate and the
enclosure.
7. Make electrical connections utilizing the wiring scheme established for the circuit
breaker. See Table 2. Connect green equipment grounding conductor to the
ground lug on the mounting plate.
8. Test wiring for correctness by performing a continuity check and check for
unwanted grounds with an insulation resistance tester.
9. Make sure cover and body machined joint surfaces are clean and not scratched.
Make sure the operator and fork are in the OFF position. Make sure circuit breaker
is in off position. Close cover to approximate position, and line up bolt holes of
cover with body. Cover and body bolt holes must match up. Hand start the corner
bolts. Fully tighten all cover bolts in the cover. See Table 1. Check operation of
circuit breaker operator.
TABLE 1
Enclosure Cover Screw Required Torque
(ft.-lbs)
EIBA 5/16-18 20 - 25
EIBB 3/8-16 35 - 40
10. Pour sealing compound into sealing fittings in accordance with the instructions
supplied with each of the approved fittings and sealing compound package labels.
TABLE 2
MAINTENANCE
1. Electrical and mechanical inspection of all components must be performed on
a regular schedule determined by the environment and frequency of use. It is
recommended that inspection be performed a minimum of once a year.
2. If necessary to open enclosure for inspection or service, always disconnect primary
power source and refer to cautionary statement or nameplate before removing
cover.
3. Perform visual, electrical and mechanical checks on all components on a regular
basis.
Visually check for undue heating evidenced by discoloration of wires or other
components, damaged or worn parts or leakage evidenced by water or corrosion in
the interior.
Electrically check to make sure that all connections are clean and tight and that
contacts in the components make and break as required.
Mechanically check that all parts are properly assembled and operating
mechanisms move freely.
4. EIB gasketed classified enclosures: do not attempt field replacement or repair of
cover gasket. Instead, remove damaged gasket and continue to use cover without
gasket. This will assure safety for use in Class I and Class II hazardous (classified)
locations. However, the enclosure will not be watertight.
In addition to these required maintenance procedures, we recommend an Electrical
Preventative Maintenance Program as described in the National Fire Protection
Association Bulletin NFPA No. 70B.
EIB CIRCUIT BREAKER SELECTION TABLE
EIBA ENCLOSURE
Amperage Manufacturer Breaker Catalog #
15 Cutler-Hammer EGE3015FFG or PDG13F0015TFFJ
20 Cutler-Hammer EGE3020FFG or PDG13F0020TFFJ
25 Cutler-Hammer EGE3025FFG or PDG13F0025TFFJ
30 Cutler-Hammer EGE3030FFG or PDG13F0030TFFJ
35 Cutler-Hammer EGE3035FFG or PDG13F0035TFFJ
EIBB ENCLOSURE
Amperage Manufacturer Breaker Catalog #
40 Cutler-Hammer EGE3040FFG or PDG13F0040TFFJ
45 Cutler-Hammer EGE3045FFG or PDG13F0045TFFJ
50 Cutler-Hammer EGE3050FFG or PDG13F0050TFFJ
60 Cutler-Hammer EGE3060FFG or PDG13F0060TFFJ
70 Cutler-Hammer EGE3070FFG or PDG13F0070TFFJ
80 Cutler-Hammer EGE3080FFG or PDG13F0080TFFJ
90 Cutler-Hammer EGE3090FFG or PDG13F0090TFFJ
100 Cutler-Hammer EGE3100FFG or PDG13F0100TFFJ
!
CAUTION
To avoid risk of ignition: clean both machined joint surfaces of body and cover
before closing. Dirt or foreign material must not accumulate on flat machined
joint surfaces. Surfaces must seat fully against each other to provide a proper
explosionproof joint.
!
CAUTION
Hazardous location information specifying Class and Group listing of each device
is marked on the nameplate of each enclosure. Conduit sealing fittings MUST
be installed in each attached conduit run (within 18 inches of the enclosure) to
comply with the National Electrical Code plus any other applicable standards, as
required. All unused conduit openings must be closed with an approved plug such
as Crouse-Hinds PLG Series. Plug must engage a minimum of five (5) full threads
and be a minimum of 1/8 inch thick. NO CONDUIT OPENINGS ARE TO BE ADDED
IN THE FIELD.
MAXIMUM WIRE SIZE
EIBA 10 AWG
EIBB 3 AWG
RECOMMENDED TORQUE VALUE
Wire Size (AWG) Torque (in.-lb.)
14-10 35
8 40
6-4 45
3 50
!
WARNING
Always disconnect primary source of electrical power before opening enclosure.
CAUTION
To avoid risk of ignition: clean both machined joint surfaces of body and cover
before closing. Dirt or foreign material must not accumulate on flat machined
joint surfaces. Surfaces must seat fully against each other to provide a proper
explosionproof joint.
!
Eaton’s Crouse-Hinds Division IF 1501
1201 Wolf Street, Syracuse, New York 13208 • U.S.A. Revision 2
Copyright© 2020, Eaton Revised 12/20
Supercedes 11/15
All statements, technical information and recommendations contained herein are based on information and tests we believe to be reliable. The accuracy or completeness thereof are not guaranteed. In accordance with Eaton’s
Crouse-Hinds Division’s “Terms and Conditions of Sale”, and since conditions of use are outside our control, the purchaser should determine the suitability of the product for his intended use and assumes all risk and liability
whatsoever in connection therewith.
-
 1
1
-
 2
2


Eaton IF 1501 - EIB Series Circuit Breakers and Enclosures Owner's manual
- Type
- Owner's manual
Ask a question and I''ll find the answer in the document
Finding information in a document is now easier with AI
Related papers
-
Eaton EMN IF677 User manual
-
-
-
-
Eaton EMA014 Specification
-
-
-
-
-