Whirlpool WTV45972 NFC IX Program Chart
- Category
- Fridge-freezers
- Type
- Program Chart
This manual is also suitable for

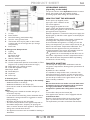
A. Freezer Compartment
1. Ice tray
2. Plastic shelves
3. Area for freezing ( with/without flap)
4. Area for storing frozen foods
5. The freezer door tray for pizza or other frozen
products with a short storage time (2** storage
compartment)
6. Door seals
B. Refrigerator Compartment
7. Lighting
8. Filter in fan
8a. button of fan
8b. cover of fan
9. Shelves / Shelf area
10. Multi-flow cold air system
11.
Cooler compartment (best for meat and fish) or "Zero
Degrees" box (to keep foods fresher for longer)
12. Rating plate with commercial name
13. Fruits and vegetables crisper
13a. Crisper divider
14. Reversibility kit
15. Separator
16. Door trays
C. Control panel
Anti-bacterial protection (depending on the model):
- Antibacterial filter in the fan (8)
- Antibacterial additives in the Crisper (13)
- Door seals are made of material able to inhibit bacterial
growth (6).
Notes:
- Depending on the model the number and type of
accessories may vary.
- In case it'll have a freezer flap, please remember that to
maximize the storage volume it's suggested to remove
flap by bending it.
- All shelves and door trays are removable.
- The internal temperatures of the appliance depend on
the ambient temperature, frequency of opening the
doors, as well as location of the appliance. Temperature
setting must consider these factors.
- The appliance accessories are not suitable for washing in
dishwasher.
HYDROSENSE SHELVES
(depending on the model)
The special contour of the HydroSense shelves creates a
barrier that contain spills and simplifies cleanup,
preventing liquids from leaking onto shelves below.
HOW TO START THE APPLIANCE
Fit the spacers (if supplied) on the
upper part of the condenser at the
rear of the appliance.
After plugging the appliance to the
mains, it starts the operation automatically.
After starting the appliance, wait at least 4-6 hours before
placing food into the appliance.
When the appliance is connected to the power supply, the
display lights up and all the icons appear on the display for
few seconds.
The default (factory) values of the freezer compartment
and refrigerator compartment settings light-up.
In the meanwhile the appliance is working to reach the
factory-set temperature, an acoustic alarm sounds, the
Alarm Icon and Freezer Temperature LEDs blink. This
indicates that the appliance has not yet reached the
optimal temperature for storage of foodstuffs. Press the
Reset button to silence the acoustic alarm.
The Alarm Icon is automatically turned-off as soon as
the freezer compartment reaches a temperature below -
10°C and the Freezer Temperature LEDs stop blinking
and shows the chosen setting.
FAN WITH A BUTTON
The fan improves temperature distribution inside the
refrigerator compartment, allowing better preservation of
stored food.
By default, the fan is ACTIVE.
It is advisable to keep the fan active, so that the "6th
Sense Fresh Control" function can work and also when
the ambient air temperature is above 27 ÷ 28°C or if you
perceive drops of water on the glass shelves or in the
severe humidity conditions.
Note
Do not obstruct the air intake area with food items.
To optimize energy consumption and to guarantee
the right performance at lower ambient
temperature (colder than 18°C) please turn off the
fan.
To turn off the fan press the button (8a).
If the appliance has the fan it can be equipped with the
antibacterial filter.
Remove it from the box (found in the crisper drawer
(item 11) and insert into the cover of fan (item 8b).
The replacement procedure is attached with the filter.
PRODUCT SHEET
GB
ID PLFGB

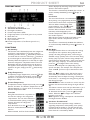
CONTROL PANEL
1. Fridge temperature LEDs
2. On/Stand-by icon/button
3. "6th Sense Fresh Control" icon
4. Eco Night icon/button
5. Freezer temperature LEDs
6. Fridge temperature / Fast Cool (press 3 sec.) button
7. Black Out icon
8. Reset button / Alarm icon
9. Key Lock button
10. Freezer temperature / Fast Freeze (press 3 sec.)
button
FUNCTIONS
On/Stand-by
This function turns On/Stand-by both the refrigerator
and freezer compartments. To put the product in
Stand-by, press & hold the On/Stand-by button for
3 seconds. All the icons turn off except On/Stand-
by icon back light to indicate that the appliance is in
Stand-by. When the appliance is in Stand-by, the light
inside the refrigerator compartment does not work.
Remember that this operation does not disconnect
the appliance from the power supply. To switch the
appliance on again, simply press the On/Stand-by
button.
Fridge Temperature
To adjust the Fridge Temperature, press the Fridge
°C button. The Fridge Temperature can be adjusted
between +2°C and +8°C, as shown by the Fridge
Temperature LEDs.
Freezer Temperature
To adjust the Freezer Temperature inside, press the
Freezer °C button. The Freezer Temperature can be
adjusted between -16°C and -24°C, as shown by the
Freezer Temperature LEDs.
Fast Cool
Using Fast Cool function it is possible to
increase the cooling in the refrigerator
compartment. The use of this function is
recommended when placing a very high
quantity of food in the refrigerator
compartment.
Press & hold for 3 sec. the Fridge °C
button to activate/deactivate Fast Cool
function.
When activated, the Fast Cool indication
will be displayed by the Fridge Temperature LEDs as
shown in the beside sequence.
The function is automatically disabled after 6 hours, or
can be manually disabled by pressing Fridge °C
button.
Fast Freeze
The use of this function is recommended
when placing a very high quantity of food
to be frozen in the freezer compartment.
24 hours before freezing fresh food,
press & hold for 3 sec. the Freezer
button to activate the Fast Freeze
function. When activated, the Fast Freeze
indication will be displayed by the
Freezer Temperature LEDs as shown in
the beside sequence.
After 24 hours place the food to be frozen on the
upper shelf in freezer compartment (area for
freezing).
The function is automatically disabled after 48 hours,
or can be manually disabled by pressing Freezer °C
button
Eco Night:
Eco Night function allows to concentrate the energy
consumption of the product during off-peak time
(usually coinciding with night time), when energy is
available in large quantity and it costs less than during
the day (only in specific countries using multiple-rate
system based on off-peak times - check your rate plan
with your utility company). To activate the function,
press the Eco Night button at the starting
moment of the off-peak rate (depending on your
specific rate plan). For example, if the off-peak rate
starts at 20:00, you have to press the button at that
time.
When the Eco Night icon is ON, the function is
active. After you activate the function, the product
automatically starts to adapt the energy consumption
to the time, i.e. consuming less energy during the day
then during the night.
IMPORTANT: In order to work in a correct way, the
function must be active both during the night and the
day.
The feature remains active until you deactivate it (or if
a blackout occurs, or if the product is switched off).
To deactivate the function, press the Eco Night
button. When the Eco Night icon is OFF the
function is not active.
Note: appliance energy consumption is declared with
Eco Night function disabled.
"6th Sense Fresh Control"
This function allows optimum storage conditions
(regarding temperature and humidity) to be quickly
reached inside the appliance. The fan must also be
switched on for it to work properly. The "6th Sense
Fresh Control" is activated by default.
PRODUCT SHEET
GB
PLIFGBD

To manually deactivate the function, press the
Freezer °C and Eco Night buttons for 3 sec.: you
will hear double long acoustical signals as confirmation
that the feature has been deactivated. The function
can be reactivated by repeating the same procedure:
you will hear a long acoustical signal as confirmation
that the feature has been activated.
Eco Mode
This optional function can be used to save energy. To
activate the Eco Mode, press Fridge °C and
Freezer °C buttons at the same time for 3 seconds
until the acoustic signal sounds. Two seconds after the
Eco Mode activation, the display goes off, except the
6th Sense icon (and the alarms, if any). To adjust
temperature or use other functions, it is necessary to
activate the display by pressing any button. After
about 15 seconds without any action, the display will
go off again, with the 6th Sense icon remaining visible.
To deactivate the function, press Fridge °C and
Freezer °C buttons at the same time for 3 seconds
until the acoustic signal sounds. The display will come
back to the normal visualization. Eco Mode function is
automatically disabled after Black-out or any Failure
alarm appearance. It is important to remember that
this function does not disconnect the appliance from
the power supply.
Key Lock
This function prevents anyone from inadvertently
changing settings or switching off the appliance. To
lock the keys, press Reset button for 3 seconds
until the display shows the Key Lock icon: an
acoustic signal confirms the function has been
selected. To unlock the keys, follow the same
procedure until the Key Lock icon switches off.
PRODUCT SHEET
GB
PLIFGBD
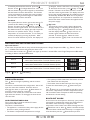
MALFUNCTION AND ALARM INDICATIONS:
Operation Alarms
In the event of operation alarms, they will also be displayed in the Fridge Temperature LEDs, (e.g. Failure1, Failure 2,
etc...) call After-sales Service and specify the alarm code.
The acoustic alarm sounds, the Alarm icon lights up and the 3 central LEDs in the Fridge Temperature LEDs blinks
according to failure code described below:
Legend: Led off Led flashing
Failure code Visualization
Error 2
RC & FC Set points blink on/off at 500msec. Blinks ON
2 times then remain off for 5 seconds. Pattern repeats.
x2
Error 3
RC & FC Set points blink on/off at 500msec. Blinks ON
3 times then remain off for 5 seconds. Pattern repeats.
x3
Error 6
RC & FC Set points blink on/off at 500msec. Blinks ON
6 times then remain off for 5 seconds. Pattern repeats.
x6
DOOR OPEN ALARM
The Alarm icon lights up blinking and the acoustic
alarm sounds.
The alarm is activated when the refrigerator's door is left
open for more than 2 minutes. Close the door to
disengage the alarm, or press once Reset button to
mute the acoustic alarm for 2 minutes.
If the door is not closed, the acoustic alarm will sound
again after two minutes. To disengage the door alarms
close the door.
OVER TEMPERATURE ALARM
The acoustic alarm sounds and all the 5 Freezer
Temperature LEDs blinks.
The alarm is activated when:
• The appliance is connected to the power supply for the
first time or after prolonged disuse
• The freezer compartment temperature is too high
• The quantity of foods loaded into the freezer exceeds
that indicated on the data plate
• The freezer door has been left open for a long time
To mute the alarm buzzer press Reset button just
once.
The Alarm Icon is automatically turned-off as soon as
the freezer compartment reaches a temperature below
-10°C and the Freezer Temperature LEDs stop blinking
and shows the chosen setting.
BLACK OUT ALARM
In the event of an interruption in electricity, your product
is designed to automatically monitor the temperature in
the freezer when electricity is resupplied. If the
temperature in the freezer rises above freezing level, the
Black Out icon lit, & the Alarm Icon blinks and the
acoustical alarm sounds when electricity is re-supplied. To
reset the alarm press the Reset button just once.

PRODUCT SHEET
GB
PLIFGBD
In case of Black Out Alarm, the following actions are
recommended:
• If the food in the freezer is unfrozen but still cold, all
the food in the freezer should be moved to the fridge
compartment and eaten within the next 24 hours.
• If the food in the freezer is frozen, this indicates the
food was thawed and then refrozen when electricity
was re-supplied which degrades taste, quality and
nutritional value and also could be unsafe. It is
recommended to not consume the food but to dispose
of the entire content of the freezer.
The Black Out Alarm is designed to provide guidance on
food quality in the freezer in the event of electricity black
out. This system does not guarantee food quality or safety
and consumers are advised to use their own judgment in
evaluating food quality in freezer and refrigerator
compartments.
CLEANING
Regularly clean the appliance using a cloth and a solution
of warm water, with some soft detergent suitable for
cleaning the inside of the refrigerator compartment.
Do not use abrasive detergents or tools.
To ensure continuous and correct flow of defrost water,
regularly clean the inside of the draining hole on the back
of the refrigerator near the fruit and vegetable drawer,
using the tool provided.
Before carrying out any cleaning or maintenance
operation, unplug the appliance or disconnect it from the
power supply.
DEFROSTING THE REFRIGERATOR
COMPARTMENT
Refrigerator compartment defrosting is completely
automatic.
Droplets of water on the rear wall inside the refrigerator
compartment indicate that the automatic defrost phase is
in progress. The defrost water is automatically run into a
drain hole and collected in a container, where it
evaporates.
DEFROSTING THE FREEZER
COMPARTMENT
No Frost freezers provide chilled air circulation around
the storage areas and prevent the formation of ice,
thereby completely eliminating the need for defrosting.
Frozen items don't stick to the walls, labeling stays legible
and storage space remains neat and clear.
LED's LIGHTING
If the inside LED light is not
working, it must be replace by
service.
Important:
The refrigerator compartment light switches on when the
refrigerator door is opened. After 10 minutes of door
opening the light switches off.
5019 636 01018 Printed in Poland 11/11
-
 1
1
-
 2
2
-
 3
3
-
 4
4


Whirlpool WTV45972 NFC IX Program Chart
- Category
- Fridge-freezers
- Type
- Program Chart
- This manual is also suitable for
Ask a question and I''ll find the answer in the document
Finding information in a document is now easier with AI
Related papers
-
Whirlpool GKIE 2883 A++ User guide
-
Whirlpool WTV4597 NFC IX Program Chart
-
Privileg PRBE 363I A+++ User guide
-
Whirlpool WTV4595 NFC TS Program Chart
-
-
-
Whirlpool WBA4398 NFC IX AQUA Program Chart
-
Whirlpool WBA4398 NFC IX Program Chart
-
Whirlpool WBA4398 NFC IX Program Chart
-
Other documents
-
Smeg CB300U Pdf Mini Bulletin
-
-
Privileg PFVN 84 A+++ Edition50 Program Chart
-
Privileg PRBE 353W A+++ Program Chart
-
-
Bauknecht KGN Platinum 5887 PT Program Chart
-
-
Bauknecht GKIS 2889 A++ Program Chart
-
-