Page is loading ...

ON OFF
AUTO
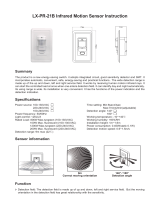
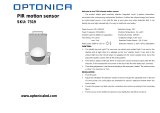
LX-PR-21C Infrared Motion Sensor Instruction
ON OFF
AUTO
70mm 42mm
115mm
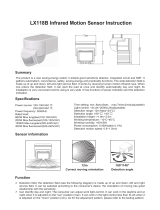
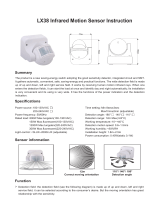
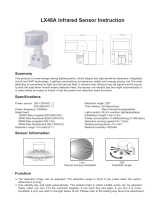
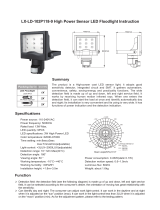
Sensor information
Summary
Specifications
The product is a new energy-saving switch. it adopts integrated circuit, good sensitivity detector and SMT. It
incorporates automatic, convenient, safe, energy-saving and practical functions.The wide detection range is
made up of the up and down, left and right service field. It works by receiving human motion infrared rays. It
can start the controlled load at once when one enters detection field. It can identify day and night automatically.
Its using range is wide. Its installation is very convenient. It has the functions of the power indication and the
detection indication.
Power source: 100-130V/AC
220-240V/AC
100-240V/AC
Power frequency: 50/60Hz
Rated load:
800W Max.tungsten (100-130V/AC)
200W Max.fluorescent(100-130V/AC)
1200W Max.tungsten(220-240V/AC)
300W Max.fluorescent(220-240V/AC)
Light-control: <20LUX
Time setting: Min:8sec±3sec
Max:7min±2min(adjustable)
Detection angle: 140° 180°
Detection range: 9m Max (22°C)
Working temperature: -10°C~+40°C
Working humidity: <93%RH
Installation height: 0.4m~1.8m
Power consumption: 0.45W(static 0.1W)
Detection motion speed: 0.6~1.5m/s
Correct moving orientation Detection angle
9m Max 140°/180°
Function
Detection field: The detection field is made up of up and down, left and right service field.(see the following
diagram I). But the moving orientation in the detection field has great relationship with the sensitivity.
Can identify day and night: It has been set before produce. But it can only work in the light-control less than
20LUX.
Power and detection indication: The indicator lamp can flash one time every 4sec after switching on the
power. It can flash 2 times every 1sec after it receives the signals. So it shows if the detection and power
is normal.

Time setting is added continually: When it receives the second induction signals after the first induction, it
will compute time once more on the rest of the first time setting basic.(set time)
Time setting adjustment: It can be set according to the consumer’s desire. The minimum time is
8sec±3sec. The maximum is 7min±2min.
The switch: LX-PR-21C switch is “AUTO”“OFF” “ON”.
Installation (see the following diagram)
Switch off the power.
The power and the load wire are connected with the sensor according to connection-wire diagram.
Take the board-face off. The sensor is fixed on the selected position.
You can switch on the power and test it after covering the board-face.
Connection-wire diagram(see the
right fig)
Test
Turn the time knob anti-clockwise on the minimum after taking the board-face off.
After switching on the power, the controlled load won’t work and the indicator lamp flash one time every
4sec. The load should work within 10sec and the indication lamp can flash 2 times every 1sec if you cover
the detection window with the opaque objects (towel etc.). (The light can’t project the detection window).
Under the no induction signals conditions, the load should stop working within 5~30sec. At the same time,
the indicator lamp should flash still one time every 4sec.
After the first is out, take 5~10sec to cover the detection
window. The load should work and the indicator lamp
flash 2 times every 1sec. The load will stop working
within 5~15sec.
The load should work within 5~10sec if you test it in the
ambient light less than 20LUX after switching on the
power. After the load stop working, the sensor load
should not work.(the sensor work continually if it
received the continual inductor signals when the load is
working ). If you sense it again, the load should work..
Under the no inductor signals conditions, it is normal for
the load to stop working within 5~15sec.
81.25
Black
Green
(White)
~in Sensor Out
Red
Load
mounting hole
indicator
detection window
time-delay adjustment
switch
L
L'
N

Notes
Electrician or experienced human can install it.
The unrest objects can’t be regarded the installation basis-face.
There aren’t hinder or unrest objects effecting detection in front of the detection window.
Avoid installing it near temperature alteration zones, for example: air condition,central heating etc.
Please don’t open the case for your safety if you find the hitch after installation.
If there are some difference between instruction and the function the product has, please give priority to
product and sorry not to inform you additionally.
Some problem and solved way
1. The load don’t work:
a. check the power and the load.
b. If the load is good.
c. If the indicator lamp speed quicken after induction. please check if the switch is on the “auto” position if the
speed quicken.
d. Please check if the working light correspond to the light-control.
2. The sensitivity is poor:
a. Please check if in front of the detection window there is hinder that effect to receive the signals.
b. Please check the ambient temperature.
c. Please check if the signal source is in the detection field.
d. Please check the installation height.
e. If the moving orientation is correct.
3. The sensor can’t shut off the load automatically:
a. If there is continual sensor signal in the detection field.
b. If the time setting be set to the longest.
c. If the power correspond to the instruction.
d. If the temperature change near the sensor. (air condition, central heating etc.)
Warning!
● Please confirm with prefessional installation.
● Please cut off power supply before installation and removal operations.
● Make sure that you have cut off the power for safety purposes.
● Improper operation caused losses, the manufacturer does not undertake any responsibility.
We are committed to promoting the product quality and reliability, however, all the electronic
components have certain probabilities to become ineffective, which will cause some
troubles.When designing, we have paid attention to redundant designs and adopted safety
quota to avoid any troubles.
This instruction, without our permission, should not be copied for any other purposes.
/