Kodak Advantix F600 User manual
- Category
- Film cameras
- Type
- User manual
This manual is also suitable for
Page is loading ...
Page is loading ...
Page is loading ...
Page is loading ...

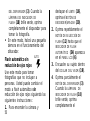
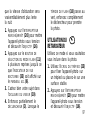
This device complies with part 15 of the FCC Rules. Operation is subject to the following two
conditions: (1) this device may not cause harmful interference, and (2) this device must
accept any interference received, including interference that may cause undesired
operation.
NOTE: Your model camera has been tested and found to comply with the limits for a Class B
digital device, pursuant to Part 15 of the FCC Rules. These limits provide reasonable protection
against interference in residential use. The camera generates, uses and can radiate radio
frequency energy and, if not used in accordance with the instructions, may cause interference
to radio communications. There is no guarantee that interference will not occur. If this camera
does cause interference to radio or television reception, which can be determined by turning
the camera off and on, you may reduce the interference by the following:
— Reorient or relocate the receiving antenna.
— Increase the separation between the camera and the receiver.
— Consult the dealer or an experienced radio/television technician for help.
Changes or modifications not approved by the party responsible for compliance could void the
user’s authority to operate the equipment.
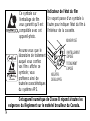
This Class B digital apparatus meets all requirements of the Canadian Interference-
Causing Equipment Regulations.

ENGLISH
KODAK ADVANTIX
F600 Zoom Camera
NEED HELP WITH YOUR CAMERA OR MORE INFORMATION
ABOUT THE ADVANCED PHOTO SYSTEM?
Visit our web site at http://www.kodak.com or call: Kodak (USA only)
from 9:00 a.m. to 7:00 p.m. (Eastern time) Monday through Friday at
1 (800) 242-2424.
Kodak (Canada only) from 8:00 a.m. to 5:00 p.m. (Eastern time)
Monday through Friday at 1 (800) 465-6325, ext. 36100; for the
Toronto area, call (416) 766-8233, ext. 36100. When you call, please
have your camera available.
For warranty purposes, please keep your sales receipt as
proof of the date of purchase.

2
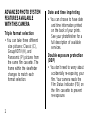
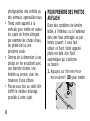
Triple format selection
• You can take three different
size pictures: Classic (C),
Group/HDTV (H), and
Panoramic (P) pictures from
the same film cassette. The
frame within the viewfinder
changes to match each
format selection.
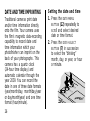
Date and time imprinting
• You can choose to have date
and time information printed
on the back of your prints.
See your photofinisher for a
full description of available
services.
Double exposure protection
(DEP)
• You don’t need to worry about
accidentally re-exposing your
film. Your camera reads the
Film Status Indicator (FSI) on
the film cassette to prevent
re-exposure.
ADVANCED PHOTO SYSTEM
FEATURES AVAILABLE
WITH THIS CAMERA

3
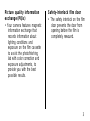
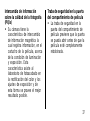
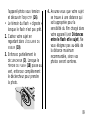
Picture quality information
exchange (PQix)
• Your camera features magnetic
information exchange that
records information about
lighting conditions and
exposure on the film cassette
to assist the photofinishing
lab with color correction and
exposure adjustments, to
provide you with the best
possible results.
Safety-interlock film door
• The safety interlock on the film
door prevents the door from
opening before the film is
completely rewound.

4
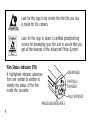
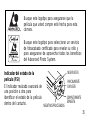
Film Status Indicator (FSI)
A highlighted indicator advances
from one symbol to another to
identify the status of the film
inside the cassette.
4
3
2
1
PROCESSED NEGATIVES
FULLY EXPOSED
PARTIALLY
EXPOSED
UNEXPOSED
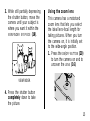
Look for this logo to be certain that the film you buy
is made for this camera.
Look for this logo to select a certified photofinishing
service for developing your film and to assure that you
get all the features of the Advanced Photo System.

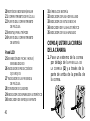
5
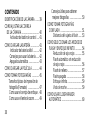
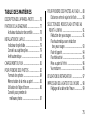
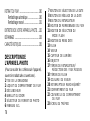
CONTENTS
CAMERA IDENTIFICATION .................. 6
ATTACHING THE STRAP ..................... 7
Control-button activator.................... 7
LOADING THE BATTERY ..................... 8
Low-battery indicator ...................... 9
Battery tips ................................... 9
Power shutdown .......................... 10
LOADING THE FILM .......................... 10
TAKING PICTURES ........................... 12
Typical print sizes (formats) ......... 13
Using the focus lock .................... 14
Using the zoom lens .................... 15
Tips for better pictures ................. 16
TAKING FLASH PICTURES ............... 17
Flash-to-subject distance ............. 18
SELECTING THE FLASH AND
INFINITY-FOCUS MODES .................. 19
Red-eye reduction ........................ 19
Auto flash without
red-eye reduction ......................... 20
Fill flash ...................................... 21
Flash off ...................................... 22
Infinity focus ............................... 23
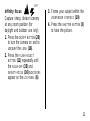
Night-view ................................... 24
USING THE SELF-TIMER .................. 24
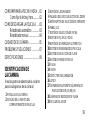
DATE AND TIME IMPRINTING ........... 26
Setting the date and time ............. 26
UNLOADING THE FILM ...................... 27
Automatic rewind ......................... 27
Manual rewind ............................. 28
CARING FOR YOUR CAMERA ........... 29
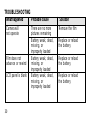
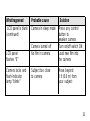
TROUBLESHOOTING ......................... 30
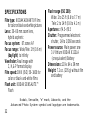
SPECIFICATIONS .............................. 32

6
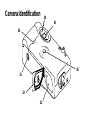
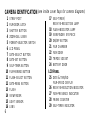
CAMERA IDENTIFICATION
1 STRAP POST
2 FILM-DOOR LATCH
3 SHUTTER BUTTON
4 ZOOM-DIAL LEVER
5 FORMAT-SELECTOR SWITCH
6 LCD PANEL
7 DATE-SELECT BUTTON
8 DATE-SET BUTTON
9 SELF-TIMER BUTTON
10 FILM-REWIND BUTTON
11 FLASH-SELECT BUTTON
12 DATE-MENU BUTTON
13 FLASH
14 VIEWFINDER
15 LIGHT SENSOR
16 LENS
17 SELF-TIMER/
RED-EYE-REDUCTION LAMP
18 FLASH-INDICATOR LAMP
19 VIEWFINDER EYEPIECE
20 ON/OFF BUTTON
21 FILM CHAMBER
22 FILM DOOR
23 TRIPOD SOCKET
24 BATTERY DOOR
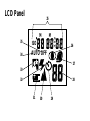
LCD PANEL
25 DATE & TIME/ISO
FILM
-SPEED DISPLAY
26 RED-EYE-REDUCTION INDICATOR
27 FILM-PRESENCE INDICATOR
28 FRAME COUNTER
29 SELF-TIMER INDICATOR
(see inside cover flaps for camera diagrams)

7
30 INFINITY-FOCUS INDICATOR
31 BATTERY SYMBOL
32 FILL-FLASH INDICATOR
33 NIGHTVIEW INDICATOR
34 AUTO-FLASH INDICATOR
35 FLASH-OFF INDICATOR
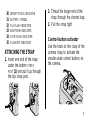
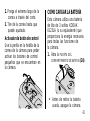
ATTACHING THE STRAP
1. Insert one end of the strap
under the bottom
STRAP
POST
(1) and pull it up through
the top strap post.
2. Thread the longer end of the
strap through the shorter loop.
3. Pull the strap tight.
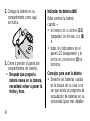
Control-button activator
Use the knob on the clasp of the
camera strap to activate the
smaller-sized control buttons on
the camera.
DATE
SELECT
SET

8
O
N
F
F
/
O
P
E
O
W
R
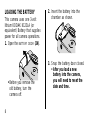
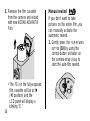
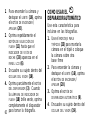
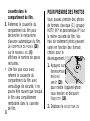
LOADING THE BATTERY
This camera uses one 3-volt
lithium KODAK K123LA (or
equivalent) Battery that supplies
power for all camera operations.
1. Open the
BATTERY
DOOR
(24).
• Before you remove the
old battery, turn the
camera off.
2. Insert the battery into the
chamber as shown.
3. Snap the battery door closed.
• After you load a new
battery into the camera,
you will need to reset the
date and time.
N
O
F
F
O
/
P
E
W
O
R

9
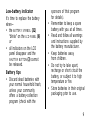
Low-battery indicator
It’s time to replace the battery
when—
• the
BATTERY
SYMBOL
(31)
“blinks”
on the
LCD
PANEL
(6)
or
• all indicators on the LCD
panel disappear and the
SHUTTER
BUTTON
(3) cannot
be released.
Battery tips
• Discard dead batteries with
your normal household trash,
unless your community
offers a battery-collection
program (check with the
sponsors of that program
for details).
• Remember to keep a spare
battery with you at all times.
• Read and follow all warnings
and instructions supplied by
the battery manufacturer.
• Keep batteries away
from children.
• Do not try to take apart,
recharge or short circuit the
battery, or subject it to high
temperature or fire.
• Store batteries in their original
packaging prior to use.

10
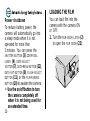
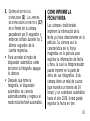
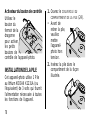
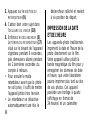
LOADING THE FILM
You can load film into the
camera with the camera ON
or OFF.
1. Turn the
FILM
-
DOOR
LATCH
(2)
to open the
FILM
DOOR
(22).
OPEN
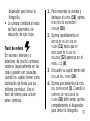
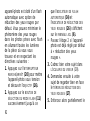
Power shutdown
To reduce battery power, the
camera will automatically go into
a sleep mode when it is not
operated for more than
3 minutes. You can press the
SHUTTER
BUTTON
(3),
ZOOM
-
DIAL
LEVER
(4),
DATE
-
SELECT
BUTTON
(7),
DATE
-
MENU
BUTTON
(12),
DATE
-
SET
BUTTON
(8),
FLASH
-
SELECT
BUTTON
(11), or the
FILM
-
REWIND
BUTTON
(10) to awaken the camera.
• Use the on/off button to turn
the camera completely off
when it is not being used for
an extended time.

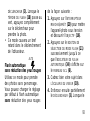
11
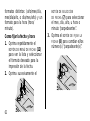
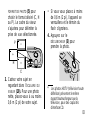
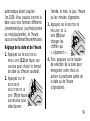
OPEN
2
3
1
4
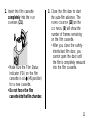
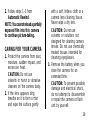
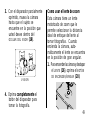
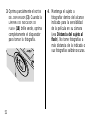
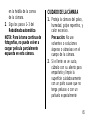
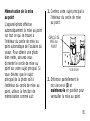
2. Insert the film cassette
completely into the
FILM
CHAMBER
(21).
• Make sure the Film Status
Indicator (FSI) on the film
cassette is at ● (#1 position)
for a new cassette.
• Do not force the film
cassette into the film chamber.
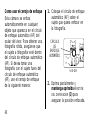
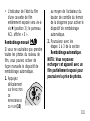
3. Close the film door to start
the auto-film advance. The
FRAME
COUNTER
(28) on the
LCD
PANEL
(6) will show the
number of frames remaining
on the film cassette.
• After you close the safety-
interlocked film door, you
cannot open the door until
the film is completely rewound
into the film cassette.

12
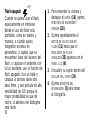
P
C
H
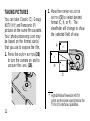
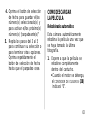
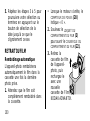
TAKING PICTURES
You can take Classic (C), Group/
HDTV (H)
*, and Panoramic (P)
pictures on the same film cassette.
Your photo-processing cost may
be based on the format size(s)
that you use to expose the film.
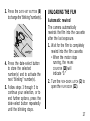
1. Press the
ON
/
OFF
BUTTON
(20)
to turn the camera on and to
uncover the
LENS
(16).
2. Move the
FORMAT
-
SELECTOR
SWITCH
(5) to select desired
format (C, H, or P). The
viewfinder will change to show
the selected field of view.
* High Definition Television (HDTV)
prints are the same aspect ratio as the
TV for CD interface capabilities.
N
O
E
O
W
P
R
F
F
O
/
C H P

13
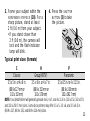
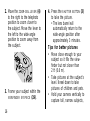
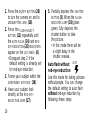
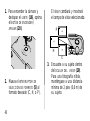
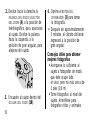
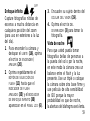
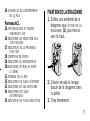
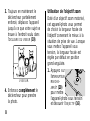
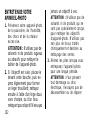
4. Press the
SHUTTER
BUTTON
(3) to take
the picture.
3. Frame your subject within the
VIEWFINDER
EYEPIECE
(19). For a
sharp picture, stand at least
2 ft (0.6 m) from your subject.
• If you stand closer than
2 ft (0.6 m), the camera will
lock and the flash-indicator
lamp will blink.
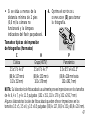
H
P
EXP
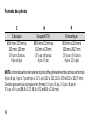
LEFT
C
CH P
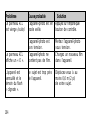
Classic Group (HDTV) Panoramic
3.5 x 5 in. or 4 x 6 in. 3.5 x 6 in. or 4 x 7 in. 3.5 x 8.5 in. to 4 x 11.5 in.
(88.9 x 127 mm or (88.9 x 152 mm or (88.9 x 216 mm to
102 x 152 mm) 102 x 178 mm) 102 x 292.7 mm)
NOTE: Your photofinisher will generally provide 4 x 6, 4 x 7, and 4 x 11.5 in. (102 x 152, 102 x 178,
and 102 x 292.7 mm) sizes. Some local printers may offer 3.5 x 5, 3.5 x 6, and 3.5 x 8.5 in.
(88.9 x 127, 88.9 x 152, and 88.9 x 216 mm) sizes.
Typical print sizes (formats)

14
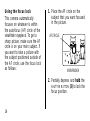
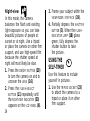
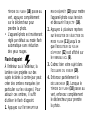
Using the focus lock
This camera automatically
focuses on whatever is within
the auto-focus (AF) circle of the
viewfinder eyepiece. To get a
sharp picture, make sure the AF
circle is on your main subject. If
you want to take a picture with
the subject positioned outside of
the AF circle, use the focus lock
as follows:
1. Place the AF circle on the
subject that you want focused
in the picture.
VIEWFINDER
AF CIRCLE
2. Partially depress and hold the
SHUTTER
BUTTON
(3) to lock the
focus position.

15
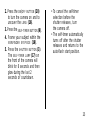
3. While still partially depressing
the shutter button, move the
camera until your subject is
where you want it within the
VIEWFINDER
EYEPIECE
(19).
Using the zoom lens
This camera has a motorized
zoom lens that lets you select
the ideal lens-focal length for
taking pictures. When you turn
the camera on, it is initially set
to the wide-angle position.
1. Press the
ON
/
OFF
BUTTON
(20)
to turn the camera on and to
uncover the
LENS
(16).
VIEWFINDER
4. Press the shutter button
completely down to take
the picture.
N
O
E
O
W
P
R
F
F
O
/

16
LEFT
EXP
H
C
P
2. Move the
ZOOM
-
DIAL
LEVER
(4)
to the right to the telephoto
position to zoom
closer
to
the subject. Move the lever to
the left to the wide-angle
position to zoom
away
from
the subject.
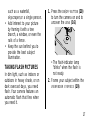
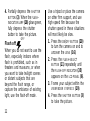
4. Press the
SHUTTER
BUTTON
(3)
to take the picture.
• The lens barrel will
automatically return to the
wide-angle position after
approximately 3 minutes.
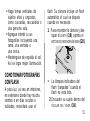
Tips for better pictures
• Move close enough to your
subject so it fills the view-
finder but not closer than
2 ft (0.6 m).
• Take pictures at the subject’s
level. Kneel down to take
pictures of children and pets.
• Hold your camera vertically to
capture tall, narrow subjects,
3. Frame your subject within the
VIEWFINDER
EYEPIECE
(19).

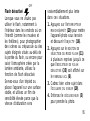
17
TAKING FLASH PICTURES
In dim light, such as indoors or
outdoors in heavy shade, or on
dark overcast days, you need
flash. Your camera features an
automatic flash that fires when
you need it.
such as a waterfall,
skyscraper,or a single person.
• Add interest to your picture
by framing it with a tree
branch, a window, or even the
rails of a fence.
• Keep the sun behind you to
provide the best subject
illumination.
1. Press the
ON
/
OFF
BUTTON
(20)
to turn the camera on and to
uncover the
LENS
(16).
• The flash-indicator lamp
“blinks” when the flash is
not ready.
2. Frame your subject within the
VIEWFINDER
EYEPIECE
(19).
N
O
E
O
W
P
R
F
F
O
/

18
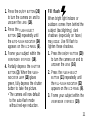
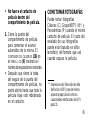
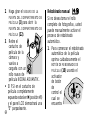
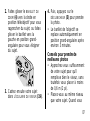
3. Partially depress the
SHUTTER
BUTTON
(3). When the
FLASH
-
INDICATOR
LAMP
(18) glows
green, fully depress the
shutter button to take
the picture.
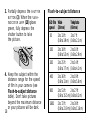
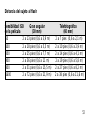
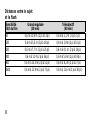
4. Keep the subject within the
distance range for the speed
of film in your camera (see
Flash-to-subject distance
table). Don’t take pictures
beyond the maximum distance
or your pictures will be dark.
EXP
LEFT
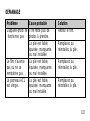
ISO film Wide Telephoto
speed (30 mm) (60 mm)
50 2 to 13 ft 2 to 7 ft
(0.6 to 3.9 m) (0.6 to 2.1 m)
100 2 to 18 ft 2 to 10 ft
(0.6 to 5.5 m) (0.6 to 2.9 m)
200 2 to 25 ft 2 to 14 ft
(0.6 to 7.7 m) (0.6 to 4.1 m)
400 2 to 36 ft 2 to 19 ft
(0.6 to 11 m) (0.6 to 5.8 m)
800 2 to 51 ft 2 to 27 ft
(0.6 to 15.5 m) (0.6 to 8.2 m)
1600 2 to 72 ft 2 to 38 ft
(0.6 to 21.9 m) (0.6 to 11.6 m)
Flash-to-subject distance

19
SET
SELECT
DATE
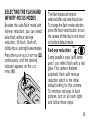
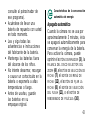
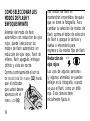
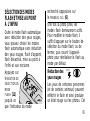
SELECTING THE FLASH AND
INFINITY-FOCUS MODES
Besides the auto-flash mode with
red-eye reduction, you can select
auto-flash without red-eye
reduction, fill-flash, flash-off,
infinity-focus, and night-view modes.
Press the
FLASH
-
SELECT
BUTTON
(11)
continuously until the desired
indicator appears on the
LCD
PANEL
(6).
The flash modes will remain
selected after you take the picture.
To change the flash-mode selection,
press the flash-select button, or turn
the camera off then back on to return
to the flash-default mode.
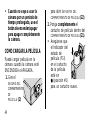
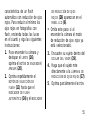
Red-eye reduction
Some people’s eyes (and some
pets’) can reflect flash with a red
glow. This camera features
automatic flash with red-eye
reduction which is the initial
default setting for this camera.
To minimize red eyes in flash
pictures, turn on all room lights
and follow these steps:
AUTO
Page is loading ...
Page is loading ...
Page is loading ...
Page is loading ...
Page is loading ...
Page is loading ...
Page is loading ...
Page is loading ...
Page is loading ...
Page is loading ...
Page is loading ...
Page is loading ...
Page is loading ...
Page is loading ...
Page is loading ...
Page is loading ...
Page is loading ...
Page is loading ...
Page is loading ...
Page is loading ...
Page is loading ...
Page is loading ...
Page is loading ...
Page is loading ...
Page is loading ...
Page is loading ...
Page is loading ...
Page is loading ...
Page is loading ...
Page is loading ...
Page is loading ...
Page is loading ...
Page is loading ...
Page is loading ...
Page is loading ...
Page is loading ...
Page is loading ...
Page is loading ...
Page is loading ...
Page is loading ...
Page is loading ...
Page is loading ...
Page is loading ...
Page is loading ...
Page is loading ...
Page is loading ...
Page is loading ...
Page is loading ...
Page is loading ...
Page is loading ...
Page is loading ...
Page is loading ...
Page is loading ...
Page is loading ...
Page is loading ...
Page is loading ...
Page is loading ...
Page is loading ...
Page is loading ...
Page is loading ...
Page is loading ...
Page is loading ...
Page is loading ...
Page is loading ...
Page is loading ...
Page is loading ...
Page is loading ...
Page is loading ...
Page is loading ...
Page is loading ...
Page is loading ...
Page is loading ...
Page is loading ...
Page is loading ...
Page is loading ...
Page is loading ...
Page is loading ...
Page is loading ...
Page is loading ...
Page is loading ...
Page is loading ...
Page is loading ...
Page is loading ...
Page is loading ...
Page is loading ...
Page is loading ...
Page is loading ...
-
 1
1
-
 2
2
-
 3
3
-
 4
4
-
 5
5
-
 6
6
-
 7
7
-
 8
8
-
 9
9
-
 10
10
-
 11
11
-
 12
12
-
 13
13
-
 14
14
-
 15
15
-
 16
16
-
 17
17
-
 18
18
-
 19
19
-
 20
20
-
 21
21
-
 22
22
-
 23
23
-
 24
24
-
 25
25
-
 26
26
-
 27
27
-
 28
28
-
 29
29
-
 30
30
-
 31
31
-
 32
32
-
 33
33
-
 34
34
-
 35
35
-
 36
36
-
 37
37
-
 38
38
-
 39
39
-
 40
40
-
 41
41
-
 42
42
-
 43
43
-
 44
44
-
 45
45
-
 46
46
-
 47
47
-
 48
48
-
 49
49
-
 50
50
-
 51
51
-
 52
52
-
 53
53
-
 54
54
-
 55
55
-
 56
56
-
 57
57
-
 58
58
-
 59
59
-
 60
60
-
 61
61
-
 62
62
-
 63
63
-
 64
64
-
 65
65
-
 66
66
-
 67
67
-
 68
68
-
 69
69
-
 70
70
-
 71
71
-
 72
72
-
 73
73
-
 74
74
-
 75
75
-
 76
76
-
 77
77
-
 78
78
-
 79
79
-
 80
80
-
 81
81
-
 82
82
-
 83
83
-
 84
84
-
 85
85
-
 86
86
-
 87
87
-
 88
88
-
 89
89
-
 90
90
-
 91
91
-
 92
92
-
 93
93
-
 94
94
-
 95
95
-
 96
96
-
 97
97
-
 98
98
-
 99
99
-
 100
100
-
 101
101
-
 102
102
-
 103
103
-
 104
104
-
 105
105
-
 106
106
-
 107
107
-
 108
108
-
 109
109
-
 110
110
-
 111
111


Kodak Advantix F600 User manual
- Category
- Film cameras
- Type
- User manual
- This manual is also suitable for
Ask a question and I''ll find the answer in the document
Finding information in a document is now easier with AI
in other languages
- français: Kodak Advantix F600 Manuel utilisateur
- español: Kodak Advantix F600 Manual de usuario
Related papers
Other documents
-
Polaroid 7500Zix User manual
-
-
-
Canon BF-9S User manual
-
Yashica Zoomate165EF Owner's manual
-
Concord Camera PZ1800 User manual
-
-
-
Contax Tvs III Owner's manual
-