Indesit NIS 41 V (EU) User guide

Category
Electric laundry dryers
Type
User guide
Contents
TUMBLE DRYER
Instruction booklet
Installation, 2
Product data, 3
Warnings, 4
Maintenance and Care, 6
Dryer description, 7
Start and programmes, 7
Laundry, 8
Troubleshooting- Service, 9
GB
English, 1
IT
Italiano, 10
FR
Français, 19
ES
Español, 28
PT
Português, 37
1
This symbol reminds you to read this
booklet.
! Keep this instruction booklet on hand in order to
refer to it when necessary. Take it with you when you
move, and should you sell this appliance or pass it
on to another party, make sure that this booklet is
supplied along with the dryer so that the new owner
may be informed about warnings and suggestions on
how the appliance works.
! Read these instructions carefully; the following
pages contain important information on installation
and suggestions on how the appliance works.
www.indesit.com
Installation
2
GB
Mobile venting
A vent tube must always be fitted when the dryer is
used in conjunction with Mobile Venting.
The tube must be fitted securely into the front of the
dryer. If possible, it is always best to connect the tube
to a permanent outlet close to the dryer. If permanent
installation is not possible, the dryer will work just as
well with the tube passing through a partly-opened
window.
! Ensure that the end of the tube is not directed toward
the air intake vent at the rear of the dryer.
! The vent tube should not exceed 2.4 metres in length
and should be kept free of any possible accumulation
of fluff, lint and water by shaking it out frequently.
Always ensure that the tube is not squashed.
Permanent venting
In conjunction with the vent tube we recommend using
a Wall/Window Vent Kit, available at a retail location or
the nearest Spare Parts Dealer.
Window mounting
1. The hole in the window should
ideally be made below the vent.
2. The tube should be
kept as short as possible.
Depending on how often you use your dryer, it is
essential that areas A and B are checked periodically
to remove lint or debris.
The vent tube adaptor must be fitted securely thus
preventing any humid air from being emitted back into
the room.
! The tube should be kept clear of the air intake vent
and kinks or ‘U’ bends must be avoided as these will
obstruct the tube or trap condensation.
Open window venting
The end of the tube should be
directed downwards, to prevent
warm moist air from condensing
in the room or in the dryer.
Wall hanging kit
This allows the dryer to be mounted on a wall of
suitable strength to take the weight. Alternatively it
should be used when the dryer is mounted on top of a
work surface to secure the dryer to the wall.
Where to put your dryer
Place your dryer at a distance from gas
ranges, stoves, heaters, or cook tops
because flames can damage the appliance.
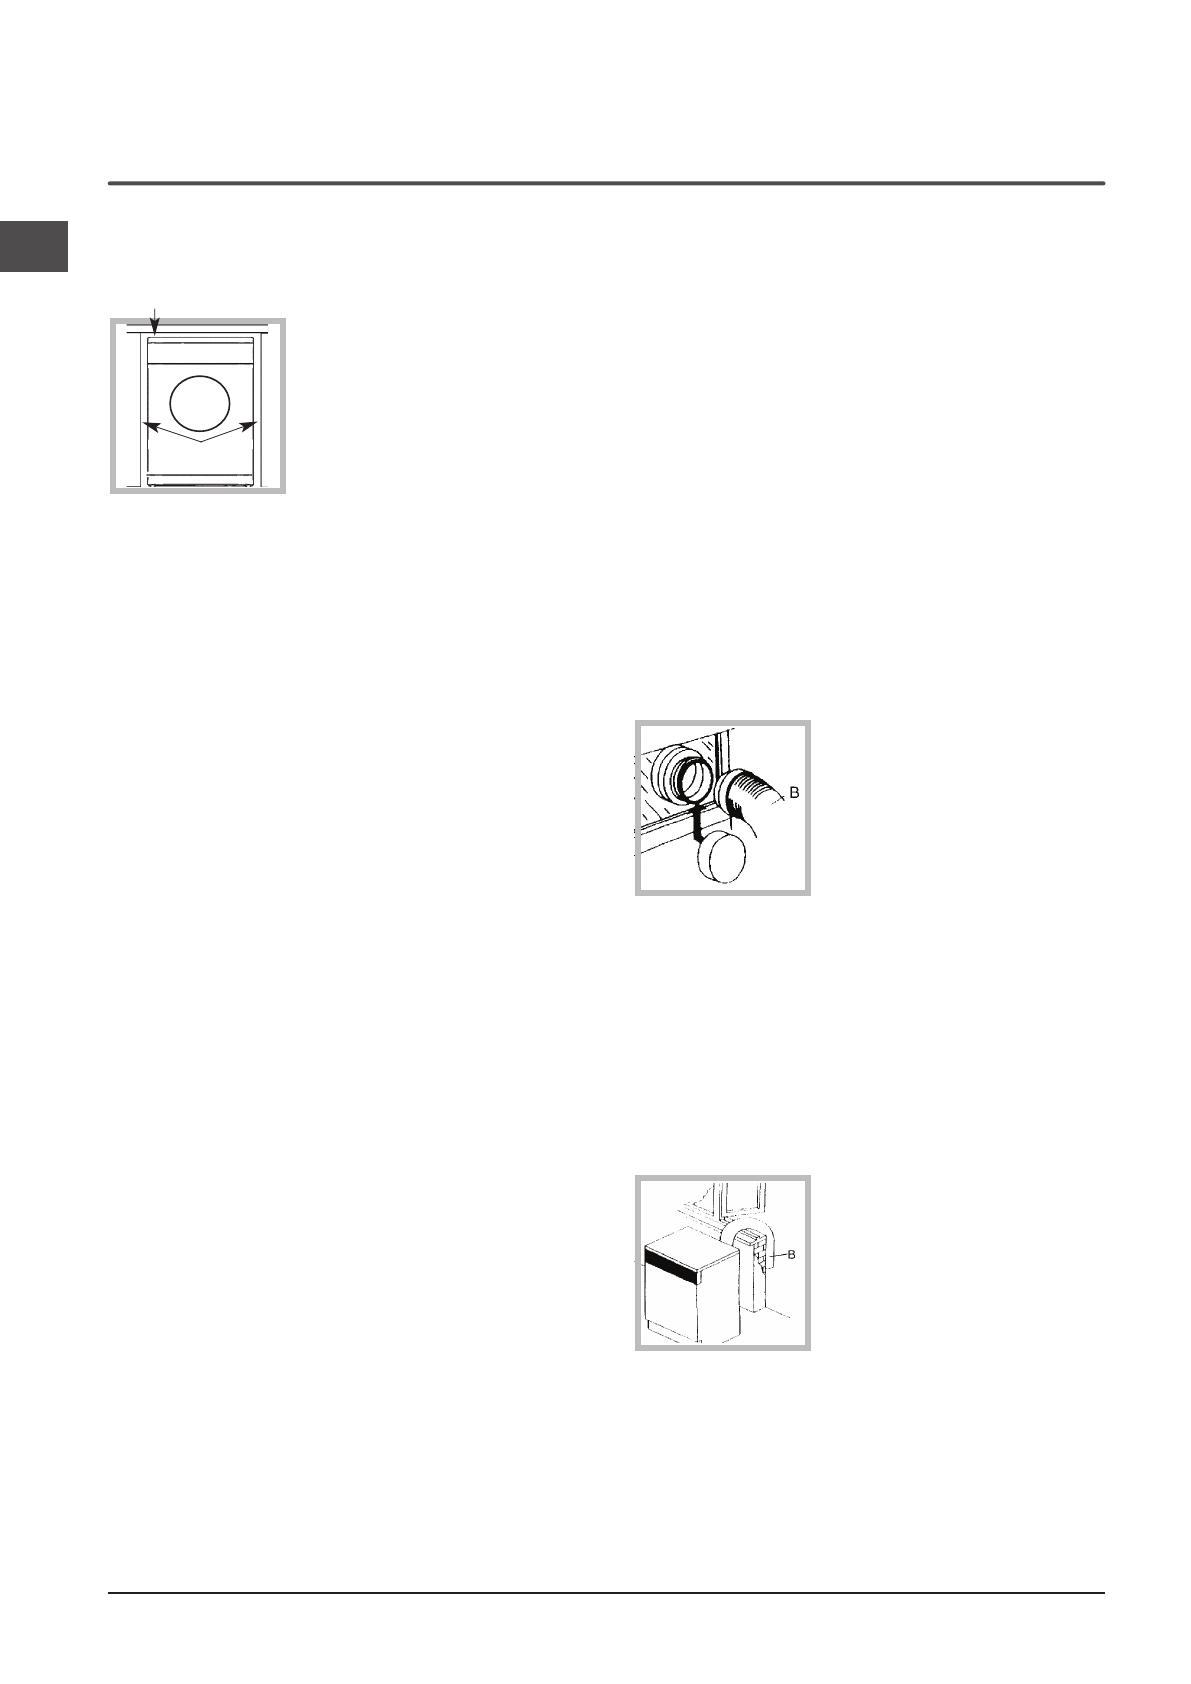
If you are going to install
the appliance under a work
counter, be sure to leave a
50mm space between the
top and any other objects
on or above the machine
and a 25mm space
between the sides and
lateral furnishings or walls.
This is to ensure proper air circulation. Make
sure that the back vents are not obstructed.
Make sure you put your dryer in an
environment that is not damp and has
proper air circulation throughout, the dryer
will not operate efficiently in an enclosed
space or cupboard.
! We do not recommend that the dryer is
installed in a cupboard but the dryer must
never be installed behind a lockable door,
a sliding door or a door with a hinge on the
opposite side to that of the dryer door.
! The appliance must be installed with the
rear surface placed against a wall.
Ventilation
The Dryer dries your laundry by drawing in cool, clean and
relatively dry air, heating it, and then distributing it through
the clothes as they are gently tumbled.
For optimum performance, the moist air is then blown out
through a vent tube.
When the dryer is in use, there has to be adequate
ventilation to avoid the back flow of gases into the room
from appliances burning other fuels, including open fires.
! Ensure that the dryer is adequately ventilated and that
the end of the vent tube is not directed towards the air
intake duct.
! The vent tube must always be fitted for optimum
performance.
! Make sure that the vent tube and air
intake vents are not
obstructed or blocked.
! The dryer must not recycle exhaust air.
! Misusing a tumble dryer may create a fire hazard.
! Do not discharge exhaust air into a flue which is used
for exhaust fumes from other appliances that burn gas or
other fuels.
! Do not discharge exhaust air into an extraction system or
any duct with an extractor fan. This will affect the way the
thermal controls operate and can result in a fire hazard.
! Do not allow clothes, towels etc., to hang down the front
of the dryer into the airstream. This obstructs the airflow
and may damage the dryer.
Minimum gap 50mm
Minimum gaps
25mm
GB
3
Installation
! The power cord should be regularly
checked. If the supply cord is damaged,
it must be replaced by the manufacturer,
its service agent or similarly qualified
persons in order to avoid a hazard. New or
longer power cords are supplied at an extra
charge by authorised dealers.
! The manufacturer denies any responsibility
should any of these rules not be followed.
! If in doubt about any of the above consult a
qualified electrician.
Before you start using your dryer
Once you have installed your dryer and before you
use it, clean the inside of the drum to remove any
dust that could have accumulated during transport.
Electrical connections
Make sure of the following before you
insert the plug into the the electrical socket:
Make sure your hands are dry.
The socket must have an earth connection.
The socket must be able to sustain the
machines maximum power, which is
indicated on the rating label (see Dryer
Description).
Power voltage must be within the values
indicated on the rating label (see Dryer
Description).
The socket must be compatible with the
dryers plug. Should this not be the case,
replace the plug or the socket.
! The dryer must not be installed outdoors,
even if the space is sheltered. It can be
very dangerous if it is exposed to rain or
storms.
! Once installed, the dryers electrical wire
and plug must be within easy reach.
! Do not use extension cords.
! The power cord must not be bent or
squashed.
Wring out items to eliminate excess water before tumble drying (if you use a washing machine first, select a
high spin cycle). Doing this will save time and energy during drying.
Always dry full loads - you save energy: single items or small loads take longer to dry.
Clean the filter after each use to contain energy consumption costs (see Maintenance).
Save energy and respect the environment
Maximum load: 4 kg
Power Consumption
O -mode (Po) - Watts 0.00
Left-on mode (Pl) - Watts 0.00
Programmes Kg kWh Minutes
Standard Cotton*
4 2.95 101
Standard Cotton
2 1.40 51
Synthetics 2 0.84 35
*This is the reference programme for the energy
label and suitable to dry normal wet cotton laundry.
This is the most e cient programme in terms of
energy consumption for drying wet cotton laundry.
4
GB
Check to see if the dryer is empty before
loading it.
The back of the dryer could
become very hot. Never touch it
while in use.
Do not use the dryer unless the filter is
securely in place (see Maintenance).
Do not overload the dryer (see Laundry
for maximum loads).
Do not load items that are dripping wet.
Carefully check all instructions on
clothing labels (see Laundry).
Do not tumble dry large, very bulky
items.
Do not tumble dry acrylic fibres at high
temperatures.
Do not turn off the dryer when there are
still warm items inside.
Clean the filter after each use (see
Maintenance).
Do not allow lint to collect around the
dryer.
Never climb on top of the dryer. It could
result in damage.
Always follow electrical standards and
requirements (see Installation).
Always buy original spare parts and
accessories (see Service).
! The appliance has been designed and
built according to international safety
standards.
These warnings are given for safety
reasons and must be followed carefully.
General safety
This appliance can be used by
children aged from 8 years and above
and persons with reduced physical,
sensory or mental capabilities, or lack of
knowledge if they are given supervision
or instruction concerning use of the
appliance in a safe way and understand
the hazards involved.
This tumble dryer has been designed
for home, and not professional use.
Do not touch the appliance while bare
foot or with wet hands or feet.
Unplug the machine by pulling on the
plug, not the cord.
After using the dryer, turn it off and
unplug it. Keep the door closed to make
sure that children do not use it as a toy.
Children should be supervised to ensure
that they do not play with the dryer.
Cleaning and user maintenance should
not be made by children without
supervision.
Children of less than 3 years should be
kept away from the appliance unless
continuously supervised.
The appliance must be installed
correctly and have proper ventilation.
The air intake vents behind the machine,
the outlet vents and the vent tube should
never be obstructed (see Installation).
Never direct the vent tube outlet towards
the air intake at the back of the machine.
Never allow the tumble dryer to recycle
exhaust air.
Never use the dryer on carpeting where
the pile height would prevent air from
entering the dryer from the base.
The
Warnings
GB
5
To minimise the risk of fire in your
tumble dryer, the following should be
observed:
Tumble dry items only if they have been
washed with detergent and water, rinsed
and been through the spin cycle. It is a
fire hazard to dry items that HAVE NOT
been washed with water.
Do not dry garments that have been
treated with chemical products.
Do not tumble dry items that have
been spotted or soaked with vegetable
or cooking oils, this constitutes a fire
hazard. Oil-affected items can ignite
spontaneously, especially when exposed
to heat sources such as a tumble dryer.
The items become warm, causing an
oxidisation reaction with the oil, Oxidisation
creates heat. If the heat cannot escape,
items can become hot enough to
catch fire. Piling, stacking or storing oil-
effected items can prevent heat from
escaping and so create a fire hazard. If
it is unavoidable that fabrics containing
vegetable or cooking oil or those that
have been contaminated with hair care
products be placed in a tumble dryer
they should first be washed with extra
detergent - this will reduce, but not
eliminate the hazard. They should not
be removed from the dryer and piled or
stacked while hot.
! WARNING: Never stop the dryer before the end of the drying cycle unless all items are
quickly removed and spread out so that the heat is dissipated.
or explosive substances. Highly
flammable substances commonly used
in domestic environments including
cooking oil, acetone, denatured alcohol,
kerosene, spot removers, turpentine,
waxes and wax removers. Ensure these
items have been washed in hot water
with an extra amount of detergent before
being dried in the tumble dryer.
Do not tumble dry items containing foam
rubber (also known as latex foam), or
similarly textured rubber like materials.
Foam rubber materials can, when heated,
produce fire by spontaneous combustion.
Fabric softener or similar products should
not be used in a tumble dryer to eliminate
the effects of static electricity unless the
practice is specifically recommended by
the manufacturer of the fabric softener
product.
Do not tumble dry undergarments that
contain metal reinforcements eg. bras
with metal reinforcing wires. Damage to
the tumble dryer can result if the metal
reinforcements come loose during drying.
Do not tumble dry rubber, plastic articles
such as shower caps or babies water
proof covers, polythene or paper.
Do not tumble dry rubber backed
articles, clothes fitted with foam rubber
pads, pillows, galoshes and rubber
coated tennis shoes.
Remove all objects from pockets, such as
lighters and matches.
Warnings
Do not tumble dry items that have
previously been cleaned in or washed
in, soaked in or soiled with petrol/
gasoline, dry cleaning solvents or other
flammable
6
GB
Maintenance and Care
Check the drum after each cycle
Turn the drum manually in order to remove small items
(handkerchiefs) that could have been left behind.
Cleaning the drum
! Do not use abrasives, steel wool or stainless steel
cleaning agents to clean the drum.
A coloured film may start to appear on the stainless
steel drum, this may be caused by a combination
of water and, or cleaning agents such as fabric
conditioner from the wash. This coloured film will not
affect the dryer performance.
Cleaning
External parts in metal or plastic and rubber parts
can be cleaned with a damp cloth.
Periodically check the vent tube and any
permanent venting fixture to make sure that there
has been no accumulation of fluff or lint, and
remove it.
Remove lint that collects around the filter and the
outlet vents.
! Do not use solvents or abrasives.
! Have your dryer checked regularly by authorised
technicians to ensure electrical and mechanical safety
(see Service).
Switching off the electricity
Unplug your dryer when not using it, when
cleaning it and during all maintenance
operations.
Clean the filter after each cycle
The filter is an important part of your dryer:
it accumulates lint and fluff that is formed
while drying.
When finished drying,
clean the filter by
rinsing it under
running water or with
your vacuum cleaner.
Should the filter
become clogged up,
the airflow inside the
dryer will be seriously
compromised: drying
times lengthen and you will consume more
energy. It may also
damage your dryer.
The filter is found in
the door trim (see
diagram).
Removing the filter:
1. Pull the plastic grip
of the filter upwards
(see diagram).
2. Clean the lint from
the inside surface of
the filter.
3.Replace the filter
correctly. Ensure the
filter is fully located
flush into the door
trim.
4. Remove any lint that has built up on the
inside of the door and around the door seal.
! Do not use the dryer without replacing the
filter.
7
GB
machine stops. When the door is closed, press the
start button and the dryer will restart but you will not
need to reset the timer control. You can however reset
the Timer Control at any stage should you wish.
The TIMER knob sets the drying time: rotate it
clockwise, never counter-clockwise, until the
indicator is pointing to the drying time you want to
select (see Start and Programmes).
To turn Off the dryer: turn this knob until the ‘0’ is in
line with the indicator.
Heat selection
Select the relevant heat setting :
To select high heat
the Heat Selection button
must be IN
To select Low heat the Heat Selection button
must be OUT
The choice of HIGH HEAT or LOW HEAT depends
upon the fabric you wish to dry (see Laundry).
Door release
To open door, grip handle and pull towards you.
If the door is opened while the dryer is in use, the
drying programme cuts out automatically and the
6. Press the start switch.
7. About 10 minutes before the programme is
completed, the heating elements will be switched
off, and the programme enters the final ‘Cool
Tumble’ phase. During this phase, the fabric is
cooled. You should always allow the dryer to
complete this phase. If you open the door you
must press the start switch to resume drying.
8. Open the door, take the laundry out, clean the filter
and replace it (see Maintenance).
9. Unplug the dryer.
Choosing a programme
1. Plug the dryer into the electrical socket.
2. Sort your laundry according to fabric type (see
Laundry).
3. Open the door and make sure the filter is clean
and in place (see Maintenance).
4. Load the machine and make sure items are not in
the way of the door seal. Close the door.
5. Choose a drying time by checking the Drying Times
guide (see Laundry).
- Select the required temperature
with the heat
button.
- Select a drying time by rotating the TIMER knob
clockwise.
Dryer Description
Start and Programmes
The features
Heat switch
Start
Filter assembly
(on inside of the door)
Timer knob
Door release
8
GB
Laundry
Sorting your laundry
Check symbols on clothing labels to make sure
that the articles can be tumble dried.
Sort laundry by fabric type.
Empty pockets and check buttons.
Close zippers and hooks and tie loose belts and
strings.
Wring out each item in order to eliminate as much
excess water as possible.
! Do not load dripping wet clothes into the dryer.
Maximum load size
Do not load more than maximum capacity.
These numbers refer to dry weight:
Natural fibres: 4kg max (9lb)
Synthetic fibres: 2kg max (4.4lb)
! DO NOT overload the dryer as this could result in
reduced drying performance.
Wash Care Labels
Look at the labels on your garments, especially when
tumble drying for the first time. The following symbols
are the most common:
May be tumble dried
Do not tumble dry
Tumble dry at high heat setting
Tumble dry at low heat setting
Drying times
The table (see below) presents APPROXIMATE drying
times in Minutes. Weights refer to dry garments.
Times are approximate and can vary depending upon:
Amount of water retained in clothes after spin
cycle: towels and delicates retain a lot of water.
Fabrics: items that are the same type of fabric
but different textures and thicknesses may not
have the same drying time.
Quantity of laundry: single items or small loads
may take longer to
dry.
Dryness: If you are going to iron some of your
clothes, they can be taken out while still a bit
damp. Others can be left longer if you need them
to be completely dry.
Heat setting.
Room temperature: if the room where the dryer is
located is cold, it will take longer for the dryer to
dry your clothes.
Bulk: some bulky items can be tumble dried with
care. We suggest that you remove these items
several times, shake them out, and return them to
the dryer until finished.
! Do not over-dry your clothes.
All fabrics contain a little natural moisture, which
keeps them soft and fluffy.
Cottons
(Standard Cotton)
Synthetics
(Synthetics)
Acrylics
(Acrylics)
Drying times 800 -1000 rpm in washing machine.
High Heat
1 kg 2 kg 4 kg
3 kg
30 - 40 40 - 55 85 - 120
60 - 70
Drying times on reduced spin in washing machine.
High Heat
1 kg 2 kg
20 - 30 30 - 45
Drying times on reduced spin in washing machine.
Low Heat
1 kg 2 kg
30 - 50 50 - 70
Note: At the end of a drying cycle, cottons could still be damp if you grouped cottons and synthetics together.
If this is the case, simply give the damp cotton items an additional short period of drying.
9
GB
Troubleshooting
Service
The dryer was overloaded (see Laundry).
Before calling the Service Centre:
Use the troubleshooting guide to see if you can
solve the problem yourself (see Troubleshooting).
If not, turn off the dryer and call the Service Centre
closest to you.
What to tell the Service Centre:
name, address and post code.
telephone number.
the type of problem.
the date of purchase.
the appliance model (Mod.).
the serial number (S/N).
This information can be found on the data label inside
the door of the machine.
Spare Parts
This dryer is a complex machine. Repairing it yourself
or having a non-authorised person try to repair it could
cause harm to one or more persons, could damage the
machine and could invalidate the spare parts warranty.
Call an authorised technician if you experience
problems while using the machine.
Recycling and Disposal Information
As part of our continued commitment to
helping the environment, we reserve the right to
use quality recycled components to keep down
customer costs and minimise material wastage.
Disposing of the packaging material: follow local
regulations, so the packaging can be recycled.
To minimise risk of injury to children, remove
the door and plug - then cut off mains cable,
flush with the appliance. Dispose of these parts
separately to ensure that the appliance can no
longer be plugged into a mains socket.
Disposal of old electrical appliances
The European Directive 2012/19/EC on Waste Electrical
and Electronic Equipment (WEEE), requires that old
household electrical appliances must not be disposed
of in the normal unsorted municipal waste stream. Old
appliances must be collected separately in order to
optimise the recovery and recycling of the materials
they contain and reduce the impact on human health
and the environment.
The crossed out “wheeled bin” symbol on the
product reminds you of your obligation, that
when you dispose of the appliance it must be
separately collected.
Consumers should contact their local authority or
retailer for information concerning the correct disposal
of their old appliance.
This appliance has been designed, constructed and distributed in compliance with the
requirements of European Directives:
- LVD 2014/35/EU, EMC 2014/30/EU and RoHS 2011/65/EU.
One day your dryer seems not to be working. Before you call your Service Centre (see Service), go
through the following troubleshooting suggestions:
Problem:
The tumble dryer won’t start.
Its taking a long time to dry.
Possible causes / Solution:
The plug is not plugged into the socket, or not making contact.
There has been a power failure.
The fuse has blown. Try to plug another appliance into the socket.
You are using an extension cord? Try to plug the dryer’s power cord directly into
the socket.
The TIMER knob has not been set properly (see Start and Programmes).
The filter has not been cleaned (see Maintenance).
The temperature setting is not ideal for the type of fabric you are drying (see
Start and Programmes, and see Laundry).
The correct drying time has not been selected for the load (see Laundry).
The flexible vent tube is obstructed (see Installation).
The air intake at the rear of the dryer is obstructed (see Installation).
The permanent ventilation flap on the storm cover is obstructed (see Installation).
The items were too wet (see Laundry).
The Start button has not been pressed (see Start and Programmes).
  • Page 1 1
  • Page 2 2
  • Page 3 3
  • Page 4 4
  • Page 5 5
  • Page 6 6
  • Page 7 7
  • Page 8 8
  • Page 9 9
  • Page 10 10
  • Page 11 11
  • Page 12 12
  • Page 13 13
  • Page 14 14
  • Page 15 15
  • Page 16 16
  • Page 17 17
  • Page 18 18
  • Page 19 19
  • Page 20 20
  • Page 21 21
  • Page 22 22
  • Page 23 23
  • Page 24 24
  • Page 25 25
  • Page 26 26
  • Page 27 27
  • Page 28 28
  • Page 29 29
  • Page 30 30
  • Page 31 31
  • Page 32 32
  • Page 33 33
  • Page 34 34
  • Page 35 35
  • Page 36 36
  • Page 37 37
  • Page 38 38
  • Page 39 39
  • Page 40 40
  • Page 41 41
  • Page 42 42
  • Page 43 43
  • Page 44 44
  • Page 45 45
  • Page 46 46
  • Page 47 47
  • Page 48 48

Indesit NIS 41 V (EU) User guide

Category
Electric laundry dryers
Type
User guide

Ask a question and I''ll find the answer in the document

Finding information in a document is now easier with AI