
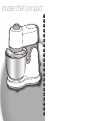
masterchef compact
EN
NL
ES
HU
CS
SK
BG
BS
HR
RO
SR
SL
ET
LV
LT
PL
NO
DA
SV
FI
TR
Page is loading ...
Page is loading ...

2
•For your own safety, use only accessories and spare parts
designed for your appliance and sold in an approved service
centre.
•Always remove the blender jug (d) before pressing the multi-
function head (a4) release button (a3).
•Switch off the appliance and unplug it from the mains power
supply before changing the accessories or touching the parts
which move during operation.
•Do not touch the mixer accessories nor the knives when the
appliance is running.
•Do not allow long hair, scarves, ties etc. to dangle over the
appliance during operation.
•Never insert utensils (spoon, spatula, etc.) through the
opening in the lid (d2), into the bowl (b1) or into the feed
tube of the drum body (e2).
•Blades are very sharp: to prevent injuries, handle them with
care when emptying the blender jug or the mini mincer,
assembling and dismantling the slicer drum A (e5), the mini
mincer and the mincer head (depending on model), and when
cleaning all those accessories.
•Do not use this appliance to blend or mix non-food items.
•Do not pour boiling liquids (over 80°C/176°F) in the bowls (b1
and d1 depending on model).
•Always pour the liquid ingredients into the blender jug
first,before adding the solid ingredients.
•In order to prevent overflow, do not fill the bowl or jug over
the maximum level (if indicated).
•Never place your fingers or any other object in the blender jug
when the appliance is running.
•Never remove the lid or the blender jug before the appliance
has come to a complete stop.
•Read the instructions for use carefully before using your
appliance for the first time and retain them for future
reference: the manufacturer shall accept no liability in the
event of any use that does not comply with the instructions.
•This appliance is not designed to be used by persons (including
children) with reduced physical, sensorial or mental capacities,
or by people with no prior knowledge or experience, except
where they have benefited from supervision or previous
instructions relating to the use of the appliance, from a person
responsible for their safety. Children must be supervised to
ensure that they do not play with the appliance.
•This product has been designed for indoor and domestic use
only, and at an altitude below 2000 m.
•Do not use the appliance if it is not working properly or if it
has been damaged. Contact an authorised service centre (see
list in the service booklet).
•Any maintenance other than routine cleaning and upkeep by
customers must be carried out by an approved service centre
(see list in the service booklet).
•Always disconnect the appliance from the supply if it is left
unattended and before assembling, disassembling or cleaning.
•Remember: you may injure yourself if you use the appliance
incorrectly.
•Be careful if hot liquid is poured into the food processor or
blender as it can be ejected out of the appliance due to a
sudden steaming.
•Do not place the appliance, the supply cable or the plug in
water or any other liquid.
•Do not place the accessories in a microwave oven.
SAFETY INSTRUCTIONS
EN
1
EN

4
Children shall not play with the appliance.
•This appliance may be used by persons with reduced physical,
sensory or mental capabilities, or whose experience or
knowledge is not sufficient, provided they are supervised or
have received instruction to use the device safely and
understand the dangers.
•The whisk (c3) and graters (e6,e7,e8,e9) (depending on model)
can be used by children aged from 8 years and above if they
have been given supervision or instruction concerning use of
the appliance in a safe way and if they understand the hazards
involved. Cleaning and user maintenance shall not be made by
children unless they are aged from 8 years and above and
supervised. Keep the appliance and its cord out of reach of
children aged less than 8 years.
On connection to power supply:
•Check that the power rating of your appliance corresponds to
your electrical supply. Any incorrect connection invalidates
the guarantee.
•Never pull the power cord to disconnect the appliance.
•The appliance must be unplugged when no longer in use, during
cleaning or in the event of a power cut.
•The power cord must be kept out of the reach of children and
must not be placed near or come into contact with the hot
parts of the appliance, sources of heat or sharp corners.
•If the power cable or the plug are damaged, do not use the
appliance. To maintain safety, these parts must be replaced by
an approved service centre (see list in the service booklet).
EN
3
•Always use the pusher (e3) with the vegetable slicer accessory
(e) and the mincer head (depending on model)to guide food
into the feed tube.
Never use your fingers, a fork, a spoon, a knife or any other
object.
•Do not operate the blender jug (d) without the lid (d2),
without ingredients or with dry products only.
•Use only one accessory at a time.
•Do not use the bowls (b1, d1) as containers for freezing,
cooking or sterilisation.
•It is not intended to be used in the following applications, and
the guarantee will not apply for:
- staff kitchen areas in shops, offices and otherworking
environments;
- farm houses;
- by clients in hotels, motels and other residentialtype
environments;
- bed and breakfast type environments.
•Refer to the instructions to obtain the operating time and
speed settings for each accessory.
•Refer to the instructions for correct fitting and assembly of
your accessories.
•Refer to the instructions for initial and regular cleaning of
surfaces in contact with foodstuff, and for cleaning and
maintenance of your appliance.
EUROPEAN MARKETS ONLY
•With all accessories (depending on model) except whisk (c3)
and graters (e6,e7,e8,e9): this appliance shall not be used by
children. Keep the appliance and its cord out of reach of
children.
EN

6
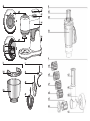
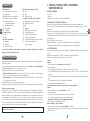
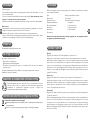
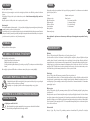
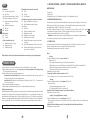
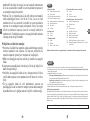
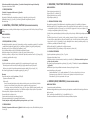
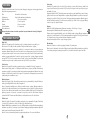
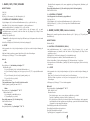
DESCRIPTION
a - Motor unit
a1 Speed selector
a2 Low-speed outlet
a2.1 Mixer accessories outlet
a2.2 Vegetable slicer outlet
a3 Multi-function head release button
a4 Multi-function head
a5 High-speed outlet
a6 Cover for outlet a5
b - Bowl assembly
b1 Bowl
b2 Lid
c - Mixer accessories
c1 Kneader
c2 Mixer
c3 Balloon whisk
d - Blender jug (depending on model)
d1 Jug
d2 Lid
d3 Measuring cap
e - Vegetable slicer (depending on model)
e1 Vegetable slicer attachment
e2 Drum body
e2.1 Shaft
e3 Pusher
e4 Drum retaining collar
e5 Slicer drum A
e6 Coarse grater drum C
e7 Fine grater drum D
e8 Parmesan drum E (depending on model)
e9 Potato shredder R
(for potato fritters - depending on model)
FIRST USE
•Before using for the first time, wash all accessory parts in soapy water. Rinse and dry.
•Place the appliance on a flat, clean and dry surface. Make sure that the speed selector (a1) is in
"0" position and plug in your appliance.
• You have several options for starting your appliance:
- Intermittent operation (pulse): turn the speed selector (a1) to the "pulse" position. Using a
succession of pulses can give you better control when preparing certain foods.
- Continuous operation: turn the speed selector (a1) to the desired position from "1" to "4"
depending on the food you are preparing.
•You can change the speed required during preparation.
•To stop the appliance, turn the selector (a1) to "0" and then unplug your appliance.
Overloading protection:
Your kitchen appliance is equipped with a microprocessor that controls and analyses the power when
operating. If your appliance is overloaded, it will adapt by reducing its speed or switching off by
itself. If it switches off, set the speed selection button (a1) to position "0", unplug your appliance,
and remove some of the ingredients. Allow your appliance to rest for a few minutes. You can then
plug in and restart your appliance by turning the speed selection button (a1) to the speed required
for the recipe.
The accessories contained in the model you have bought are represented on the label located
on the top of the packaging.
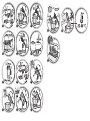
The paragraph numbering corresponds to the numbers in the diagrams.
EN
5
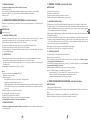
1 - MIXING/KNEADING/BEATING/EMULSIFYING/WHISKING
ACCESSORIES USED:
- Bowl (b1)
- Lid (b2)
- Kneader (c1) or mixer (c2) or balloon whisk (c3)
1.1 ASSEMBLING THE BOWL ACCESSORIES (DIAGRAMS 1):
•Press the button (a3) to release the multi-function head (a4) and raise it until it locks in place.
•Lock the bowl (b1) (anti-clockwise) on the appliance and put in the ingredients.
•Insert the desired accessory (c) into the outlet (a2.1), until it is clipped in place.
•Place the multi-function head (a4) to the horizontal position: press the button (a3) and manually lower
the multi-function head (a4) until it locks (the button (a3) returns to its initial position).
•Slide the lid (b2) over the bowl (b1).
Please note: it is not necessary to use the lid. It limits the risk of splashing.
•Make sure that the cover (a6) is correctly in place on the high-speed outlet (a5).
1.2 USAGE:
•Start by turning the selector (a1) to the desired speed according to the recipe.
•You can add food through the hole in the lid (b2) during preparation.
•To stop the appliance, turn the selector (a1) to "0".
Tips:
- Kneading
- Use the kneader (c1) at speed "1" only.
You can knead up to:
- 500 g strong bread flour for bread dough (e.g. white bread, whole-grain bread, etc.)
- 400 g flour for speciality types of bread (French flour above type T55, rye bread, whoelmeal bread, ...)
- 250 g flour for enriched yeast dough and pastry dough (brioche, kouglof, pizza dough, shortcrust pastry,
etc.)
- 750 g flour for milk bread (see basic recipe in recipe section)
- Maximum operating time: 13 min.
For the best results, follow the instructions in figure 4.
Liquid for yeast dough and bread dough should be at 25-30 C.
- Mixing
- Use the mixer (c2) at speed "1" to "4".
You can mix up to:
- 1 kg of sponge cake mixture, choux pastry, etc.
- 2.7 kg of mixture vanilla sponge slab cake (see basic recipe in recipe section).
- Never use the mixer (c2) to knead heavy dough.
- Maximum operating time: 13 min.
- Beating / emulsifying / whisking
- Use the balloon whisk (c3) at speed "1" to "4".
You can prepare: mayonnaise, aioli, sauces, beaten egg whites (up to 8 egg whites), chantilly cream or
whipped cream (up to 500 ml), etc.
- Never use the balloon whisk (c3) to knead heavy dough or mix light cake mixture.
- Maximum operating time: 10 min.
1.3 - DISMANTLING THE ACCESSORIES:
EN

87
•Wait for the appliance to come to a complete stop and unplug it.
•Remove the lid (b2).
•Using the button (a3), release the multi-function head (a4) and raise it to the upper position.
•Pull the accessory (c1), (c2) or (c3) to remove it from the multi-function head.
•Remove the bowl.
2 - BLENDING/MIXING (DEPENDING ON MODEL)
Depending on the nature of the food, you can use the blender (d) to prepare up to 1 L of thick mixtures
and 0.75 L of liquid mixtures.
ACCESSORIES USED:
- Blender jug (d)
2.1 - ASSEMBLING THE BLENDER JUG ACCESSORIES (DIAGRAMS 2):
•Place the multi-function head (a4) in the horizontal position: press the button (a3) and manually lower
the multi-function head (a4) until it locks (the button (a3) returns to its initial position).
•Pull the cover (a6) upwards to remove it from the high-speed outlet (a5).
•Make sure that the appliance is switched off before fitting the blender jug (d).
•Fit the blender jug (d) on the high-speed outlet (a5). Four positions are possible.
•Place the food in the blender jug, and lock the lid (d2) fitted with the measuring cap (d3), by rotating
it clockwise.
2.2 - USAGE
•Start by turning the selector (a1) to the desired speed according to the recipe.
Use the "Pulse" position for better mixing control and for a better blending of your preparation.
You can add food after removing the measuring cap (d3) from the lid (d2) during preparation.
•To stop the appliance, turn the selector (a1) to "0".
Tips:
- Use the blender jug (d)
at speed "3" to "4".
Maximum operating time: 3 min.
You can prepare:
- finely blended soups, sauces, stewed fruit, milkshakes and cocktails.
- liquid batter (pancake, fritters, clafoutis and custard flans).
- If ingredients stick to the sides of the jug when mixing, stop the appliance. Remove the blender jug,
and push the food down onto the blades using a spatula and put your blender jug back to continue
your preparation.
- Never fill the blender jug with boiling liquid.
- Never run the blender empty.
- Always use the blender jug with its lid.
- Never remove the lid before the blades have stopped completely.
-
Always pour liquid ingredients into the blender jug first before adding solid ingredients.
2.3 - DISMANTLING THE ACCESSORY
•Wait for the appliance to come to a complete stop and unplug it. Remove the blender jug. Put back the
cover (a6) on the outlet (a5).
3 - GRATING/SLICING (DEPENDING ON MODEL)
ACCESSORIES USED:
- Vegetable slicer attachment (e1)
- Drum body (e2) + pusher (e3)
- Drums (depending on model)
- Drum retaining collar (e4)
3.1 - ASSEMBLING THE ACCESSORIES (DIAGRAMS 3)
•Press the button (a3) to release the multi-function head (a4) and raise it until it locks in place.
•Fit the attachment (e1) under the multi-function head (a4): align the left-hand mark on the attachment
(e1) with the mark on the multi-function head (a4), and turn until the right-hand mark on the attachment
(e1) is aligned with that of the multi-function head (a4).
•Insert the chosen drum into the body, and make sure that it is fully engaged in the body. Fit the drum
retaining collar (e4).
•Facing the attachment (e) outlet, insert the drum body (e2) inclined to the right, aligning the two
bayonets in the drum body with the two notches in the attachment. Push it home. If you find it difficult
to fit it, slightly turn the shaft (e2.1) of the drum body and push it again. Turn the drum body anti-
clockwise until it latches with the feed tube in the vertical position.
•Lock the bowl (b1) (anti-clockwise) on the appliance.
•Make sure that the cover (a6) is correctly in place on the high-speed outlet (a5).
3.2 - USAGE AND TIPS:
•Run the appliance by turning the selector (a1) to speed "3".
•Maximum operating time: 10 min.
•Place the food in the feed tube on the body and press down with the pusher (e3).
Never push the
ingredients with your fingers or any other utensil.
•To stop the appliance, turn the selector (a1) to "0". Wait for the appliance to come to a complete stop
and unplug it.
•Unlock the drum body in the reverse order of the assembly.
•With the cones, you can prepare up to 2 kg of:
- Grate coarsely C (e6) / grate finely D (e7): carrots, celery, potatoes, cheeses, etc.
- Slice thickly A (e5): potatoes, carrots, cucumbers, apples, beetroot, etc.
- Parmesan E (e8): potatoes, parmesan, etc.
- Potato shredder R (e9): potatoes.
Maximum quantity: 2 kg.
4 - CHOPPING SMALL QUANTITIES (DEPENDING ON MODEL)
ACCESSORY USED:
- Assembled mini-mincer.
With the mini-mincer, you can chop in few seconds by pulsing: dried figs, dried apricots, etc.
Quantity / max time: model QA100: 50g / 8 sec, model QA200: 90g / 8 sec.
The mini-mincer is not designed for hard products like coffee.
EN EN

109
Think of the environment first!
Your appliance contains valuable materials which can be recovered or recycled.
Leave it at a local civic waste collection point.
STORAGE
Do not store your appliance in a humid environment.
WHAT TO DO IF YOUR APPLIANCE DOES NOT WORK
If your appliance does not work, check:
- that it is plugged in correctly.
- that the accessories are correctly locked.
- The position of the speed selector (a1): turn it to position "0" and then select the desired speed
again.
Your appliance still does not work? Contact an approved service centre (see list in service booklet).
DISPOSAL OF PACKAGING AND THE APPLIANCE
The packaging is comprised exclusively of materials that present no danger for the
environment and which may therefore be disposed of in accordance with the recycling
measures in force in your area.
For disposing of the appliance itself, please contact the appropriate service of your local
authority.
END-OF-LIFE ELECTRICAL OR ELECTRONIC PRODUCTS
CLEANING
•Unplug the appliance.
•Never immerse the motor unit (a) in water or put it under running water. Wipe it with a dry or
slightly damp cloth.
•For easier cleaning, rinse the accessories quickly after use. Handle the blades with care to prevent
injury.
•Wash, rinse and dry the accessories: they are all dishwasher-safe.
Tip:
- In the event any of your accessories are coloured by food (carrots, oranges, etc.), rub with a cloth
dipped in cooking oil and then clean them as usual.
- Blender jug (d): pour some hot water containing a few drops of washing up liquid into the blender
jug. Close the lid. Place it on the appliance and pulse a few times. After removing it, rinse the bowl
in running water and allow to dry (bowl upside down).
ACCESSORIES
You can customise your appliance and obtain the following accessories from your usual retailer or an
authorised service centre:
BASIC RECIPES
White bread
Ingredients: 350 g flour (type 55), 210 ml warm water, 5 g dried baker's yeast, 5 g salt.
Put the salt, flour and baker's yeast in the bowl. Fit the kneader and the lid. Run for a few seconds
at speed 1, and add water with the appliance running. Knead for about 8 minutes on speed 1. Allow
the dough to rest at room temperature for around half an hour. Then work the dough by hand into a
ball. Place the ball of dough on a buttered, floured baking sheet. Allow to rise for about an hour.
Preheat the oven to 240°C. Make cuts on the top of the loaf with a sharp blade, and brush with
lukewarm water. Put a small container full of water into the oven as this helps the bread to form a
golden crust. Bake for 30 minutes.
For the UK only: Use 350 g strong white bread flour - 1½ tsp Easy Bake or Fast Action dried yeast –
¾ tsp salt – ½ tsp sugar – 2 tsp vegetable oil – 210 ml lukewarm water.
Make the dough as the recipe directs but there is no need to rest the dough for half an hour with UK
dried yeast. Shape the dough as directed and leave to prove until doubled in size (for about 45 min
to 1 hour). Bake in a preheated oven at 230°c for 15 minutes and then reduce to 190°C and bake for
a further 15 minutes.
Butter shortcrust pastry
Ingredients: 200 g flour (plain), 100 g softened butter cut into pieces, 50 ml cold water, 1 pinch of
salt.
Put the flour, butter and salt in the bowl. Fit the kneader and the lid. Run for a few seconds at speed
1, and add water with the appliance running. Continue to knead until the pastry forms a ball. Remove
from the bowl, cover it in cling film and allow the pastry to rest in a cool place or refrigerator for
about half an hour before rolling out and cooking.
Note: Do not substitute butter with margarine or lard.
Milk bread buns
These sweet buns have a light, airy texture similar to brioche.
Ingredients: 500 g flour, 1 egg, 80 g softened butter cut into pieces, 80 g sugar, 250 ml warm milk, 5
g dried baker's yeast, 1 pinch of salt.
Put all the ingredients in the bowl. Fit the kneader and the lid. Run the appliance at speed 1 for
about 8 minutes. Allow the dough to rest at room temperature for about 1 hour and then work the
dough by hand. Cut the dough into small pieces and form them into buns. Place them on a baking
Note: you can purchase an accessory only when you present your instruction leaflet or your
appliance.
Bowl
Bowl lid
Kneader
Mixer blade
Balloon whisk
Blender jug
Mini-mincer
Mincer head
Vegetable slicer attachment
Vegetable slicer:
- A: slicing
- C: coarse grating
- D: fine grating
- E: parmesan
- R: Potato shredder
EN EN

12
•Lees de gebruiksaanwijzing zorgvuldig door voordat u het
apparaat in gebruik neemt: bij een verkeerd gebruik vervalt
elke aansprakelijkheid van de fabrikant.
•Dit apparaat is niet bedoeld om zonder hulp en/of toezicht
gebruikt te worden door kinderen of andere personen indien
hun fysieke, zintuiglijke of mentale vermogen hen niet in staat
stellen dit apparaat op een veilige wijze te gebruiken.
Er moet toezicht zijn op kinderen zodat zij niet met het
apparaat kunnen spelen.
•Uw apparaat is uitsluitend bedoeld voor huishoudelijk gebruik
binnenshuis en op een hoogte van minder dan 2000 m.
•Maak geen gebruik van het apparaat als het niet goed werkt of
als het beschadigd is. Richt u in dit geval tot een erkend
servicecentrum (zie lijst in het serviceboekje).
•Met uitzondering van de gebruikelijke reinigings- en
onderhoudswerkzaamheden die de klant zelf kan uitvoeren,
dienen alle werkzaamheden door een erkend centrum te worden
uitgevoerd (zie lijst in het serviceboekje).
•Trek altijd de stekker van het apparaat uit het stopcontact
wanneer u het onbewaakt achterlaat en voordat u het
monteert, demonteert of reinigt.
•Wees voorzichtig om het risico op verwondingen bij foutief
gebruik van het apparaat te voorkomen.
•Verhit de accessoires niet in de magnetron of oven.
•Gebruik voor uw eigen veiligheid uitsluitend de voor uw
apparaat geschikte accessoires en onderdelen, verkocht in een
erkend servicecentrum.
•Verwijder altijd de mixkom (d) voor u de ontgrendelingsknop
(a3) van de multifunctionele kop (a4) activeert.
VEILIGHEIDSVOORSCHRIFTEN
11
sheet lined with parchment paper and allow to rise for about 30 to 40 minutes. Preheat the oven to
200°C. Brush the buns with egg yolk mixed with a little milk and sugar. Bake for about 15 to 20
minutes. Note: Do not substitute butter with margarine or lard.
For UK only: Use 500 strong white bread flour, 80 g softened butter, 80 caster sugar, 250 ml lukewarm
milk, 2 tsp Easybake or Fast Action dried yeast, 1 pinch of salt, 1 egg beaten with 1 tsp water, for
glaze.
Make the dough as the recipe directs but there is no need to rest the dough for 1 hour. Shape the
dough as directed and leave to prove until doubled in size (for about 45 min to 1 hour). Bake as
directed above.
Vanilla Sponge Slab Cake
Ingredients: 2 eggs, 125 g caster sugar, 125 g softened butter in pieces, 250 g flour (plain), 70 ml
milk, 1 sachet (11 g) baking powder or 4 level tsp baking powder, 1 sachet (6.5 g) vanilla sugar or 1
tsp vanilla extract.
Put all the ingredients in the bowl except for the flour. Fit the kneader and the lid. Run for a few
seconds at speed 1, and add the flour little by little with the appliance running. Mix for 3 minutes.
Preheat the oven to 180°C. Place the mixture in a buttered and floured non-stick loaf tin (900g /2
lb size). Bake for about 40 minutes or until a fine skewer inserted in the centre come out clean with
no mixture attached. Best eaten within 2 days of making .
Feta, Olive and Sun-dried Tomato Loaf
Ingredients: 200 g flour (plain), 4 eggs, 1 sachet (11 g) baking powder or 4 level tsp baking powder,
100 ml cold milk, 50 ml olive oil, 12 dried tomatoes, 200 g feta cheese, 15 destoned green olives cut
into pieces, salt, pepper.
Preheat the oven to 180°C. Butter and flour a loaf tin. Put the flour, eggs and baking powder in the
bowl. Fit the kneader and the lid. Start at speed 1 and then increase to speed 3. Add the olive oil and
milk with the appliance running for one and a half minutes. Decrease to speed 1 and add the dried
tomatoes, feta cheese and olives. Add salt and pepper. Pour the mixture into the tin and bake for 30
to 40 minutes.
Mayonnaise
Ingredients: 1 egg yolk, 1 tablespoon mustard, 1 teaspoon white wine vinegar, 250 ml oil (sunflower,
olive or half and half of each), salt, pepper.
Attention: all the ingredients must be at room temperature.
Put all the ingredients except for the oil in the bowl. Fit the balloon whisk and lid. Start at speed 1
and begin to pour the oil in a thin trickle. After 10 seconds, increase to speed 4, and continue to add
the oil little by little. Once you have added all the oil, run the appliance for another 30 seconds.
NB: Keep refrigerated and consume within 24 hours.
Chantilly cream
Ingredients: 250 ml very cold liquid crème fraiche*, 50g icing sugar.
Put the cream and icing sugar in the bowl. Fit the balloon whisk and lid. Run the appliance at speed
3 for 2 minutes and then at speed 4 for one and a half minutes.
* liquid creme fraiche is not available in all countries.
For the UK only: Use 300 ml well chilled double cream and 35 g icing sugar. Place the cream and
icing sugar in the bowl. Fit the balloon whisk and lid. Whip on speed 3 until it forms firm peaks
(takes about 2 to 3 minutes).
EN NL
Page is loading ...
Page is loading ...
Page is loading ...
Page is loading ...
Page is loading ...
Page is loading ...
Page is loading ...
Page is loading ...
Page is loading ...
Page is loading ...
Page is loading ...
Page is loading ...
Page is loading ...
Page is loading ...
Page is loading ...
Page is loading ...
Page is loading ...
Page is loading ...
Page is loading ...
Page is loading ...
Page is loading ...
Page is loading ...
Page is loading ...
Page is loading ...
Page is loading ...
Page is loading ...
Page is loading ...
Page is loading ...
Page is loading ...
Page is loading ...
Page is loading ...
Page is loading ...
Page is loading ...
Page is loading ...
Page is loading ...
Page is loading ...
Page is loading ...
Page is loading ...
Page is loading ...
Page is loading ...
Page is loading ...
Page is loading ...
Page is loading ...
Page is loading ...
Page is loading ...
Page is loading ...
Page is loading ...
Page is loading ...
Page is loading ...
Page is loading ...
Page is loading ...
Page is loading ...
Page is loading ...
Page is loading ...
Page is loading ...
Page is loading ...
Page is loading ...
Page is loading ...
Page is loading ...
Page is loading ...
Page is loading ...
Page is loading ...
Page is loading ...
Page is loading ...
Page is loading ...
Page is loading ...
Page is loading ...
Page is loading ...
Page is loading ...
Page is loading ...
Page is loading ...
Page is loading ...
Page is loading ...
Page is loading ...
Page is loading ...
Page is loading ...
Page is loading ...
Page is loading ...
Page is loading ...
Page is loading ...
Page is loading ...
Page is loading ...
Page is loading ...
Page is loading ...
Page is loading ...
Page is loading ...
Page is loading ...
Page is loading ...
Page is loading ...
Page is loading ...
Page is loading ...
Page is loading ...
Page is loading ...
Page is loading ...
Page is loading ...
Page is loading ...
Page is loading ...
Page is loading ...
Page is loading ...
Page is loading ...
Page is loading ...
Page is loading ...
Page is loading ...
Page is loading ...
Page is loading ...
Page is loading ...
Page is loading ...
Page is loading ...
Page is loading ...
Page is loading ...
Page is loading ...
Page is loading ...
Page is loading ...
Page is loading ...
-
 1
1
-
 2
2
-
 3
3
-
 4
4
-
 5
5
-
 6
6
-
 7
7
-
 8
8
-
 9
9
-
 10
10
-
 11
11
-
 12
12
-
 13
13
-
 14
14
-
 15
15
-
 16
16
-
 17
17
-
 18
18
-
 19
19
-
 20
20
-
 21
21
-
 22
22
-
 23
23
-
 24
24
-
 25
25
-
 26
26
-
 27
27
-
 28
28
-
 29
29
-
 30
30
-
 31
31
-
 32
32
-
 33
33
-
 34
34
-
 35
35
-
 36
36
-
 37
37
-
 38
38
-
 39
39
-
 40
40
-
 41
41
-
 42
42
-
 43
43
-
 44
44
-
 45
45
-
 46
46
-
 47
47
-
 48
48
-
 49
49
-
 50
50
-
 51
51
-
 52
52
-
 53
53
-
 54
54
-
 55
55
-
 56
56
-
 57
57
-
 58
58
-
 59
59
-
 60
60
-
 61
61
-
 62
62
-
 63
63
-
 64
64
-
 65
65
-
 66
66
-
 67
67
-
 68
68
-
 69
69
-
 70
70
-
 71
71
-
 72
72
-
 73
73
-
 74
74
-
 75
75
-
 76
76
-
 77
77
-
 78
78
-
 79
79
-
 80
80
-
 81
81
-
 82
82
-
 83
83
-
 84
84
-
 85
85
-
 86
86
-
 87
87
-
 88
88
-
 89
89
-
 90
90
-
 91
91
-
 92
92
-
 93
93
-
 94
94
-
 95
95
-
 96
96
-
 97
97
-
 98
98
-
 99
99
-
 100
100
-
 101
101
-
 102
102
-
 103
103
-
 104
104
-
 105
105
-
 106
106
-
 107
107
-
 108
108
-
 109
109
-
 110
110
-
 111
111
-
 112
112
-
 113
113
-
 114
114
-
 115
115
-
 116
116
-
 117
117
-
 118
118
-
 119
119
-
 120
120
-
 121
121
-
 122
122
-
 123
123


Ask a question and I''ll find the answer in the document
Finding information in a document is now easier with AI
in other languages
- español: Tefal QB200138 Manual de usuario
- Nederlands: Tefal QB200138 Handleiding
- slovenčina: Tefal QB200138 Používateľská príručka
- čeština: Tefal QB200138 Uživatelský manuál
- eesti: Tefal QB200138 Kasutusjuhend
- română: Tefal QB200138 Manual de utilizare
Related papers
-
Tefal QB502140 User manual
-
-
-
Tefal QB404H Masterchef Gourmet Owner's manual
-
-
-
Tefal QB317538 User manual
-
-
-
