Samsung RF268ABBP User manual

Category
Fridges
Type
User manual

This manual is also suitable for

imagine the possibilities
Thank you for purchasing this Samsung product.
To receive more complete service,
please register your product at
www.samsung.com/register
RF268AB
English
Refrigerator
user manual
Español
2_ features
For easy future reference, write the
model and serial number down. You
will find your model number and serial
number on the left side of the refrigerator.
Model #
Serial #
Features of your new Refrigerator
KEY FEATURES OF YOUR NEW REFRIGERATOR
Your Samsung French Door Refrigerator comes equipped with various innovative storage and energy-efficient
features.
t Twin Cooling System
The Refrigerator and Freezer have separate evaporators. Due to this independent cooling system,
the Freezer and Refrigerator cool more efficiently.
Additionally, this separate air flow system prevents food odor of one compartment from seeping into
other compartments.
t Bigger & Wider Space
The wide shelf area and pantry provide enough space for larger items like a pizza box, etc.
The wide freezer drawer also provides enough space for 2~3 turkeys.
t Cool Select Pantry
Plus
The Cool Select pantry
Plus
is a full-width drawer with adjustable temperature control.
t Compact Ice Maker
The Ice maker can dispense cubed or crushed ice.
t Secure Auto Close
The Secure Auto Close feature will automatically close a door that is slightly open.
t Digital Display and Temperature Control
t Water Filtration System
t Door Alarm
A helpful beeper alerts you if door is ajar.
t Tilting Pocket
The Tilting pocket can be used to store up to a 16” pizza.
t Auto Pull Out Drawer
The upper drawer in the freezer comes out automatically when you open the freezer door.
t Easy Handle
Freezer door can be opened with less effort.
t Energy Star
This Energy star labeled product may save you money on your energy costs.
t Dual Ice Maker
The Refrigerator and freezer each have an ice maker; providing even more cubed and crushed ice.
safety information _3
SAFETY INFORMATION
Before using your new Samsung French Door Refrigerator, please read this manual thoroughly to ensure that
you know how to safely and efficiently operate the features and functions that your new appliance offers.
This appliance is not intended for use by persons (including children) with reduced physical, sensory or mental
capabilities, or lack of experience and knowledge, unless they have been given supervision or instruction
concerning use of the appliance by a person responsible for their safety.
Because the following instruction covers various models, the characteristics of your Refrigerator may differ
slightly from the Refrigerator described in this manual. If you have any question, contact us at 1-800-SAMSUNG
or find help and information online at www.samsung.com.
Important safety symbols and precautions:
WARNING
Hazards or unsafe practices that may result in TFWFSFQFSTPOBMJOKVSZPSEFBUI.
CAUTION
Hazards or unsafe practices that may result in NJOPSQFSTPOBMJOKVSZPSQSPQFSUZ
EBNBHF.
Do NOT attempt.
Do NOT disassemble.
Do NOT touch.
Follow directions carefully.
Unplug the power plug from the wall socket.
Make sure the refrigerator is grounded to prevent electric shock.
Call the contact center for help.
Note.
5IFTFXBSOJOHTJHOTBSFIFSFUPQSFWFOUJOKVSZUPZPVBOEPUIFST
1MFBTFGPMMPXUIFNDBSFGVMMZ
"GUFSSFBEJOHUIJTTFDUJPOLFFQJUJOBTBGFQMBDFGPSGVUVSFSFGFSFODF
WARNING
SEVERE WARNING SIGNS FOR INSTALLATION
Safety Information
t%POPUQMBDFUIJTSFGSJHFSBUPSJOEJSFDUTVOMJHIUPSFYQPTFUPUIFIFBUGSPNTUPWFTSPPNIFBUFSTPS
other appliance.
t%POPUJOTUBMMUIFSFGSJHFSBUPSJOBEBNQQMBDFPSQMBDFXIFSFJUNBZDPNFJODPOUBDUXJUIXBUFS
- Deteriorated insulation of electrical parts may cause an electric shock or fire.
t%POPUQMVHTFWFSBMBQQMJBODFTJOUPUIFTBNFNVMUJQMFQPXFSCPBSE5IFSFGSJHFSBUPSTIPVMEBMXBZTCF
QMVHHFEJOUPJUTPXOJOEJWJEVBMFMFDUSJDBMXIJDIIBTBWPMUBHFSBUJOHUIBUNBUDIFEUIFSBUJOHQMBUF
- This provides the best performance and also prevents overloading house wiring circuits, which could cause
a fire hazard from overheated wires.
4_ safety information
Safety Information
t5IF3FGSJHFSBUPSNVTUCFTBGFMZHSPVOEFE
- Always make sure that you have grounded the Refrigerator before attempting to investigate or repair any
part of the appliance. Power leakages can cause severe electric shock.
t/FWFSVTFHBTQJQFTUFMFQIPOFMJOFTPSPUIFSQPUFOUJBMMJHIUOJOHBUUSBDUPSTBTBOFMFDUSJDBMHSPVOE
- Improper use of the grounding plug can result in a risk of electric shock. If it is necessary to use an
extension cord, use only a 3-wire extension cord that has a 3-blade grounding plug and a 3-slot
receptacle that will accept the plug on the appliance. The marked rating of the extension cord should
be AC115-120 V, 10 A, or more. If a grounding adapter is used, make sure the receptacle box is fully
grounded.
t*GUIFQPXFSDPSEJTEBNBHFEIBWFJUSFQMBDFEJNNFEJBUFMZCZUIFNBOVGBDUVSFSPSJUTTFSWJDF
agent.
t5IJTSFGSJHFSBUPSNVTUCFQSPQFSMZJOTUBMMFEBOEMPDBUFEJOBDDPSEBODFXJUIUIFNBOVBMCFGPSFJUJT
used.
t$POOFDUUIFQPXFSQMVHJOQSPQFSQPTJUJPOXJUIUIFDPSEIBOHJOHEPXO
- If you connect the power plug upside down, the wire can get cut off and cause a fire or electric shock.
t8IFONPWJOHUIFSFGSJHFSBUPSCFDBSFGVMOPUUPSPMMPWFSPSEBNBHFUIFQPXFSDPSE
- This constitutes a fire hazard.
t.BLFTVSFUIBUUIFQPXFSQMVHJTOPUTRVBTIFEPSEBNBHFECZUIFCBDLPGUIFSFGSJHFSBUPS
t,FFQUIFQBDLJOHNBUFSJBMTPVUPGSFBDIPGDIJMESFO
- There is a risk of death from suffocation if children put them on their head.
t5IFBQQMJBODFNVTUCFQPTJUJPOFETPUIBUUIFQMVHJTBDDFTTJCMFBGUFSJOTUBMMBUJPO
t%POPUJOTFSUUIFQPXFSQMVHXJUIXFUIBOET
t%POPUTUPSFBSUJDMFTPOUIFUPQPGUIFBQQMJBODF
- When you open or close the door, the articles may fall and cause personal injury and/or material damage.
t%POPUQVUBDPOUBJOFSmMMFEXJUIXBUFSPOUIFSFGSJHFSBUPS
- If spilled, there is a risk of fire or electric shock.
t$IJMESFOTIPVMECFTVQFSWJTFEUPFOTVSFUIBUUIFZEPOPUQMBZXJUIUIFBQQMJBODF
t%POPUMFUDIJMESFOIBOHPOUIFEPPS"TFSJPVTJOKVSZNBZPDDVS
t%POPUMFUDIJMESFOFOUFSJOTJEFPGUIFSFGSJHFSBUPS5IFSFJTBSJTLPGDIJMEFOUSBQNFOU
CAUTION
CAUTION SIGNS FOR INSTALLATION
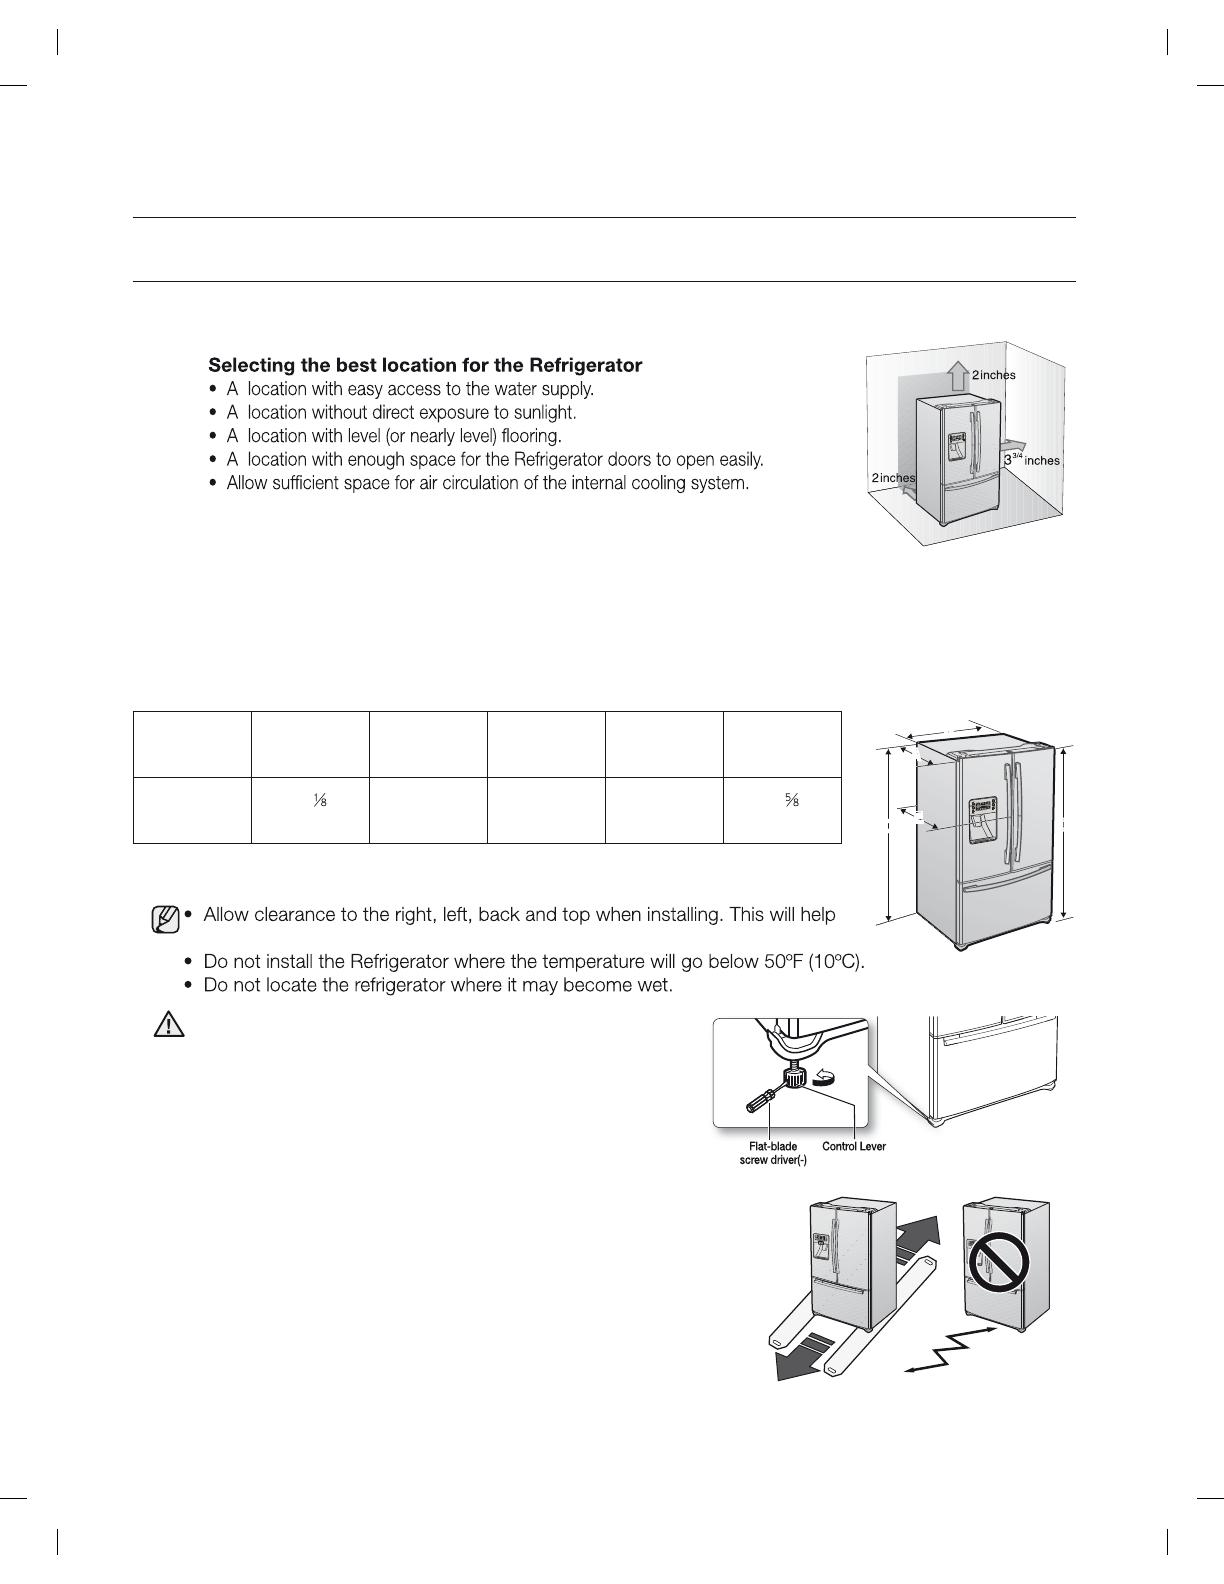
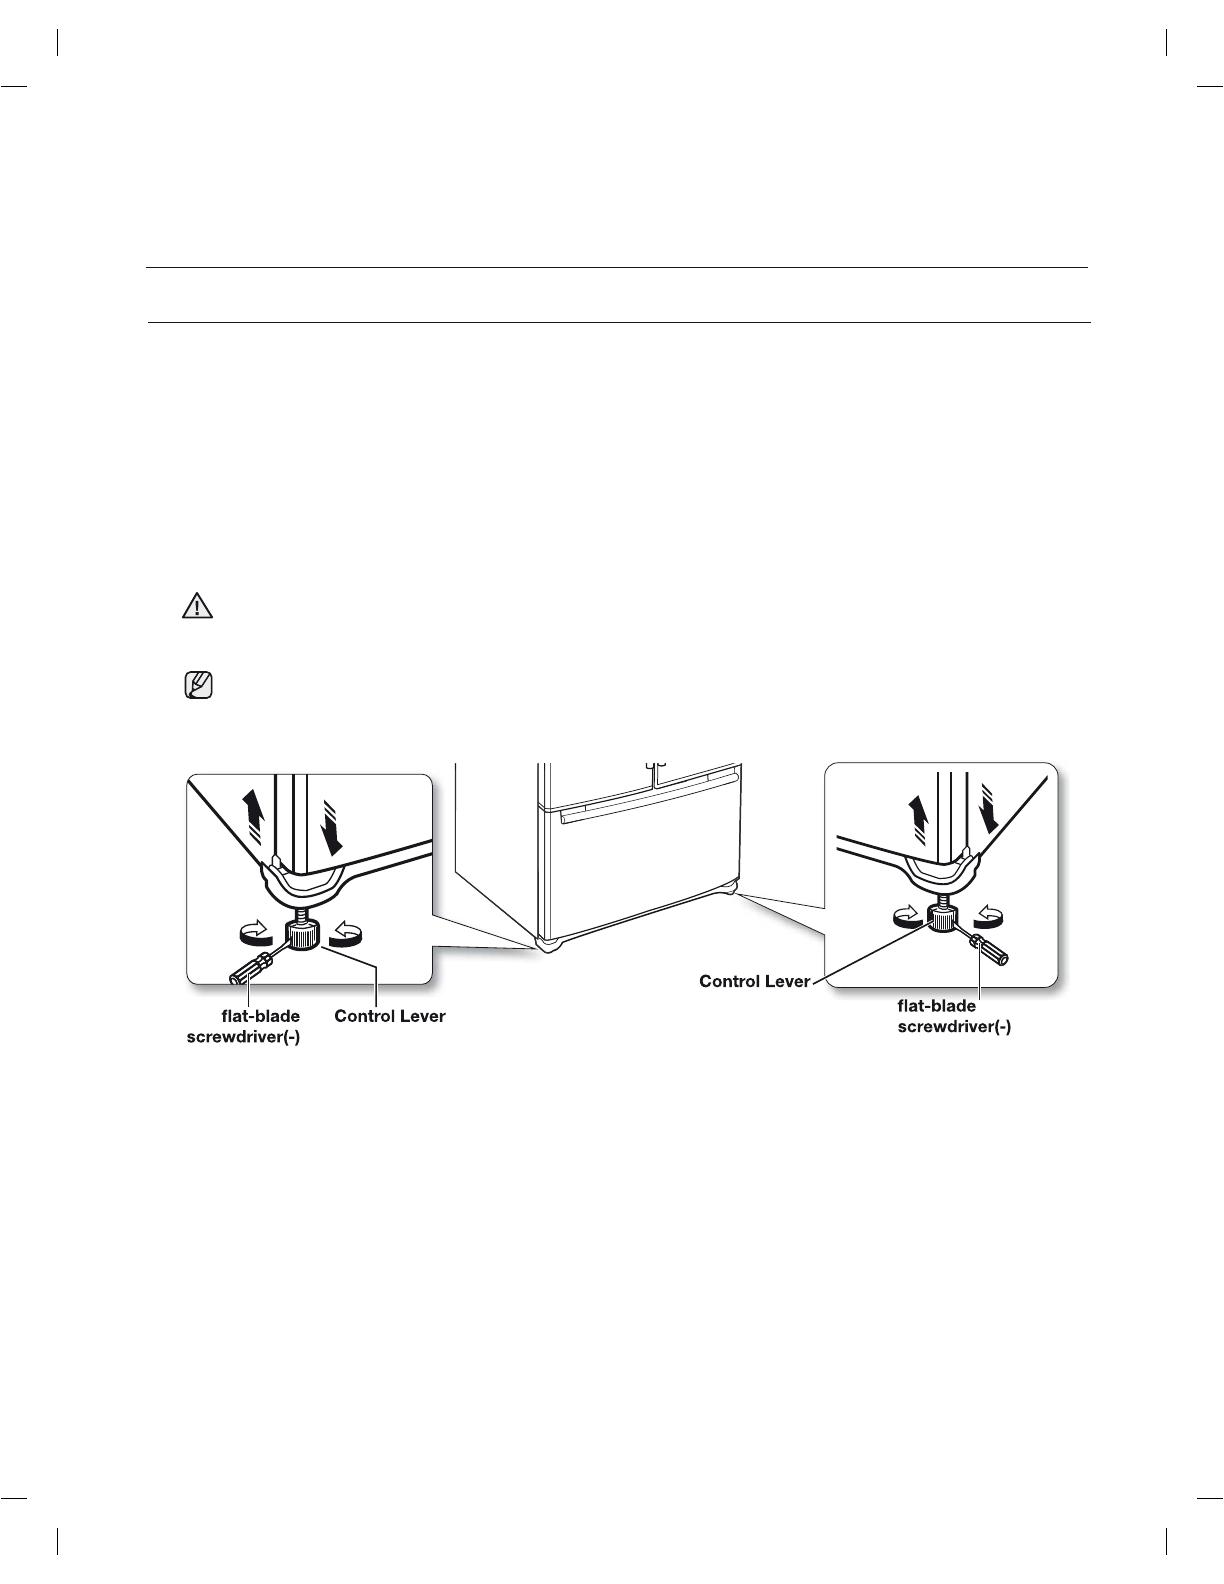
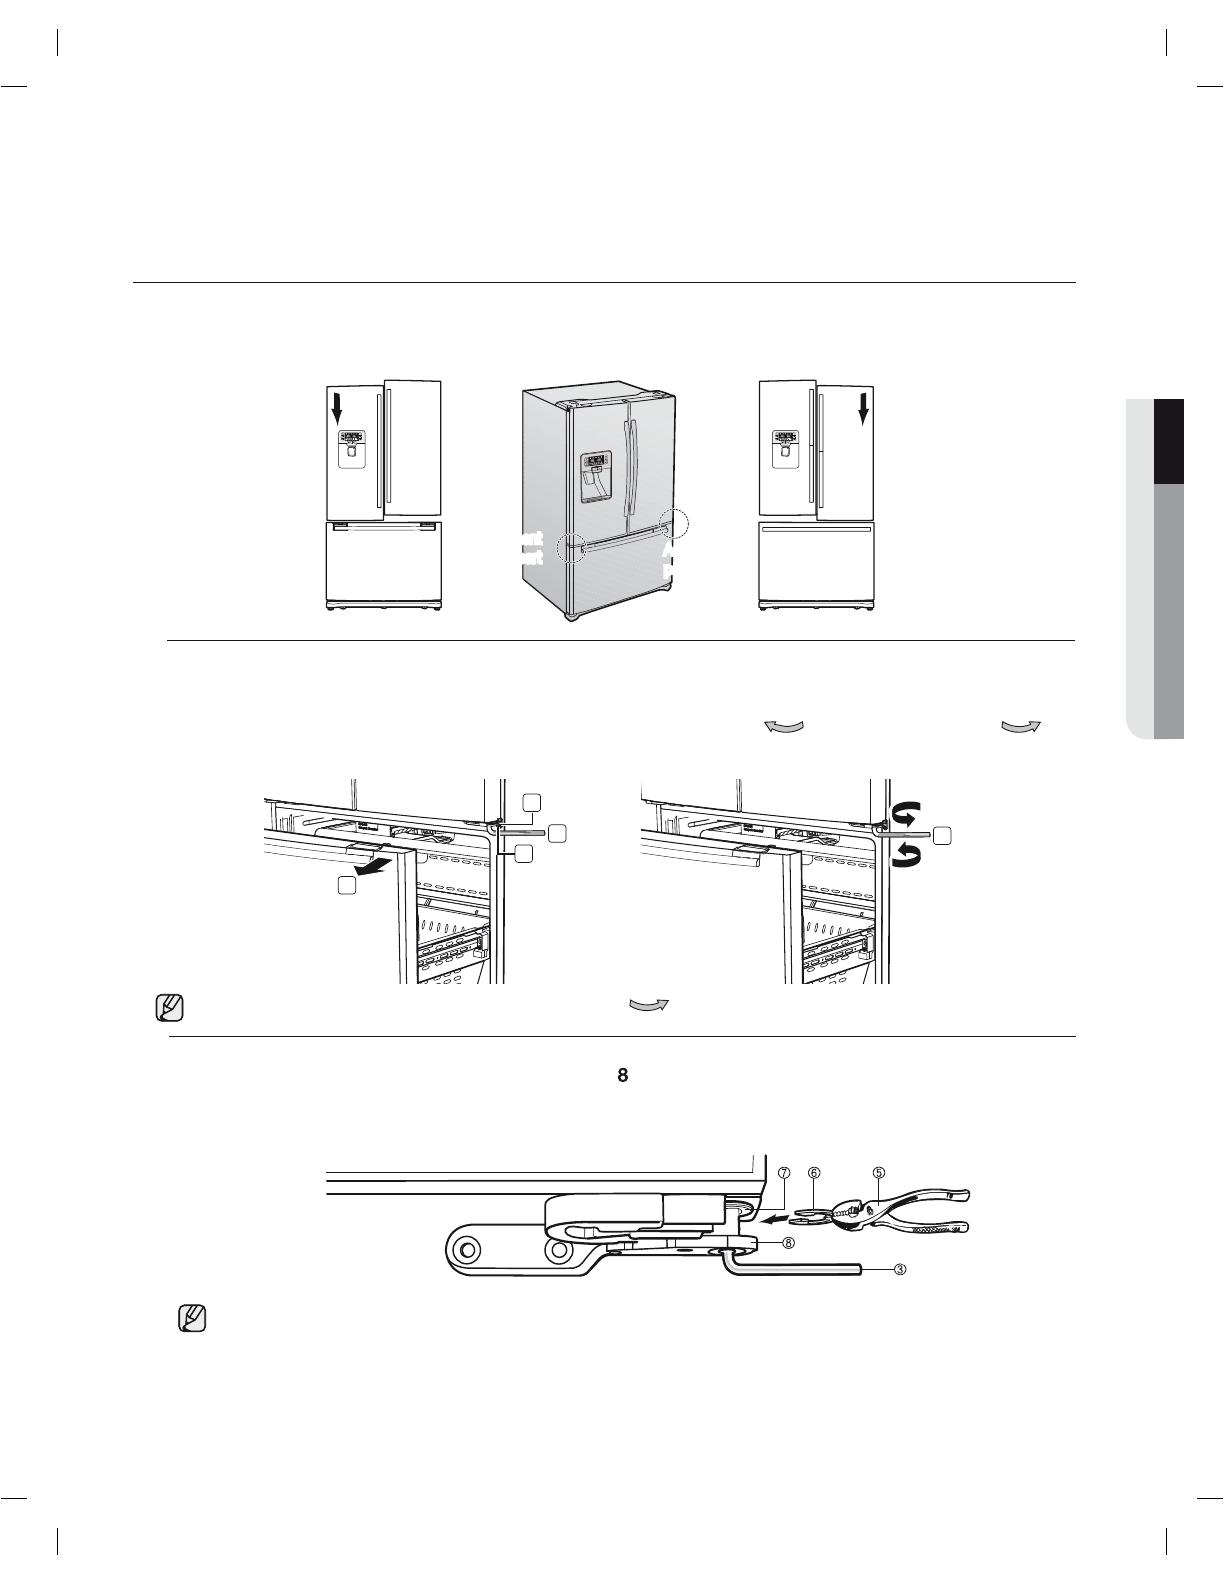
t"MMPXTVGmDJFOUTQBDFUPJOTUBMMUIFSFGSJHFSBUPSPOBnBUTVSGBDF
- If your refrigerator is not level, the internal cooling system may not work correctly.
t,FFQWFOUJMBUJPOPQFOJOHJOUIFBQQMJBODFFODMPTVSFPSNPVOUJOHTUSVDUVSFDMFBSPGPCTUSVDUJPO
t"MMPXUIFBQQMJBODFUPTUBOEGPSIPVSTBGUFSJOTUBMMBUJPO
WARNING
SEVERE WARNING SIGNS FOR USING
t*GUIFXBMMTPDLFUJTMPPTFEPOPUJOTFSUUIFQPXFSQMVH
- There is a risk of electric shock of fire.
t%POPUVTFBDPSEUIBUTIPXTDSBDLTPSBCSBTJPOEBNBHFBMPOHJUTMFOHUIPSBUFJUIFSFOE
t%POPUCFOEUIFQPXFSDPSEFYDFTTJWFMZPSQMBDFIFBWZBSUJDMFTPOJU
t/FWFSVOQMVHZPVSSFGSJHFSBUPSCZQVMMJOHPOUIFQPXFSDPSE"MXBZTHSJQQMVHmSNMZBOEQVMMTUSBJHIU
out from the outlet.
- Damage to the cord may cause a short-circuit, fire and/or electric shock.
t%POPUVTFBFSPTPMTOFBSUIF3FGSJHFSBUPS
- Aerosols used near the Refrigerator may cause an explosion or fire.
safety information _5
t%POPUJOTFSUZPVSIBOETJOUPUIFCPUUPNBSFBVOEFSUIFBQQMJBODF
- Any sharp edges may cause personal injury.
t%POPUMFUDIJMESFOTUFQPOESBXFSTDPWFS
- The drawer may break and cause them to slip.
t%POPUPWFSmMMUIFSFGSJHFSBUPSXJUIGPPE
- When you open the door, an item may fall out and cause personal injury or material damage.
t%POPUUPVDIUIFJOTJEFXBMMTPGUIFGSFF[FSPSQSPEVDUTTUPSFEJOUIFGSFF[FSXJUIXFUIBOET
- This may cause frostbite.
t%POPUTQSBZJOnBNNBCMFHBTOFBSUIFSFGSJHFSBUPS
- There is a risk of explosion or fire.
t%POPUTUPSFWPMBUJMFPSnBNNBCMFTVCTUBODFTJOUIFSFGSJHFSBUPS
- The storage of benzene, thinner, alcohol, ether, LP gas and other such products may cause explosions.
t%POPUTUPSFQIBSNBDFVUJDBMTQSPEVDUTTDJFOUJmDNBUFSJBMTPSUFNQFSBUVSFTFOTJUJWFQSPEVDUTJOUIF
refrigerator.
- Products that require strict temperature controls must not be stored in the refrigerator.
t%POPUQMBDFPSVTFBOFMFDUSJDBMBQQMJBODFJOTJEFUIFSFGSJHFSBUPSVOMFTTJUJTPGBUZQF
recommended by the manufacturer.
t%POPUVTFNFDIBOJDBMEFWJDFTPSBOZPUIFSNFBOTUPBDDFMFSBUFUIFEFGSPTUJOHQSPDFTTPUIFSUIBO
those recommended by the manufacturer.
t%POPUEBNBHFUIFSFGSJHFSBOUDJSDVJU
t%POPUEJTBTTFNCMFPSSFQBJSUIFSFGSJHFSBUPSCZZPVSTFMG
- You run risk of causing a fire, malfunction and/or personal injury.
WARNING
SEVERE WARNING SIGNS FOR USING
t*GUIFBQQMJBODFHFOFSBUFTBTUSBOHFOPJTFBCVSOJOHTNFMMPSTNPLFVOQMVHUIFQPXFSQMVH
JNNFEJBUFMZBOEDPOUBDUZPVSOFBSFTUTFSWJDFDFOUFS
t*GZPVFYQFSJFODFEJGmDVMUZXIFODIBOHJOHUIFMJHIUDPOUBDUTFSWJDFBHFOUT
t*GUIFQSPEVDUTFRVJQQFEXJUI-&%-BNQEPOPUEJTBTTFNCMF-BNQ$PWFSBOE-&%-BNQCZ
yourself.
- Please contact your service agents.
t*GBOZEVTUPSXBUFSJTJO3FGSJHFSBUPSQVMMPVUQPXFSQMVHBOEDPOUBDUZPVS4BNTVOH&MFDUSPOJDT
TFSWJDFDFOUFS
- Otherwise there is a risk of fire
t$IJMESFOTIPVMECFTVQFSWJTFEUPFOTVSFUIBUUIFZEPOPUQMBZXJUIUIFBQQMJBODF
t#PUUMFTTIPVMECFTUPSFEUJHIUMZUPHFUIFSTPUIBUUIFZEPOPUGBMMPVU
t5IJTQSPEVDUJTJOUFOEFEPOMZGPSUIFTUPSBHFPGGPPEJOBEPNFTUJDFOWJSPONFOU
t*GBHBTMFBLJTEFUFDUFEBWPJEBOZOBLFEnBNFTPSQPUFOUJBMTPVSDFTPGJHOJUJPOBOEBJSUIFSPPNJO
XIJDIUIFBQQMJBODFJTTUBOEJOHGPSTFWFSBMNJOVUFT
t1VMMUIFQPXFSQMVHPVUPGUIFTPDLFUCFGPSFDIBOHJOHUIFJOUFSJPSMBNQTPGUIFSFGSJHFSBUPS
- Otherwise, there is a risk of electric shock.
t%POPUSFGSFF[FGSP[FOGPPETUIBUIBWFUIBXFEDPNQMFUFMZ
t%POPUQMBDFDBSCPOBUFEPSm[[ZESJOLTJOUIFGSFF[FSDPNQBSUNFOU%POPUQVUCPUUMFTPSHMBTT
DPOUBJOFSTJOUIFGSFF[FS
- When the contents freeze, the glass may break and cause personal injury.
CAUTION
CAUTION SIGNS FOR USING
Contents _7
Contents
SETTING YOUR
FRENCH DOOR REFRIGERATOR
08
08 Getting ready to install the refrigerator
09 Setting up the refrigerator
10 Removing the refrigerator doors
12 Disassemble the Freezer Drawer
13 Reattaching the refrigerator doors
15 Assemble the Freezer Drawer
17 Adjusting the doors
17 Making minor adjustments between doors
18 Adjusting the freezer drawer level
19 Checking the water dispenser line
20 Installing the water line
OPERATING YOUR
SAMSUNG REFRIGERATOR
22
22 Using the control panel
23 Using the digital display
24 Controlling the temperature
25 Using the cold water dispenser
27 Parts and Features
28 Storing food in the refrigerator
28 Storing food in the freezer drawer
29 Using the Cool Select Pantry
Plus
30 Removing the refrigerator accessories
31 Using the doors
31 Using the tilting pocket
32 Removing the freezer accessories
33 Food Storage Tips
35 Cleaning the refrigerator
36 Changing the LED lamp
37 Changing the water filter
TROUBLESHOOTING
38
38 Troubleshooting
WARRANTY
39
39 Water filter chart
40 Water filter certification
41 Warranty on SAMSUNG refrigerator
36 Wiring diagram
09 How to assemble the handles
8_ Setting up
Setting up your French Door Refrigerator
If your refrigerator has an ice maker, allow extra space at the back for the water line connections.
When you install the refrigerator next to a fixed wall, minimum clearance is 3 ¾” (95mm) between the refrigerator
and wall to allow the door to swing open.
First thing! Make sure that you can easily move your Refrigerator to its final location by measuring doorways
(both width and height), thresholds, ceilings, stairways, etc.
The following chart details the exact height and depth of Samsung French Door Refrigerator.
FLOORING
For proper installation, this refrigerator must be placed on a level
surface of hard material that is the same height as the rest of the
flooring. This surface should be strong enough to support a fully
loaded refrigerator, or approximately 328lbs (150kg). To protect
the finish of the flooring, cut a large section of the cardboard
carton and place under the refrigerator where you are working.
When moving the refrigerator, be sure to pull it straight out and
push it back straight in.
reduce power consumption and keep your energy bills lower.
When moving your refrigerator
To prevent floor damage, be sure the front adjusting legs
are in the up position(above the floor).
Refer to ‘Adjusting the doors’ in the manual (on page 15).
CAUTION
Congratulations on your purchase of the Samsung French Door Refrigerator. We hope you enjoy the state-of-art
features and efficiencies that this new appliance oers.
If the Refrigerator does not have enough space, the internal cooling system may
not work properly.
GETTING READY TO INSTALL THE REFRIGERATOR
Model
Depth
“A”
Width
“B”
Height
“C”
Overall
Height “D”
Depth
“E”
RF268AB
29-
(83.6cm)
35-¾”
(90.8cm)
69
(175.2cm)
69-¾”
(177.4cm)
35-
(90.5cm)
B
A
C
E
D
B
A
C
E
D
Setting up _9
01 SETTING UP
SETTING UP THE REFRIGERATOR
Now that you have your new Refrigerator installed in place, you are ready to set up and enjoy the features and
functions of the appliance. By completing the following steps, your Refrigerator should be fully operational.
1. Place the Refrigerator in an appropriate location with reasonable clearance between it and the wall.
Refer to installation instructions in this manual.
2. Once the Refrigerator is plugged in, make sure the interior light comes on when you open the doors.
3. Set the Temperature control to the coldest temperature and wait for an hour. The Freezer will get slightly
chilled and the motor will run smoothly.
4. After powering the Refrigerator, it will take a few hours to reach the appropriate temperature. You can
store food and drinks in the Refrigerator after the temperature is sufficiently cool.
Philips screwdriver(+) Flat-blade screwdriver(-) Socket wrench (7/16”) Pliers Allen wrench(3/16”)
Water filter Hex wrench Fastener Compression fitting Compression nut Clip fitting lock(red)
Check the accessories listed below.
COMPONENTS FOR HANDLE ASSEMBLY
[ 3-DOOR TYPE ]
Wrench : 3/32 inch
Label Handle Instruction
Fridge
Freezer
HOW TO ASSEMBLE THE HANDLE
Fridge door handle assembly
OKOK
By using L-wrench, Fix the screw with the Longer part of it and
then fully tighten up with the Shorter part.
To best conceal the connection
points : Assemble the handles
with the mounting screws facing
each other.
the screw and then put the handle
(Optional)
Freezer / Flex zone door handle assembly
Please do not remove the Freezer / Flex Zone drawer. Handle can be attached without removing the door.
CAUTION
HOW TO ASSEMBLE THE HANDLES (CONT’D)
10_Setting up
REMOVING THE REFRIGERATOR DOORS
Some installations require door removal to transport the Refrigerator to its final location.
Do not remove the door/drawer if it is not needed. Before removing the door/drawer, make sure you read
following items.
Disconnect power to the Refrigerator before removing the door or drawer.
WARNING
Be careful not to drop and scratch the doors while removing the
doors.
WARNING
- Moisture from air leakage.
- Uneven door alignment.
- Wasting energy due to improper door seal.
2
1
Disassemble the Refrigerator doors
1. With the door opened, remove the cap top table ( 1 ) with
a flat-blade screwdriver(-), and close the door.
Remove the 3 screws holding down the top table ( 2 ) and
remove it AS SHOWN IN THE PICTURE.
Setting up your French Door Refrigerator
OKOK
*
Tilt up the Handle bar and turn the wrench.
By using L-wrench, Fix the screw with the Longer part of it and
then fully tighten up with the Shorter part.
To best conceal the connection
points : Assemble the handles
with the mounting screws facing
down.
Put the handle on the xer
2.
3. Remove the 3 hex head bolts ( 6 ) attached to the
upper left and right door hinges with a socket wrench
(7/16”). Remove the ground screw ( 7 ) attached to
the upper left and right door hinges with a philips
screwdriver(+).
Remove the upper left and right door hinges ( 8 ).
4. Lift the door straight up to remove.
5. Remove the screw ( 9 ) attached to the lower left
and right door hinges with a philips screwdriver(+).
Remove the 2 hex head bolts ( 10 ) attached to the
lower left and right door hinges with an allen wrench
(3/16”).
Remove the lower left and right door hinges ( 11 ).
Socket wrench
8
6
7
4
5
3
11
9
10
Allen wrench
If a red clip is on the coupler, it must
be removed before removing the
tube.
CAUTION
2. Disconnect the one connector (3) on
left side door, pressing the middle part
while is taking away. Remove the tube
(4) with pressing strongly the dark gray
color (5) of the water line couple, take
away the hose at the same time.
tube.
Be sure to close the door to prevent
damage.
Setting up_11
01 SETTING UP
12_Setting up
1. Take out the upper drawer by lifting it up.
2. Remove the tilting pocket ( 1 ) by pulling strongly both support
guards ( 2 ) upward at the same time.
3. Take out the lower basket( 3 ) by lifting the basket up
from the rail system.
4. Remove 4 hex head bolts from both sides with a
socket wrench(7/16”).
5. Lift up the freezer door from the rails.
1
2
3
DISASSEMBLE THE FREEZER DRAWER
Setting up your French Door Refrigerator
12
Assemble the Refrigerator doors
1. Reattach the lower left and right door hinges ( 12 ).
With a Philips head screwdriver, insert and tighten the
screw ( 10 ) into the lower left and right door hinges.
With a allen wrench(3/16”), insert and tighten the 2
hex head bolts ( 11 ) into the lower left and right door
hinges.
2. Place the hole in the bottom of the door over the door
hinge ( 12 ).
3. Insert the upper hinges ( 9 ) into the holes at the top
of the doors.
Insert and tighten the 3 hex head bolts ( 7 ) into
the upper left and right door hinges with a socket
wrench(7/16”).
Insert and tighten the ground screw ( 8 ) into the
upper left and right door hinges with a philips
screwdriver(+).
REATTACHING THE REFRIGERATOR DOORS
12
10
11
Allen wrench
7
8
9
Socket wrench
Be careful not to miss the hinge cap because it
can be easily taken o
.
Setting up_13
01 SETTING UP
14_Setting up
5. Position the top table ( 2 ) in place. Insert and tighten
the 3 screws into the top table with a philips screw
driver(+). With the doors open, reinsert the cap top
table ( 1 ) and close the doors.
REATTACHING THE REFRIGERATOR DOORS
1
2
3
3
4
5
dispenser door tube
The dispenser door tube ( 5 ) must be fully inserted to the marked
line to prevent water leakage from the dispenser.
CAUTION
4. Connect the dispenser door tube ( 5 ) and then
insert a clip on the coupler with pulling tube.
Connect the connector ( 4 ) on the left side door
and two connectors ( 3 ) at each side of the top
cap.
The clip is enveloped inside of the top cap.
When reattaching the top table, make sure that
the wires are not pressed or damaged by the
hinge cover.
After assembling, close the doors and check
to see whether the doors have gaps between
gaskets or are tilted. If you see a gap or tilt
please refer to “Adjusting the doors” on page 15.
Be sure to sensor (yellow cable) is inside the top table.
Setting up your French Door Refrigerator
7
8
9
ASSEMBLE THE FREEZER DRAWER
1. Pull out the rails fully on each side of the cabinet.
2. Attach the freezer door front onto the open slots on the sides.
3. Tighten 4 hex head bolts completely with a socket
wrench(7/16”).
4. Insert the lower basket ( 6 ) into the rail system.
5. Hook the ends of the tilting pocket ( 7 ) onto the support
guards ( 8 ) and push down until they lock into place.
6. Insert the upper drawer.
Slot
Slot
6
Remove 2 pieces of tape ( 9 ) attached to the side of the
drawer bin.
Reattach the tape in the same position when moving the
refrigerator to prevent scratching the drawer bin.
CAUTION
Make sure the door is well assembled on the rail
CAUTION
If the drawer is not properly assembled on the rail, the door
will not close and it will cause frost.
Setting up_15
01 SETTING UP
16_Setting up
ADJUSTING THE DOORS
After putting the doors back on the refrigerator, make sure the refrigerator is level so that you can make final
adjustments.
If the Refrigerator is not level, it will not be possible to get the doors perfectly even, which may cause moisture
condensation and increased energy bills.
For example, when the left side is lower than the right side, insert a flat-blade screwdriver(-) into a notch on the
left control lever, and turn it counterclockwise to level the door.
Turn it clockwise to lower the refrigerator and counterclockwise to raise it.
Both control levers must be touching the floor to avoid possible personal injury or property damage
because of tipping.
CAUTION
We do not recommend making small adjustments with the control lever. Instead, refer to the next
page for the best way to make minor adjustments to the doors.
Setting up your French Door Refrigerator
1. Pull out the freezer drawer ( 1 ), then you can see the middle hinge ( 2 ) .
2. Insert the supplied hex wrench ( 3 ) into the shaft ( 4) of the middle hinge.
3. Please adjust the height by turning the hex wrench ( 3 ) clockwise (
) or counter-clockwise ( ).
MAKING MINOR ADJUSTMENTS BETWEEN DOORS
Remember, a level Refrigerator is necessary for getting the doors perfectly even. If you need help, review the
previous section on leveling the Refrigerator.
When you turn the hex wrench counter-clockwise(
), the door will move up.
When the left
door is lower
than the right
door.
When the left
door is higher
than the right
door.
Adjustment
part
Adjustment
part
3
2
3
4
1
Setting up_17
01 SETTING UP
1. After adjusting the doors, please insert the supplied fastener ( 6 ) using pliers ( 5 ) in the gap between
the hinge-grommet ( 7 ) and the lower hinge (
). The number of fasteners you’ll need to insert
depends on the gap.
2 fasteners are enclosed with the refrigerator.
The thickness of each fastener is 0.04”.
18_Setting up
ADJUSTING THE FREEZER DRAWER LEVEL
1. Locate the height-adjuster ( 1 ) in the freezer drawer.
Unscrew the 8 Phillips screws ( 2 ) slightly to loosen the door.
3. Find the best level to align the door slope.
After adjustment, tighten the controller screw ( 3 ) and then philips screws.
Freezer Drawer
Adjustment part
2. Loosen the controller screw( 3 ) with a Phillips screwdriver(+).
3
2
1
Example) The slope is about 0.08inch(2mm) as shown below.
- Rotate the height adjuster to -2.0 to reduce the door slope.
Slope
Reference
plane
Setting up your French Door Refrigerator
CHECKING THE WATER DISPENSER LINE
A water dispenser is one of the helpful features on your new Refrigerator. To help promote better health,
the water filter removes unwanted particles from your water. However, it does not sterilize or destroy
microorganisms. You may need to purchase a water purifying system to do that.
In order for the ice maker to operate properly, a water pressure of 20~125 psi is required.
Under normal conditions, a 170 cc (5.75 oz.) cup can be filled in 10 seconds.
If the Refrigerator is installed in an area with low water pressure (below 20psi), you can install a booster pump to
compensate for the low pressure.
Make sure the water storage tank inside the Refrigerator is properly filled. To do this, press the water dispenser
lever until the water runs from the water outlet.
Water line installation kits are available at extra cost from your dealer. We recommend using a water line
installation kit that contains copper tubing and ¼” compression nut.
After connecting the water supply to the water filter, turn your main water supply back on and flush 4 or
more gallons into a bucket to clear and prime the water filter.
If water drop or leakage is found on the connection area, tur
the main water supply. Check it and, if
necessary, tighten it more.
Pipe clamp
Cold water line
valve
valve
Pipe clamp
Cold water line
Water line installation kit
Connecting to the water supply line
1. First, shut o
the main water supply.
2. Locate the nearest cold water drinking line and install
the pipe clamp and shut o
valve.
3. Connect the water line installation kit to shut o
valve.
Setting up_19
01 SETTING UP
20_Setting up
INSTALLING THE WATER LINE
Only connect the water line to a drinkable water source.
If you have to r
1/4“ of the plastic tubing to make sure you
get a snug, leak-free connection.
After removing the right side upper shelf, you can
install the water filter more easily.
Connecting the water supply line to the refrigerator.
There are several items that you need to purchase to complete this connection.
You may find these items sold as a kit at your local hardware store.
1. Tighten the compression nut ( B ) onto the 1/4” compression fitting.
- If you are using copper tubing, slip the compression nut ( B ) (not supplied) and ferrule (not supplied) on
copper tubing (not supplied) as shown.
-
If you are using plastic tubing ( B ), insert the molded end(Bulb) of the plastic tubing ( B ) into the compression fitting.
2. Tighten the compression nut ( B ) onto the compression tting. Do not over-tighten the compression nut ( B ).
3. Turn water on and check for any leakage.
1. Remove the water filter cover ( 1 )
2. Remove the fixed cap ( 2 ) by turning it counter-clockwise. Keep
the cap in a safe place for later use if you don’t use the filter.
3. Remove the water filter ( 3 ) from the box and put a replacement
indicator sticker (Indicator sticker is included in the box) on
the filter as shown. Place the sticker on the filter that dates
six months in the future. For example, if you install the water
filter in March, put the “SEP” sticker on the filter to remind you
to replace it in September. This way, you can remember the
time to replace the water filter. Normally, a filter life is about 6
months.
2 3
Indicator sticker
(month indicator)
Use Copper Tubing Use Plastic Tubing
¼” copper tubing
¼” compression nut (2pc)
Ferrule (2pc)
¼” plastic tubing
Molded end(Bulb)
¼” compression nut (2pc)
Do not use without the molded end(Bulb) of the plastic tubing ( B ) .
CAUTION
Assembled)
Assembled)
4. Remove the filter cap ( 4 ) and insert the filter
into the filter housing.
with the printing mark on the cover, locking the
filter in position. Make sure to align the water
filter label mark ( 5 ) with center of cover filter
printing as illustrated.
Remember, do not over-tighten.
Turn until the label
is aligned.
Separation
of filter cap(red)
Cover filter.
4
5
1. Turn on the main water supply & turn on the valve to the water supply line.
2. Run water through the dispenser until the water runs clear (approx. 6-7minutes).
This will clean the water supply system and remove air from the lines.
3. Additional clearing time may be required in some households.
4. Open the Refrigerator door and make sure there are no water leaks coming
from the water filter.
The pressure of the water supply coming ou t of a reverse osmosis system going to the
water inlet valve of the refrigerator needs to be between 35 and 120 psi (241 and 827 kPa).
If a reverse osmosis water filtration system is connecte d to your cold water supply, the water pressure to
the reverse osmosis system needs to be a minimum of 40 to 60 psi (276 to 414 kPa.)
necessary.
with a reverse osmosis system. Remove the water filter.
If you have questions about your water pressure, call a licensed, qualified plumber.
Be sure to flush the dispenser thoroughly or water may leak from it.
This is due to the fact that there is still air in the line.
Setting up_21
01 SETTING UP
  • Page 1 1
  • Page 2 2
  • Page 3 3
  • Page 4 4
  • Page 5 5
  • Page 6 6
  • Page 7 7
  • Page 8 8
  • Page 9 9
  • Page 10 10
  • Page 11 11
  • Page 12 12
  • Page 13 13
  • Page 14 14
  • Page 15 15
  • Page 16 16
  • Page 17 17
  • Page 18 18
  • Page 19 19
  • Page 20 20
  • Page 21 21
  • Page 22 22
  • Page 23 23
  • Page 24 24
  • Page 25 25
  • Page 26 26
  • Page 27 27
  • Page 28 28
  • Page 29 29
  • Page 30 30
  • Page 31 31
  • Page 32 32
  • Page 33 33
  • Page 34 34
  • Page 35 35
  • Page 36 36
  • Page 37 37
  • Page 38 38
  • Page 39 39
  • Page 40 40
  • Page 41 41
  • Page 42 42
  • Page 43 43
  • Page 44 44
  • Page 45 45
  • Page 46 46
  • Page 47 47
  • Page 48 48
  • Page 49 49
  • Page 50 50
  • Page 51 51
  • Page 52 52
  • Page 53 53
  • Page 54 54
  • Page 55 55
  • Page 56 56
  • Page 57 57
  • Page 58 58
  • Page 59 59
  • Page 60 60
  • Page 61 61
  • Page 62 62
  • Page 63 63
  • Page 64 64
  • Page 65 65
  • Page 66 66
  • Page 67 67
  • Page 68 68
  • Page 69 69
  • Page 70 70
  • Page 71 71
  • Page 72 72
  • Page 73 73
  • Page 74 74
  • Page 75 75
  • Page 76 76
  • Page 77 77
  • Page 78 78
  • Page 79 79
  • Page 80 80
  • Page 81 81
  • Page 82 82
  • Page 83 83
  • Page 84 84
  • Page 85 85
  • Page 86 86
  • Page 87 87
  • Page 88 88

Samsung RF268ABBP User manual

Category
Fridges
Type
User manual
This manual is also suitable for

Ask a question and I''ll find the answer in the document

Finding information in a document is now easier with AI

in other languages