Page is loading ...

PRECAUTIONS
2
AE!!!!5SA
“CAUTION:TO REDUCE THE RISK OF
ELECTRIC SHOCK,
DO NOT REMOVE COVER (OR BACK).
NO USER-SERVICEABLE PARTS INSIDE.
REFER SERVICING TO QUALIFIED
SERVICE PERSONNEL.”
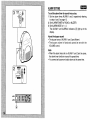
Explanation of Graphical Symbols:
A
Read the Operating Instructions carefully and completely
before operating the unit. Be sure to keep the Operating
Instructions for future reference. All warnings and cautions in
the Operating Instructions and on the unit should ,be strictly
followed, as well as the safety suggestions below.
Installation
1 Water and moisture — Do not use this unit near water, such
as near a bathtub, washbowl, swimming pool, or the like.
2 Heat — Do not use this unit near sources of heat, including
heating vents, stoves, or other appliances that generate
heat. It also should not be placed in temperatures less than
5°C (41“F) or greater than 35°C (95”F).
3 Mounting surface — Place the unit on a flat, even surface.
4 Ventilation — The unit should be situated with adequate
space around it so that proper heat ventilation is assured.
Allow 10 cm (4 in.) clearance from the unit.
The lightning flash with arrowhead
– Do not place the unit on a bed, rug, or similar surface that
symbol, within an equilateral triangle,
may block the ventilation openings.
is intended to alert the user to the
– Do not install the unit in a bookcase, cabinet, or airtight
presence of uninsulated “dangerous
voltage” within the product’s enclosure
that may be of sufficient magnitude to
constitute a risk of electric shock to
persons.
The exclamation point within an equi-
lateral triangle is intended to alert the
user to the presence of important op-
erating and maintenance (servicing)
instructions in the literature accompa-
nying the appliance.
rack where ventilation may be impeded,
5 Objects and /iquid entry — Take care that objects or
liquids do not get inside the unit through the ventilation
openings.
6 Carts and stands — When placed or
mounted on a stand or cart, the unit should
be moved with care.
Quick stops, excessive force, and uneven
@
surfaces may cause the unit or cart to
overturn or fall.
7 kVa// or ceiling mounting — The unit should not be
mounted on a wall or ceiling, unless specified in the
Operating Instructions.
Page is loading ...

PRECAUTIONS
mm
Electric Power
1
2
3
4
5
Power sources — Connect this unit only to power sources
specified in the Operating Instructions, and as marked on
the unit.
Polarization — As a safety feature, some units are
equipped with polarized AC power plugs which can only be
inserted one way into a power outlet. If it is difficult or
impossible to inserl the AC power plug into an outlet, turn
the plug over and try again. If it still does not easily insert
into the outlet, please call a qualified service technician to
service or replace the outlet. To avoid defeating the safety
feature of the polarized plug, do not force it into a power
outlet.
AC power cord
-When disconnecting the AC power cord, pull it out by the
AC power plug. Do not pull the cord itself.
– Never handle the AC power plug with wet hands, as this
could result in fire or shock.
–Power cords should be firmly secured to avoid being
severely bent, pinched, or walked upon. Pay particular
attention to the cord from the unit to the power socket.
–Avoid overloading AC power plugs and extension cords
beyond their capacity, as this could result in fire or shock.
Extension cord — To help prevent electric shock, do not
use a polarized AC power plug with an extension cord,
receptacle, or other outlet unless the polarized plug can be
completely inserted to prevent exposure of the blades of the
plug.
When not in use — Unplug the AC power cord from the AC
power plug if the unit will not be used for several months or
more. When the cord is plugged in, a small amount of
current continues to flow to the unit, even when the power is
turned off.
Page is loading ...

PRECAUTIONS
mm
Maintenance
Clean the unit only as recommended in the Operating
Instructions.
Damage Requiring Service
Have the units serviced by a qualified service technician if
–The AC power cord or plug has been damaged
- Foreign objects or liquid have gotten inside the unit
–The unit has been exposed to rain or water
–The unit does not seem to operate normally
–The unit exhibits a marked change in performance
–The unit has been dropped, or the cabinet has been
damaged
DO NOT ATTEMPT TO SERVICE THE UNIT YOURSELF.
Page is loading ...

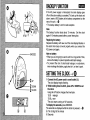
BACKUP FUNCTION
mm
If the AC power supply is interrupted, the clock display goes
off and the alarm setting is canceled. To back up the clock and
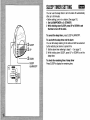
alarm, insert a 6F22 battery in the battery compartment on the
rear of the unit. + @
● The backup battery is not for radio reception.
Note
The backup function lasts about 10 minutes. Set the clock
again if 10 minutes passed after a power interruption.
Replacing the battery
Replace the battery with new one if the clock display flashes or
the alarm timer does not work properly when you connect the
AC power cord again.
Note on battery
● When you are not going to use the unit for a long period of time,
remove the battery to prevent possible electrolyte leakage.
● To prevent the risk of electrolyte leakage or explosions,
never recharge the battery, apply heat to it, or take it apart.
SETTING THE CLOCK +6)
1
2
Connect the AC power cord to a wall outlet (@).
The clock display begins flashing.
While holding down CLOCK, press UP or DOWN to set
.
the clock. -
Using the UP button changes the time faster.
12:00 midnight
12:00. noon
The clock starts running at “00 seconds.
To display the seconds, press SNOOZE.
The seconds are displayed while the button is pressed. + @
@ The 1st digit of the minute
@ Seconds
Page is loading ...

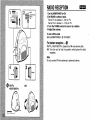
RADIO RECEPTION
1 Set ALARMIPOWER to ON.
2 Set BAND to select a band.
Set to TVL to receive 2 – 6 ch on TV.
Set to TVH to receive 7 – 13 ch on TV.
3 Turn the TUNING control to tune into a station.
4 Adjust the volume.
To turn off the radio
Set ALARM/POWER to (!) STANDBY.
For better reception + @
FM/TVL, WEATHER/TVH: Extend the FM wire antenna fully.
AM: Turn the unit to find the position which gives
reception.
Note
Do not connect FM wire antenna to external antenna.
the ‘best
Page is loading ...

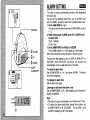
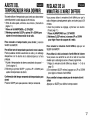
m
1
ALARM
MODE
l+;:
2“
$
m
3 =J
ALARM/OFF
BUZZER .
G
6STAND; ~
#
-.
ALARM SETTING
The radio or buzzer automatically sounds at the designated
time every day.
You can set two different alarm times, one in ALARM 1 and
one in ALARM 2, so that the alarm timer operates twice a day.
1 Set ALARM MODE to 1 or 2.
You cannot set the alarm time when ALARM MODE is set to
1+2.
2 While holding down ALARM, press UP or DOWN to set
the alarm time.
12:00 midnight
12:00. noon
3 Set ALARMIPOWER to RADIO or BUZZER.
The ALARM indicator 1 or 2 (@) lights up in the display.
When the preset time comes, the radio or buzzer sounds.
To turn off the alarm, press SLEEP ALARM/OFF or
SNOOZE. When SNOOZE is pressed, the buzzer will
automatically come on again after about 7 minutes.
To check the alarm time
Set ALARM MODE to 1 or 2 and press ALARM. The alarm
time will be displayed.
To change the alarm time
Set the alarm time again.
Listening to radio while the alarm is set
Set ALARM/POWER to ON. After listening, set the switch to
RADIO or BUZZER.
Note
● The radio or buzzer automatically turns off after about 1 hour.
● To cancel the alarm before the preset time comes, set
ALARM/POWER to (!) STANDBY. The ALARM 1 and
ALARM 2 indicators go off in the display.
Page is loading ...

ALARM SETTING
To set the alarm timer to sound twice a day
1 Set two alarm times ALARM 1 and 2 respectively referring
to steps 1 and 2 on page 12.
2 Set ALARM/POWER to RADIO or BUZZER.
3 Set ALARM MODE to 1 + 2.
The ALARM 1 and ALARM 2 indicators (@) light up in the
display.
About the buzzer sound
QThe buzzer tones of ALARM 1 and 2 are different.
● The buzzer volume is fixed and cannot be set with the
VOLUME control,
Note
● When the alarm times set on ALARM 1 and 2 are the same,
the alarm timer functions once at the preset time.
● You cannot set buzzer and radio alarms at the same time.
Page is loading ...

2
2
2
SLEEP
UP
DOWN
m
1 ?%??l
BUZZER .
=$
ALARM/OFF
SLEEP TIMER SETTING -
You can use the sleep timer to turn the radio off automatically
after up to 59 minutes.
● Before setting, tune in to a station. (See page 10.)
1 Set ALARM/POWER to (!) STANDBY.
2 While holding down SLEEP, press UP or DOWN to set
the time to turn off the radio.
To cancel the sleep timer, press SLEEP ALARM/OFF.
To use both the sleep timer and the alarm
You can fall asleep listening to the radio and still be awakened
by the radio/buzzer alarm at a preset time.
1 Set the alarm timer referring to steps 1-3 on page 12.
2 While holding down SLEEP, press UP or DOWN to set the
sleep timer.
To check the remaining time of sleep timer
Press SLEEP to display the remaining time.
Page is loading ...

SPECIFICATIONS
Power source
output
Power consumption
Speaker
Frequency range
Antennas
Dimensions (W x H x D)
Weight
AC 120 V, 60 HZ
280 mW (EIAJ)
4W
57 mm
FM: 87.5 – 108 MHz
AM: 530– 1,710 kHz
TV:2–13th
WEATHER: 162.4-162.55 MHz
FM wire antenna
Ferrite bar antenna for AM
137x 160x 128mm
(5 ‘/2X 6 3/8
X 5 ‘/8 in.)
672 g (1.48 Ibs.)
● The specifications and external appearance are subject to
change without notice.
● Specifications, trade mark and model name are marked on
the bottom of the unit.
Note
Keep cassette tapes, magnetic cards and other magnetically
recorded materials away from the speaker as the recorded
information may be erased or noise on cassette tapes may
occur.
To clean the cabinet
Use a soft cloth lightly moistened with a mild detergent
solution.
Do not use strong solvents, such as alcohol, benzine or
thinner,
Page is loading ...

AIWA CO.,LTD.
88-RU4-901 -11
980323 BY0-OX
Printed in Hong Kong
-
 1
1
-
 2
2
-
 3
3
-
 4
4
-
 5
5
-
 6
6
-
 7
7
-
 8
8
-
 9
9
-
 10
10
-
 11
11
-
 12
12
-
 13
13
-
 14
14
-
 15
15
-
 16
16
-
 17
17
-
 18
18
-
 19
19
-
 20
20


Ask a question and I''ll find the answer in the document
Finding information in a document is now easier with AI
in other languages
- français: Aiwa FR-A308 Manuel utilisateur
- español: Aiwa FR-A308 Manual de usuario
Related papers
-
Aiwa FR-A255u Operating instructions
-
-
-
-
-
-
-
-
-

