Page is loading ...

OWNER’S GUIDE
GS300 series
www.sharkclean.com
MANUEL DU PROPRIÉTAIRE

2 TOLL FREE: 1-800-798-7398
WARNINGS
WHEN USING YOUR SHARK
®
GARMENT
STEAMER, BASIC SAFETY PRECAUTIONS
SHOULD ALWAYS BE FOLLOWED, INCLUDING THE
FOLLOWING:
READ ALL INSTRUCTIONS BEFORE USING YOUR
GARMENT STEAMER.
DANGER OF SCALDING
Please use caution when using the garment steamer.
The steam emitted from the openings is very hot.
POLARIZED PLUG:
To reduce the risk of electric shock, this appliance has
a polarized plug (one blade is wider than the other). As
a safety feature, this plug will fit into a polarized outlet
only one way. If the plug does not fit fully into the outlet,
reverse the plug. If it still does not fit, contact a qualified
electrician. Do not attempt to defeat this safety feature.
Do not change the plug in any way.
IMPORTANT SAFETY INSTRUCTIONS
For Household Use Only
1. USE THE SYSTEM ONLY FOR ITS INTENDED USE AS
DESCRIBED IN THIS MANUAL.
2. ONLY USE WATER. To extend the life of your 3 in 1
Fabric Steamer, we recommend using distilled water
especially if you live in an area with hard tap water.
3. DO NOT add cleaning solutions, scented perfumes,
oils, or any other chemicals to the water used in this
appliance as this may damage the unit or make it
unsafe for use.
4. Use of any substances other than manufacturer’s
recommended accessories will automatically void your
warranty.
5. DO NOT use outdoors.
6. DO NOT leave the appliance unattended when
plugged in.
7. Always unplug the power cord from the electrical outlet
when not in use, when filling the water tank and before
cleaning.
8. DO NOT allow to be used as a toy.
9. DO NOT put any objects into openings or operate with
any opening blocked.
10. DO NOT use on leather, suede, vinyl, plastic or other
delicate steam sensitive materials. Always determine
the colorfastness of any fabric before using the
fabric steamer by testing it on a small portion of the
garment’s underside.
11. This appliance and the accessories become hot during
use. Exercise care when changing accessories and
follow removal and changing instructions as outlined
in the manual. Do not change frames while the unit is
turned on. Turn the unit off, wait for the unit to cool,
and then change frames.
12. The garment steamer can be used in a vertical or
horizontal motion. NEVER hold the steam head down
while at rest or tilt it in a backward position as this may
result in discharge.
13. When cleaning the garment steamer, unplug the power
cord and clean with a dry or damp cloth. DO NOT pour
water on the unit or use alcohol, benzene or paint
thinner on the unit.
14. NEVER attempt to steam clothing while it is
being worn.
15. To protect against a risk of fire, electric shock,
or injury:
a. To avoid circuit overload, DO NOT operate
another appliance on the same socket (circuit)
as the fabric steamer.
b. DO NOT immerse any part of the system in
water or other liquids.
c. DO NOT pull power cord to disconnect
from outlet; instead, grasp plug and pull to
disconnect.
d. DO NOT use extension cords or outlets with
inadequate current carrying capacity. If
an extension cord is absolutely necessary,
use a 15-ampere cord. Cords rated for less
amperage may overheat. Use care to arrange
the cord so that it cannot be pulled or tripped
over.
e. DO NOT operate the system with a damaged
cord or plug, or if the appliance or any other
part of the system has been dropped or
damaged.
f. DO NOT disassemble or attempt to repair the
fabric steamer. Return the system to EURO-
PRO Operating LLC for examination and repair.
Incorrect reassembly or repair can cause a risk
of electrical shock or injury to persons when
the fabric steamer is used.

3www.sharkclean.com
SAVE THESE
INSTRUCTIONS
g. DO NOT handle plug or fabric steamer with wet
hands or operate without shoes.
h. DO NOT pull or carry by power cord, use power
cord as a handle, close a door on the power
cord, or pull the power cord around sharp
corners or edges.
i. DO NOT allow power cord to touch hot
surfaces.
j. ALWAYS disconnect system from electrical
outlet when filling the water tank or emptying
and when not in use.
k. NEVER aim or direct steam towards people,
animals, or plants. The steam is very hot
and can cause burns. Burns can occur from
touching hot metal parts, steam, steam
bonnets or frames.
l. DO NOT operate the product while under the
influence of drugs, alcohol or medications.
m. DO NOT operate in the presence of explosive
and/or flammable fumes.
n. Store your appliance indoors in a cool, dry area
out of the reach of children.
o. Keep your work area well lit.
p. Let the system cool completely before
putting away.
q. Keep out of the reach of children.
r. Burns could occur from touching hot metal,
hot water or steam. Use care when you turn a
steam appliance upside down, there may be
hot water in the reservoir.
CONTENTS
Quick Start Guide 4
Assembly 6
Using your Garment Steamer 8
Maintenance 10
Troubleshooting Guide 10
Warranty and Registration 11
Thank you
for purchasing
the Shark
®
3 in1 Fabric
Steamer
This manual covers model numers:
GS300 53
GS300C 53
Euro-Pro and Shark are trademarks of
Euro-Pro Operating LLC.
ENGLISH
TECHNICAL SPECIFICATIONS
Voltage: 120V., 60Hz.
Power: 1200 Watts
Water Capacity: 1150 ml (38.5 oz.)

4 TOLL FREE: 1-800-798-7398
ASSEMBLY
1 Set the base on the floor and
insert the telescoping pole, align
the groove of the pole with the
arrow on the base. Turn the pole
connector clockwise to secure.
(fig. 1)
2 Attach the steam nozzle cradle to
the telescoping pole. The garment
hook should face away from the
front of the base. (fig. 2)
3 Pull the release button (3) on the
base towards you. (2) Holding
the unit at a slight angle align
the slot on the front of the unit
with the base rib and insert it into
the base. (1) Then push down
to engage the latch. Then push
the release button in to lock it in
place. (fig. 3)
4 Align the notch on the inside of the
hose connector to the steam unit
and turn the connector clockwise.
Hang the steam nozzle on the
steam nozzle cradle. (fig. 4)
NOTE: The hose will remain stiff
until heated.
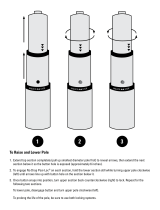
5 Adjust the telescoping pole to the
desired height.
QUICK START GUIDE
fig. 1
fig. 4
fig. 3
fig. 2
2
3
1

5www.sharkclean.com
ENGLISH
FILLING THE WATER TANK
1 Make sure the power switch is
OFF “0” then unplug the unit from
the power outlet.
2 Remove the water tank cap and
using a cup fill the water tank to
the max fill line. (fig. 5)
3 Replace the cap on the filling
inlet. Push the cap down and turn
clockwise making sure the arrows
are aligned.
USING THE STEAMER
Stand Mode
1 Make sure the steam bonnet is in
place during all usage.
2 Hang the garment on the garment
hook and begin steaming in an up
and down motion. (fig. 6)
Portable Mode
1 Remove the steam unit from the
base, pull the release button
towards you and lift the steam
unit off.
2 Hold the steam unit at waist level
in one hand or place on a table.
(fig. 7)
3 Steam the fabric in an up and
down motion.
fig. 5
PUSH
fig. 6
fig. 7

6 TOLL FREE: 1-800-798-7398
GARMENT STEAMER
COMPONENTS
A Unit / Garment Steamer
B Steam hose/steam nozzle with
steam bonnet and bristle brush
frame assembled. (Bonnet and
frame are removable)
C Telescoping Garment Pole
D Steam Nozzle Cradle
with Garment Hook
E Unit Base
F Steam Nozzle
G Garment Hook
H Telescoping Garment Pole
Adjustment Clips
I Steam Hose with fabric cover
J Hose Connection
K Carrying Handle
L Water Tank Cap
M Power Switch
N Base Release Button
O Wheels
ASSEMBLY
YOUR GARMENT
STEAMER FEATURES
A
F
K
O
I
J
G
H
B
C
D
E
N
M
L

7www.sharkclean.com
ASSEMBLY
1 Remove all packaging from the
appliance. Do not plug in or turn
on until assembly is complete.
2 Set the base on the floor and
insert the telescoping pole, align
the groove of the pole with the
arrow on the base. Turn the pole
connector clockwise to secure.
(fig. 1)
3 Attach the steam nozzle cradle
to the top of the telescoping pole
and gently press down on the
cradle. The garment hook should
face away from the front of the
base. (fig. 2)
4 Pull the release button (3) on the
base towards you. (2) Holding
the unit at a slight angle align
the slot on the front of the unit
with the base rib and insert it into
the base. (1) Then push down
to engage the latch. Then push
the release button in to lock it in
place. (fig. 3)
5 Align the notch on the inside of
the hose connector to the steam
unit and turn the connector
clockwise to secure the hose to
the steamer. (fig. 4)
NOTE: The hose will remain stiff
until heated.
ENGLISH
6 Hang the steam nozzle on the
steam nozzle cradle.
7 Adjust the telescoping pole to the
desired height by unlocking the
three latches one by one. Extend
the pole to the appropriate height,
then lock the latch back in place
to secure.
fig. 1
fig. 4
fig. 2
fig. 3
2
3
1

8 TOLL FREE: 1-800-798-7398
fig. 6
PUSH
STEAM BONNET
1 The steam bonnet protects
fabrics from water marks and
filters impurities from tap water.
Attach the left side of the bonnet
over the nozzle and stretch the
bonnet across the nozzle securing
the right side of the bonnet.
(fig. 7)
2 To remove the bonnet, pull the
purple tab from the edge of the
bonnet and pull off.
IMPORTANT: The bonnet should
be in place at all times.
WARNING: The bonnet should
never be removed during use or
until the unit has cooled.
FILLING THE WATER TANK
1 Make sure the power switch is
OFF “0” then unplug the unit from
the power outlet.
2 Unscrew the water cap from
the inlet, the cap is tethered to
the water tank and can not be
completely removed. (fig. 6)
3 Using a cup fill the water tank to
the max fill line.
4 Replace the cap on the filling
inlet. Push the cap down and turn
clockwise to lock making sure the
arrows align.
IMPORTANT: The water cap must
be locked into place securely to
allow proper flow of water. Once
turned on, steam will not emit if
the water cap is not secure.
WARNING: Do not fill the water
tank when the unit is plugged in to
an electrical outlet.
WARNING: The steam is hot! Be
careful not to touch the steam
nozzle when the unit is turned on
or has been in use.
fig. 8
fig. 7
USING YOUR ACCESSORIES
ASSEMBLY- cont.
BRISTLE FRAME
1 The bristle brush frame provides
deep steam penetration for heavy
weight fabrics (denim, canvas,
cotton, etc.). It should be attached
over the steam bonnet.
2 The bristles of the frame should
be on top of the steam nozzle.
Attach the two tabs on the bottom
of the frame to the nozzle, then
lock into place using the upper
tab. (fig. 8)

9www.sharkclean.com
fig. 11
USING YOUR ACCESSORIES
ENGLISH
USING YOUR GARMENT STEAMER
STAND STEAMING
1 Plug the steamer into an electrical
outlet and turn the On/Off Switch
to the “I” position, a blue LED
light will illuminate. (fig. 9)
2 The steam will start emitting after
1 minute.
3 Hang your desired garment on the
garment hook. Begin steaming
the garment in an up and down
motion pressing the steam nozzle
on the fabric. (fig. 10)
CAUTION: Steam hose and metal
spring can become hot during use.
Never hold the hose while in use.
When steaming garments, hold it
always by the steam nozzle.
fig. 10
GARMENT HOOK
fig. 9
PORTABLE/TABLETOP
STEAMING
1 Use the steamer in portable or
tabletop mode to freshen fabrics
all around your home.
WARNING: Do not use on leather,
suede, or leather like materials.
2 Remove the steam unit from
the base, by pulling the release
button towards you (see assembly
section for more detail p. 6)
3 Plug the steamer into an electrical
outlet and turn the unit on.
4 Hold the unit at waist level in one
hand or place on a table. (fig. 11)
5 Begin steaming the fabric,
upholstery or garment in an up
and down motion pressing the
steam nozzle on the fabric.
IMPORTANT: Make sure to hold
the water tank level to the floor.
The steam hose should be fully
extended for best steam results
and to avoid gurgling.
WARNING: The steam hose and
metal spring become hot during
usage.

10 TOLL FREE: 1-800-798-7398
MAINTENANCE
PROBLEM
There is no steam.
The nozzle leaves water drops
on the garment.
Gurgling/Inconsistent Steam Flow
Unit won’t turn on.
SUGGESTED SOLUTION
1 Make sure the unit is plugged in and turned on.
2 The water tank might be empty, add water.
3 The water cap is not fully pushed in, press the cap down and turn clockwise
to secure tightly making sure the arrows are aligned.
1 Make sure the steam bonnet is attached to the nozzle.
2 The steam bonnet could be too wet, remove the bonnet and let it dry
before reusing.
3 The steam hose is bent, straighten the hose to eliminate condensation
build up.
1 The hose may be bent trapping steam or condensation. Simply straighten
the hose to eliminate condensation build up.
2 In portable usage the unit must be level to the floor with the hose extended
to generate continuous steam.
1 Make sure the unit is plugged in and turned into the “I” position.
To order any of the above replacement parts, go to www.sharkclean.com or call 1-800-798-7398.
CLEANING & STORING
1 Turn the steamer off “0” and
unplug from the electrical outlet.
Let the steamer cool for 30
minutes and empty the water
from the tank.
2 Hang the steam nozzle on the
cradle.
3 Collapse the telescoping pole
for compact storage. Wipe the
exterior of the steamer with
a damp cloth and wipe dry if
needed.
REPLACEMENT PARTS
A 100SDL Bristle Brush Frame
B XPD300 Steam Bonnet
4 Store the steamer in a cool
dry place.
5 We recommend to remove the
steam hose from the steam unit
and turn the water tank upside
down over the sink to empty any
excess water once a week. This
will prolong the life of the garment
steamer.
TROUBLESHOOTING GUIDE & REPLACEMENT PARTS

11www.sharkclean.com
WARRANTY & PRODUCT REGISTRATION
EURO-PRO ONE-YEAR (1) LIMITED WARRANTY
EURO-PRO Operating LLC warrants this product to be free from defects in material and workmanship for a period
of one (1) year from the date of the original purchase, when utilized for normal household use, subject to the
following conditions, exclusions and exceptions.
If your appliance fails to operate properly while in use under normal household conditions within the warranty
period, return the complete appliance and accessories, freight prepaid to:
• U.S.: EURO-PRO Operating LLC
For customer service support call 1-800-798-7398
or visit www.sharkclean.com
• Canada: EURO-PRO Operating LLC
4400 Bois Franc, St. Laurent, Québec H4S 1A7
If the appliance is found to be defective in material or workmanship, EURO-PRO Operating LLC will repair or
replace it free of charge. Proof of purchase date and $19.95 to cover the cost of return shipping and handling must
be included.*
Non-durable parts including, without limitation, filters, brushes and electrical parts which normally require
replacement are specifically excluded from warranty.
The liability of EURO-PRO Operating LLC is limited solely to the cost of the repair or replacement of the unit at our
option. This warranty does not cover normal wear of parts and does not apply to any unit that has been tampered
with or used for commercial purposes. This limited warranty does not cover damage caused by misuse, abuse,
negligent handling or damage due to faulty packaging or mishandling in transit. This warranty does not cover
damage or defects caused by or resulting from damages from shipping or repairs, service or alterations to the
product or any of its parts, which have been performed by a repair person not authorized by EURO-PRO Operating
LLC.
This warranty is extended to the original purchaser of the unit and excludes all other legal and/or conventional
warranties. The responsibility of EURO-PRO Operating LLC if any, is limited to the specific obligations expressly
assumed by it under the terms of the limited warranty. In no event is EURO-PRO Operating LLC liable for incidental
or consequential damages of any nature whatsoever. Some states do not permit the exclusion or limitation of
incidental or consequential damages, so the above may not apply to you.
This warranty gives you specific legal rights, and you may also have other rights which vary from state to state or
province to province.
* IMPORTANT: Carefully pack item to avoid damage in shipping. Be sure to include proof of purchase date
and to attach tag to item before packing with your name, complete address and phone number with
a note giving purchase information, model number and what you believe is the problem with item. We
recommend you insure the package (as damage in shipping is not covered by your warranty). Mark the
outside of your package “ATTENTION CUSTOMER SERVICE”. We are constantly striving to improve our
products, therefore the specifications contained herein are subject to change without notice.
PRODUCT REGISTRATION
Please visit www.sharkclean.com or call 1-800-798-7398 to register your new Shark
®
product within ten (10) days of
purchase. You will be asked to provide the store name, date of purchase and model number along with your name and
address.
The registration will enable us to contact you in the unlikely event of a product safety notification. By registering
you acknowledge to have read and understood the instructions for use, and warnings set forth in the accompanying
instructions.
ENGLISH

23www.sharkclean.com
Notes
/