Page is loading ...

2
Contents:
Introduction ....................................................................................... 3
Features ............................................................................................. 4
Body..................................................................................... 4
Electronics............................................................................ 4
Neck..................................................................................... 4
Hardware ............................................................................. 4
Construction....................................................................................... 5
Body..................................................................................... 5
Neck..................................................................................... 5
Pickups................................................................................. 5
Controls ............................................................................................. 5
Pickup Selector Switch......................................................... 5
Volume................................................................................. 6
Tone..................................................................................... 6
Output Jack .......................................................................... 6
Adjustments........................................................................................ 6
Torsion Rod.......................................................................... 6
Tremolo Bridge..................................................................... 7
String Retainer Bar................................................................ 8
Locking Topnut .................................................................... 8
String Installation.................................................................. 8
D-Tuner
™
Operation/Adjustment........................................... 8
Tremolo Bridge Height....................................................... 10
Tremolo Bridge Tension ..................................................... 10
Tremolo Arm...................................................................... 11
Fixed Bridge Assembly ....................................................... 11
String Intonation .............................................................................. 12
Care of Your Instrument................................................................... 13
Temperature & Humidity.................................................... 13
Strings................................................................................. 13
Finish.................................................................................. 14
Accessories......................................................................... 14
Español ............................................................................................16
Français ........................................................................................... 29
Deutsch .......................................................................................... 40
Warranty.......................................................................................... 56
5150
®
Stack/212 Combo Amps......................................................... 58

3
Introduction
For as long as I’ve been
playing guitar, I’ve always
been searching for a certain
feel and tone...I’ve experi-
mented by tearing apart and
reassembling hundreds of
guitars in different ways
searching for these qualities.
Although I’ve ruined a lot of
great guitars by having done
this, I have learned what it
takes to make a truly great
guitar. The Wolfgang
®
, after
years of trial and error, (for
me) is that guitar.
Based on the familylike
atmosphere, their commit-
ment to quality and the
camaraderie we established
during the research and
development process of the
5150
®
stack and combo
amplifier projects, Peavey
was my logical choice as
the company to bring my
ideas to life.
Our collective efforts in designing the Wolfgang guitar have
resulted in a versatile, quality-crafted guitar that feels great,
sounds great and is truly inspiring to play. I’ve already put
mine to the test in the studio and on tour and now it’s your
turn.
Stay Tuned,

4
Thank you for buying a Peavey EVH Wolfgang guitar. This
guitar was built by the most skilled craftsmen and made
from the finest materials available. As with all of our musi-
cal equipment, we have built our guitars using a combina-
tion of leading-edge technology and traditional handcraft-
ed methods. Ask your Peavey dealer for a full list of other
Peavey musical equipment and accessories.
EVH Wolfgang Features
Body
•
Figured maple top/basswood back or solid basswood
construction
•
Unique offset cutaway design with carved top
•
Cream or black top-edge binding
Neck
•
Birdseye maple neck and fingerboard, oil-finished
•
Dual graphite reinforcements and adjustable torsion rod
•
25 1/2" scale length, 22 jumbo frets
•
15" fingerboard radius
•
10 degree tilt-back headstock with 3+3 tuning machine
configuration
•
Bolt-on construction with contoured neck heel
Electronics
•
Two custom-wound Peavey humbucking pickups
•
Volume and tone controls
•
Switchcraft
®
3-way toggle switch and output jack
Hardware
•
Schaller
®
tuning machines w/pearloid or cream buttons
•
Peavey/Floyd Rose
®
licensed, double-locking tremolo
assembly or tune-o-matic/stop tailpiece fixed-bridge
assembly
•
D-Tuner
™
(available on tremolo model only)
•
Chrome-plated hardware finish

5
Construction
Body
The body of this instrument is constructed of select hard-
woods chosen specifically for tonal qualities as well as for
natural beauty and weight characteristics. The carved top and
offset, asymmetrical body design offer comfort, proper
balance and maximum playing ease. Cream or black edge
binding is also added to accent the body.
Neck
The select birdseye maple neck is crafted to provide
unmatched rigidity and freedom from warpage. The
single-piece neck features a fingerboard cut from the
same piece of wood to keep the color and grain
patterns consistent. This stress-relieved lamination also
adds increased stability. Additional strength is provided
by the dual graphite reinforcement bars and an easy
access, adjustable steel torsion rod. (See
Adjust-
ments–Torsion Rod
for adjustment instructions.)
Pickups
The two Peavey humbucking pickups, custom-wound to
Edward's specifications, supply optimal output and tonal
response. A two-step wax dipping process is used to pro-
vide ultra-low noise operation and resistance to micro-
phonic feedback. The pickups are mounted directly to the
body, which further reduces feedback at high volume lev-
els and offers enhanced tonal response.
Controls
Pickup Selector Switch (1)
This three-position switch allows selection of pickups
in various combinations. The selection possibilities
are as follows:
•
Up = Bridge pickup
•
Center = Both pickups
•
Down = Neck pickup

6
Volume (2)
The volume knob controls
the total signal delivered
from both pickups. Rotating
clockwise will increase vol-
ume; rotating counterclock-
wise will reduce volume.
Tone (3)
Rotating the tone knob
clockwise will result in
more treble (higher fre-
quencies) and a brighter
tonality; rotating counter-
clockwise will reduce the
amount of treble.
Output Jack (4)
The output jack accepts standard guitar patch cords.
(We recommend high-quality Peavey “shielded” patch
cords.)
Adjustments
Your instrument has been carefully adjusted at the Peavey
factory for accurate intonation and playing ease. However,
your playing style and requirements may necessitate addi-
tional adjustments. These should be made by your autho-
rized Peavey dealer; but with a little care and by closely
adhering to the following instructions, you may attempt
these adjustments yourself.
Please read the instructions
thoroughly before attempting
any adjustments
.
Torsion Rod (1)
All guitar necks have a slight amount of
bow to keep the strings from “buzzing”
on the frets. This instrument features an
4
3
2
1
1

7
easy access torsion rod adjustment wheel located at the end
of the neck. This wheel can be adjusted with a hex wrench
or small screwdriver. Just insert the tool into the adjustment
wheel and rotate accordingly.
1. Tune the instrument to standard (A-440) pitch.
2. Fret the sixth string (E) at the first and last frets.
3. Check for clearance between the string and the
eighth fret.
4. Clearance should be no less than .005" and no
more than .015".
5. To increase clearance‚ loosen (counterclock-
wise) the torsion rod adjustment wheel. Less
clearance (straightening of the neck) is
accomplished by tightening (clockwise) the
torsion rod adjustment wheel.
6. Retune the instrument and repeat steps 1-5 until
proper clearance has been achieved.
Tremolo Bridge
The Peavey/Floyd Rose
®
licensed, double-locking tremolo
system features a locking topnut, locking bridge saddles and
a steel bridge plate with a massive brass inertia block for
maximum tuning stability, sustain and tonal response. This
tremolo system has been carefully adjusted for accurate
intonation, playing ease and pitch change. To adjust this
unit properly, you must first understand the operating prin-
ciple. The strings are clamped at the locking topnut and
bridge areas, ensuring increased tuning stability during use.
Proper tremolo action is also a result of accurate balancing
between string tension and tremolo spring tension. This
instrument has been set up at the factory with high-quality
Peavey EVH Wolfgang guitar strings. Should you desire a
larger or smaller gauge of strings, the spring tension, as well
as the intonation, must be adjusted. For string changes, and
in case an adjustment needs to be made, read the instruc-
tions carefully.

8
String Retainer Bar (1)
The string retainer bar is used to pro-
vide the proper amount of downward
string pressure over the locking top-
nut. This should be adjusted only low
enough to keep the strings in contact
with the surface of the locking topnut,
which will prevent the strings from
going sharp in pitch after tightening
the locking topnut.
Locking Topnut (2) (at headstock)
With the supplied 3mm hex wrench, loosen the three locking
topnut screws to allow the strings to pass through the string
slots. Tune to pitch and tighten locking topnut screws until
snug.
DO NOT OVERTIGHTEN SCREWS.
String Installation
After loosening topnut screws (at headstock), use tuning
machines to remove string tension. Loosen string lock
bolts at bridge approximately three turns using the 3mm
hex wrench. Insert string end through tuning machines
and locking topnut. Cut off excess string length approxi-
mately one inch past string lock bolts. Insert string end
into bridge saddle (between saddle housing and lock
block) and tighten until snug. DO NOT OVERTIGHTEN.
Adjust fine tuning knobs to middle position. Stretch strings
and tune to pitch. Tighten locking topnut, stretch string
once more and fine-tune to pitch. (See
D-Tuner
™
Operation and Adjustment
below.)
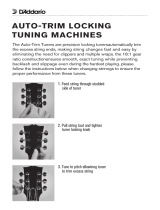
D-Tuner
™
Operation and Adjustment
The D-Tuner
™
is a unique
pitch dropping device that
offers instant “Drop-D” tun-
ing by dropping the low-E
string down to D. This is
located on the low-E string
lock bolt, and is actuated by
“E” position
fine-tuning adjustment screw
1
2

9
simply sliding the mecha-
nism in (for E) or out (for D).
Please read the instructions
carefully to understand the
operation and adjustment of
the D-Tuner.
1. Loosen the locking topnut screw for the low-E string.
2. Adjust the D-Tuner to the “D” position by pulling it
back (away from the tremolo).
3. Turn the fine-tuning adjustment screw for the low-E
string counterclockwise until it stops. Then, turn
the fine-tuning adjustment screw clockwise approxi-
mately one full turn. This will allow proper travel for
the D-Tuner.
4. Using the tuning machine, stretch and retune the low-E
string to “D.” Then, tighten the locking topnut screw and
fine tune the “D” using the fine-tuning adjustment
screw.
5. Slide the D-Tuner forward (toward the bridge) while
applying slight downward pressure. The D-Tuner will
now be in the “E” position. The fine-tuning screw will
now be positioned on the top, flat surface of the
D-Tuner.
6. Check the tuning of the low-E string.
7. If the low-E string is out of tune, use the supplied 1.5mm
hex wrench to turn the set screw on the D-Tuner clock-
wise if the pitch is flat, or counterclockwise if the pitch is
sharp.
8. Pull the D-Tuner back to the “D” position and check tun-
ing. Push it back to the “E” position, check tuning and
readjust the set screw if necessary.
9. Once the set screw on the D-Tuner is correctly adjusted,
use only the fine-tuning screw for tuning. (The fine-tun-
ing screw will simultaneously tune both notes in either
position.)
It is recommended that the D-Tuner, fine-tuning
adjustment screw and bridge saddle be
cleaned and lubricated to ensure smooth oper-
ation. The saddle should be allowed to pivot up and down
freely to ensure proper operation of the D-Tuner.
Changing string gauges or deviation from proper pitch
(A-440) will necessitate readjustment of the D-Tuner.
Note
set screw
“D” position

10
Tremolo Bridge Height
Bridge height may be adjusted by means of the bridge
pivot bolts. Turn the pivot bolts clockwise to reduce
bridge height. Turn the pivot bolts counterclockwise to
increase bridge height.
tremolo Bridge Tension
The tension of the tremolo bridge is
set by adjusting the spring tension
screws that hold the spring claw in
place. To gain access to the spring
tension screws and spring claw,
remove the spring cover on the back
of the guitar.
Per Edward’s specification, the
tremolo system is adjusted to rest on
the body surface for maximum sus-
tain and tonality. This will only
allow the strings to be dropped below pitch.
This also ensures tuning stability when using the D-Tuner
™
or when a string breaks. The instrument is equipped with
two springs, which allow proper tension for the string
gauge supplied with the guitar. The extra spring is
enclosed should you prefer to use a heavier string gauge.
Proper tremolo tension is achieved when the bottom of the
tremolo bridge plate rests on the top surface of the guitar
body without requiring excessive force to depress the
tremolo arm.
The tremolo can be adjusted to operate as a floating style
tremolo by loosening the spring tension. Turn the spring
tension screws clockwise to increase the spring tension,
and counterclockwise to decrease the spring tension.
This instrument should be tuned to proper pitch (A-440)
before and after making adjustments.
If the floating tremolo style is desired, it is
recommended that you remove the D-Tuner, as
its operation causes a change in string tension
that will affect the tuning of the other strings. An extra
string lock bolt is enclosed in the case, should the
D-Tuner be removed.
Note

11
CAUTION: Loosen all string tension before installing or
removing tension springs. Tremolo springs are designed
for high tension. Extreme care should be taken when
installing and removing these springs.
Tremolo Arm
The tremolo arm is inserted and screwed into the tremolo
arm socket on the bridge plate. This assembly can be
adjusted to control the amount of torque required to rotate
the tremolo arm. Some players prefer the tremolo arm to
stay in place when used. This can be accomplished by
using the supplied 12mm wrench to hold the top of the
tremolo arm socket while screwing the tremolo arm firmly
into place.
If you prefer to have the tremolo arm swing freely, loosen
the nut on the bottom of the tremolo arm socket. This is
accessible through the tremolo spring pocket. Edward
prefers an extremely loose feel, allowing approximately
one inch of play before the tremolo is actuated. This
adjustment accommodates Edward’s particular playing
style. It allows him to hold onto the tremolo arm while
picking without moving the tremolo until needed.
Fixed-Bridge Assembly
The fixed-bridge assembly on the EVH Wolfgang features a
recessed, low-profile design. This allows string height from
the body to be consistent with the tremolo bridge version
of the guitar. The height of the classic tune-o-matic style
bridge may be adjusted by using the supplied 2.5mm hex
wrench.
To decrease bridge height, turn the bridge height screws
clockwise. To increase bridge height, turn the bridge
height screws counterclockwise. The stop tailpiece may
also be adjusted to increase or decrease string tension
across the bridge. Lowering the tailpiece (turning screw
clockwise) will increase the string tension, while raising
the tailpiece (turning screw counterclockwise) will
decrease the string tension.

12
String Intonation
Accurate string intonation set-
tings ensure that your instrument
will play in tune at any point on
the neck. Although “perfect into-
nation” is an impossibility with a
fretted instrument, the proper
adjustments will maximize the
accuracy of individual notes up
and down the neck.
Intonation is set by comparing
the pitch of an open string to
the pitch of the same string
when played one octave higher
at the 12th fret. The actual “vibrating length” of that string
is varied until the notes are both at the correct pitch. The
vibrating length of the string is altered by adjusting the
individual saddles either
forward or backward, depending on whether the fretted
note is sharper or flatter in pitch than the open note.
This process should always be performed with
new strings. Intonation problems can often
result from worn strings. It is often difficult for
the untrained ear to determine when the open note and the
fretted note are at precisely the same pitch. Some players
find that comparing the 12th fret harmonic of the string
(rather than the open note) to the fretted note is much
easier.
A harmonic is played by plucking the string with the right
hand while touching the string with the left index finger (as
lightly as possible) directly above the 12th fret. The left fin-
ger is drawn away as quickly as possible after the string is
plucked, producing a ÒchimeÓ effect. This chimed note is
then compared to the fretted note. For greater ease and
accuracy, we recommend one of the many types of elec-
tronic guitar tuners that are available from most music
stores.
1. Ensure that the torsion rod and string-height settings
are accurate and the strings are new.
2. Tune the instrument to standard (A-440) pitch.
3. Hold the instrument in a normal playing position or
place the guitar on a clean, flat surface so that the
body is in contact with the work surface. Any pressure
on the neck will affect intonation settings.
Note

13
4. Play the first (E) string open and compare it to the
pitch of the same string when it is played at the 12th
fret. These notes should sound the same (actually,
there is an octave difference).
5. Using a 2.5mm hex wrench for the tremolo or a small,
flat blade screwdriver for the fixed bridge, adjust the
string saddle so that both the fretted and open notes
are the same. If the fretted note is sharper than the
open note, the vibrating length of the string must be
increased. Move the bridge saddle to the rear–away
from the pickups. If the fretted note is flat, the vibrat-
ing length must be shortened. Move the bridge saddle
forward–toward the pickups–to shorten the length.
It will often be necessary to retune the open
string to standard pitch after the bridge
position is altered.
6. Repeat steps 4 and 5 for the remaining strings.
7. Repeat steps 1-6 until the intonation of all the strings
is accurately adjusted.
Care of your Instrument
The EVH Wolfgang is a high-quality musical instrument
constructed from the finest materials, using the most up-
to-date production methods. With reasonable care, it
should provide many years of service and outstanding
playability.
Temperature and Humidity
It is important to protect your instrument from any extreme
or sudden changes in temperature or humidity. You should
store the instrument in its case when not using it.
Strings
Your instrument is equipped with high-quality Peavey EVH
Wolfgang strings. String life may be greatly extended by
frequent cleaning with string cleaner. Dirt and perspira-
tion tend to build up on the underside of the strings, so it
is often necessary to slide a rag between the strings and
the fingerboard. Dirt-laden strings cause tuning and into-
nation problems, as well as rust and corrosion.
Note

14
For optimum performance, strings should be changed
approximately once a month, or after about every twenty-
four hours of playing. Some players prefer to change
strings more often.
Finish
Your instrument has a polyester/urethane finish that is
both durable and weather-resistant, but requires care.
Regular cleaning with Peavey guitar polish is recommend-
ed. Between polishes, the instrument should be wiped
with a dry, soft cloth.
Accessories
Peavey offers a full line of accessories for your instru-
ments. Cases, amplifiers, strings, polishes, straps and more
are all available from a Peavey dealer near you.

15
WARNINGS
All amplification accessories, microphones, mixers,
etc., must be properly grounded and should be
utilized with a 3-wire mains system in order to
prevent electrical shock.
Do not come into contact with other electrical
apparatus when playing (or touching) your
instrument. The metal parts of this instrument are
grounded according to proper and accepted
industry practice, but it is possible to encounter an
electrical shock when coming into contact with
another electrical apparatus if it has improper
grounding facilities.
Do not use improper or poorly designed guitar
straps or other means of support. Possible injury
could result if improper, inferior, ill-fitting, or worn
out straps are used. The instrument could possibly
fall, causing bodily injury or damage to the
instrument or associated equipment if the holding
devices fail for any reason.
Guitar strings are made from very strong steel
alloys and are under considerable tension when
tuned to pitch. Exercise extreme care when tuning
(especially above concert pitch) or when employing
string bending or "popping" playing techniques. The
possibility of string breakage and personal injury
exists under these conditions.
The patch cord between the guitar and
the amplifier is an extremely important
link for optimum performance. A high-quality,
well-shielded cord should be used in this
application.
5150
®
is a registered trademark of Edward Van Halen.
Floyd Rose
®
is a registered trademark of Floyd Rose
Marketing, Inc.
Schaller
®
is a registered trademark of Schaller Electronic.
Switchcraft
®
is a registered trademark of Switchcraft, Inc.
Note

56
Peavey Guitar One-Year Limited
Warranty/Remedy
PEAVEY ELECTRONICS CORPORATION (“Peavey”) warrants this guitar to be free
from defects in material and workmanship for a period of one year from date of
purchase. PROVIDED‚ however‚ that this limited warranty is extended only to the
original retail purchaser and is subject to the following conditions.
Conditions‚ Exclusions‚ and Limitations of Limited Warranty
This limited warranty shall be void and of NO EFFECT if:
1. The first purchase of the product is for the purpose of resale; or
2. The original retail purchase is not made from an AUTHORIZED
PEAVEY DEALER; or
3. The product has been damaged by accident or unreasonable
use‚ neglect‚ improper service or maintenance‚ or other causes
not arising out of defects in material or workmanship.
This Limited Warranty shall not extend to or cover guitar strings. Replacement of
guitar strings is deemed to be reasonable and necessary maintenance.
Purchaser’s exclusive remedy for breach of this limited warranty is repair of the
defect or replacement of the guitar‚ at the option of Peavey. Service work may be
performed by any Peavey Authorized Service Center or‚ if the service center is
unable to provide the necessary warranty service‚ you will be directed to the near-
est Peavey Authorized Service Center which can provide such service. Or... you
may return the guitar‚ postage prepaid and insured‚ along with a description of the
problem‚ proof of purchase‚ and a complete return address to:
PEAVEY ELECTRONICS CORPORATION
International Service Center
Hwy. 80 East
Meridian‚ MS 39301
If the defect is remedial under this warranty‚ and the other terms and conditions
expressed herein have been complied with‚ Peavey will repair or replace the prod-
uct and return it‚ freight collect‚ to the purchaser. Other than the postage and
insurance requirement‚ no charge will be assessed for such repair or replacement.
The liability of Peavey to the purchaser for any cost whatsoever‚ and regardless of
the form of action‚ whether in contract or in tort‚ including negligence‚ shall be
limited to actual damages up to an amount equal to the purchase price of the prod-
uct or $500.00.
Under no circumstances will Peavey be liable for any lost profits‚ any incidental
damages‚ or any consequential damages resulting from the use of or inability to
use the guitar‚ even if Peavey has been advised of the possibility of such damages.
The foregoing limitation of remedy will not apply to the payment of cost and dam-
age awards for personal injury or damage to real property or tangible personal
property caused by negligence on the part of Peavey.

57
This limited warranty is in lieu of any and all warrantiesâ
expressed or impliedâ including but not limited toâ implied war-
ranties of merchantability and fitness for a particular use; pro-
videdâ howeverâ that if the other terms and conditions neces-
sary to the existence of the expressed limited warrantyâ as
hereinbefore statedâ have been complied withâ implied war-
ranties are not disclaimed during the one-year period from date
of purchase of this product.
Some states do not allow limitation on how long an implied
warranty lastsâ or the exclusion or limitation of incidental or
consequential damagesâ so the above limitations or exclusions
may not apply to you. This warranty gives you specific legal
rightsâ and you may also have other rights which may vary
from state to state.
This limited warranty is the only expressed warranty on this
guitarâ and no other statementâ representationâ warranty or
agreement by any person shall be valid as to or binding upon
Peavey.
The warranty registration card and a legible copy of the proof
of purchase supplied to you by the authorized Peavey dealer in
connection with your purchase of this guitar should be accu-
rately completedâ mailed toâ and received by Peavey within
fourteen (14) days from the date of your purchase.
Should notification become necessary for any condition that would require correc-
tion‚ the registration card will help ensure that you are contacted and properly
notified.
If you move from the address shown on the warranty registration card‚ you should
notify Peavey of the change of address to facilitate receipt of any bulletins or other
forms of notification which may become necessary in connection with any condi-
tion that may require dissemination of information or correction.
The warranty of registration card and subsequent notices of change of address
should be mailed to:
Peavey Electronics Corporation
P.O. Box 2898
Meridian‚ MS 39302-2898
In the event of any modification of disclaimer of expressed or implied warranties
or any limitation of remedies contained herein conflicts with applicable law‚ then
such modification‚ disclaimer or limitation‚ as the case may be‚ shall be deemed
to be modified to the extent necessary to comply with such law.
The limited warranty is given by Peavey Electronics Corporation with respect to
equipment purchased in the United States of America.

58
The legendary 5150
®
sound of
Edward Van Halen
is now available in both stack and
combo. With Rhythm and Lead
channels voiced personally by
Edward Van Halen, the 5150 120
watt top features all-tube pre- and
power amps. Combined with 5150
Straight and 5150 Slant cabinets,
this stack supplies big, muscular
tone at any volume level. Months
of rigorous testing, many combi-
nations of speaker voicing and
cabinet construction were scruti-
nized and discarded before the
ultimate combination emerged.
Now, the new 5150 212 Combo
joins the 5150 amp stack, afford-
ing the recording guitarist or club
player the same signature tone
and drive in a compact, self-con-
tained package.
The development of the
5150 212 Combo was no
less intense than that of the
stack. Numerous prototypes
were built and tweaked until the
final combo kicked and screamed
with fury only a stack could attain.
At 60 watts, the all-tube 5150 212 Combo speaks through two
of the same Sheffield
™
1200 speakers found only in the 5150 4 x 12
cabinets. The addition of reverb adds a new dimension to the 5150’s
exceptional tone.
5150
®
212 Combo
5150
®
Stack

Look for our other
products and Accessories
at your local
Peavey dealer.
TM
®

©1998 Printed in USA 3/98
PEAVEY ELECTRONICS CORPORATION
711 A Street · Meridian‚ MS 39301 · USA
phone: (601)483-5365 · fax: (601)486-1278
80301829
/