Page is loading ...

1
2
my light | my style
EGLO
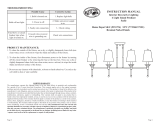
Model#: 202841A
Model#: 202842A
PACKAGE CONTENTS
PLANNING INSTALLATION
INSTALLATION
Use and Care Guide
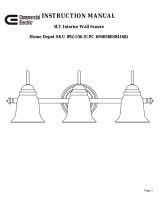
INTERIOR VANITY
Cross Bar
X 1
Read all instructions before assembly. Before starting installation of this fixture or removal of a previous fixture, disconnect the power by turning
off the circuit breaker or by removing the fuse at the fuse box. To avoid damaging this product, assemble it on a soft, non-abrasive surface such
as carpet or cardboard.
The manufacturer warrants this lighting fixture to be free from defects in materials and workanship for a period of one (1) year from date of purchase.
This warranty applies only to the original consumer and only to products used in normal use and service. If this proudct is found to be defective, the
manufacturer’s only obligation, and your exclusive remedy, is the repair or replacement of the product at the manufacturer’s discretion, provided that
the product has not been damaged through misuse, abuse, accident, modifications, alterations, neglect or mishandling.
AA BB CC
Outlet Box Screw
X 2
Wire Connector
X 3
INSTALLATION(Continued)
Warranty
WHAT IS COVERED
This warranty shall not apply to any product that is found to have been improperly installed, set-up, or used in any way not in accordance with the
instructions supplied with the product. This warranty shall not apply to a failure of the product as a result of an accident, misuse, abuse, negligence,
alteration, or faulty installation, or any other failure not relating to faulty material or workmanship. This warranty shall not apply to the finish on any
portion of the product, such as surface and/or weathering, as this is considered normal wear and tear.
The manufacturer does not warrant and specially disclaims any warranty, whether express or implied, of fitness for a particular purpose, other than
the warranty contained herein. The manufacturer specifically disclaims any liability and shall not be liable for any consequential or incidental loss or
damage, including but not limited to any labor/expense costs involved in the replacement or repair of said product.
WHAT IS NOT COVERED
Safety Information
Email our customer service at
or call 1-877-892-0007
1. Unscrew cap nuts (DD) from cross bar (AA). Save for later
use. Separate the cross bar (AA) from fixture body (A).
2. Attach cross bar (AA) to outlet box (not included) using
outlet box screws (BB).
Note: The mounting screws on the cross bar (AA)
should protrude out from the outlet box.
3. Strip 3/4 in. of insulation from fixture wire ends. Twist stripped
ends together with pliers (not included), black to black (power),
white to white (neutral). Snip ends. Wrap the ground wire from
the outlet box around the green screw preassembled on the
cross bar (AA), and then connect the ground wire from the
outlet box to the ground wire from the fixture.
Helpful hint: if the outlet box doesn’t have a ground wire, you
can attach the ground wire from the fixture directly to the green
screw on the cross bar (AA).
Attach wire connectors (CC) to ends. Tape wire connectors
(CC) and wires together with electrical tape (not included).
4. Place fixture body (A) onto mounting screws of the cross
bar (AA), securing with previously removed cap nuts (DD).
WARNING:Carefully read and understand the information given in this manual before beginning the assembly and installation.
Failure to do so could lead to electric shock, fire or other injuries which could be hazardous or even fatal.
WARNING: Be sure the electricity to the wires you are working on is shut off. Either remove the fuse or turn the circuit off.
NOTICE: Changes or modifications not expressly approved by the party responsible for compliance could void the user’s
authority to operate the equipment.
DD
Cap Nut
X 2
5. Install light bulbs (not included). Use three 60-watt max.
medium-base incandescent bulbs or CFLs or LEDs
equivalent (not included).
CC
AA
A
DD
A
/