Page is loading ...

FormNo.3360-254RevA
CommercialWalk-BehindMower
FloatingDeck,T-Bar,Gearwith32inCutting
Unit
ModelNo.39092—SerialNo.280000001andUp
Registeratwww.Toro.com.OriginalInstructions(EN)

Warning
CALIFORNIA
Proposition65Warning
Theengineexhaustfromthisproduct
containschemicalsknowntotheStateof
Californiatocausecancer,birthdefects,
orotherreproductiveharm.
ThissparkignitionsystemcomplieswithCanadian
ICES-002.
Important:Thisengineisnotequippedwitha
sparkarrestermufer.ItisaviolationofCalifornia
PublicResourceCodeSection4442touseoroperate
theengineonanyforest-covered,brush-covered,or
grass-coveredland.Otherstatesorfederalareas
mayhavesimilarlaws.
Theenclosed
Engine Owner’ s Man ual
issupplied
forinformationregardingtheUSEnvironmental
ProtectionAgency(EPA)andtheCalifornia
EmissionControlRegulationofemissionsystems,
maintenance,andwarranty.Replacementsmaybe
orderedthroughtheenginemanufacturer.
Introduction
Readthisinformationcarefullytolearnhowtooperate
andmaintainyourproductproperlyandtoavoidinjury
andproductdamage.Youareresponsibleforoperating
theproductproperlyandsafely.
YoumaycontactTorodirectlyatwww.Toro.comfor
productandaccessoryinformation,helpndinga
dealer,ortoregisteryourproduct.
Wheneveryouneedservice,genuineToroparts,or
additionalinformation,contactanAuthorizedService
DealerorToroCustomerServiceandhavethemodel
andserialnumbersofyourproductready.Figure1
identiesthelocationofthemodelandserialnumbers
ontheproduct.Writethenumbersinthespace
provided.
Figure1
1.Modelandserialnumberlocation
ModelNo.
SerialNo.
Thismanualidentiespotentialhazardsandhas
safetymessagesidentiedbythesafetyalertsymbol
(Figure2),whichsignalsahazardthatmaycauseserious
injuryordeathifyoudonotfollowtherecommended
precautions.
Figure2
1.Safetyalertsymbol
Thismanualuses2otherwordstohighlightinformation.
Importantcallsattentiontospecialmechanical
informationandNoteemphasizesgeneralinformation
worthyofspecialattention.
Contents
Introduction.................................................................2
Safety...........................................................................4
SafeOperatingPractices.......................................4
ToroMowerSafety...............................................5
SlopeChart..........................................................7
SafetyandInstructionalDecals.............................8
Setup..........................................................................10
1InstallingtheHandleAssembly........................10
©2008—TheToro®Company
8111LyndaleAvenueSouth
Bloomington,MN55420
2
Contactusatwww.Toro.com.
PrintedintheUSA.
AllRightsReserved

2InstallingtheFuelTank....................................11
3CheckingandAdjustingtheShiftLever
Plate...............................................................11
4InstallingtheControlRods..............................12
5ReadingtheManualandViewingthe
TrainingMaterial............................................13
ProductOverview......................................................14
Controls.............................................................14
Operation...................................................................15
AddingFuel.......................................................15
CheckingtheEngineOilLevel............................16
ThinkSafetyFirst...............................................16
OperatingtheParkingBrake...............................17
StartingandStoppingtheEngine........................17
OperatingtheBladeControlSwitch
(PTO)............................................................18
TheSafetyInterlockSystem................................18
DrivingForwardorBackward.............................18
UsingtheLowerControlBar..............................19
StoppingtheMachine.........................................20
TransportingMachines.......................................20
UsingtheSideDischarge....................................20
AdjustingtheHeight-of-Cut...............................21
AdjustingtheHandleHeight..............................21
UsingtheSideDischarge....................................22
OperatingTips...................................................22
Maintenance...............................................................24
RecommendedMaintenanceSchedule(s)................24
Lubrication.............................................................24
HowtoGrease...................................................24
LubricatingtheCasterandWheel
Bearings.........................................................25
GreasingtheTransmissionCouplers...................25
GreasingtheSpindleBearing..............................25
EngineMaintenance...............................................26
ServicingtheAirCleaner....................................26
ServicingtheEngineOil.....................................27
ServicingtheSparkPlugs....................................28
FuelSystemMaintenance.......................................30
ServicingtheFuelTank......................................30
ElectricalSystemMaintenance................................31
ServicingtheFuse..............................................31
DriveSystemMaintenance.....................................32
CheckingtheTirePressure.................................32
ReplacingtheCasterWheelFork
Bushings........................................................32
ServicingtheCasterWheelandBearings.............33
AdjustingtheElectricClutch..............................33
CoolingSystemMaintenance..................................34
CleaningtheAirIntakeScreen............................34
BrakeMaintenance.................................................34
ServicingtheBrakes...........................................34
BeltMaintenance....................................................35
InspectingtheBelts............................................35
ReplacingtheTractionDriveBelt........................35
ReplacingtheTransmissionBelt.........................36
ReplacingtheMowerBelt...................................36
MowerDeckMaintenance......................................37
ServicingtheCuttingBlades...............................37
CorrectingtheMowerQualityofCut..................39
RemovingtheDischargeCover...........................40
ReplacingtheGrassDeector.............................40
Storage.......................................................................41
CleaningandStorage..........................................41
Troubleshooting.........................................................43
Schematics.................................................................45
3

Safety
Note:Theadditionofattachmentsmadeby
othermanufacturersthatdonotmeetAmerican
NationalStandardsInstitutecerticationwillcause
noncomplianceofthismachine.
Improperuseormaintenancebytheoperatororowner
canresultininjury.Toreducethepotentialforinjury,
complywiththesesafetyinstructionsandalwayspay
attentiontothesafetyalertsymbol
,whichmeans
CAUTION,WARNING,orDANGER-“personalsafety
instruction."Failuretocomplywiththeinstructionmay
resultinpersonalinjuryordeath.
SafeOperatingPractices
ThefollowinginstructionsarefromANSIstandard
B71.4-2004.
Training
•ReadtheOperator’sManualandothertraining
material.Iftheoperator(s)ormechanic(s)cannot
readEnglishitistheownersresponsibilitytoexplain
thismaterialtothem.
•Becomefamiliarwiththesafeoperationofthe
equipment,operatorcontrols,andsafetysigns.
•Alloperatorsandmechanicsshouldbetrained.The
ownerisresponsiblefortrainingtheusers.
•Neverletchildrenoruntrainedpeopleoperateor
servicetheequipment.Localregulationsmayrestrict
theageoftheoperator.
•Theowner/usercanpreventandisresponsiblefor
accidentsorinjuriesoccurringtohimselforherself,
otherpeopleorproperty.
Preparation
•Evaluatetheterraintodeterminewhataccessories
andattachmentsareneededtoproperlyand
safelyperformthejob.Onlyuseaccessoriesand
attachmentsapprovedbythemanufacturer.
•Wearappropriateclothingincludinghardhat,safety
glassesandhearingprotection.Longhair,loose
clothingorjewelrymaygettangledinmovingparts.
•Inspecttheareawheretheequipmentistobeused
andremoveallobjectssuchasrocks,toysandwire
whichcanbethrownbythemachine.
•Useextracarewhenhandlinggasolineandother
fuels.Theyareammableandvaporsareexplosive.
–Useonlyanapprovedcontainer
–Neverremovegascaporaddfuelwithengine
running.Allowenginetocoolbeforerefueling.
Donotsmoke.
–Neverrefuelordrainthemachineindoors.
•Checkthatoperator’spresencecontrols,safety
switchesandshieldsareattachedandfunctioning
properly.Donotoperateunlesstheyarefunctioning
properly.
Operation
•Neverrunanengineinanenclosedarea.
•Onlyoperateingoodlight,keepingawayfromholes
andhiddenhazards.
•Besurealldrivesareinneutralandparkingbrakeis
engagedbeforestartingengine.Onlystartengine
fromtheoperator’sposition.
•Besureofyourfootingwhileusingthismachine,
especiallywhenbackingup.Walk,don’trun.Never
operateonwetgrass.Reducedfootingcouldcause
slipping.
•Slowdownanduseextracareonhillsides.Besure
totravelsidetosideonhillsides.Turfconditions
canaffectthemachine’sstability.Usecautionwhile
operatingneardrop-offs.
•Slowdownandusecautionwhenmakingturnsand
whenchangingdirectionsonslopes.
•Neverraisedeckwiththebladesrunning.
•NeveroperatewiththePTOshield,orotherguards
notsecurelyinplace.Besureallinterlocksare
attached,adjustedproperly,andfunctioningproperly.
•Neveroperatewiththedischargedeectorraised,
removedoraltered,unlessusingagrasscatcher.
•Donotchangetheenginegovernorsettingor
overspeedtheengine.
•Stoponlevelground,disengagedrives,engage
parkingbrake(ifprovided),shutoffenginebefore
leavingtheoperator’spositionforanyreason
includingemptyingthecatchersoruncloggingthe
chute.
•Stopequipmentandinspectbladesafterstriking
objectsorifanabnormalvibrationoccurs.Make
necessaryrepairsbeforeresumingoperations.
•Keephandsandfeetawayfromthecuttingunit.
•Lookbehindanddownbeforebackinguptobesure
ofaclearpath.
•Keeppetsandbystandersaway.
•Slowdownandusecautionwhenmakingturnsand
crossingroadsandsidewalks.Stopbladesifnot
mowing.
4

•Beawareofthemowerdischargedirectionanddo
notpointitatanyone.
•Donotoperatethemowerundertheinuenceof
alcoholordrugs.
•Usecarewhenloadingorunloadingthemachine
intoorfromatrailerortruck.
•Usecarewhenapproachingblindcorners,shrubs,
trees,orotherobjectsthatmayobscurevision.
Maintenanceandstorage
•Disengagedrives,setparkingbrake,stopengineand
removekeyordisconnectsparkplugwire.Waitfor
allmovementtostopbeforeadjusting,cleaningor
repairing.
•Cleangrassanddebrisfromcuttingunit,drives,
mufers,andenginetohelppreventres.Cleanup
oilorfuelspillage.
•Letenginecoolbeforestoringanddonotstorenear
ame.
•Shutofffuelwhilestoringortransporting.Donot
storefuelnearamesordrainindoors.
•Parkmachineonlevelground.Setparkingbrake.
Neverallowuntrainedpersonneltoservicemachine.
•Usejackstandstosupportcomponentswhen
required.
•Carefullyreleasepressurefromcomponentswith
storedenergy.
•Disconnectthebatteryorremovesparkplugwire
beforemakinganyrepairs.Disconnectthenegative
terminalrstandthepositivelast.Reconnectthe
positiverstandnegativelast.
•Usecarewhencheckingblades.Wraptheblade(s)or
weargloves,andusecautionwhenservicingthem.
Onlyreplaceblades.Neverstraightenorweldthem.
•Keephandsandfeetawayfrommovingparts.If
possible,donotmakeadjustmentswiththeengine
running.
•Keepallpartsingoodworkingconditionandall
hardwaretightened.Replaceallwornordamaged
decals.
ToroMowerSafety
Thefollowinglistcontainssafetyinformationspecic
toToroproductsandothersafetyinformationyoumust
know .
Thisproductiscapableofamputatinghandsand
feetandthrowingobjects.Alwaysfollowallsafety
instructionstoavoidseriousinjuryordeath.
Thisproductisdesignedforcuttingandrecyclinggrass
or,whenequippedwithagrassbagger,forcatching
cutgrass.Anyuseforpurposesotherthanthesecould
provedangeroustouserandbystanders.
GeneralOperation
•Besuretheareaisclearofotherpeoplebefore
mowing.Stopthemachineifanyoneentersthearea.
•Donottouchequipmentorattachmentpartswhich
maybehotfromoperation.Allowtocoolbefore
attemptingtomaintain,adjustorservice.
•UseonlyToroapprovedattachments.Warrantymay
bevoidedifusedwithunapprovedattachments.
•Checkcarefullyforoverheadclearances(i.e.
branches,doorways,electricalwires)before
operatingunderanyobjectsanddonotcontact
them.
SlopeOperation
Allslopesandrampsrequireextracaution.Ifyoufeel
uneasyonaslope,donotmowit.
•Removeobstaclessuchasrocks,treelimbs,etc.from
themowingarea.
•Watchforholes,rutsorbumps.Tallgrasscanhide
obstacles.
•Usecautionneardrop-offs,ditches,orembankments.
Themachinecouldsuddenlyturnoverifawheel
goesovertheedgeofaclifforditch,orifanedge
cavesin.
•Useextracarewithgrasscatchersorother
attachments.Thesecanchangethestabilityofthe
machine.
•Keepallmovementonslopesslowandgradual.Do
notmakesuddenchangesinspeedordirection.
•Mowslopessidetoside.
•Donotmowslopesgreaterthan15degrees.
Service
•Neverstorethemachineorfuelcontainerinside
wherethereisanopename,suchasnearawater
heaterorfurnace.
•Keepnutsandboltstight,especiallytheblade
attachmentbolts.Keepequipmentingood
condition.
•Nevertamperwithsafetydevices.Checksafety
systemsforproperoperationbeforeeachuse.
5

•Useonlygenuinereplacementpartstoensurethat
originalstandardsaremaintained.
•Checkbrakeoperationfrequently.Adjustandservice
asrequired.
6

SlopeChart
7

SafetyandInstructional
Decals
Safetydecalsandinstructionsareeasilyvisibletotheoperatorandarelocatednearanyareaof
potentialdanger.Replaceanydecalthatisdamagedorlost.
52-2010
54-0910
54-9220
66-1340
66-6380
67-5360
68-8340
82 - 2280
REVERSE TRACT ION DRIVE
82-2280
82-2290
93-1159
95-2814
8

98-0776
98-3256
98-4387
1.Warning—wearhearingprotection.
105-0884
106-0699
110-4971
1.Engine—stop
2.Engine—Start3.EngagebalethenpulloutonthePTO
toengagetheblade.
9

Setup
LooseParts
Usethechartbelowtoverifythatallpartshavebeenshipped.
ProcedureDescription
Qty.
Use
Handleassembly1
Flangedbolt,(3/8x1inch)
4
1
Flangenut,(3/8inch)
4
Installthehandleassembly.
Fueltankwithstudsinstalled1
Bolt,(5/16x7/8inch)
2
Locknut,(5/16inch)
2
Washer,(5/16inch)
4
Hoseclamp1
Lockwasher,(5/16inch)
2
2
Spring
2
Installthefueltank.
3
Nopartsrequired
–
Checkandadjusttheshiftleverplate.
Controlrods
2
Cotterpin
2
ClevisPin
2
Washer2
4
Hairpincotterpin2
Installthecontrolrods.
Operator’sManual
1
EngineOperator’sManual
1
PartsCatalog
1
Trainingmaterial1
5
RegistrationCard
1
ReadtheOperator’sManualandwatch
thetrainingmaterialbeforeoperating
themachine.
Note:Determinetheleftandrightsidesofthemachinefromthenormaloperatingposition.
1
InstallingtheHandleAssembly
Partsneededforthisprocedure:
1Handleassembly
4
Flangedbolt,(3/8x1inch)
4
Flangenut,(3/8inch)
Procedure
1.Alignhandlewithuppermountingholesinrear
frame(Figure3).
2.Securethehandleateachuppermountingholewith
aangebolt(3/8x1inch)andangenut(3/8
inch)(Figure3).
3.Selectthelowpositionforthelowermountinghole
(Figure3).
4.Securethehandleateachlowermountingholewith
aangebolt(3/8x1inch)andangenut(3/8
inch)(Figure3).
Note:Thehandlepositioncanbeadjustedtomatch
theoperator’sheightpreference.
10

Figure3
1.Upperhandle5.Uppermountinghole
2.Rearframe
6.Lowermountingholes
3.Flangenut,(3/8inch)
7.Lowposition
4.Flangebolt,(3/8x1inch)
8.Highposition
Note:Handleassemblymustbeinstalledbefore
fueltankisinstalled.
2
InstallingtheFuelTank
Partsneededforthisprocedure:
1Fueltankwithstudsinstalled
2
Bolt,(5/16x7/8inch)
2
Locknut,(5/16inch)
4
Washer,(5/16inch)
1Hoseclamp
2
Lockwasher,(5/16inch)
2
Spring
Procedure
1.Alignfueltankwiththetopoftherearframe
(Figure4).
2.Securetherightsideofthefueltanktotherear
framewith2bolts(5/16x7/8inch),lockwashers
(5/16inch)andwashers(5/16inch)(Figure4).
3.Securetheleftsideofthefueltanktotherear
framewith2studs,washers(5/16inch),springsand
locknuts(5/16inch)(Figure4).
Note:Tightenleftsideofthefueltankuntilitis
completelytightandthenunscrewlocknutonefull
turn.Thiswillallowthespringtowork.
Figure4
1.Bolt,5/16x7/8inch4.Stud
2.Lockwasher,(5/16inch)5.Spring
3.Washer,(5/16inch)
6.Locknut
Note:Removetheplasticcapfromthefueltting
beforeinstallingthefuelline.
4.Slidethehoseclampontothefuelline(Figure5).
5.Pushthefuellineontothefueltankconnectionand
secureitwithahoseclamp(Figure5).
Figure5
1.Fuelline
3.Fueltting
2.Hoseclamp
3
CheckingandAdjustingthe
ShiftLeverPlate
NoPartsRequired
Procedure
1.Shiftlevertosecondgearandcheckalignment
ofleverinslotofshiftleverplate.Theclearance
betweentopandbottomoftheshiftlevershould
beequal(Figure6).
11

Figure6
1.Shiftlever4.Squareholewasher
2.Shiftleverplate5.Springwasher
3.Rubbersealwasher
6.Locknut,3/8inch
2.Ifclearanceisnotcorrect,removeleverandbendit
slightlytoadjust(Figure6).
Note:Donotbendleverwhileitisattachedtothe
transmissionshaftordamagemayoccur.
3.Shiftlevertoneutralandcheckalignmentofleverin
slotofshiftleverplate.Theclearanceonthesidesof
shiftlevershouldbeequal(Figure6).
4.Ifclearanceisnotcorrect,loosenshiftleverplateand
adjustitside-to-side.Tightentheshiftleverplate.
Figure7
1.Shiftleverin2ndgear3.Shiftleverinneutral
position
2.Shiftleverplate
4.Equaldistance
4
InstallingtheControlRods
Partsneededforthisprocedure:
2
Controlrods
2
Cotterpin
2
ClevisPin
2Washer
2Hairpincotterpin
Procedure
1.Installthecontrolrodsintotheuppercontrolbar
andthebladecontrolbail.Securethecontrolrods
with2cotterpins(Figure8).
Figure8
1.Controlrod
3.Bladecontrolbail
2.Uppercontrolbar
4.Cotterpin
2.Makesuretherodttingsareequaldistanceonto
eachcontrolrod.Therodttingsshouldbe
approximately3-1/2inch(89mm)fromthestartof
thethreadsforthehandleslowestposition(Figure9).
3.Slideclevispinsthroughrodttingsandmounting
holesinidlerbrackets(fromoutside)(Figure9).
Securewithwashersandhairpincotters(Figure9).
Note:Makesurebrakerodisinstalledinfront(F)
mountingholeinidlerbracket.
12

Figure9
1.Controlrodandtting
5.Washer
2.3-1/2inch(89mm)
6.Hairpincotterpin
3.Idlerbracket
7.Rodtting
4.Clevispin
8.HoleF
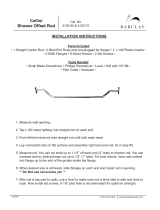
4.Checkthegapbetweenuppercontrolbarandxed
barwithwheeldrivefullyengaged.Gapshould
beapproximately1to1-1/4inch(25-32mm)
(Figure10).
Note:Theuppercontrolbarandxedbarmustbe
parallelwhentheuppercontrolbarisintheengaged,
drive,neutral,orbrakepositions.
5.Checktheoperation.Ifadjustmentisrequired,
removehairpincotter,washerandclevispinsecuring
controlrodttingtoidlerbracket.
6.Threadttingupordownonroduntilproper
positionisattainedandinstallthettingintotheidler
bracketwithclevispin,washerandhairpincotter.
Figure10
1.Controlrod
4.Uppercontrolbar
2.Fixedcontrolbar
5.1to1-1/4inch(25-32mm)
gap
3.Parkingbrakelever
7.Checktheparkingbrakeadjustment.Referto
CheckingtheBrakesinBrakeMaintenance.
5
ReadingtheManualand
ViewingtheTrainingMaterial
Partsneededforthisprocedure:
1
Operator’sManual
1
EngineOperator’sManual
1
PartsCatalog
1Trainingmaterial
1
RegistrationCard
Procedure
•ReadtheOperator’sManual.
•Viewthetrainingmaterial.
•Fillouttheregistrationcardandmailitinorregister
onlineatwww.Toro.com.
•Usetheoildrainhosewhenchangingtheengineoil.
13

ProductOverview
Figure11
1.Sidedischargechute4.Gastank
2.Mowerdeck
5.Controls
3.Engine6.Frontcasterwheel
Controls
Becomefamiliarwithallthecontrols(Figure12)before
youstarttheengineandoperatethemachine.
Figure12
1.Gearshiftlever
7.Bladecontrolbail
2.Powertakeoffswitch
(PTO)
8.Uppercontrolbar
3.Chokecontrol
9.Upperhandle
4.Lowerhandle10.Throttlecontrol
5.Lowercontrolbar11.Ignitionswitch
6.Parkingbrake
lever-releasedposition
12.Fuelshutoffvalve
ThrottleControl
Thethrottlecontrolhastwopositions:FastandSlow.
Choke
Usethechoketostartacoldengine.
BladeControlBail
Thebailisusedinconjunctionwiththebladecontrol
switch(PTO)toengagetheclutchtodrivethemower
blade.Releasethemowercontrolbailtodisengagethe
mowerblade.
BladeControlSwitch(PTO)
Thispullswitchisusedinconjunctionwiththeblade
controlbailtoengagetheclutchtodrivethemower
blade.
GearShiftLever
Thetransmissionhasveforwardspeeds,neutraland
reverse,andhasanin-lineshiftpattern.
Important:Donotshiftwhileunitismoving,as
transmissiondamagemayoccur.
14

UpperControlBar
Shifttothedesiredgearandpushforwardontheupper
controlbartoengageforwardtractionoperationand
pullbacktobrakeforwardmovement.Pullbackon
rightsideofuppercontrolbartoturnrightandleftside
toturnleft.
LowerControlBar
Shifttransmissiontoreverseandsqueezethelower
controlbarandhandletogethertoengagerearward
tractionassistoperation.
ParkingBrakeLever
Pullbackonuppercontrolbarandswingbrakeleverup
againsttheupperhandle(Figure12).
IgnitionSwitch
Thisswitchisusedinconjunctionwithrecoilstarterand
hastwopositions:RunandOff.
RecoilStarter
Pullrecoilstarterhandletostartengine(notshownin
Figure12).
FuelShutOffValve
Closethefuelshutoffvalvewhentransportingor
storingmower.
Operation
AddingFuel
UseUnleadedRegularGasolinesuitablefor
automotiveuse(85pumpoctaneminimum).Leaded
regulargasolinemaybeusedifunleadedregularisnot
available.
Important:Neverusemethanol,gasoline
containingmethanol,orgasoholcontainingmore
than10%ethanolbecausethefuelsystemcouldbe
damaged.Donotmixoilwithgasoline.
Incertainconditions,gasolineisextremely
ammableandhighlyexplosive.Areor
explosionfromgasolinecanburnyouand
othersandcandamageproperty.
•Fillthefueltankoutdoors,inanopenarea,
whentheengineiscold.Wipeupany
gasolinethatspills.
•Neverllthefueltankinsideanenclosed
trailer.
•Donotllthefueltankcompletelyfull.Add
gasolinetothefueltankuntilthelevelis1/4
to1/2inch(6to13mm)belowthebottomof
thellerneck.Thisemptyspaceinthetank
allowsgasolinetoexpand.
•Neversmokewhenhandlinggasoline,and
stayawayfromanopenameorwhere
gasolinefumesmaybeignitedbyaspark.
•Storegasolineinanapprovedcontainerand
keepitoutofthereachofchildren.Never
buymorethana30-daysupplyofgasoline.
•Donotoperatewithoutentireexhaust
systeminplaceandinproperworking
condition.
15

Incertainconditionsduringfueling,static
electricitycanbereleasedcausingaspark
whichcanignitethegasolinevapors.Are
orexplosionfromgasolinecanburnyouand
othersandcandamageproperty.
•Alwaysplacegasolinecontainersonthe
groundawayfromyourvehiclebeforelling.
•Donotllgasolinecontainersinsidea
vehicleoronatruckortrailerbedbecause
interiorcarpetsorplastictruckbedliners
mayinsulatethecontainerandslowtheloss
ofanystaticcharge.
•Whenpractical,removegas-powered
equipmentfromthetruckortrailerand
refueltheequipmentwithitswheelsonthe
ground.
•Ifthisisnotpossible,thenrefuelsuch
equipmentonatruckortrailerfroma
portablecontainer,ratherthanfroma
gasolinedispensernozzle.
•Ifagasolinedispensernozzlemustbeused,
keepthenozzleincontactwiththerimof
thefueltankorcontaineropeningatall
timesuntilfuelingiscomplete.
Gasolineisharmfulorfatalifswallowed.
Long-termexposuretovaporscancauseserious
injuryandillness.
•Avoidprolongedbreathingofvapors.
•Keepfaceawayfromnozzleandgastankor
conditioneropening.
•Keepgasawayfromeyesandskin.
UsingStabilizer/Conditioner
Useafuelstabilizer/conditionerinthemachineto
providethefollowingbenets:
•Keepsgasolinefreshduringstorageof90daysor
less.Forlongerstorageitisrecommendedthatthe
fueltankbedrained.
•Cleanstheenginewhileitruns
•Eliminatesgum-likevarnishbuildupinthefuel
system,whichcauseshardstarting
Important:Donotusefueladditives
containingmethanolorethanol.
Addthecorrectamountofgas
stabilizer/conditionertothegas.
Note:Afuelstabilizer/conditionerismost
effectivewhenmixedwithfreshgasoline.To
minimizethechanceofvarnishdepositsinthefuel
system,usefuelstabilizeratalltimes.
FillingtheFuelTank
1.Shuttheengineoffandsettheparkingbrake.
2.Cleanaroundfueltankcapandremovethecap.
Addunleadedregulargasolinetofueltank,untilthe
levelis1/4to1/2inch(6to13mm)belowthe
bottomofthellerneck.Thisspaceinthetank
allowsgasolinetoexpand.Donotllthefueltank
completelyfull.
3.Installfueltankcapsecurely.Wipeupanygasoline
thatmayhavespilled.
CheckingtheEngineOilLevel
Beforeyoustarttheengineandusethemachine,check
theoillevelintheenginecrankcase;refertoChecking
theEngineOilLevelinMaintenance.
Note:Determinetheleftandrightsidesofthe
machinefromthenormaloperatingposition.
ThinkSafetyFirst
Carefullyreadallthesafetyinstructionsanddecalsin
thesafetysection.Knowingthisinformationcould
helpyouoranybystandersavoidinjury.
Theuseofprotectiveequipmentforeyes,hearing,feet
andheadisrecommended.
Thismachineproducessoundlevelsinexcess
of85dBAattheoperator’searandcancause
hearinglossthroughextendedperiodsof
exposure.
Wearhearingprotectionwhenoperatingthis
machine.
16

Figure13
1.Warning—wearhearingprotection.
OperatingtheParkingBrake
Stoponlevelground,disengagedrives,engageparking
brake,shutoffengineandremovekey.Alwayssetthe
parkingbrakewhenyoustopthemachineorleaveit
unattended.
SettingtheParkingBrake
1.Pulltheuppercontrolbar(Figure14)rearwardand
holditinthisposition.
2.Lifttheparkingbrakelock(Figure14)upand
graduallyreleasetheuppercontrolbar.Thebrake
lockshouldstayintheset(locked)position.
Figure14
1.Uppercontrolbar3.Upperhandle
2.Parkingbrakelever-set
position
ReleasingtheParkingBrake
1.Pullrearwardontheuppercontrolbar.Lowerthe
parkingbrakelocktothereleasedposition.
2.Graduallyreleasetheuppercontrolbar(Figure14).
StartingandStoppingthe
Engine
StartingtheEngine
1.Makesuresparkplugwire(s)areinstalledonspark
plug(s)andfuelvalveisopen.
2.Movetheshiftlevertoneutral,settheparkingbrake
andturnignitionkeytorun.
3.Movethethrottlecontroltofastandmovethe
chokelevertotheonpositionbeforestartingacold
engine.
Note:Awarmorhotengineusuallydoesnot
requireanychoking.Tostartawarmengine,move
throttlecontroltothefastposition.
4.Grasprecoilstarterhandlermlyandpullout
untilpositiveengagementresults;thenpullhandle
vigorouslytostartengineandallowropetorecoil
slowly.
Important:Donotpullrecoilropetoitslimit
orletgoofthestarterhandlewhenropeis
pulledoutbecauseropemaybreakorrecoil
assemblymaybedamaged.
5.Movethechokelevertotheoffposition.
StoppingtheEngine
1.Movethethrottlelevertotheslowposition
(Figure15).
2.Letengineidlefor30to60secondsbeforeturning
theignitionkeytooff.
3.Turntheignitionkeytooff(Figure15).
Figure15
1.Throttlelever2.Ignitionkey
4.Settheparkingbrakeandremovekey.
5.Pullwireoffsparkplug(s)topreventpossibilityof
accidentalstartingbeforestoringmachine.
6.Closethefuelshutoffvalvebeforestoringmachine.
17

Important:Makesurefuelshutoffvalveis
closedbeforetransportingorstoringmachine,
asfuelleakagemayoccur.
OperatingtheBladeControl
Switch(PTO)
Thebladecontrolswitch(PTO)inconjunctionwith
thebladecontrolbailengagesanddisengagespowerto
theelectricclutchandmowerblades.
EngagingtheMowerBlades(PTO)
1.Releasetheuppercontrolbartostopthemachine
(Figure16).
2.Toengageblade,squeezebladecontrolbailagainst
theuppercontrolbar(Figure16).
3.Pullthebladecontrolswitch(PTO)upandrelease.
Holdthebladecontrolbailagainsttheupper
controlbarwhileoperating.
4.Repeattheproceduretoengagethemowerbladesif
thebladecontrolbailisreleased.
Figure16
1.Uppercontrolbar
3.Powertakeoffswitch
(PTO)
2.Bladecontrolbail
DisengagingtheMowerBlades(PTO)
Releasethebladecontrolbailtodisengagetheblades
(Figure16).
TheSafetyInterlockSystem
Ifsafetyinterlockswitchesaredisconnected
ordamagedthemachinecouldoperate
unexpectedlycausingpersonalinjury.
•Donottamperwiththeinterlockswitches.
•Checktheoperationoftheinterlock
switchesdailyandreplaceanydamaged
switchesbeforeoperatingthemachine.
UnderstandingtheSafetyInterlock
System
Thesafetyinterlocksystemisdesignedtopreventthe
mowerbladesfromrotatingunless:
•Thecontrolbailisdepressed.
•Thebladecontrolswitch(PTO)ispulledon.
Thesafetyinterlocksystemisdesignedtostopthe
mowerbladesifyoureleasethebladecontrolbail.
TestingtheSafetyInterlockSystem
ServiceInterval:Beforeeachuseordaily
Testthesafetyinterlocksystembeforeyouusethe
machineeachtime.
Note:Ifthesafetysystemdoesnotoperateas
describedbelow,haveanAuthorizedServiceDealer
repairthesafetysystemimmediately.
1.Settheparkingbrakeandstarttheengine;referto
StartingandStoppingtheEngineinOperation,
page15.
2.Squeezethebladecontrolbailagainstuppercontrol
bar.Thebladesshouldnotrotate.
3.Thencontinueholdingthebladecontrolbailand
pulluponthebladecontrolswitchandrelease.The
clutchshouldengageandthemowerbladesbegin
rotating.
4.Releasethebladecontrolbail.Thebladesshould
stoprotating.
5.Withtheenginerunning,pullupthebladecontrol
switch(PTO)andreleasewithoutholdingtheblade
controlbail.Thebladesshouldnotrotate.
DrivingForwardorBackward
Thethrottlecontrolregulatestheenginespeedas
measuredinRPM(revolutionsperminute).Placethe
18

throttlecontrolinthefastpositionforbestmowing
performance.
DrivingForward
1.Togoforward,movetheshiftlevertoaforward
gear(Figure17).
2.Releasetheparkingbrake;refertoReleasingthe
ParkingBrakeinBrakeMaintenance,page34.
3.Slowlypressontheuppercontrolbartomove
forward(Figure17).
Togostraight,applyequalpressuretobothendsof
theuppercontrolbar(Figure17).
Toturn,releasepressureontheuppercontrolbar
sideinthedirectionyouwanttoturn(Figure17).
Figure17
1.Uppercontrolbar
3.Shiftlever
2.Lowercontrolbar
DrivingBackward
1.Togobackward,movetheshiftlevertoreversegear.
2.Releasetheparkingbrake;refertoReleasingthe
ParkingBrakeinOperation,page15.
3.Slowlysqueezethelowercontrolbarandlower
handletogethertomoverearward(Figure17).
UsingtheLowerControlBar
Thisprocedureisfordrivingupacurb.Thiscanbe
performedwhiledrivingforwardorbackward.
Note:Somecurbsdonotallowthereardrivetiresto
contactthecurb.Ifthishappens,drivethemachineup
thecurbatanangle.
Abladecanbebentordamagedwhendriving
upacurb.Piecesofbladethatmaybethrown
couldseriouslyinjureorkillyouorbystanders.
Donotrunbladeswhiledrivingupacurb
forwardorbackward.
DrivingForwardUpaCurb
1.Disengagethemowerblades.
2.Selectrstgeartodrivethemachine.
3.Drivemachineuntilthecastorwheelscontactcurb
(Figure18).
4.Liftthefrontofthemachinebypushingdownon
thelowerhandle(Figure18).
5.Drivethemachineuntildrivewheelscontactthe
curb(Figure18).
6.Lowerthefrontofthemachine(Figure18).
Note:Bothdrivewheelsshouldcontactthecurb
andcasterwheelsstraight.
7.Atthesametimeengagethelowercontrolbarand
liftuponthelowerhandletodriveoverthecurb
(Figure17andFigure18).
Note:Liftinguponthelowerhandlewillassist
drivingthemachineupacurbandnotspinthe
drivewheels.
19

Figure18
1.LowerControlBar
engagedandmower
inreverse.
3.LowerControlBar
engagedandmower
goingforward.
2.Pulluptoassistmachine
DrivingBackwardUpaCurb
1.Disengagethemowerblades.
2.Selectreversetodrivemachine.
3.Drivethemachineuntildrivewheelscontactcurb
(Figure18).
Note:Bothdrivewheelsshouldcontactthecurb
andcasterwheelsstraight.
4.Atthesametimeengagelowercontrolbarandlift
uponthelowerhandle(Figure17andFigure18).
Note:Liftinguponthelowerhandlewillassist
drivingthemachineupacurbandnotspinthe
drivewheels.
StoppingtheMachine
Tostopthemachine,pullbackontheuppercontrol
bar,releasethebladecontrolbail,andturntheignition
keytooff.Alsosettheparkingbrakeifyouleavethe
machineunattended;refertoSettingtheParkingBrake
inOperation,page15.Remembertoremovethekey
fromtheignitionswitch.
Childrenorbystandersmaybeinjuredifthey
moveorattempttooperatethemachinewhile
itisunattended.
Alwaysremovetheignitionkeyandsetthe
parkingbrakewhenleavingthemachine
unattended,evenifjustforafewminutes.
TransportingMachines
Useaheavy-dutytrailerortrucktotransportthe
machine.Ensurethatthetrailerortruckhasall
necessarylightingandmarkingasrequiredbylaw.
Pleasecarefullyreadallthesafetyinstructions.
Knowingthisinformationcouldhelpyou,yourfamily,
petsorbystandersavoidinjury.
Totransportthemachine:
1.Stoptheengine,removethekey,lockthebrake,
closethefuelvalveandblockthewheels.
2.Securelyfastenthemachinetothetrailerortruck
withstraps,chains,cable,orropes.
3.Ifusingatrailer,securethetrailertothetowing
vehicleandsecureitwithsafetychains.
4.Ifapplicable,connectthetrailerbrakes.
UsingtheSideDischarge
Thismowerhasahingedgrassdeectorthatdisperses
clippingstothesideanddowntowardtheturf.
20
/