Compuprint 10300/10300plus Quick start guide

Category
Dot matrix printers
Type
Quick start guide

Compuprint 10300/10300plus is a versatile line printer designed for high-volume, continuous forms printing. With a print speed of up to 1000 lines per minute, it can quickly handle large print jobs. It supports multiple paper paths, including front and rear tractors, and can accommodate a variety of paper types and sizes. The printer also features a range of connectivity options, including parallel, serial, and Ethernet interfaces, making it easy to integrate into your existing network.

Compuprint 10300/10300plus is a versatile line printer designed for high-volume, continuous forms printing. With a print speed of up to 1000 lines per minute, it can quickly handle large print jobs. It supports multiple paper paths, including front and rear tractors, and can accommodate a variety of paper types and sizes. The printer also features a range of connectivity options, including parallel, serial, and Ethernet interfaces, making it easy to integrate into your existing network.

MAN
1
CAU
T
Unpa
The fol
l
are incl
carton:
- Ribb
o
- Powe
- CD fo
User’
s
- Quick
Guide
Contac
Attenti
o
shipm
e
Unpa
Movi
n
Attenti
are lo
c
center
o
For go
o
each p
e
hand i
n
and th
e
rear of
Loca
t
Fron
t
1
0xxxR01
10300
p
T
ION
Hazardous
v
sockets of t
h
Carefully fo
l
materials an
High tempe
r
minutes for
p
If the secon
d
protector co
v
insert any o
b
This printer
installed on
must suppo
r
the print acti
c
king
Y
our
l
owing items
uded in the
o
n Cartridge
r
Cord
r drivers and
s
Guides
Setup
t your point of
p
o
n! Always retai
e
nt of the printe
r
c
king the p
r
n
g the print
e
on: The lifting
c
ated forward
o
f gravity.
o
d printer balan
c
e
rson should pl
a
n
a gray lifting h
a
e
other hand un
d
t
he printer.
t
ing Printer
t
View
p
lus Qui
c
a
nd Setu
p
v
oltages are p
r
h
e power recep
t
l
low all cleanin
g
d solutions rec
o
r
ature; switch o
f
p
arts in this are
a
d
tractor unit is
ver is closed.
D
b
ject into the g
e
has an option
a
any other stan
d
r
t the printer w
e
on vibration.
Printe
r
p
urchase seller
n the original p
r
r
.
r
inte
r
e
r to the fin
a
handles
of the
c
e,
a
ce one
a
ndle
d
er the
Parts
R
c
k Installa
t
p
Guide
r
esent. Do not
t
acle.
g
instructions,
o
mmended.
f
f the printer an
a
to cool befor
e
not installed,
m
D
o not touch In
e
ars.
a
l printer pedes
t
d
or surface, thi
e
ight of 33kg (7
3
if any items are
r
inter packagin
g
a
l location
R
ear View
 
t
ion
touch the pins
using only
d
allow at least
e
handling.
m
ake sure the g
e
side the printe
r
t
al. If the printe
s stand or surf
a
3
lb) and with st
a
missing.
g
in case of any
1
s
or
the
t
20
ear
r
or
r is
a
ce
a
nd
C
C
o
w
h
y
o
-
T
a
n
e
x
c
a
-
T
h
o
-
Y
e
x
e
x
h
u
S
p
G
u
c
o
p
r
-
F
st
a
N
1
R
1.
2.
I
n
W
in
s
1.
2.
T
3.
4.
5.
A
6.
7.
T
8.
9.
A
1
0
1
1
hoosing a
s
o
nsider the
f
h
en you choos
e
o
ur printe
r
:
T
he distance be
t
n
d the host co
m
x
ceed the lengt
h
a
ble.
T
he location
m
o
rizontal and st
a
Y
our printer
x
posed to
d
x
treme heat,
u
midity (s
e
p
ecifications”
u
ide you find
o
You need
a
o
mpatible with
r
inter's power c
o
F
or best continu
o
a
cking, the for
m
ominal AC
i
Nominal
Voltage
0
0–240Vac
R
emoving th
O
pen the tract
o
shipping locks,
the lock swith t
h
O
pen the uppe
r
head, remove i
t
n
stalling th
e
W
e recommend
t
s
tall the ribbon
c
Remove the rib
guide, snap a
r
pins.
T
urn the ribbon
any slack in th
place of ribbon
Open the top c
o
cover.
S
lide the print
h
A
lign the cartri
d
right cartridge
s
Position the rib
b
perpendicular t
o
T
urn the ribbon
Position the s
n
assembly. Pus
until it snaps in
t
A
lign the ribbo
n
cartridge with
t
cartridge down
0
.Turn the ribbo
take up any sl
a
and forth to e
n
ribbon.
1
.If the ribbon
installed the rib
s
uitable loc
a
ollowing point
e
the location f
o
t
ween the print
e
m
puter must n
o
h
of the interfac
e
m
ust be sturd
y
a
ble.
must not b
e
d
irect sunligh
t
cold, dust
o
e
e “Print
e
in the User'
n the CD-Rom
)
a
power outl
e
the plug of th
e
o
rd.
o
us forms
m
s should be
i
nput powe
r
Voltage Rang
e
90–264Vac
e
Shipment
o
r area cover an
including the
2
h
e packing mat
e
r
printer cover. I
t
.
Ribbon Ca
t
hat you use an
c
artridge, follo
w
bon cartridge fr
o
r
m, ribbon adv
a
advance knob
e ribbon. If th
e
purchase to re
p
o
ver using the
s
h
ead to the cent
d
ge pins with th
e
s
upports.
b
on guide over
t
o
the print head
advance knob
n
ap arm with t
h
h
the snap ar
m
t
o place.
n
mounting pins
t
he slots in the
into place.
n advance kno
b
a
ck in the ribbo
n
sure that the ri
b
is not runnin
g
bon cartridge c
o

a
tion
t
s
or
er
o
t
c
e
y
,
b
e
t,
o
r
e
r
'
s
).
e
t
e
stacked o
surface b
e
printer. F
parking, t
h
must alwa
base of th
e
Area outsi
d
Width: 20
c
Depth:10
0
Height:80
c
r
requireme
n
e
Amps/W
a
2.9–1.
3
Locks
n
d make sure th
2
knurled ship
p
e
rial.
I
f there is a wir
e
rtridge
n
approved origi
w
these steps:
r
om the packag
e
ance knob, an
in the direction
e
ribbon does
n
p
lace the ribbo
n
s
mall handles
o
t
er of the printe
r
e
locking groov
e
the print head,
d
.
to take up any
s
h
e small lever
m
down onto t
h
on the left and
e
cartridge sup
p
b
again in the d
i
o
n, as you slide
b
bon guide run
s
g
freely, or to
o
rrectly, ensur
e
10300Pl
u
n the floor o
r
e
low the base
or successful
h
e input form
s
ys be lower t
h
e
printer.
d
e the printer:
c
m (7.9in.) eac
h
cm 39.4in.) ea
c
c
m (31.5in.)
n
ts
a
tts Pha
s
3
A Si
n
50-
6
at you remove
a
p
ing lock scre
w
e
tie around the
nal ribbon cart
r
e
. Locate the ri
b
d the ribbon
m
of the arrow to
n
ot move, cont
a
n
cartridge.
o
ne it her side
o
r
.
e
s on the left a
n
holding it
s
lack in the rib
b
up onto the ri
b
h
e ribbon lift a
s
right side of th
e
p
orts. Snap th
e
i
rection of the a
t
he print head
b
s
freely along t
h
ensure that y
o
e
that:
u
sQSG
r
on a
of the
forms
s
stack
h
an the
h
side
c
h side
s
e/Hz
n
gle
6
0Hz
a
ll
w
s. Store
print
r
idge. To
b
bon
m
ounting
take up
a
ct your
o
f the top
n
d
b
on.
b
bon lift
s
sembly
e
ribbon
e
ribbon
rrow to
b
ack
h
e
o
u have
MAN10xxxR01 2 10300PlusQSG
a.The left and right ribbon mounting pins are securely snapped
into the cartridge supports.
b.There are not wists or folds in the ribbon.
c.The ribbon is not catching on the print head.
d.The ribbon moves when you turn the ribbon advance knob in
the direction of the arrow. If the ribbon does not move, replace
the ribbon cartridge. Contact your place of ribbon cartridge
purchase if you believe that the ribbon is faulty.
12.Close the top printer cover.
The ribbon must
be between the
print head noose
and the mask.
Host Computer Connection
There are two types of Controller Boards:
1.Controller Board with a bidirectional
IEEE1284 parallel interface, Serial RS-
232/DB9, USB 2.0 and ASCII Ethernet
10/100 BaseT LAN interface.
2. Controller Board with a bidirectional
IEEE1284 parallel interface, Serial RS-
232/DB9, USB 2.0 and IPDS
Ethernet10/100 BaseT LAN interface.
Software Driver Selection
At this point it is necessary to configure your printer for your application
package. The installation procedures depend upon the host
environment. In a Windows® environment, the printer supports the
Plug&Play feature.
Power Connection
1. Make sure the power outlet is near the printer location and
easily accessible.
2.Make sure that the power switch is in 0 position(OFF).
3.Insert the power cable plug into the printer connector and the
other power cable end into a convenient outlet.
4.Turn the printer on, press the power switch in the position (ON).
Attention: Use always wall oulet with ground wire.
Attention: If, for any reason, the Controller Board was not correctly
installed in the printer, the printer will not work and the following
audio/visual symptoms will occur:
- The buzzer sounds continuously.
- The Operator Panel display is partially filled with solid black boxes.
- The Operator Panel LEDs are all lit. If this is the case, power off the
printer, re-seat the Controller Board, and power the printer on again.
Loading Fanfold Paper
This sequence describes how to load the fanfold paper with the push
tractor (default). For the other paper paths please see the User's
Guide you find on the CD Rom.
1.Turn the printer on.
2.Open the Push tractors cover turning it upwards and lay it on the top
of the printer.
3.Unlock the tractors by moving the sprocket levers up. Slide the left
tractor to the left.
4.Space the paper guides along the tractor bar. Open the left and right
sprocket covers.
5.Hold the fanfold paper in front of the sprockets and insert the paper
perforation on the left sprocket pins and close the left sprocket cover.
6.Insert the paper on the right sprocket pins.
7.Match the left sprocket for the first printing position, that is the left
margin must match the 9
th
mark on the printer cabinet. Note:
Aligning the left-hand edge of the paper past the 22
nd
spacer on the
printer cabinet will cause the paper to be misaligned with the Paper
Load Sensor resulting in a '001 End of Forms' error.
8.Adjust the right sprocket gently to remove slack from the paper.
Lock the left and right sprockets moving the sprocket levers to the
up position.
9.Close the Push tractors cover.
10.Press the STOP key to take the printer Not Ready.
11.Press the LOAD/EJECT key to load the paper into the printer.
12.Press the START key to put the printer Ready.

Operator Panel
The operator panel contains 5 status indicators, a 1-line by 16-
characters display panel, 9 printer function keys, and an audible alarm
as indicated in the figure below. For indicators and function keys there
is a short description. For details see User’Guide.
Indicators
ALTERNATE
Lit when the alternate function of the keys has been enabled pressing
the ALTERNATE key
PROGRAM Blinks when one of the printer set up procedures has been selected:
Program Configuration or Power-On Configuration
ON LINE
Lit when the printer can receive and print data (printer on line).
Blinks when there is data in the buffer and the printer is off line.
Unlit when the printer is disabled and the buffer does not contain any
data, or during the initialization, setup or tests
FRONT 1 Lit when the Front1 paper path is selected.
FRONT 2 Lit when the Front2 paper path is selected.
Keys
Pressing the function keys it is possible to activate the functions indicated by the word or
symbol signed near the key. Each key may have different functions, according to the selected
function modes: Normal, Alternate or Program.
Status Normal Alternate Progam
ON LINE Enables or disables the
printer.
-If this key is pressed while
powering the printer on, the
self test is printed; the
printout is stopped pressing
this key again.
-In an error condition, once
the error cause has been
Pressing this key,
the input buffer is
clear end a break
(250msec.) on a
serial interface is
sent.
The message
RESET&BREAK
is displayed
MAN10xxxR01 3 10300PlusQSG
removed, press this key to
enable the printer
PROGRAM Enables the printer setups
as follows:
-Pressing this key while
powering on the printer, the
Power-On Configuration is
selected.
-Pressing this key when the
printer is enabled without
printing or disabled the
Program Setup Is
enabled (PROGRAM
indicator lit).
Exits the printer
setups.
TEAR Moves the paper to the
tear-off position (TEAR
NORMAL function must be
selected in the Program
Setup).
Selects the pitch
to be used with
the currently
selected font.
The selected
pitch is valid until
the printer is
turned off.
MACRO Selects one of the user
macros (Macro1, Macro2,
Macro3 or Macro4). If you
want to select the displayed
macro, wait for 2 seconds
without pressing any key
and the parameters of this
macro will be set.
Scrolls the
parameters of the
functions or
macros forwards.
FONT Selects the font to be used
with the currently selected
pitch.
The selected font is valid
until the printer is turned off
or a new font is selected
using this key.
Scrolls the
parameters of the
functions or
macros
backwards.
LF
MICROFEED
Performs a line feed
according to the current
line spacing settings.
Moves the paper
forward in micro
steps. Keeping
the key pressed
the paper is
moved
continuously at
increasing peed.
Scrolls the setup
and macro
functions
backwards.
LOAD/FF
MICROFEED
Executes a FormFeed (FF):
when paper is loaded into
the printer ,It advances to
the ollowing page; if no
paper is loaded, it is
positioned for printing.
Moves the paper
backward in
micro steps.
Keeping
the key pressed
the paper is
moved
continuously at
increasing peed.
Scrolls the setup
and macro
functions
forwards.
PATH
PARK
Selects one of the paper
paths in off line status. The
parameters of the displayed
path are set after 2
seconds without pressing
any key.
Parks the paper
in the currently
selected paper
path
ALTERNATE Enables the lternative key
functions. If the printer is
receiving print data, press
the ON LINE key before
Pressing the ALTERNATE
key.
If no printing data are in the
print buffer, pressing the
ALTERNATE key, the
printer goes off line. The
display then shows
ALTERNATE to indicate
that the Alternate Function
of the keys is enabled
(ALTERNATE indicator lit).
Maybe used to abort paper
parking procedure.
When the printer is in
Program Setup Mode, this
key is disabled.
Disables the
alternative key
functions
ON LINE +
MACRO+
ALTERNATE
Lock or unlock the access
to the printer setups.
Printing the First Document
The SELF TEST, PROGRAM SETUP and CONFIGURATION are
print tests that may help familiarize you with the operator panel keys
and the configuration menu you can set. These tests printouts allows
you to check print quality and printer operations.
1. Loading a fanfold paper
2. While pressing ON LINE turn the printer on.
3. The printer now prints the SELF TEST. To stop it press again the
ON LINE key. The display will show:
SELF TEST
YOU HAVE JUST COMPLETED A SETUP AND CHECK OUT OF
THE PRINTER.
We recommend that you now print your printer configuration defaults.
Save this printout for future reference. You can create a printout of the
printer configuration by following these steps:
1. Make sure that the printer is turned off.
2. Press and hold the PROGRAM key pressed while powering on
the printer until the RELEASE KEY message is displayed.
As soon as the PROGRAM key gets released, the following
message will be displayed:
PRINTOUT? NO
3. Press the key to show YES
The printer Configuration setup is printed. The printout starts as soon
as you select this value.
The Configuration setup indicates:
- Emulation options
- Interface
- Functions
At this point, the Power On Configuration Setup procedure is finished.
Press the PROGRAM key again to exit and the printer has returned
on line.
4. Press PROGRAM key when the printer is turned on and is off line
or on line without printing. The displays will show :
PRINTOUT? NO
5. Press the key to show YES
The Program setup is printed. The Program setup indicates:
- The currently selected vlues
- The current selected macro is marked with the #x#
symbols (USER MACRO #x#).
- The current Firmware release.
Press the PROGRAM key again to exit and the printer has returned
on line.
See “Printer Configuration” in the User's Guide for more information
about these printouts.
Configuring the Printer
See the User's Guide on the CD-ROM for information about how to
make and save printer configuration setting changes
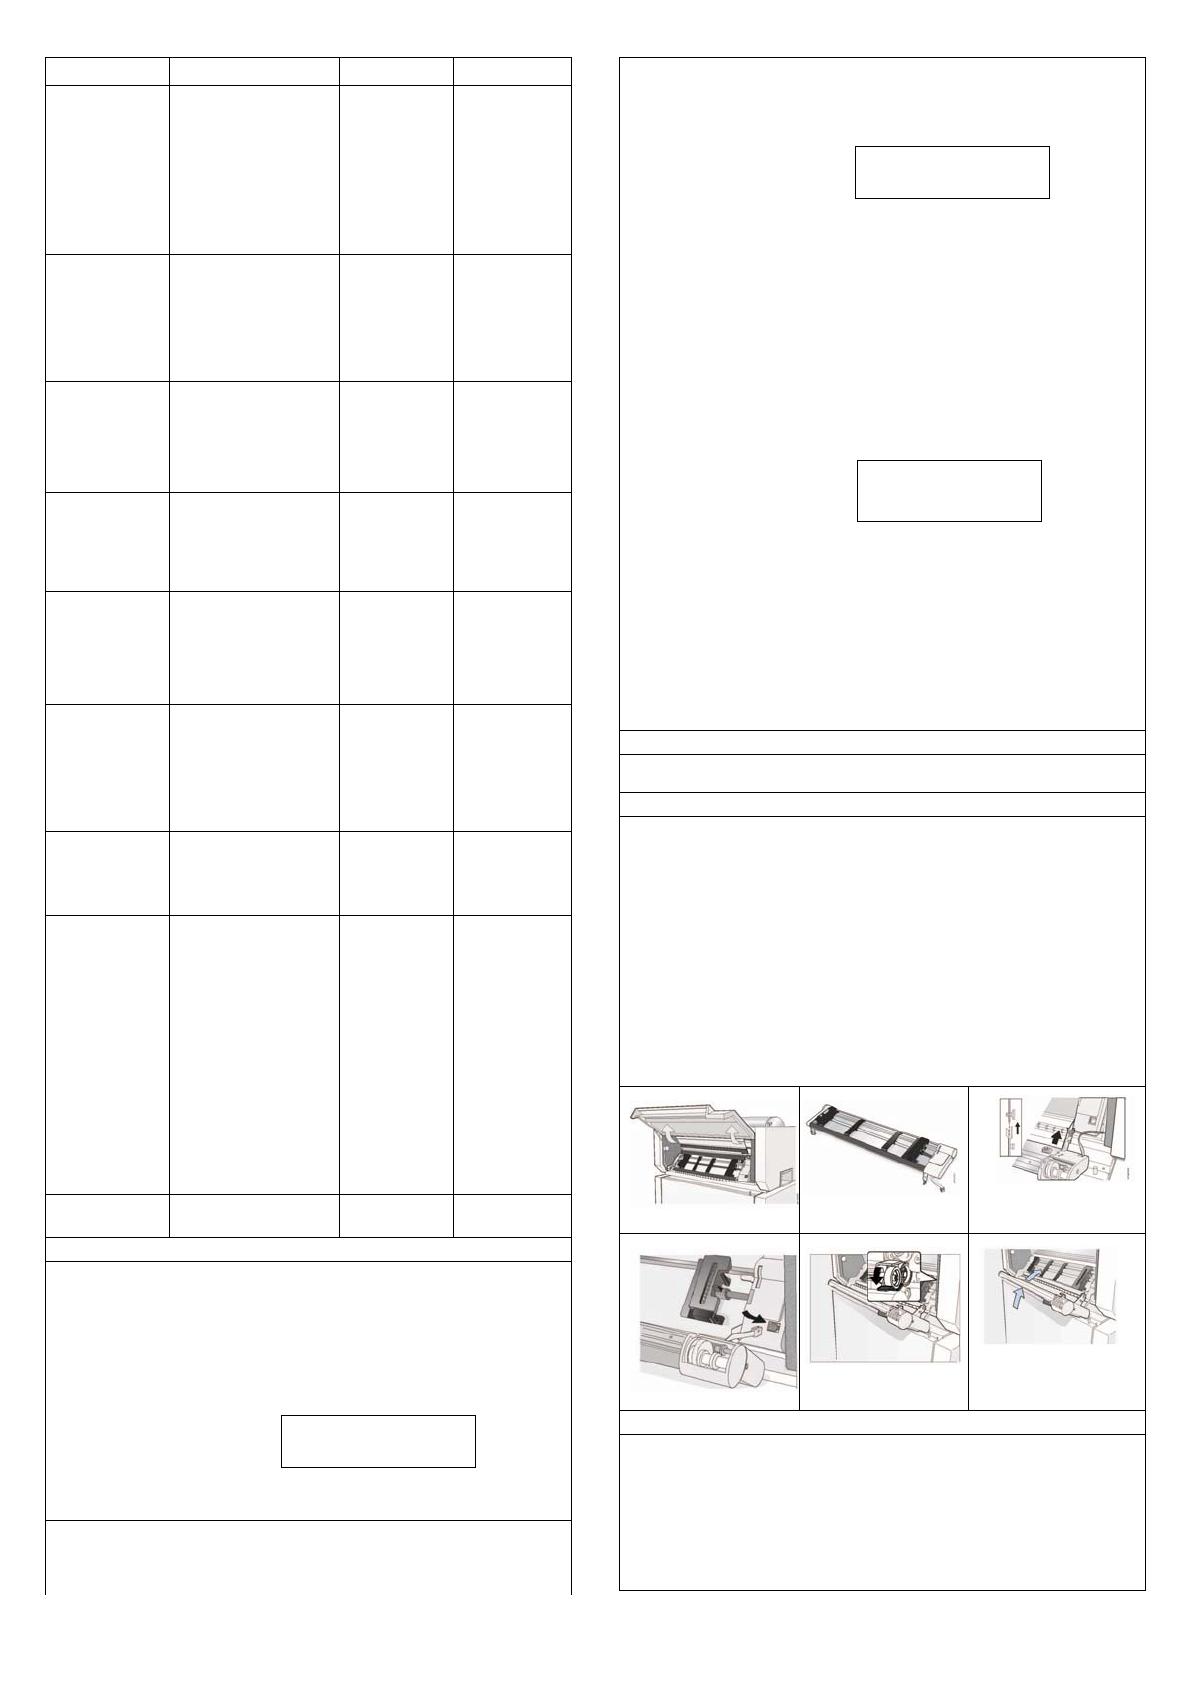
Installing the optional second tractor
A second optional tractor is available for your printer. This tractor may
be installed on the first (standard) front tractor.
1.Open the tractor area cover.
2.Unpack the second tractor.
3.Align the hooks on both sides of the second tractor with the pins on
the first tractor. Push the second tractor on the pins until it is fully
engaged.
4.Connect the second tractor to the first using the electrical
cable/connector provided on the tractor.
5.Rotate the tractor gear protection cover downwards to free the gear.
6.Rotate the second tractor into the closed operating position.
7.To load paper onto the first tractor when the second tractor is
installed, rotate the second tractor outstands insert paper between the
two tractors.
Removing and Installing the Controller Board
The printer is shipped with the controller board already installed.
The following operations explain how to remove the controller and
install a new one into the proper slot in the back of the printer before it
can be used.
Attention: Do not remove the Controller Board from the protective
package until instructed to do so. Static electricity, though harmless to
you, can damage sensitive Controller Board components.
Attention: Ensure that the printer is powered off before installing or
MAN
1
removi
n
1. Use
remov
e
the tw
o
2. Alig
n
in the
p
3. Ge
n
seated
correct
l
aligned
4. Firm
the scr
e
Main
t
Periodi
c
will alw
1. Turn
2. Unpl
3. Wait
proced
u
Cleani
n
Every f
e
dust, ri
b
preven
t
dust fr
o
Cleani
n
Clean t
not us
e
Do not
stains
o
Do not
becau
s
Attenti
to fall i
n
Probl
Using
s
When
a
code
a
proble
m
Status
Find t
h
perfor
m
can ta
k
Note: I
f
code
a
No Sta
Scan t
h
beside
page t
o
If you
secon
d
servic
e
Statu
s
A.G.A. N
O
ADJUST
BUFFER
CHARA
C
1
0xxxR01
Pi
n
Staple
n
g the Controll
e
the screwdrive
r
e
the controller
o
screws.
n
the left and ri
g
p
rinter and slide
n
tly push the
n
in the conne
c
ly
seated in the
with the back
p
l
y fix the Contr
o
e
wdriver that c
a
t
enance - Cl
c
cleaning will
h
ays provide op
t
off the printer.
ug the power c
o
at least 15 min
u
re
n
g inside the
P
e
w months, us
e
b
bon lint, and p
i
t
the ribbon fro
m
o
m around the
p
n
g the outside
he outside of t
h
e
any spray-typ
e
put any liquids
o
n the cover, u
s
use an abrasiv
e
s
e they may ca
u
on: Do not allo
w
n
side the printe
r
em Solving
s
tatus code a
n
a
problem with
a
nd message.
m
and gives a r
e
Code and Me
s
h
e code listed
m
the steps to fi
k
e action are in
c
f
you get a cod
e
nd run the job
a
tus Code Disp
h
e “Problem list
the problem.
F
o
the “Solution”
still cannot co
r
d
s, and turn o
n
e
.
s
codes an
d
O
T OPER
THE GAP
OVERFLOW
C
TER LOST
Clip
n
For
e
mat
e
e
r Board.
r
that came in t
h
board on the
b
g
ht sides of th
e
it into the slot.
n
ew Controller
c
tor inside the
printer when t
h
p
rofile of the sl
o
o
ller Board with
a
me in the Cont
eaning the
h
elp keep your
p
t
imal performan
o
rd.
utes for the pri
n
P
rinter
e
a soft brush a
n
ieces of paper.
m
going into the
p
rint head and i
n
covers
h
e printer with a
e
or chemical cl
e
or spray near t
h
s
e a commercia
e
cloth, alcohol,
u
se discoloratio
n
w
any staples,
p
r
.
n
d problem lis
t
the printer occ
The messag
e
e
commended
a
s
sages Displa
y
in numeric or
d
x the problem.
O
c
luded.
e
that you can
n
a
gain. If you ge
t
lays
index” hereaft
e
F
ind your probl
and perform th
r
rect the situat
i
n
the printer.
I
d
recovery
a
Indication: The
operating.
Solution: Press
t
Adjust the print
h
Select the print
‘Program Menu
Rom.
Indication:Buffe
r
Solution:Turn th
e
PROGRAM an
d
F
Tear
e
ign
e
rial
h
e Controller B
o
b
ack of the pri
n
e
Controller Bo
a
Board into th
e
printer. The
C
h
e Controller B
o
o
t.
the two captur
e
roller Board bo
x
printe
r
p
rinter in top co
ce. Before you
n
thead to cool
b
n
d a vacuum cl
e
Remove the ri
b
vacuum clean
e
n
the printer ca
v
damp cloth an
d
e
aners anywhe
h
e air vents. Fo
r
l mechanic's h
a
paint thinner,
o
n
or scratching.
p
aper clips, or
s
t
ings
urs, the printer
e
on the disp
l
a
ction.
y
s
d
er on the foll
o
O
nly codes on
w
n
ot find in this
s
t
the same cod
e
e
r and go to the
em in the cha
r
e recommende
d
i
on, turn off th
e
I
f the problem
a
ctions
automatic gap adj
t
he ONLINE key to r
e
h
ead gap to a fixed
d
head fixed gap adj
’. See the User's Gu
r
overflow.
e
printer off and
o
d
ON LINE key su
c
 
F
ol
o
ard box to
n
ter by unscre
w
a
rd with the gui
d
e
printer until i
t
C
ontroller Boar
d
o
ard metal plat
e
e
d screws using
x
.
n
dition so that i
t
clean the print
e
b
efore starting t
h
e
aner to remov
e
b
bon cartridge t
o
e
r. Vacuum any
v
ity.
d
mild soap. Do
r
e on your print
e
r
stubborn ink
a
nd cleaner.
o
r similar agent
s
s
mall metal piec
displays a sta
t
l
ay identifies t
o
wing pages a
w
hich an opera
t
ection, record t
e
, call for servic
e
page listed
r
t, read down t
d
recovery acti
o
e
printer, wait
persists, call
f
u
stment (A.G.A) is
e
set the error conditi
o
d
istance.
u
stment function in
ide you find on the
C
o
n again, or press
c
cessively to clear
4
w
ing
d
es
t
is
d
is
e
is
g
t
e
r:
h
is
e
o
y
o
er.
s
c
es
t
us
t
he
a
nd
tor
t
he
e
.
t
he
o
n.
10
for
not
on.
the
C
D-
the
the
D
A
N
V
R
E
P
A
C
H
P
R
RI
B
RI
B
IN
T
C
H
N
O
T
r
C
a
F
o
Pr
o
1.
T
S
o
2.
T
3.
T
4.
T
5.
T
6.
T
7.
T
8.
T
S
o
re
G
u
Pr
o
1.
T
2.
T
3.
Y
S
o
pa
Pr
o
1.
T
2.
T
S
o
ob
s
3.
T
S
o
an
d
4.
T
S
o
ho
N
o
le
n
5.
S
o
te
C
h
1.
T
S
o
“P
r
P
r
Pr
o
1.
T
S
o
2.
T
S
o
ad
j
3.
S
o
4.
S
o
ad
j
5.
S
o
U
s
Pr
o
1.
T
S
o
2.
T
S
o
3.
T
A
TA SET OFF
V
M CHANGE
E
MOVE PAPER
A
PER JAM
H
ECK ALL PATHS
R
INT INTEGRITY
B
BON BLOCKED C
B
BON
T
ERLOCK ERROR
H
ECK INSERTION
O
PATH
A
VAILABL
E
r
oubleshoo
t
a
uses are listed for e
a
o
rms problem
s
o
blem: Forms buc
k
T
he right tractor is a
d
o
lution: Move the rig
h
the center of the tra
c
T
he printer is not at
t
Solution: Move the
p
path or move the pr
i
path.
T
he forms supply is
n
Solution: Move the f
o
T
he forms supply is
n
Solution: Reposition
T
he forms are catch
i
Solution: Remove t
h
Note: As the forms
r
T
he ribbon is twiste
d
Solution: Check the
T
he forms contain e
x
Solution: Store the
f
printer area for 24 h
o
T
he forms are defec
t
o
lution: Try unloadi
n
quirements specifie
d
u
ide.
o
blem: Forms do n
o
T
he Automatic Form
using needs to be c
h
Solution: See the p
r
panel under “Printer
T
he ribbon is twistin
g
Y
ou are using thick
m
o
lution: See the proc
e
nel (see “Printer Set
u
o
blem: Forms do n
o
T
he forms do not st
a
Solution: Use the re
c
Note: Up to 101,6 m
decreasing the abilit
y
T
he forms do not st
a
o
lution: Check for ob
s
s
truction, remove or
T
he forms do not m
e
o
lution: Yhe forms m
a
d
maintenance” in th
T
he form contain ex
c
o
lution: Store the for
m
urs.
o
te: Forms stack bes
t
n
gth is outside this r
a
Form are too dry.
o
lution: condition th
e
mperature and humi
d
h
aracters are off re
g
T
he first print positio
o
lution: Check your s
e
r
inter Specifications”
r
int quality an
d
o
blem: Unreadable
T
he ribbon is dry or
w
o
lution: Check the rib
b
T
he Automatic Form
using needs to be
d
o
lution: See the proc
e
j
ustments” in the Us
e
Poor quality multiple
o
lution: Try new form
s
Bidirectional adjust
m
o
lution: See the pr
j
ustment” in the Use
r
Forms thickness ex
c
o
lution: Use forms t
h
s
er’s Guide).
o
blem: Missing do
t
T
he ribbon is worn
o
lution: Check the rib
b
T
he ribbon is twiste
d
o
lution:Straighten the
T
he Automatic Form
buffer. C
h
the User'
s
Indication
Solution:
T
PROGR
A
buffer.
C
See the
U
Indication
on, an N
V
Solution:
not solve
Indication
Solution:
key
Indication
Solution:
possible
b
HECK
Indication
Check th
e
condition.
Indication
Solution:
E
Indication
paths.
Solution:
C
t
ing
a
ch problem in orde
r
s
k
le, twist, jam, or tr
a
d
justed incorrectly.
h
t tractor to obtain p
r
c
tor holes.
t
he edge of the table
p
rinter to the front e
d
nter to the rear edg
e
n
ot below the level o
f
o
rms supply to the fl
o
n
ot aligned with the
p
the forms supply so
ng on the carton ed
g
e uneven carton ed
g
e
ach the bottom of t
h
or folded.
ribbon for folds or t
w
x
cessive moisture.
f
orms in a cool, dry
o
urs.
t
ive or does not mee
t
g the forms and t
h
d
under “Supplies, o
p
o
t feed past printh
e
s
Thickness Adjust
m
h
anged.
r
ocedure for adjusti
n
adjustments” in the
U
g
or olding. Solution:
m
ultiple-part forms.
e
dure for setting perf
o
u
p” in the User's Gui
d
o
t stack correctly
a
ck correctly on the t
a
c
ommended table si
z
m
(4 in.) of forms m
a
y
of the forms to sta
c
a
ck correctly in the o
u
s
tructions to the form
relocate it.
e
et specifications.
a
y be outside nomin
a
e
User’s Guide”).
c
essive moisture
m
s in a cool, dry plac
e
t
when the forms are
nge, operator assist
a
forms for 24 hour
s
d
ity setting.
g
istration
n
I adjusted incorrec
t
e
ttings for the left m
a
in the User’s Guide)
d
ribbon probl
e
characters
w
orn.
b
on and replace it if
i
s
Thickness Adjust
m
d
ecreased. Paper
m
e
dure for adjusting th
e
r’s Guide).
-
part forms.
s
(Fast Draft)
m
ent needs to be ma
d
o
cedure for settin
g
r
’s Guide).
eeds forms specific
a
h
at meet specificati
o
s
or irregular char
a
b
on for wear; replac
e
or folded.
ribbon.
s
Thickness Adjust
m

h
eck the printer SE
R
s
Guide you find on
t
n
: Buffer overflow.
Turn the p
r
inter off
a
A
M and ON LINE
k
C
heck the printer
S
U
ser's Guide you fin
d
n
: If this error is dis
p
V
M error condition o
c
Turn the printer off
a
e
d call Service
n
: A paper jam occur
s
Check all the pape
r
n
: Print head movem
e
Check ribbon cart
r
b
lockages to the Pri
n
n
: The ribbon of th
e
e
ribbon. Press the
.
n
: Top area cover no
t
Install the top area
c
n
: An electromechan
Call Service.
r
of priority.
a
ctor holes tea
r
r
oper forms tension.
e
.
d
ge of the table if h
a
e
of the table if havi
n
o
f the printer.
oor or on a shelf bel
o
p
rinter.
that the forms feed
g
e.
g
es, or remove the f
o
h
e box, this problem
w
ists.
place before using
e
t specifications.
h
en reloading form
s
p
tional features, and
e
ad
m
ent (AFTA) setting
f
n
g the forms thickne
User's Guide.
Replace the ribbon.
f
oration safety to En
a
de).
a
ble behind the prin
t
z
e (see “Printer Spe
c
a
y stack on the table
c
k correctly.
u
tput rack on the tab
m
s path (cables, cord
s
a
l specifications (se
e
c
e before using them
e
203.2 to 304.8 mm
a
nce may be requir
e
s
or more at the m
c
tly.
a
rgin, tear position
a
)
.
e
ms
it is dry or worn.
m
ent (AFTA) setting
f
m
ust be loaded for
t
h
e AFTA through the
d
e.
g
the bidirectional
a
tions.
o
ns (see “Continuo
u
a
cters
e
it if necessary.
m
ent (AFTA) setting
f
10300Pl
u
IAL INTERFACE se
t
t
he CD-Rom.
a
nd on again, or pre
s
k
ey successively to
S
ERIAL INTERFAC
E
d
on the CD-Rom.
p
layed during the pr
i
c
curs.
a
nd on again. If the
p
s
in a paper path.
r
paths and press th
e
e
nt is blocked.
r
idge installation an
d
n
t head carriage.
e
cartridge isblocke
d
O
N LINE key to res
e
t
installed
c
ove
r
ical failure occurs i
n
T
he tractor pins sho
u
a
ving problems with
n
g problems with th
e
o
w the level of the p
r
e
venly.
o
rms from the carton
can occur more oft
e
t
hem, or store the f
o
s
. Forms should m
e
maintenance” in the
o
r the paper source
y
s
s setting through t
h
a
bled through the op
e
e
r.
c
ifications” in the Us
e
behind the printer
w
le.
s
, or other items). If
y
“Supplies, optional
f
or leave in the print
e
(8 to 12 in.) long. If t
h
e
d.
anufacturer recom
m
a
nd the paper load p
o
o
r the paper source
y
his adjustment to b
e
operator panel (see
adjustment (see “
B
u
s Forms specificati
o
o
r the paper source
y
u
sQSG
t
tings. See
s
s the
clear the
E
settings.
i
nter power
p
roblem is
e
ON LINE
d
fo
r
other
d
. Solution:
e
t the error
n
the paper
u
ld be in
front forms
e
rear forms
r
inter.
.
e
n.
o
rms in the
e
et the
User's
y
ou are
h
e operator
e
rator
e
r’s Guide).
w
ithout
y
ou find an
f
eatures
e
r for 24
h
e form
m
ended
o
sition (see
y
ou are
e
effective.
“Printe
r
B
idirecional
o
ns” in the
y
ou are
MAN10xxxR01 5 10300PlusQSG
using needs to be changed. Paper must be loaded for this adjustment to be effective.
Solution: Set the procedure for adjusting the forms thickness setting through the operator
panel (see “Printer Adjustments” in the User’s Guide).
Problem: Ribbon smudging forms
1. The ribbon is twisted or folded.
Solution: Try to moving the printhead back and forth while turning the ribbon advance knob. If
the ribbon advance knob does not turn, replace the ribbon.
2. The Automatic Forms Thickness Adjustment (AFTA) setting for the paper source you are
using needs to be increased. Paper must be loaded for this adjustment to be effective.
Solution Set the procedure for adjusting the forms thickness setting through the operator panel
(see “Printer Adjustments” in the User’s Guide).
3. The ribbon cartridge is defective
Solution: Replace the ribbon cartridge.
4. A new ribbon is over-inked.
Solution: Replace the ribbon.
Problem: Printing is too light or partial characters print
1. The Automatic Forms Thickness Adjustment (AFTA) setting for the paper source you are
using needs to be changed. Do not attempt to manually move the AFTA wheel. Paper must
be loaded for this adjustment to be effective.
Solution: Set the procedure for adjusting the forms thickness setting through the operator
panel (see “Printer Adjustments” in the User’s Guide).
2. The ribbon guide is seated incorrectly or the white snap arm is not snapped into place.
Solution: Remove the ribbon and reinstall it.
Problem: Ribbon snagging, tearing or not moving
1. The ribbon is worn.
Solution: Replace the ribbon cartridge.
2. The ribbon cartridge is not properly installed.
Solution: Remove and then reinstall the same ribbon.
Problem: Line-to-line horizontal misregistration
1. The dot registration of the characters printed is not aligned.
Solution: See “Printer adjustments” in the User’s Guide.
Configuration problems
Problem: Printer does not print or prints wrong characters
1. Nothing is printed or the wrong characters print.
Solution: Ensure the printer cable is attached to the host. Assure the configuration menu
parameters values for your printer attachment (see “Parallel, Serial, USB and LAN
Configuration” in the User’s Guide).
Miscellaneous problems
Problem: Printer has no power
1. The power cord is not connected.
Solution: Ensure the power cord is plug into the back of the printer and also in the wall outlet.
Problem: Throughput o printer at half speed
1. The Quiet Print function is set on.
Solution: Ensure the Quiet Print” function is the Printer Configuration menu is disabled.
Clearing Forms Jams
Use the following procedure to clear forms jams from the printer.
1. Open the top cover.
2. Tear off the forms at perforation before it enters the printer and after it exits the printer.
3. Open the tractor doors and remove forms from the tractors.
4. Try to move the printhead off of the form and to the far right. Do not force it.
5. Remove jammed forms by pulling in the direction of the printing.
6. If the jam cannot be removed, lightly pull the form in the opposite direction.
7. If the jam still cannot be removed, remove the paper bail assembly:
a. Remove the ribbon cartridge
b. Grip the paper bail assembly and rotate it toward
the front of the printer until the pivots posts on the
sides disengage from the printer frame.
c. Lift the bail assembly out of the printer and set it
aside.
d. Removed jammed forms by polling in the
direction of the printing.
8. If you removed the paper bail assembly in the previous step, reinstall it, as follows:
a. Grip the paper bail assembly as shown in the
illustration.
Important! To avoid damaging the plastic, ensure the plastic points down
b. Insert the left and right paper bail end cap pivots
into the side frames.
c. Rotate the paper bail assembly toward the back
of the printer, closing it as far as it will go.
d. Reinstall the ribbon cartridge.
9. Reload the forms.
Detailed information on the Configuration of the Printer and not
reported in this Quick Guide can be found in the User’s Guide
present in the CD and also in the download link of the website:
www.compuprint.com
  • Page 1 1
  • Page 2 2
  • Page 3 3
  • Page 4 4
  • Page 5 5

Compuprint 10300/10300plus Quick start guide

Category
Dot matrix printers
Type
Quick start guide

Compuprint 10300/10300plus is a versatile line printer designed for high-volume, continuous forms printing. With a print speed of up to 1000 lines per minute, it can quickly handle large print jobs. It supports multiple paper paths, including front and rear tractors, and can accommodate a variety of paper types and sizes. The printer also features a range of connectivity options, including parallel, serial, and Ethernet interfaces, making it easy to integrate into your existing network.

Ask a question and I''ll find the answer in the document

Finding information in a document is now easier with AI