QUICKGUIDE 3262i/4062i
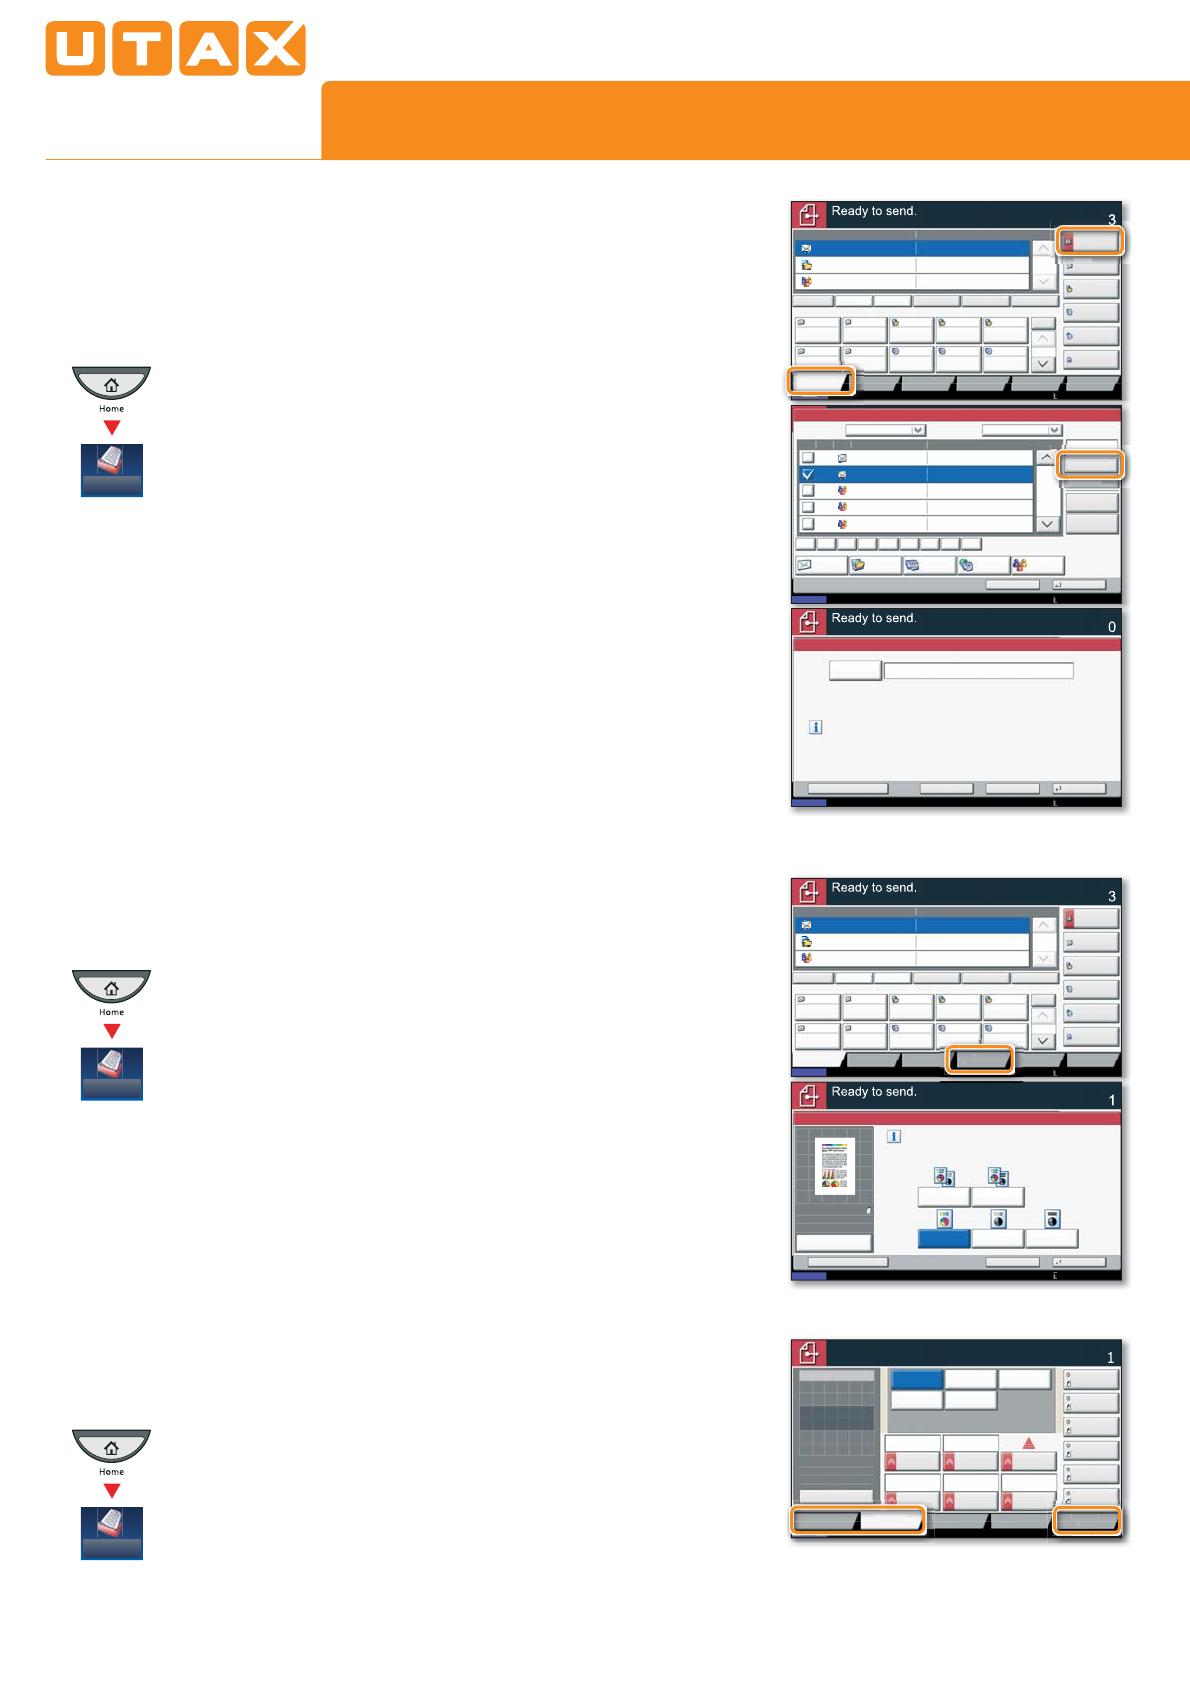
E-Mail operation
Sending
q
Place the originals on the
platen or in the optional
document processor.
q
Press SEND on the Home
screen.
❶
Enter the destination address.
From the address book:
Press ADDRESS BOOK. Press the checkbox to select the
desired destination from the list. Press SEARCH (NAME)
WR¿QGWKHGHVWLQDWLRQ(QWHUWKHQDPH\RXVHDUFKIRU
&RQ¿UPZLWK
OK.
<RXPD\FKRRVHPXOWLSOHGHVWLQDWLRQV
Enter an e-mail address:
Press
E-MAIL ADDR. ENTRY and E-MAIL ADDRESS. Enter
the E-Mail address on the touch screen. After that
press
OK.
,I\RXZDQWWRVHQGWKHHPDLOWRVHYHUDOGHVWLQDWLRQV
go back to step 1.
❷
To send the e-mail press START.
Scan settings
q
Press SEND on the Home
screen.
❶
Press COLOR/IMAGE QUALITY.
❷
Press COLOR SELECTION.
❸
Choose the Color to be used.
❹
&RQ¿UPZLWKOK.
Further settings
q
Press SEND on the Home
screen.
❶
Press QUICK SETUP.
&KRRVHDQLWHPWREHFKDQJHG$IWHUFKDQJLQJFRQ¿UP
ZLWK
OK.
7RHQWHUD¿OHQDPHSUHVV
ADVANCED SETUP. Press FILE
NAME ENTRYDQGFKDQJHWKHQDPH&RQ¿UPZLWKOK.
❷
Press DESTINATION to return.
Status
Destination Detail
Address
Book
Folder Path
Entry
E-mail
Addr Entry
No.
1/100
AAA BBB CCC DDD
FFF GGG HHH III JJJ
00040003 00050001 0002
0006 0007 0008 0009 0010
1/1
i-FAX
Addr Entry
FAX No.
Entry
WSD Scan
'606FDQ
Destination
TUVW 192.168.188.120
Group1 Group1
EEE
Detail/Edit Delete RecallChainDirectOn Hook
Org./Sending
Data Format
Quick SetupDestination Color/
Image Quality
Advanced
Setup
Program
10/10/201 10:10
Status
Address Book
Cancel OK
Group
E-mail
Dest.
Search(Name)
Search(No.)
No. Type Name Detail
Folder
Detail
Address Book SortAddr Book
0001
0002
0005
0004
0003
Group1
Group2
Group3
Name
Register/Edit
Address Book
1/2
i-FAXFAX
ABC DEF JKL MNO PQRS TUV WXYZGHI 0-9
10/10/201 10:10
E-mail
Address
Add a new e-mail destination.
Press [E-mail Address], then enter
the address using the keyboard screen.
Status
E-mail Address Entry
Enter Destination.
Destination
Cancel OKNext Dest.Add to Addr Book
10/10/201 10:10
-m
u
D
tin
ti
earch
Name
08/08/20 10:10
Destination
Status
Destination
Quick Setup
Original/Sending
Data Format
Color/
Image Quality
Advanced
Setup
Shortcut 1
Shortcut 2
Shortcut 3
Shortcut 4
Shortcut 5
Shortcut 6
Ready to send.
Sending Image
Place original.
Preview
Original
Zoom
Send
:
:
:
100%
---
---
File Format
PDF
2-sided/Book
Original
Density
FAX TX
Resolution
Zoom
600x600dpi
Scan
Resolution
100%
1-sidedAuto
600x600dpi 400x400dpi
Ultra Fine
200x400dpi
Super Fine
200x200dpi
Fine
200x100dpi
Normal
estin
ti
Quick Setu
A
v
nce
Status
Destination Detail
Address
Book
Folder Path
Entry
E-mail
Addr Entry
No.
1/100
AAA BBB CCC DDD
FFF GGG HHH III JJJ
00040003 00050001 0002
0006 0007 0008 0009 0010
1/1
i-FAX
Addr Entry
FAX No.
Entry
WSD Scan
'606FDQ
Destination
TUVW 192.168.188.120
Group1 Group1
EEE
Detail/Edit Delete RecallChainDirectOn Hook
Org./Sending
Data Format
Quick SetupDestination Color/
Image Quality
Advanced
Setup
Program
10/10/201 10:10
Black & WhiteGrayscale
Color Selection
Full Color
Select scanning color.
Use [Auto Color] to automatically produce color originals
in full color and black & white originals in black & white.
Cancel OKAdd Shortcut
Status
Destination
Auto Color
(Color/B & W)
Auto Color
(Color/Gray)
10/10/201 10:10
100%
A4
A4
Preview
Original
Zoom
Send
:
:
:
n
Send
Send
Send


