A. HOW TO SUCTION LOAD YOUR GREASE GUN :
5. Screw the Head Assembly onto the barrel. Tighten the Head Assembly securely (See Figure 4).
6. Unlock the Plunger Rod from the end cap, by releasing the Plunger Lock. This would push the Plunger Rod into the barrel.
7. Prime the gun (Priming is the act of removing air and introducing Grease into the Grease Gun’s pumping mechanism). When filling the Grease Gun, it is
very important to prevent air pockets and to purge any air that may be trapped in the barrel. Caution : Air pockets in the lubricant will cause the
Lever Grease Gun to lose its prime. Prime the Grease Gun while pressing the Air Bleeder Valve to vent Air Pockets in the Grease Chamber. In most cases
the Grease Gun will prime simply by operating the Lever handle several times. Should Grease fail to appear, the Head Assembly must be bled.
8. Pump the Lever handle several times until Grease flows from the Coupler.
B. HOW TO BULK-LOAD YOUR GREASE GUN USING A GREASE FILLER PUMP : This procedure applies to all Lumax Grease Guns
(except LX-1100 and LX-1112). All Lumax Grease Guns are equipped (except LX-1100 and LX-1112) with a Filler Nipple (Bulk-loader Fitting)
on the head. CAUTION : The Filler Nipple on the Grease Gun must mate with the Loader Coupler on the Pump. The Pump may not operate
if the components are not compatible.
WARNING : The Grease Gun is equipped with a low-pressure Filler Nipple. Do not substitute with a high-pressure Grease Fitting.
Personal injury can occur due to excessive pressure. The use of a Grease Fitting will also void the warranty.
1. Wipe the Filler Nipple with a clean cloth.
2. Push the Plunger Rod (Follower-rod) all the way into the barrel of the Grease Gun.
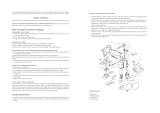
3. Insert the Filler Nipple into the Loader Coupler on the Pump and extend the lever handle away from the barrel (See Figure 5).
4. Operate the pump until the Grease Gun barrel is full of Grease. The Plunger Rod will be fully extended when the barrel is full.
5. Remove the Filler Nipple from the Loader Coupler on the Pump.
6. Unlock the Plunger Rod from the end cap, by releasing the Plunger Lock. This would push the Plunger Rod into the barrel.
7. Refer to Point A (7), above
8. Pump the Lever handle several times until Grease flows from the Coupler.
C. HOW TO LOAD YOUR GREASE GUN WITH A LUBRICANT CARTRIDGE :
1. Unscrew the Head Assembly from the barrel of the Grease Gun (See Figure 1). Pack head with Grease (See Figure 2).
2. Pull back the Plunger Rod. When the rod is fully extended, the Plunger Rod locks into place with posi-stop Plunger Lock.
3. Remove the plastic cap from the end of Grease Cartridge and, insert open end first, into the barrel of Grease Gun (See Figure 6)
4. Push the Grease Cartridge into the barrel until the rim of the pull-tab end contacts the rim of the barrel (See Figure 7).
Then remove the pull-tub seal from the end of the Grease Cartridge (See Figure 8).
5. Screw the head back onto the barrel. Tighten the Head Assembly securely (See Figure 4).
6. Unlock the Plunger Rod from the end cap, by releasing the Plunger Lock. This would push the Plunger Rod into the barrel.
7. Refer to Point A (7), above
8. Pump the Lever handle several times until Grease flows from the Coupler.
TROUBLESHOOTING CHART
Problem : Gun will not dispense Grease
Possible Cause : 1. Grease Cartridge or Barrel is empty. 2. Air is trapped in the Grease Gun head.
Solution : • Replace the grease cartridge or rell the barrel.
• Expel the trapped air, while pressing the Air Bleeder Valve, and pushing the Plunger (Follower) Rod handle.
Problem : Grease Cartridge will not empty completely. Also, if you are not sure whether the Cartridge is completely empty or not.
Possible Cause : Tabs on rod are binding to rubber plunger assembly.
Solution : • Connect the rod to the rubber plunger assembly. • Push the rod into the barrel as far as it will go to move the grease forward.
• Measure the rod handle from the end cap on the barrel to the tip of the rod handle.
• If the measurement is more than 1-3/4”, the grease cartridge is not empty.
• If not completely empty, disconnect rod from rubber plunger assembly after grease has been pushed forward.
Problem : Grease leakage visible between Barrel and Head Assembly
Possible Cause : Initial tightening of Barrel into Head Assembly not sufficient or the Rubber Seal inside the Head Assembly is damaged or missing.
Solution : • Tighten Barrel into Head Assembly securely or replace the Rubber Seal
Problem : Grease leakage visible at Extension or at Head Assembly
Possible Cause : 1. Initial tightening of extension into Head Assembly and/or Coupler not sufficient 2. Filler Nipple may be loose
3. Worn or damaged piston and/or bore in Head Assembly 4. Worn Air Bleeder Valve “O” Ring
Solution : • Tighten Extension into Head Assembly and Coupler into the Extension • Tighten Filler Nipple into Head Assembly securely
• Replace “O” Ring or Air Bleeder Valve
LIMITED WARRANTY POLICY ON NEW EQUIPMENT. PLEASE READ THE FOLLOWING CAREFULLY
Lumax
®
warrants all lubrication equipment manufactured by Lumax
®
to be free from defects in material and workmanship on the date of sale by an authorized Lumax
®
distributor to the original purchaser for use. Lumax
®
will during
one (1) year, following the date of purchase, repair, or replace any part of the equipment determined by Lumax
®
to be defective. This warranty applies only when the equipment is installed, operated, and maintained in accordance
with Lumax
®
written recommendations. Lumax
®
does not make any representation or warranty of any kind to the buyer that he or she is qualified to make any repairs to the product or that he or she is qualified to replace any parts
of the product. In fact, Lumax
®
expressly states that all repairs and parts replacements should be undertaken by certified and licensed technicians and not by the buyer. The buyer assumes all risk and liability arising out of his or her
repairs to the original product or replacement parts thereto, or arising out of his or her installation of replacement parts thereto. If equipment proves to be defective during this warranty period, it will be repaired or replaced without
charge, provided that factory examination indicates the equipment to be defective.
This warranty does not cover, and Lumax
®
shall not be liable for general wear and tear, accident, overload, or any malfunction, damage, or wear caused by faulty installation, misapplication, misuse, abuse, abrasion, corrosion,
inadequate or improper maintenance, negligence, accident, tampering, or substitution of non-Lumax
®
component parts. Nor shall Lumax
®
be liable for the equipment repaired or altered by anyone not authorized by Lumax
®
to
repair or alter the equipment. Lumax
®
will also not be liable for malfunction, damage, or wear caused by the incompatibility of Lumax
®
equipment with accessories, equipment or materials not supplied by Lumax
®
. This warranty
is extended to the original retail purchaser only and is conditioned upon the prepaid return of the equipment claimed to be defective to an authorized Lumax
®
distributor for verification of the claimed defect. If the claimed defect
is verified, Lumax
®
will repair or replace free of charge any defective parts. The equipment will be returned to the original buyer, transportation prepaid. If inspection of the equipment does not disclose any defect in material or
workmanship, repairs will be made at a reasonable charge, which charges may include the cost of parts, labor, and transportation. This warranty is exclusive, and is in lieu of any other warranties, express or implied, including but
not limited to warranty of merchantability or warranty of fitness for a particular purpose. Lumax
®
sole obligation and buyer’s sole remedy for any breach of warranty shall be as set forth above. The buyer agrees that no other remedy
(including but not limited to, incidental or consequential damage for lost profits, lost sales, injury to person or property, or any other incidental or consequential loss) shall be available. In no event shall Lumax
®
be liable for incidental
or consequential damages. The liability of Lumax
®
on any claim for loss or damage arising out of the sale, resale, or use of lubrication equipment, materials dispensing equipment, and other related equipment should in no event
exceed the purchase price. Some states do not allow the exclusion or limitation of incidental or consequential damages, so the above limitation or exclusion may not apply to you. This warranty gives you specific legal rights, and you
may also have other rights, which vary from state to state. Any action for breach of warranty must be brought within two (2) years from the date of sale.
Lumax
®
makes no warranty, and disclaims all implied warranties of merchantability and fitness for a particular purpose in connection with accessories, equipment, materials, or components sold but not manufactured by Lumax
®
(such
as Electric Motors, Switches, Hoses, etc.) are subject reasonable assistance in making any claim for breach of these warranties. In no event will Lumax
®
be liable for indirect, incidental, special, or consequential damages resulting
from Lumax
®
supplying equipment hereunder, or the furnishing, performance, or use of any products or other goods sold hereto, whether due to a breach of contract, breach of warranty, the negligence of Lumax
®
or otherwise. Any
implied warranties applicable to lubrication equipment, materials dispensing equipment, and other related equipment manufactured by Lumax
®
, including the warranties of merchantability and fitness for a particular purpose, will
last only for one (1) year from the date of purchase. Some states do not allow limitations on how long an implied warranty last, so the above limitation may not apply to you.
© 2010 Lumax
®
. All Rights Reserved. Lumax
®
and the Products described in it are Copyrighted by Lumax
®
, with All Rights Reserved.
This Form may not be Copied in Whole or Part, without the Express Written Consent of Lumax
®
.
Barrel
{ Barril }
[ Baril ]
Pull-Tab Seal
{ Tire Del Sello
De la Lengüeta }
[ Joint D'Tirer
-Étiquette ]
Tw ist
{ Torcedura }
[ To rsion ]
Grease Cartridge
{ Cartucho De la Grasa }
[ Cartouche De Graisse ]
Plastic Cap
{ Casquillo Plástico }
[ Chapeau en Plastique ]
Barrel
{ Barril }
[ Baril ]
Figure 5
Figura 5
Figure 5
Filler Socket
{ Zócalo del
Llenador }
[ Douille de
Remplisseur ]
(LX-1305)
Filler Nipple
{ Entrerrosca
del Llenador }
[ Mamelon de
Remplisseur ]
(LX-1420)
Figure 6
Figura 6
Figure 6
Figure 7
Figura 7
Figure 7
Figure 8
Figura 8
Figure 8
Lumax
®
3705 Centre Circle, Fort Mill, SC 29715, USA
Fax : 803-547-0800 www.Lumax.com
Form : LX-1100-12-20-23-IS