Zenith IQVB425 Owner's manual
- Category
- Cassette players
- Type
- Owner's manual

,ach|ne number IQVB425
operating guide / warranty

RECORDYOURRODELNUMBER |
(Noe,whiteyoucanseeit)
The mode[and serial numberof your new VCRare located
on the back of the VCRcabinet. Foryour future convenience,
we suggestthat you recordthese numbershere:
MODELNO.
SERIAL NO.
WARNING:
TOREDUCETHERISKOFELECTRICSHOCKDO NOTREMOVECOVER(OR RACK).NOUSERSERVICEABLEPARTSINSIDE. REFER
SERVICINGTO QUALIFIEDSERVICEPERSONNEL.
The Eghtning flash with arrowheadsymbol within an equilateral triangle, is intended to alert the userto the presence
of uninsutatod"dangerous voltage" within the product'senclosurethat may be of sufficient magnitude to constitute a
risk of electric shockto persons.
The exclamation point within an equilateral triangle is intended to alert the userto the presenceof important
operating and maintenance (servicing) instructions in the Literature accompanying the appliance.
WARNING:
TOREDUCETHERISKOFFIREORELECTRICSHOCK,DONOTEXPOSETHISAPPLIANCETORAINORMOISTURE.
I
POWER CORD POLARIZATION: |
CAUTION: To Prevent ELectricShock, matchwide blade of plug to wide slot, fully insert.
I
ATTENTION: Pour_viter tes chocs_tectfiques, introduire la tame ta plus large de la fiche dans ta borne eorrespendante
de ta prise et pousserjusqu'au fond.
NOTE TO CABLE/TV INSTALLER:
This reminderis provided to call the cable TVsysteminstallers attention to Article 820-40 of the National ELectricCode
(U.S.A.). The code providesguidelinesfor proper grounding and, in particular,specifies that the cameground shall be
connectedto the grounding system of the building, as closeto the point of the cableentry as practical
REGULATORY INFORMATION:
This equipment has been tested and found to comply with the Limitsfor a Class Bdigital device, pursuantto Part 15
of the FCCRules. TheseEmits aredesignedto providereasonableprotection against harmfol interference whenthe
equipment is operated in a residentialinstallation. This equipment generates,usesand can radiate radiofrequency
energy and, if not installed and used in accordancewith the instruction manual may causeharmfo[interference to
radio communications.However,there is no guaranteethat interference will not occurin a particularinstallation. If this
equipment does causeharmful interference to radio or television reception, which can be determined by turning
the equipment off and on, the user is encouragedto.try to correct the interference by one or more of the following
measures: • Reorient or relocate the receiving antenna.
• Increase the separation betweenthe equipment and receiver.
• Connect the equipment into an outlet on a circuit different from that to which the receiveris
connected.
• Consult the dealer or an experiencedradio/rv technician for help.
CAUTION:
Do not attempt to modiEj this product in any way without written authorization from Zenith Electronics
Corporation. Unauthorized modification could void the user'sauthority to operate this product.
This class R digital apparatus meets all requirements of the Canadian Interference-Causing Equipment
Regulations.
"Ce appareil num_rlque de ta class b respecte routes Lesexigences du R_gul.ement sur le materiel broui|ller du
Canada."
Zenith is a trademark of ZEC© Copyright Zenith ELectronics Corporation 1999

SAFETY T]PS I PAGE 3
These simple precautions will help ensure that you get many years of safe enjoyment from your new product.
1.
2,
Read Instructions
Read all of the safety and operating instructions before
operaUngthe product.
Retain ZnstrncUons
Keep all safety and operating instructions for future
reference.
11. Power Sources
Operate product only from type of power source
indicated on marking Label. If you are not sure of the
type of power supply to your home, consult your
product dealer or Localpower company. For products
intended to operate flora battery power or other
sources, refer to manual.
3. Heed Warnings
FoLLowwarnings on the productand in the opemUng
guide.
4. FoLLowInstructions
FoLLowartopemUnganduseinstructions.
5. CLeaning
Unplugthis productfrom the walloutletbefore
cleaning.Donot useLiquidcleanersor aerosolcleaners.
Usea dampcloth for cleaning,
6. Attachments
Donot useattachmentsnot recommendedby product
manufacturerastheymaycausehazards.
7. Water and Moisture
Do not use this product near water--for example, near
a bathtub, wash bowl, sink, or Laundrytub, in a wet
basement, or near a swimming pool.
12.
13.
Line-Cord Polarization
Product is equipped with a polarized alternating-
current Une plug (a plug having one bLadewider than
the other). Asa safety feature, this plug wilt fit into
power outlet only one way. If you're unable to insert
plug fully into outlet, try reversing the plug. If plug
still fails to fit, contact an electrician to repLace your
obsolete outlet. Do not defeat safety purposeof
polarized plug.
Power-Cord Protection
Route power-supply cords so
they are not Ukeiy to be
walked on or pinched by items
placed upon or against them,
paying particular attention to
cordsat plugs, convenience
receptacles, and the point
whqrethey exit from product.
8. Accessodes
Do not place product on an unstable cart, stand,
tripod, bracket, or table. Product may fat[+ causing
serious injury to a chltd or adult, and seriousdamage
to the product. Useonly with a cart, stand, tripod,
bracket, or table recommended by the manufacturer or
sold with the product. Any mounting of product should
follow manufacturer's instructions and should use a
mounting accessoryrecommendedby manufacturer+
9. Transporting Product
Move product and cart combinations
with care. Quick stops, excessive
force, and uneven surfacesmay cause
product and cart combination to
overturn.
®
10. Ventilation
Slots and openings in cabinet must not be blocked or
covered. They are provided for ventiLation, to ensure
reliable operation, and to protect from overheating.
Never block openings by placing product on a bed,
sofa, rug, or other simiLarsun'ace. Do not place product
in bui[t-ln installation such as a bookcase or rack
unless proper ventilation is provided or manufacturer's
instructions have been adhered to.
14.
Outdoor Antenna Grounding
If an outside antenna or cable system is connected to
this product, be sureantenna or cable system is
grounded so as to provide some protection against
voltage surgesand built-up static charges.A_c[e 810
of the National ELectricalCode (USA), ANSI/NFPA 70
providesinformation on grounding of mast and
supporting structure, grounding of Lead-inwife to an
antenna discharge unit connection to grounding
electrodes, and requirementsfor grounding electrode.
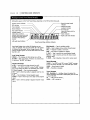
( See Fig. 1 below. )
Fig. 1 +
_ Antenna Lead-ln Wire
Ground
Clamp
Antenna DischargeUnit
NECSection 810-20
• • Grounding Conductors
ELectricSer_ce NECSection 810-?1
Equipment GroundClamps
__m, OUnding
NECArtZSO, Part H
NEC: National ELectricalCode
Antennagroundingper NECCode,ANSI/NFPA70

I SAFETY TIPS
These simpte precautionsWIUheLpensure that you get many years of safe enjoyment from your new product.
25. Lightning
For added protection for
this product during a
Lightningstorm, or when
product is [eft unattended
and unusedfor tong
periods of time, unptug it
from the watt out[e[ and
disconnect antenna or
cabte system. This wiLt
prevent damage to product
due to ttghtning and
power Linesurges.
16. Power lines
An outside antenna system should not be tocated in
the vicinity of overhead power tines or other etectric
Lightor power circuits, or where it can fat[ into such
power tines or circuits. When instaffing an outside
antenna system, take extreme care to keep from
touching such power lines or circuits, as contact with
them might he fatal
17. Overtoadtng
Do not overload watt outtets, extension cords or
integra[ convenience receptac[es, as this can resutt in
risk of fire or electric shock.
18. Object and Liquid Entry
Never push objects of any kind into this product
through openings, asthey may touch dangerous
vottage points or short-out parts that coutdresuLt in
fire or etectric shock. Never split Liquidof any kind on
product.
19. Servidng
Do not attempt to servicethis productyoursetf, as
opening or removing covers may exposeyou to
dangerousvoltage or other hazards. Refer atLservicing
to qualified service personneL.
20. Wait or CettlngMounting
Mount productto waLLor ceiLingontyas recommended•
by manufacturer.
21.
22.
23.
Replacement Parts
When reptacement part(s) are required, be sure service
technician has used replacement part(s) specified by
manufactureror have same characteristics as originaL
part(s). Unauthorized substitutions may resuLtin fire,
etectric shock, or other hazards.
Damage Requiring Service
Unptug this product from the watt outtet and refer
servicingto quaUfied service personnetunder these
conditions:
a. If power-supply cord or pLugis damaged.
h. If liquid has been spilted or objects have fallen into
product.
c. If product has been exposedto rain or water.
d. If product doesn't operate normaLlyby foLtowing
handbook instructions. AdJust onty those controLs
covered by handbook instructions; improper
adjustment of other controLsmay resutt in damage
and often requires extensive work by a qua[tried
technician to restore product to normat operation.
o. If product has been dropped or cabinet has been
damaged.
f. If product exhibits a distinct change in performance.
Heat
Keep product away
from heat sources
such as radiators,
heat registers, stoves,
or other products
(incLudingamp[triers)
that produceheat.
24. Safety Check
Upon comptetion of any service or repairs to this
product, ask service technician to perform safety
checksto determine that product is in proper operating
condition.

INSTALLATION I PAGE 5
CONTENTS
SAFETYTIPS............................. 2-4
INSTALLATION .......................... 6-16
VCRFeatures Chart ........................ 6
Connections for Your VCR.................. 7-8
Before you operate your VCR............... g-12
Setup for VCRPEus+®C3recording ........... 13-16
CONTROLSAND DISPLAYS.................. 17-19
Front Pane[ Diagram...................... 17
Message Center Front Panel Display ............ 18
VCRStatus Displays ...................... lg
OPERATION ........................... 20-35
The Buttons on Your Remote ................ 20
Programmingyour remote .................. 21
Playback 3og-Shuttie operation ............... 22
CLockMenu ............................ 23
Timer Menu............................ 24
Setup Menu ........................... 25
Audio Menu ........................... 26
Watching TVThrough the VCR................ 27
CameorderConnected to VCR ............... ".28
Playing Tapes ........................ 2g-30
Instant Recording ..................... 31-33
RecordingWhiLeYou're Away ................ 34 °
VCRPLus+®C3recording .................... 35
TROUBLESHOOTING...................... 36-38
SPECIFICATIONS........................... 39
INDEX
Audio Menu .............................. 26
Auto ChanneL Search ...................... 11, 25
Connections ........................... 7-8, 27
ChanneLAdd/DeE ........................ 12, 25
CrockSet ............................. 11, 23
Features Chart ............................. 6
Front Panel Diagram ........................ 17
Instant Recording ........................ 33-33
LanguageMenu ............................ 25
Main Menus ............................... 9
Message Center Front Panel DispLay............... 18
PLayback3og-ShuttLeoperation ................. 22
PLayingTapes ........................... 29-30
Remote Control ............................ 20
Safety Information ......................... 2-4
Setup for VCRPLus+®C3recording .............. 13-16
Setup Menu .............................. 25
SpeakEZFunction .......................... 10
Timer Menu .............................. 24
Timer-ControLLedRecording .................... 34
Troublashooting ......................... 36-38
VCRPlus+®C3recording ....................... 35
VCRStatus Displays ......................... lg
Watching TVthrough the VCR .................. 27

PAGE 6 I XNSTALLATION
Thispageshowsthe featuresofyourVCRandthe differencesbetweenthe models.
FEATURES
VCRP[us+®C3 RecordingSystem
Auto SetupSystem(CLock& Tuner)
SpeakEZFunction (English/Spanish)
4-Heads(SpecialVideoEffects)
FuELLoad/QuickStart
Auto Head CLeaner
HTSHi-FiStereoAudioSystem
Frontand RearStereoAudio/Video(A/V) 3acks
RemoteControlMBR425Z
Auto/Manual BandSelect
Auto/ManualChannelSearch
181 ChannelCapability(CATV& TV)
RecordSpeedsSF/EP
PLaybackSpeedsSP/LP/EP
Auto PLaybackSystem
Auto/Manual DigitalTracking
Instant Recording
Timer-ControlledRecording
Auto PLaybackTapeSpeedAdjust
Forward/ReverseSlow-MotionVideo(4-head VCR);Variable1/10 to 1/32
CtearPause/StillVideo
Real-TimeTapeCounter
HighSpeedRewind(Lessthan 70 secondswith T-120 tape)
SpeedSearch
CMSkip
EngEsh/Spanish/FrenchMenus
1-Year,8-Event Timer
MessageCenterFront Pane[Display
Auto CLockSet System
Hook-upCable(VCRto W)
EnergySaving
VCRdesign and specifications are subject to change wi'_hout prior notice.

INSTALLATION I PAGE 7
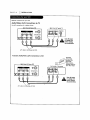
RequiredconnectionsforyourVCR.
Connections Without a CabLeBox
Back PaneLof Stereo VCR
Antenna
FLatWire
(300 ohm)
Adaptor
OR (Not pro
OR
CabLeTV
Wail3ack BackPanel of Typical I_/
%% VHF/L_F_CATV
Thiscableis provided
with yourVCR.
Turn off power or unplug VCRbefore making any connections.
ConnectionsWith a CabLe Box
BackPaneLof Stereo VCR _
Back Panel of
Typical CabLeBox CaMeTv
WaLl 3ack
_L Turn off power or unplug VCR
before making any connecUons.
BackPanelof Typical TV
This cable is provided
with your VCR.

PAGE 8 IINSTALLATION
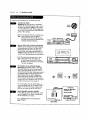
OpUona[ connections for your VCR.
Audio/Video (A/V) Connections to TV
Use A/V connections for a better picture.
Back Pane[of Stereo VCR
VHFIUHFICATV
OUT
,_Tum off power
or unptug VCR
before ma_ng
afly conflect_ofl$.
A/V cab|e is not provlded with VCR.
Accessory Audio/Video (A/V) Connections to VCR
BackPane[ of Stereo VCR
VHF/UHF/CATV
Accessory
(__ Component:
AnotherVCR,
Camcorder,
VideoCamera,
SatelliteReceiver,
3ack pane[ of Accessory LaserDiscPlayer
,_Tum off power
or unplugVCR
beforema_ng
any connections.
A/V cable is not provided with VCR.

INSTALLATION I PAGE g
Thingsyou must do before you can operate your VCR.
CLOCKMENU
AUTOCLOCKSET(ON):[]
MANUALCLOCKSET :N
Pressnumberkeys
QUIT=exit
CLOCK
f
PROGRAM k'l
MONTH
DAY
START
STOP
CHANNEL
SPEED
REPEAT
11-8) tO select program
ENTER to adjust program
SETUP MENU
AUDIOMENU
SpeakEZ;ON NON mOFF
PLAYBACK:HI-R
AUTOPROGRAM:
CH. ADD!DEL:
SOURCE:
ON-SCREENDISPLAY:
LANGUAGESELECT:
Press number keys
QUIT = exN
SETUP
RECORD:STEREO
Press number keys
then ENTER QUiT = exit
TIMER AUDIO
Press NUMBER (1, 2, 3, 4) button
SpukEZ
CLOCK :_
ITMER :
SETUP :
AUmO :
Pressnumberkeys
QUIT=exit
MAIN MENU
How to Access Menus
Menu operation is easy--just foLlowthe instructions shown
at the bottom of the menu.
1. PressMENU to see main menu.
2. PressNUMBER(1, 2, 3, or 4) to see desiredsub menuto
be used.
3. PressNUMBERto choose desired option to be changed.
4. PressQUIT/CCto exit menu, or wait a few minutes and
the VCRreturns to normal operation.
Note:
Perform menu operations with the VCRand _/on, and tune
the TVto channet 3 or 4. The VCRmustalso be in the VCR
mode of operation. Pressthe W/VCR button repeatedly
untiLVCRindicator light appears in the fTont paneL.
Point remote toward VCR
+

PAGE 10 I INSTALLATION
Things you must do before you can operate yOUTVCR.
Connect the Power
(Required) Plug your VCRinto an unswitched
120 Vac, 60 Hz household power outlet. Turn on
the VCRby pressingthe POWERon the remote
or on the VCR'sfront panel. While plugged into
an AC o_let,the VCR consumes 3W of eLectTical
powerin OFF condition.
_ Do not plug the VCRinto o switchedpower
outlet. Otherwise, when the power is
switched oj_, the VCRturns o_. Youmay
then hove to resetthe time and date, and
reprogramoperational/eotures.
B
Set your VCR's Clock and Tuner automaUcal[y
After you connect an antenna (or cablecompany).
and you plugyour VCRinto a 120 Vac, 60 Hz
power outlet, the VERwilt set the clock and
place channels into memory automaUcaLLy.The
"SEARCH" messagewit[ blink for 2-5 minutes in
the VCR'sfront panel display during auto setting.
[_] The auto clock set works only in areas
where Data Service (DS) signals are
provided alongwith normal W signals,
Ifthereisnot channelthatismernodzed,
"No DATA"will appear.
Set PosiUon of the CH3/CH4 Switch
(Required) The CH3/CH4 switch on the VCR's
back panel determines which channel the VCR
usesto send video signals to your TV.The IV
must be tuned to the same channel you set with
the CH3/CH4 switchto see tapeplaybackand
statusdisplaysfromthe VER.To determine
which videochannelprovidesthe bestpictur6
foryour system,trythe switchinEH3 position
and tune your TV to channel3;thentrythe CH4
positionand tune yourTV to channel4.
For a test display, pressthe TV/VCR button on
remote repeatedly until the VCRindicator Eght
appearsin the VCR'sfrontpar_ldisplay.Press
MENU on the remoteto see the main menu.
Select SpeakEZ Function (On/Off)
A voicetells youhowto usethe featuresin the
menusif SpeakEZis ON,(ONis recommended.)
Seethe AUDIOMenufor details.
[_ SpeokEZ_unctions with ENGLISHand
SPANISH.
WALL
SWITCH
POWER
OUTLET
IYPICALZENITH VCR _
P_ess 6,
SpeakE2
CLOCK
Tg/_g
SEep
AUDIO
PreSsnumberkeys
QUIT=exit
MAIN MENU
ADD_MEHU
v Spe_EZ:ON lION _IOFF
PLAYBACK:HI.FI
RECORD:STEREO
Pressnumberkeys
thenENTER QUIT= exit
w
Press NUMBER (1 or 2) to
choose ON or OFF

INSTALLATION I PAGE 11
Some things you must do and others you may want to do before you can operate your VCR.
Select Language for VCR Menus/Displays
(Optional) Select EngLish,Spanish, or French for
VCRmenus and status displays. See the
LANGUAGESELECToption on the SETUPmenu
(page 25) for details.
Press 5.
I
SETUPMENU
AUTOPROGRAM:
CH.ADD/DEL;
SOURCE:
ON-SCREENDISPLAY:
LANGUAGESELECT:
Pressnumberkeys
QUIT: exit
SETUPMENU
SE11Jp MENU
D
LANGUAGESELECT:ENGUS:-
BENGLI6HIqESPA_IOL
FRANGAIS
Pressnumberkeys
thenENTER QUIT= exit
Press NUMBER (1, 2, or 3)
to select the desired
language
W Set Date and Ttme for Clock
Set the clock in the VCRto the current date and
time. See CLOCKMenu for details.
YourVCRaLsohasonAuto-ClockSetfeature. See
CLOCKMenuon poge23for detaiLs.
_The Timer feature will not function unless
the Clock has been set.
Press 2.
I
CLOCKMENU
AUTOCLOCKSET(ON):[]
MANUALCLOCKSET :N
Press numhef keys
QUIT = exit
CLOCKMENU
CLOCKMENU
D
MONTH [] JANUARY
DAY I FRI
YEAR 1999
TIME 12:00AM
Pressnumberkeys
thenENTER QUIT=exU
Press NUMBER (0-9) then
ENTERto set date and tlme
B
Select Source for VCR
(Optional) Set the sourceof the VCRfor the
type of program signal you have connected to
the ANT IN jack on the back of the VCR.Choose
TVif you have an antenna connected to the VCR.
ChooseCATVif you have a cabLesystem (with or
w_thouta cabLebox) connected to the VCR.
ChooseAUXl (or AUX2) if you have an accessory
Audlo/Video (A/V) connected to the VCR. See'
SOURCEoption on SETUPmenu (page 25) for
details.
Press 3.
I
SETUpMENU
AUTOPROGRAM:
CH.ADD/DEL:
SOURCE:
ON*SCREENDISPLAy:
LANGUAGESELECT:
Pressnumberkeys
QUIT=exit
SETUPMENU
SETUPMENU
r
SOURCE:TUNER(TV)
CATV
gAT_xI HAUX2
Pressnumberkeys
• thenENTER QUIT= exit
Press NUMBER (1, 2, 3 or 4)
to select the desired source
B
Use Auto Program to Find Channels
(Required) UseAUTOPROGRAMto find active
channels in your broadcast area. AUTOPROGRAM
storesthe active channels that you can access
by usingthe CH (V/A). See AUTOPROGRAMon
the SETUPMenu (page 25) for details.
Press 1.
I
SETUpMENU
AUTOPROGRAM: M
CH.AOU_EL:
SOURCE:
O_CREEN DISPLAY:
LANGUAGESELECT:
Press number keys
QUIT=exN
SETUPMENU
SETUP MENU
AUTO PROGRAM: SEARCHIN(
QUIT : exit ,_

PAGE 12 I INSTALLATION
Thingsyou may want to do before you operate your VCR.
Use CH. ADD/DEL to Create Favorite
Channels
(Optional) UseCH. ADD/DEL to change the |ist
of active channels found when using AUTO
PROGRAM,so you can list your favorites. See
CH. ADD/DELon the SETUPMenu (page 25) for
details.
Press 2.
I
SETUPMENU
AUTOPROGRAM:
CH. ADD/eEL:
SOURCE:
ON-SCREENDISPLAY:
LANGUAGESELECT:
Press number keys
% QUIT = exit
SETUP MENU
SETUPMENU
CH. ADD/DEL: CH. [] ADD
Press number keys
then ENTER QUIT = exit
Press NUMBER (0-9)
then ENTER
Select Other Menu Options
Showor hide the VCRstatus on your screen by
usingthe ON-SCREENDISPLAYoption on the
SETUPmenu. We recommendkeeping this option
ON. See the SETUPmenu for details.
Press 4.
I
SETUPMENU
AUTOPROGRAM:
CH, ADD/DEL:
SOURCE:
ON-SCREENDISPLAY:
LANGUAGESELECT:
Press number keys
QUIT = exR
SETUP MENU
SETUPMENU
)D
ON-SCREENDISPLAy:ON
DON mOFF
Press numl_ keys
then ENTER QUIT : exit
Press NUMBER (1 or 2) to
choose ON or OFF
If you have a stereo VCR, press ENTERto se{ecL
the audio format (HI-FI or NORMAL)to use
when you pray a tape. We recommend seLLing
this option to HI-FI. See the PLAYBACKMODE
option on the AUDIO Menu for details.
Press 4.
SpeakEZ
CLOCK
TIMER
SETUP
AUDIO
I_ rmmber_mys
QUIT= exit
MAIN MENU
AUDIOMENU
SpeakEZ:ON
HkFI
PLAYBACK:HI-R m
NORMAL
[]
RECORD:STEREO
Pressnumberkeys
thenENTER QUIT=exit
Press NUMBER (1 or 2) to
choose HI-FI or NORMAl.
If you have a stereo VCR, press ENTERto select
the audio format (STEREO,MONOor SAP) to use
when recording. We recommend using STEREO.
See the RECORDMODEoption on the AUDIO
Menu for details.
Press 4.
SpeakEZ
CLOCK
TIMER
SETUP
AUDIO
AUDIOMENU
)l
SpeekEZ:ON
PLAYBACK:HI-FI
RECORD:STEREO_s_TI;O
Pressnumberkeys
thenENTER QUiT=exit
Press NUMBER (1, 2 or 3)
to choose STEREO,NON0,
or SAP
Pressnumberkeys
QUIT= exit
MAIN MENU

INSTALLATION I PAGE 13
Before you can recordprogramswith VCRPtus+®C3,you must teLLthis VCRthe PlusCodeTM channels for your area.
Introduction
These PlusCodeTM channeLsmust be mapped to the active
channels you found using AUTOCHANNELon the SETUP
menu. An example of channel mapping and a blank
worksheet are provided for your convenience. Checkthe TV
schedule in your Local newspaper for the published
PtusCodeTM channels.
Note: The C3system providescabLe-boxchannel control for
most cable boxes.
Channel Mapping Your VCR
PREPARATION(Already Done)
See "Before You OperateYour VCR".
1. Set Date and Time for CLock.
2. Select Tuning Band for VCR.
3. Use Auto Channel to find channels.
PRELIMINARY STEPS
1. Turn on VCR,TV,and cable box (if used).
2. Select TV (or CAW) for SOURCEon SETUPmenu.
3. Obtain Listingof PtusCodechannels.
CHANNEL MAPPING
1. Complete Channel Mapping Worksheet.
2. Determine the 'MFR"number for your cabte box or DBS
(if used) from the tLstof Cable Box/DBS "MFR'
(Manufacturer) Numbers providedon the next page.
3. PressVCR+on remote and follow all on-screen
instructions. Enterchannels with Numbers. UseAD3
(Lea/Right) to erase (some models).
Example of Compteted Worksheet
Worksheet with Channels Found
via Auto Channel
Published
Channelfound Networkor PlusCedeTM
viaAutoChannel
StationID Channel
(TVCh/CableCh) (VCR+Ch)
2 CBS
5 NBC
7 ABC
9 WB
11 PB$
2O PBS
26
WSNS
50 WPWR
60 HSN
66 WGBO
÷
÷
Completed Worksheet for Channel Mspping
Channelfound Published
viaAtaoChannelNetworkor PlusCodeTM
(TVCWCab_eCh Staho_lID Channel
(VCR+Ch)
2 CBS 2
5 NBC 5
7 ABC 6
9 WB 8
11 PBS 11&19
20 PBS 20
23 WFBT - -
WSNS 4
50 WPWR 42
60 HSN - -
66 WGBO 46
VCR PLus+, C' and PlusCode are registered trademarks of Gemstar
Development Corporation. The VCRPLus+system is manufactured under
Licensefrom Gemstar0eve[opment Corporation.
Published List of PlusCode TM
Channels
PlusCodes
Ch.2:WBBM ICBS) 2
Ch.5:WMAQ (NBC) 5
Ch.7:WLS LABC) 6
Ch.9:WGN (WB) 8
Ch.11:WTTW (PBS) 11&19
Ch.20:WYCC (PBS) 20
Ch.26:WCIU (Ind) 26
Ch.32:WFLD (Fox) 32
Ch.38:WCFC (Ind.) 3
Ch.44:WSNS (Tel.) 4
Ch,50:WPWR (UPN) 42
Ch.66:WGBO (Uni.) 46

PAGE 14 IINSTALLATION
Beforeyou can record programswith VCRP[us+®C3,you musttel[ this VCRthe PiusCodeTM channeLsfor your area.
CabLeBox DBS
Tunesto OR Tunesto
Channel19 Channel 200
IR(Infrared)
SignalPath
from VCR
to CabLeBox
or DBS
CLearpath to
waiL,windowor
anyreflective
surfaceto
bounce IR
signals to
CabLeBox
or DBS
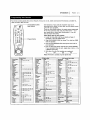
Testing your VCRwith CaMe Box and DBSManufacturer Numbers
Manufacturer NumbeJs
ARCHER 1.5, 6, 37, 49
CABLETENNA 1,37,49
CABLEVIEW 4, 25, 3s, 37, 41, 49
CENTURy 37, 40, 46, 56
CITXZEN 4, 25, 3S, 37, 41, 49
CURTXS 8, 9, 42, 47
OIAMOND 1, 37, 49
EAGLE 11, 18, 19, 22, 33, 4S. 48
EASTERN 24
GCBRAND 4, 2S, 35, 37, 41, 49
GEMINI 4
GENERALELECTRIC 1, 44
GENERAL ], Z, 3, 4, Zg,43, 51,
INSTRUMENTS 53, 54, 58
HAi4LIN 12, ]3, 24,34
HITACHI 26
I ,_XSCO 4
! JERROLD 1, 2, 3, 4, Zg, 43, 51, 53, 54, $8
MACOM Z6
MAGNAVOX 2Z
MAGNAVOXDBS1 59
MAGNAVOXDBS2 60
MATSUSHITA 14, 15, 62
t4OV]ETIkiE 27, 32, 3S. 37
NOVAVXS[ON 8, 9, 42, 47
Manufacturer Numbers
NSC 27, 31, 33
NEE 27, 31, 33
OAK 10, 38
OAKSIGMA 10, 38
PA/4ASONIC 14, 1S, 62
PANASONICDBS 61
pHILIPS 7, 11, 18, 20, El, 3g
PIONEER 5, 6
PULSER 4, 25, 55, 37, 41, 49
OUF_T S, 6
RADIOSHACK 37, 40, 46, 56
RCA 14. 15, 62
RCADBS 62
REALISTIC 37, 40, 46. 56
RECOTON 37, 40, 46, 56
REGAL 12, 13. 24, 34
REGENCY 24
REMBRANDT 1, 27, 32, 3S, 37, 49
SAMSUNG 5, 6, 27. 33, 35
SCZENTLFICkTLANTA 8, 9, 4Z, 47
SIGNAL 22
SHERITECH 23
SLMARX 6, 27, 33, 35
S.L MARX 35, 16, 37, 41, 49
Manufacturer Numbers
SONYDBS 63
SPRUCER 14, 15, 62
STANDARD 27, 32, 35, 37
COMPONENTS
STARGATE 4, 6, ZS, 27, 33, 35, 37, 41, 4g
SYLVANIA 17
TEI(NIKA 5S
TELECAPTION 5?
TELEVtEW 6, 27, 3_, 35
I"EXSCAN 16. 17
TOCOM 1, _9, 30, 35, 52
TOSHIBA 30
UNIDENOBS1 59
UNIOENDBS1 60
UNIKA 1, 37, 49
UNIVERSAL 3S, 36, 37. 41, 49
VIDEOWAY ?, ZO.39
V_EWSTAR 11, 18, 19, 22.33, 45, 48
VID TECH 50
VIDTEK 5O
ZENITH 7, 20, 3g
Note: Use 9g for aLLother cable boxes.
Using Cable Box and DBS 'MFR" Numbers
Beforeyou can use VCR+, you'LLneed to test your VCRand
cable box the way:
While fo[Lowlngthe on-screen instructions for CH MAP.you
wii[ be askedto enter the output channel of your cable
box/DBS and its MFR(Manufacturer) number. Locate your
brand of your cable box/DBS in the above list and usethe
first number shown. If your cable box does not seLect
channeL19 while you're testing, try the next MFRnumber.
Keep testing untl( you have tried a[[ of the NFR numbersfor
your brand.
If none of the Usted MFRnumbers work, you can:
1. Try aLLMFR numbersavailable, from 1-63 until you find a
numberthat works; or
2. Enter gg for the MFR numberto disable cabLe-box
channel control
Note: With gg, your VCRcannot remotely control the
cable box. Keepthe cable box on and presetectthe
cabLe-boxchannel when using VCRP[us+®C_ recording.

INSTALLATION I PAGE 15
Beforeyou canrecordprogramswlth VCRPtus+®C3,you musttell this VCRthe PtusCodeTM channelsforyourarea.
On-Screen Instructions for TV Tuning Band
START
PressVCR+ on remote
c_ ..p _=p: :: QU IT
_ Map Rm4t.e:
B zanw/,_t Ig_ld_ml
_ r_'v_r _OUlT, i _ ourt,mnt
2-Setup_
Tv tlu la, a_ _ _ Tv
1-Yes I
On-Screen Instructions for CA_/or DBSTuning Band
V_RF_t_
s_upm
T
Press 0000 to show
Double Map Screen
I J;=l
T_Ch V_q_ _'_CA_
0
Channel mapping a
secondPtusCodeTM
Channelfor
TVchannel 3.
START
PressVCR+onremote
E=._.J i"_ Quit
2-Setup-_
-1
-* _ QUIT
1-Yes _"
"=° -
: ENTER .-'_*'--'== - QUIT
ENTER ,_,_
.--_%., ! ::: OUIT .,,.,,.,,..
QUIT
T
Press 0_00 to show
Ooub[e Nap Screen
Channel map "rig a
second PLus_de TM
Channel for Cable
channel 3.

PAGE 16 I ZNSTALLATZON
Beforeyoucanrecordprogramswith VCRPlus÷®C_,youmusttell this VCRthe PlusCedeTM channelsforyourarea.
Channel Mapping Worksheets
Channel found Network or Published Channel found Network or Published
via Auto Channel Station ID PtusCode'_ via Auto Channel Station (D PlusCodeTM
(TV Ch/Cable Ch) Channel (VCR+ Ch) (TV Ch/Cabte Ch) Channel (VCE+ Ch)
NOTE:Two PlusCodeTM channel numbersmay be listed for certain networksor stations. Enterboth numbers on the
worksheet. After you have "mapped" the first number,press0000 to showthe Double Map menu. Then enter the
second numbernext to the first one.

CONTROLS AND DISPLAYS I PAGE 17
Descriptions of items you need to know to operate your VCR.
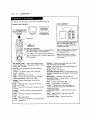
Front Pane| Controls
These controls perform basic VCRoperations. The Remote performs basic as wei[ as advanced VCRoperations.
POWEROn/Off Stop/Eject Channe[ Up/Down Cassette
Button Selector Setector Compartment
/
PLAY SHUffLE Ring
7
Audio/Video (A/V)
AuxlilaTyIn 3acks
(AUX2)
/
Messagecenter
Front Pane[ Display
REC/ITR PAUSE Recording
(Instant Timer Speed Setector
Record) Setector

PAGE 18 I CONTROLS AND DISPLAYS
nformation appears in the Front Pane[ DispLaydepending on the VCRfunction being used.
Counter memory indlcator
VCRindicator
Timerindicator
Recordindicator
Tape speed indicator \
x
Cassette indictor
Lights white a cassette is
inserted, flashes varying its speed
according to the tape operation,
and flashes white ejecting a
cassette
Leffaudio {eveIindicator
indicator
RemainlngtapeLength
indicator
Audio
program) indicator
Lights when pla_ng back the
Hi-Hsound.
ht audio [eve[ indicator
Front Pane[ Displayshows which VCRfunction you are
using. For examp[e, when you pressSP/EP,SP or EP appears
to indicate the tape speed. Asyou change channels, the
channet numbers appear.The current time shows even white
theVCR isoff.
Auto Setup Message
SEARCH-- This messagewiLLbunk during auto setting.
No DATA-- After auto setting, if there is not channel that
is memorled, "No DATA"wiLLappear.
Ptayback Messages
A.TRK -- Tape tracking is being adjusted from VCR.
ALARM -- Turn VCROn and OFFto erase "ALARM"message.
If it is not erased, take VCRto an authorized repair center.
FF (Fast Forward) -- Tape is advancing rapidly.
CUE-- Tape is advancing rapidly in playback modefor visu-
aLsearch.
PLAY -- Tape is playing at norma[ ptayback speed.
PLAYX2 -- Tape is advancing at twice (X2) normal playback
speed.
REV -- Tape is reversing rapidly in playback mode for vlsua[
search.
REW (Rewind) -- Tape is rewinding rapidly.
SLOW -- Tape is praying at slow-motion forward speed.
STILL -- PLaybackis haLtedon one frame,
STOP-- Tape rewind or playback is stopped.
R, PLAY-- Tape is reversing at normal p_aybackspeed.
REV.X3 -- Tape is reversing at three (X3) times normal
playback speed.
R. SLOW -- Tape is p[aylng at stow-motion reversespeed.
Record Message
ALARM -- Turn VCROn and OFFto erase "ALARM"message.
If it is not erased, take VCRto an authorized repair center.
PAUSE-- Recordmodeis hatted.
STOP-- Recordingis stopped.
Tuner Messages
AUX_ (Aux_tlen]_) -- AuxiUarychannel is setected for
viewing equipment connected to Audio/Video jacks on front
or rear of the VCR.
CH _ -- VCRtuned to Channel.
HELLO-- VCRis turned on.

CONTROLS AND DISPLAYS I PAGE lg
On-ScreendispLaysteLLyou the status of the tape inserted and VCRfunctions.
Current mode of operation
(STOP,PAUSE,RECORD,PLAY,etc.)
and audio format of tape, where
PLay-HI-F1 or NORMAL(Nodisplay)
Tape Speed
EP-Extended PLay
LP=LongPLay
SP-Standard PLay
Current date, day, and time__
[
PLAY HI-F! VCR CH 11
-SP STISAP
15 MON
7:17 AM M-1:35:45-
TypicalVCRStatusDisplayonTV
Current CH (ChanneL)selected by
using tuner in VCR
--Audiofurmat of _gnaLreceived by
VCRtuner:
STEREO,MONOor ST/SAP
-- Reat-Umetape counter
M = Counter Memorj is active
- - Tape is rewound past index
mark.
1:35:45 - Length of tape (in Ume)
1 - 1 hour
35 = 35 minutes
45 - 45 seconds
M-1:35:45
TapeCounterPosition
REM 1:3_
Tape Time Remaining
VCR Status Disp|ay
The VCRStatus DispLayappearson the TV when a VCR
function starts, Like when you change a channel or select a
different VCRmode. Forexample, pressingSTOPwhile the •
VCRis in PLAYmode shows STOPin the display. PressENTER
on the remote at any time (except Special Effects PLayback
mode; SLOW,STILL etc.) to see the Status DispLay.
Note:
Zf the VCRStatus DispLaydoes not appear on the 1_/screen,
check the ON-SCREENDTSPLAYoption on the SETUPmenu.
SeLectONto see the display. See "Setup Menu" section for
details.
VCR Status DispLay OpUons
When the Status DispLayappears, press ENTERrepeatedly to
see abbreviated dispLays,as foLLows:
t. PressENTERto see Status DispLay.
2. PressENTERa second time to showonly the tape
counter position.
3. PressENTERa third timeto showonlythe tapeUme
remaining.
4. PressENTERrepeatedly untit aLLdisplays are removed.

PAGE 20 I OPERATION
A quick list of all the buttons on your remote control and what they do,
RemoteControtOperation
Select VCR Mode,
aimatVCR
÷
Select DVD Mode,
aim at Zenith DVD
L I
SeLectW Mode, SelectCBLDBS)Mode,
aimat_/ arnatcabeboxorDes
CBL
_'__'__*_( _ Selecting Mode of Operation
1. SUdeVCR/CBL(DBS)/IV selector to desired position for
VCR,cable box lOBS), IV, or DVD operation.
2. PressPOWERto turn On/Off the selected equipment.
3. Refer to instructions with TV, cabLebox (DBS) and/or
DVDfor operation.
]nstaLUngBatteries
e sure to install the batteries provided
with this remote. Match positive (+)
and negative (-) with markings shown
in battery compartment.
After installing batteries, the remote
resets to the following brand codes:
TV - 100, CABLE- 300
Note: All VCRoperations and menu
options con be accessedby using the
remote control.
AIM lAD,lUST) (_l/Ib) -- Adjusts tape playback tracking
while in VCRmode. Use to changestatus of Zenith TV menu
options while in TV mode.
CH (Y/A) -- Channel Selectors. Also selects AUX A/V
input channel.
CM SKIP -- Fast forwards picture search through 30
seconds of recording,
E3ECT-- Ejects the tape from the VCR.
ENTER-- Programs menu options and shows VCRdisplay_.
F FWD (Fast Forward)--Advances tape rapidly.
MEMORY-- Returns real-time tape counter to zero
(M 0:00:00),
MENU -- Shows main menu. Accesses Zenith IV menus
while in the TV mode.
MUTE-- Pressto turn off TV sound. Press again to restore
TVsound.
Numbers -- Chooseschannels and enters programming
information.
PAUSE-- Pausestape temporarily during playback or
record.
PLAY-- Begins tape playback.
POWER-- TurnsVCROn and Off. ALsoturns VCRTimer Off
and On, if programmed.
PROGRAM-- Programsremote with brand codes for your
brand of TV and/or cable box (DBS).
QU]T/CC -- Exits menu system. Selects closed caption for
Zenith TV while in IV mode.
REC/ITR -- Begins tape recording.
REV [] FWD (Reverse/Forward) -- Rotate Shuttle Ring for
variable-speed playback. Move Oog Wheel for frame-by-frame
playback.
REW (Rewind) -- Rewindstape to the beginning.
SEL(Select) (Y/_,) -- Chooses Zenith IV on-screen menu
options white in IV mode.
SP/EP -- Choosestape recording speed.
STOP-- Cancelsplayback or recordmodes.
TV/VCR -- Switches sourceof TV picture between TV
channel and VCRchannel selection. VCRfunctions are
available in VCRmode.
VER/CBL(DBS)/TV/DVD -- Selects operational mode of
remote.
VER+ -- Begins VCRPlus+® setup and accessesVCR
Ptus+®C_recording.
VOL (Volume) (,/A) -- Changesvolume of IV.
Page is loading ...
Page is loading ...
Page is loading ...
Page is loading ...
Page is loading ...
Page is loading ...
Page is loading ...
Page is loading ...
Page is loading ...
Page is loading ...
Page is loading ...
Page is loading ...
Page is loading ...
Page is loading ...
Page is loading ...
Page is loading ...
Page is loading ...
Page is loading ...
Page is loading ...
Page is loading ...
Page is loading ...
Page is loading ...
Page is loading ...
Page is loading ...
-
 1
1
-
 2
2
-
 3
3
-
 4
4
-
 5
5
-
 6
6
-
 7
7
-
 8
8
-
 9
9
-
 10
10
-
 11
11
-
 12
12
-
 13
13
-
 14
14
-
 15
15
-
 16
16
-
 17
17
-
 18
18
-
 19
19
-
 20
20
-
 21
21
-
 22
22
-
 23
23
-
 24
24
-
 25
25
-
 26
26
-
 27
27
-
 28
28
-
 29
29
-
 30
30
-
 31
31
-
 32
32
-
 33
33
-
 34
34
-
 35
35
-
 36
36
-
 37
37
-
 38
38
-
 39
39
-
 40
40
-
 41
41
-
 42
42
-
 43
43
-
 44
44


Zenith IQVB425 Owner's manual
- Category
- Cassette players
- Type
- Owner's manual
Ask a question and I''ll find the answer in the document
Finding information in a document is now easier with AI
Related papers
-
Zenith IQVB423 Owner's manual
-
-
-
-
-
-
-
-
-
Other documents
-
Philips VR788/50 User manual
-
JVC Model SR-TS1U User manual
-
-
ProScan Plus Silver PSVR85 User manual
-
RCA VR634HF - Hi-Fi VCR User manual
-
Sylvania SREC427 Owner's manual
-
Optimus 16-422 User manual
-
Mitsubishi HS-U120 Owner's manual
-
-